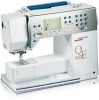
Bernina Aurora 440QE Support Question
Bernina Aurora 440QE Support Question
Find answers below for this question about Bernina Aurora 440QE.Need a Bernina Aurora 440QE manual? We have 1 online manual for this item!
Question posted by miriams on April 30th, 2012
Machine Won't Embroider Without The Foot Pedal
The person who posted this question about this Bernina product did not include a detailed explanation. Please use the "Request More Information" button to the right if more details would help you to answer this question.
Current Answers
Related Bernina Aurora 440QE Manual Pages
User Guide - Page 3
...Starting to embroider Mega-Hoop ...Accessories Setting up the sewing computer Thread tension Important facts on threads and needles Stitch plate, Feed dog and Fabric feed Presser foot pressure, Balance
Cleaning... Eyelets / Button sew - Important information Application of practical stitches, Quilt stitches, Decorative stitches Buttonholes - Your sewing computer
Accessories Details aurora 430 / 440 QE...
User Guide - Page 4
...!
27
Helpful tips!
!
4 Key to signs
Key to the safety instructions! In order to improve the product, and for our customers' benefit, all of the sewing and embroidery computer's features, parts, and accessories are subject to unannounced changes and alterations at any time.
User Guide - Page 5
... stitch, Basting stitch • Darning • sewing on
buttons
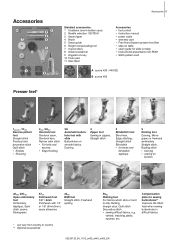
20440, 20C450 Open embroidery foot Embroidery, Appliqué, Satin stitch seams, Monograms
37440 Patchwork foot 1/4" / 6mm Patchwork with slide Buttonholes on table • Instructional presentation CD-ROM • Stitch-pattern card
1
A aurora 430 / 440 QE
2
11
A
B
B aurora 450
Presser feet*
1430/440 , 1C450 Reverse...
User Guide - Page 9
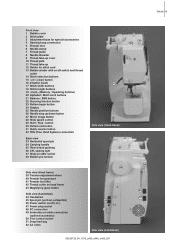
... thread guideng 36 CFL sewing light 37 Slide-on table socket 38 Bobbin pre-tension
Side view (Head frame) 39 Tension adjustment wheel 40 Presser foot pressure 41 Presser foot lifter 42 Thread cutter ... («0») 47 Power plug socket 48 PC connection 49 Embroidery module connection
(optional accessory) 50 Foot control socket 51 Drop feed dog 52 Air vents
39 38 40
42
43
41
Side view (Head...
User Guide - Page 11
... and the index against the table - to slide it
engages
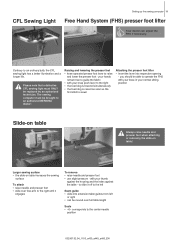
To remove • raise needle and presser foot • use slight pressure - CFL Sewing Light
Setting up the sewing computer 11
Free Hand System (FHS) presser foot lifter
& Your dealer can be moved over free-arm to the right until it off to the...
User Guide - Page 13
...on the left side of the disc
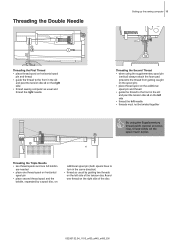
032907.52.04_1103_a430_a440_a450_EN Threading the Double Needle
Setting up the sewing computer 13
A
Threading the First Thread • place thread spool on horizontal spool
pin and... the front in the slit
and past the tension disc A on the right side • thread sewing computer as usual by a spool disc, on
additional spool pin (both spools have to turn in ...
User Guide - Page 16
... be
brought up as the loose end is just the right length to start sewing
!
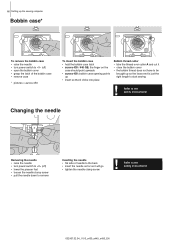
Changing the needle
Removing the needle • raise the needle • turn power switch to ... lower the presser foot • loosen the needle clamp screw • pull the needle down to remove
Inserting the needle • flat side of the bobbin case • remove case
* pictures = aurora 450
To insert ...
User Guide - Page 18
... slight sheen
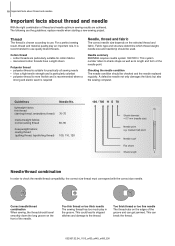
Polyester thread • polyester thread is suitable for practically all sewing needs • it has a high tensile strength and is particularly colorfast &#...Guidelines
lightweight fabrics: thin thread (darning thread, embroidery thread)
mediumweight fabrics: normal sewing thread
heavyweight fabrics: sewing thread (quilting thread, topstitching thread)
Needle No. 70-75 80-90 100,...
User Guide - Page 27
...(430 / 440 QE)
032907.52.04_1103_a430_a440_a450_EN Memory 27
aurora 430 / 440 QE
aurora 450
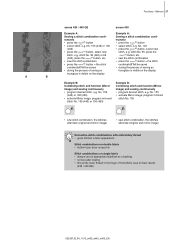
Example A:
Example A:
Sewing a stitch combination conti- No. 155 • activate Mirror image, program mirrored
stitch No. 155
• sew stitch combination, the stitches alternate (original and mirror image)
• sew stitch combination, the stitches alternate (original and mirror image...
User Guide - Page 28
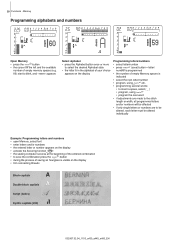
..., select font
• enter letters and/or numbers
• the entered letter or number appears on the display
• activate the Securing function
• the sewing computer secures at the beginning of the entered combination
• to save the combination press the
-button
• during the process of saving an hourglass...
User Guide - Page 36
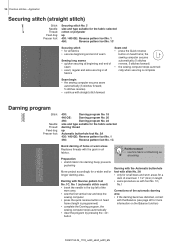
... suitable for the fabric selected
Thread: cotton or polyester
Feed dog: up
Presser foot: 430 / 440 QE: Reverse pattern foot No. 1
450:
Reverse pattern foot No. 1C
Securing stitch • for all fabrics • secures beginning and end of seam
Sewing long seams • quicker securing at beginning and end of the
worn area...
User Guide - Page 46
...
be reduced
depending on the fabric type and thickness
• attach the desired presser foot sole to the BSR presser foot • removing sole: press both buttons (see arrows) on the display =
the sewing computer stops with the BSR foot, without BSR activation • press the BSR/Balance button -
«BSR 1» goes off...
User Guide - Page 53
... at the first stitch (buttonhole begin) • press the Quick reverse button
5. sew the second bead in reverse, stop the sewing computer • press the Quick reverse button
2. sew the bottom bartack and securing stitches
1. sew straight stitch forwards, stop the sewing computer at the first stitch (buttonhole begin ) • press the Quick reverse button...
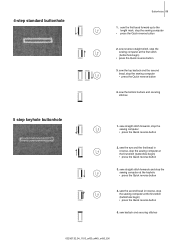
User Guide - Page 55
...) the second bead forwards
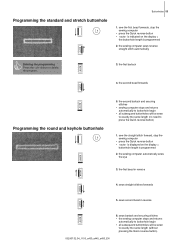
Programming the round and keyhole buttonhole
5. the first bead in reverse
032907.52.04_1103_a430_a440_a450_EN
6. the second bartack and securing stitches
• sewing computer stops and returns automatically to buttonhole begin • all subsequent buttonholes will be sewn to exactly the same length (no need to press the...
User Guide - Page 56
.... 19
depends on distance between the holes
size and type suitable for the fabric selected
cotton or polyester
down
Darning foot No. 9
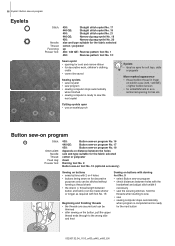
Button sew-on foot No. 18 (optional accessory)
Sewing on buttons • sews buttons with 2 or 4 holes • buttons being sewn on for decorative
purposes only can be stitched without forming a thread shank...
User Guide - Page 60
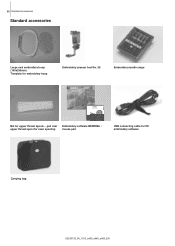
60 Standard accessories
Standard accessories
Large oval embroidery hoop (145x255mm) Template for embroidery hoop
Embroidery presser foot No. 26
Embroidery needle range
Art Design V1 Embroidery Software
Net for PC embroidery software
Carrying bag
032907.52.04_1103_a430_a440_a450_EN pull over upper thread spool ...
User Guide - Page 63
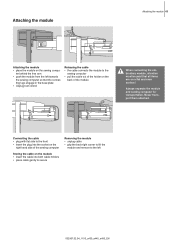
... engage in the base plate • Unplug foot control
Releasing the cable • the cable connects the module to the
sewing computer • pull the cable out of the holder on the
back of the sewing computer
Storing the cable on the module •...52.04_1103_a430_a440_a450_EN ter behind the free arm • push the module from the left towards
the sewing computer so that all items are on the...
User Guide - Page 73
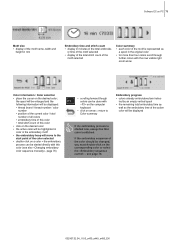
... Color summary
& If the embroidery process is started now, always the first color is stitched. Embroidery progress • colors already embroidered are indica- see also «Changing embroidery color sequence manually», page 76)
• scrolling forward though colors can be started... the total stitch count of the
motif selected
Color summary • each color of the total embroide-
User Guide - Page 75
... motif can not be done with the four arrows on the computer keyboard
Positioning of motif within the hoop • this procedure can also be embroidered in place • if the motif is available when the positio- ning mode is active • place the cursor on the motif (within the embroidery...
User Guide - Page 85
...
computer
Embroidery module
63-67
Sewing computer
10-17
Sewing
Accessories
5-7
Function buttons
24-25
Letters (Alphabets)
25, 28
Reverse sewing
25
Sewing corners
21
Sewing stitch combinations
26-28
Sewing with BSR
45
Special characters
25
Using compensating plates
21
Sewing light (CFL light)
11
Sewing-on elastic
38
Sewing speed
Foot control
10
Speed control
24...
Similar Questions

Switch Between Foot Pedal And Machine Not Making Contact....
Switch between foot pedal and machine not working
Switch between foot pedal and machine not working
(Posted by iverson 5 years ago)
Aurora. 440 Not Working. Lights On But Sluggish When Turned On.
Foot pedal not working. Lights on but sluggish. What is problem
Foot pedal not working. Lights on but sluggish. What is problem
(Posted by Valeriehadley 10 years ago)

My Bernina Aurora 440 Machine Won't Run When Stepping On Foot Pedal. Nothing
(Posted by jdeguc 11 years ago)

The Model Is Bernina 830 Record. The Foot Pedal Works Only Sporadically.
This foot pedal problem has been going on for years and when taken to be fixed, it works at the repa...
This foot pedal problem has been going on for years and when taken to be fixed, it works at the repa...
(Posted by spinmrs 11 years ago)

Machine Won't Run When Stepping On Foot Pedal,it Beeps.
(Posted by amsch999 11 years ago)