Bernina 330 Support Question
Bernina 330 Support Question
Find answers below for this question about Bernina 330.Need a Bernina 330 manual? We have 1 online manual for this item!
Question posted by Jarodd on March 3rd, 2013
Rethread And Start
My Bernina Deco 330 Embroidery Machine was working perfectly and then suddenly made a juddering noise and got stuck. It now will not sew more than a few stitches before stopping and the message "RETHREAD and START" comes up. HELP PLEASE>
Current Answers
Related Bernina 330 Manual Pages
Manual - Page 2

... and many years of dependable service
Before attempting to obtain the maximum benefits, please study IhiS bookie; Your new sewing.moc bine is stage will eliminate errorsand will result in your machine Repeal the process until
you are familiar with funclionol design techniques toachieve
on your complete satisfaction and enjoyment. however, and...
Manual - Page 3

...MACHINE-NEEDLE PLATE
27. STRAIGHT STITCHING REVERSE STITCHING REMOVING FABRIC THREAD CUTTER
17. CONNECTING MACHINE TO POWER SUPPLY FOOT CONTROL NEEDLE LIGHT
6. INSERTING BOBBIN AND BOBBIN CASE. STRAIGHT STRETCH STITCH...THREAD
15. COLOUR CODING
25. BLIND HEM STITCH
23. SELECTION AND FITTING OF 24. CONTENTS INSTRUCTION BOOK MODELS 320.330
Page Title
1. FOOT PRESSURE
DROP FEED ...
Manual - Page 5
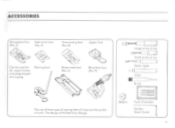
... usual >filches including straight and oafag
Darning loot
Button hole fool (No.5)
Blind hem foot (No 91
The use of these speciol sewing feel will improve roe quality al stitch The design of the feet may change
Large screwdriver
Small screw dove,
Seam ripper C-11
Oiler
I D Bobbin
Brush
I tL_.a=1
Pack of needle...
Manual - Page 6

CONNECTING MACHINE TO POWER SUPPLY
Feel control
Connect the machine too power supply as illustroted (1).
Using the correct plug, and switch on the machine power switch. FOOT
Manual - Page 7

... chonging the lamp and during interruptions in sewing or offer completion of the lead wire to terminal marked L or coloured RED.
THE MAXIMUM INPUT OF LAMP: 240 V IS W.
Repairs la the electric section, especially the changing of work, the machine must be observed without foil- Connect BLUE wire to fingers). As the colours...
Manual - Page 8
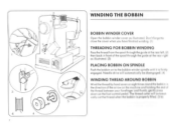
... winding. (1)
THREADING FOR BOBBIN WINDING
Dossthe thread from the spool through the guideat therearleft (21
then bock in the direction of the arrow on the machine end holding the end of the rear right os illustrated (3)
PLACING BOBBIN ON SPINDLE
Push the bobbin on the foot control podol.
Manual - Page 9

... it is gently swung, the tension is tooTight, if it slips down too freely. See pages 9/10.
2 %CC:le t t,
r
II
8
()
INSERTING BOBBIN AND CASE INTO MACHINE
INSERTING BOBBIN INTO CASE
Open hook cover as case by suspending the wound bobbinin as illustrated. (1) Insert fit led bobbin into case os decoded. (2) Molding...
Manual - Page 12

... thick fabrics, tne presser foot can be raised further nv Idling the presser lever o second stage. (2)
DROP FEED CONTROL
For normal sewing the feed dogs should be lowered.
o for free hand embroidery or darning etc., the feeddog should be fed through the mochine. Oft8B
3 1/.4
11
HOW TO ADJUST FOOT PRESSURE
Varying thicknesses...
Manual - Page 16
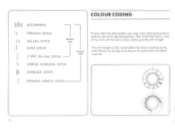
... with the some colour mocking on the dials Choose the settings accoriSng to the desired position. COLOUR CODING
Ann BUTTONHOLE
0
STRAIGHT STITCH
1.5 ZIG-ZAG STITCH
Model 320
BLIND STITCH 3 STEP ZIGZAG STITCH
Model 330
STRETCH OVERLOCK STITCH
OVERLOCK STITCH
Simply select the stitch pollens yourequire by rotating the pattern selector dial to the application and effect required. The...
Manual - Page 17
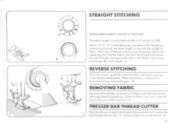
... the reverse button and hold it, sewing a few stitches bockwords When the button is contioiled with the stitch length dial (B)
"r while ' 7" or on the dial gives a sum:able stitch length for
ordinary purposes, the stitch length vones with the weight of labrtc, thickness of threod end purpose of the machine. Ge"etallY speaking, the finer the...
Manual - Page 19
...MNJ LeM
3
-14 -°\
11A`
330 3
/
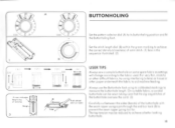
BUTTONHOLING
Set the pattern selector dial IA) to its calibrated markings to TeOftle 0 the buttonhole length. Seethe stitch length dial (8) within the green marking to ...tissue, or Other pope underneath the fabric to aid machine feeding. A
y
310
1
I I ) Sew in the seouence illustrated (21
USER TIPS
Always sew o sample buttonhole on some spore fob...cos settings...
Manual - Page 20
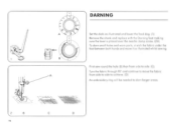
Turn the fabric through 90' ond continue to move ',OS ollustroied whilst sewi ng
First sew round the hole (8) then from side to side to achieve. (DI An embroidery ring w,lt be needed to side (Cl. p
= 1
2
8
19
DARNING
Set the (loots os illustrated and lower the feed dog Remove the shank and reploce...
Manual - Page 21
...
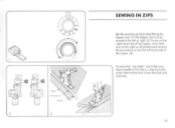
Set the machine os illustroted fitting the Zipper foot (1) The Zipper foot con be moved to sew the left hand side of the way, leave needle in the fabric, raise foot and slide .... To move fool over to the right os illustrated and reverse the procedure to the left or right. (2) To sew on the right bond side of the zipper, move the "zip slider" out of
the zipper (3)
Very.
lower the fool and ...
Manual - Page 22
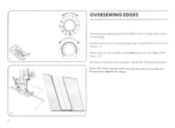
...sewing, the needle should just pass over the edge of the
labac. 12)
I
On fabrics that ate opt to pucker, use the P4r. 8 overcasting loot
Note: The 3 step zig-log stitch... con also be used, but use the All Purpose foot not Ilse Hr. OVERSEWING EDGES
AA
Oversewing edges prevents the fabric from fraying and creates
r14
a neat edge
Set the machine as illustrated selecting a 'unable stitch...
Manual - Page 23
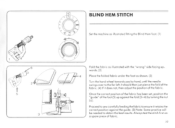
... should then lust pierce the fold of the fabric. Always lest the stitch first on a spare piece al fabric.
12
wrong" side fixing upwards. (21
4
Place the folded fabric under the fool as shown. BLIND HEM STITCH
Set the machine os illustrated fitting the Blind Horn foot,
Fold the fabric os illustrated with...
Manual - Page 24
... I
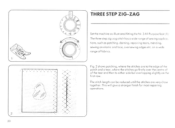
mc0. oversewing edges etc. The ihr ee slepligizag stitch hose wide range of fabrics. on the fall row. The stitch length con be reduced until the stitches ore very close together This will give a stronger finish For... where the shiches are to the edge of rho porch and o tear, where the stitches go firstly over the centre: of of the teat and then to either side but overtopping slightly on ...
Manual - Page 25

Use it for stretch fabricsmixt for areas of "stress" where a strong stitch is required (2A)
24 thereby giving "triple" strength. STRAIGHT STRETCH STITCH
(Not ler Model 320) Set the machine as illustroted fitting the All Purpose foot. (I) 1he straight stretch sews two stitches forward and one stitch back words.
Manual - Page 26
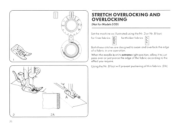
... the edge of thin fabrics. (2Ai
sv. 2
2A
2b
I for finer fabrics 11
for Models 320)
Set the machine as illust Toted using the Nr. 3 or Ni. 8 foot. Using the Nr, 8 foot will prevent puckering of the... OVERLOCKING AND OVERLOCKING
fry
(Not for thicker fabrics
Both these stitches a e designed to she effect you require.
When the needle is of a labia in one operation.
/". Ec;
Manual - Page 27
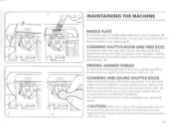
... every comer has been cleaned.
Your mochiee should be serviced regularly by your specialist dealer.
(CAUTION) when servicing or changing mechanical ports
or accessories, the machine must be disconnected from around the feed dog. Remove the bobbin case and clean every pod with o brush. 'Urn the hondwheel slowly towards you to...
Manual - Page 28
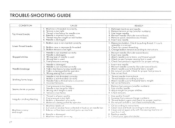
Ihrcod mod be cougea owe& holder 6 Needle a I Mahnn ntetilded t. dery on is Por-dle 3 Mood wo Awes lot needle set 4 Needle awned rev:weeds 5. thsnl or Ducky bregclot vorhowleedew
Mire hew rt roar od rowth 27
CAUSE
I Bobber 014•1$ rey .metd TROUBLE-SHOOTING GUIDE
COMiIIION Top tfveal beads
t
trims", week •
Stewed traclet
Needle tverokOtt
SISchPng 'own IOW, Sewn;
Similar Questions

Bernette Deco 340 Embroidery Machine
I am seeking an Embroidery Foot no 22 for the Bernette Deco 340
I am seeking an Embroidery Foot no 22 for the Bernette Deco 340
(Posted by baxterclan 1 year ago)

Bernina 330 Sewing Machine Issue
I have only used this machine probably 2-3 dozen times and purchased brand new in 2011. Machine now ...
I have only used this machine probably 2-3 dozen times and purchased brand new in 2011. Machine now ...
(Posted by Yellr1 8 years ago)

Bernina Deco 330 Embroidery Machine.
I can not set the top tension. Set the dial to 0 or 9, the tension stays loose.
I can not set the top tension. Set the dial to 0 or 9, the tension stays loose.
(Posted by dvdg59 9 years ago)

I Have A Bernina Deco 330 Embroidery Machine.can It Do Machine Applique?
(Posted by Sugardogsmom 11 years ago)
Need A Bernina Deco 330 Manual
I have lost my Bernina Deco 330 Embroidery machine manual, and have not located one online in Englis...
I have lost my Bernina Deco 330 Embroidery machine manual, and have not located one online in Englis...
(Posted by lindakmiller1 11 years ago)