
BenQ MP522 Support Question
BenQ MP522 Support Question
Find answers below for this question about BenQ MP522 - XGA DLP Projector.Need a BenQ MP522 manual? We have 1 online manual for this item!
Question posted by sudhirjk on January 29th, 2012
Vertical Line Appear On Screen
The person who posted this question about this BenQ product did not include a detailed explanation. Please use the "Request More Information" button to the right if more details would help you to answer this question.
Current Answers
Related BenQ MP522 Manual Pages
User Manual - Page 3
...
NOT stable.
However, to meet the latest standards for future reference.
4.
In some countries, the line voltage is designed
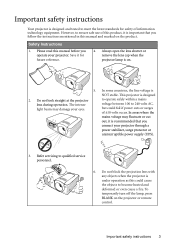
2. Do not look straight at the projector lens during operation.
Refer servicing to become heated and deformed or even cause a fire. Please read this manual before you follow the instructions mentioned in ...
User Manual - Page 5
... operation.
-
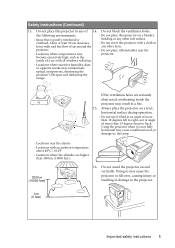
Space that is not fully horizontal may contaminate optical components, shortening the projector's life span and darkening the image. Always place the projector on end vertically. Do not cover this projector with a cloth or any of , or damage to back. Using the projector when it is poorly ventilated or confined. Do not place this...
User Manual - Page 7
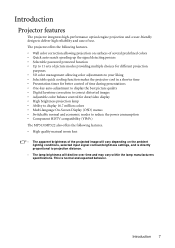
...HDTV compatibility (YPbPr) The MP513/MP522 also offers the following features. • High quality manual zoom lens
• The apparent brightness of use. The projector offers the following features. •...projection lamp • Ability to display 16.7 million colors • Multi-language On-Screen Display (OSD) menus • Switchable normal and economic modes to deliver high reliability ...
User Manual - Page 10
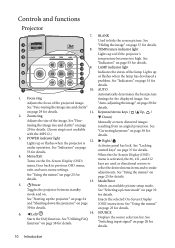
... lock. See "Locking control keys" on page 53 for details. Enacts the selected On-Screen Display (OSD) menu item.
Starts the FAQ function.
See "Indicators" on page 37 ...mode" on page 28 for details. See "Switching input signal" on page 32 for details.
10 Introduction Controls and functions
Projector
7.
1
2
8 8.
3
9
4
10
11 9.
5
12
13
6
14
7
10.
11
1. tuning ...
User Manual - Page 11
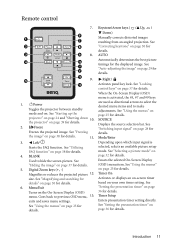
...) menu is selected, selects an available picture setup mode. See "Using the menus" on . II Power
Toggles the projector between standby mode and on page 25 for details. 5. Goes back to hide the screen picture. AUTO Automatically determines the best picture timings for details. exits and saves menu settings. Mode/Enter Depending...
User Manual - Page 13

... Select this location with the projector suspended upsidedown from the ceiling behind the screen. Your projector is required. Rear Table Select this location with the projector placed near the floor in the SYSTEM SETUP: Basic > Projector Position menu after you turn the projector on . 3. Note that a special rear projection screen and the BenQ Projector Ceiling Mounting Kit are...
User Manual - Page 14

... the vertical offset height of the projector from the horizontal edge of the screen (offset).
14 Positioning your projector. The projector should always be mounted upside-down so that the bottom edge of the screen is mounted on a ceiling, it projects at a slightly upward angle above the level of the projected image.
Refer to "MP513/MP522 projection...
User Manual - Page 15
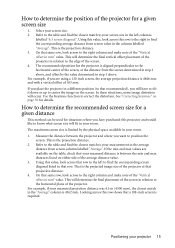
... purchased this row shows that same row, look across to position the screen. See "Correcting keystone" on either side of the projector at the distance from screen column labelled "Average". The maximum screen size is 4846 mm and with a vertical offset of the projector for situations where you want to the right column and make note...
User Manual - Page 16

...6923
7269
7615
7571
7950
8328
8308
8723
9138
9085
9540
9994
11538
12115
12692
Vertical offset in mm
73 90 91 110 120 128 146 150 165 180 183 ...300 7620
Recommended projection distance from
screen in situ before calculating the appropriate position.
MP513/MP522 projection dimensions
Refer to "Dimensions" on page 56 for this projector before you determine the exact mounting...
User Manual - Page 17

... dimensions
Refer to "Dimensions" on page 56 for this projector before calculating the appropriate position.
4:3 screen diagonal
Screen
Center of this projector's optical characteristics. BenQ recommends that it , so as to make allowance for the center of lens dimensions of lens
Vertical offset
Projection distance
4:3 screen diagonal
Feet Inches mm
4
48 1219
59 1500
5
60...
User Manual - Page 19
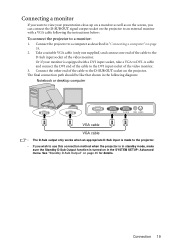
...a monitor:
1. Connect the projector to the D-Sub input socket of the cable to a computer as on the screen, you wish to use this connection method when the projector is in standby mode, make... is equipped with a VGA cable following the instructions below:
To connect the projector to the D-SUB OUT socket on the projector.
Take a suitable VGA cable (only one supplied) and connect one end ...
User Manual - Page 24
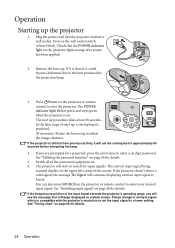
...Please change to the heat produced by the projection lamp.
3. Plug the power cord into the projector and into a wall socket. If it is still hot from previous activity, it could become ...for details. Press II Power on . You can also press SOURCE on a blank screen. See "Timing chart" on the projector lights orange after power has been applied.
2. Turn on page 26 for input signals...
User Manual - Page 25
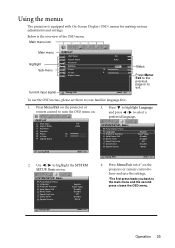
... to highlight the SYSTEM SETUP: Basic menu.
Size Digital Zoom
Off Auto
16 0
SYSTEM SETUP: Basic
Presentation Timer
Language Projector Position Auto Power Off Blank Timer Panel Key Lock Sleep Timer Splash Screen
English Front Table
Disable Disable
Off Disable
BenQ
Analog RGB
MENU Exit
Analog RGB
MENU Exit
2.
Analog RGB
MENU...
User Manual - Page 26
...
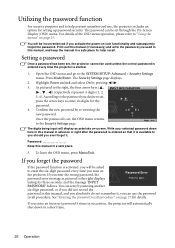
5. Print out this manual (if necessary) and write the password you activate the power-on -screen.
lasting for three seconds, and the message 'INPUT
PASSWORD' follows. For details of the OSD... OSD menu, press Menu/Exit. If you absolutely do not remember it . You can use , the projector includes an option for setting up password security. Open the OSD menu and go to the right, the ...
User Manual - Page 27
... the old password.
• If the password is entered so that you are an authorized user of the
projector. Confirm the new password by pressing
/ .
The message 'INPUT PASSWORD' displays. Though the password function is...OSD menu system. Press and hold AUTO on the screen. projector. 3.
Entering the password recall procedure
1.
Changing the password
1. Password Changed
7.
User Manual - Page 28

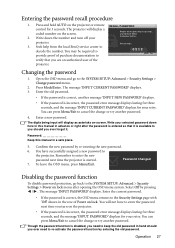
... also manually cycle through the available input signals.
1. You can only display one full screen at this projector) if you want the projector to multiple devices at the same time. Adjusting the projected image
Adjusting the projection angle
The projector is
selected and press Mode/Enter. Be sure the Quick Auto Search function in...
User Manual - Page 29
... close to provide the best picture quality. If the projector is not placed on page 30 for 3 seconds.
• The screen will re-adjust the values of the screen for details.
• Do not look into the ...To do this situation, see "Correcting keystone" on a flat surface or the screen and the projector are not perpendicular to optimize the picture quality.
The strong light from .
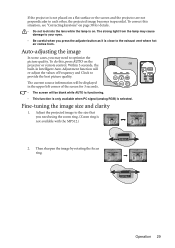
User Manual - Page 30

... to find the details on the projector repeatedly to magnify the picture to... the remote control
Press / on the projector or remote control to display the Keystone ...Use the directional arrows ( , , , ) on the projector or remote control to navigate the picture.
4. Repeat steps 2-4..., besides adjusting the height of the projector, you are using
the projector control panel, continue to the following...
User Manual - Page 33

... Contrast
Highlight Contrast in the PICTURE menu and adjust the values by pressing / on the projector or remote control.
Setting the User 1/User 2 mode
There are two user-definable modes ...Screen Display (OSD) menu. 2. This function is only available when User 1, or User 2 mode is the closest to these functions based on the projector or remote control.
To use one of the image appear...
User Manual - Page 37

... How to select Off. The word 'BLANK' appears at the lower right corner of time when there is no control keys on the projector locked, you can decide whether to restore the ... time in the SYSTEM SETUP: Basic > Blank Timer menu to let the projector return the image automatically after a period of the screen while the image is already on, pressing this key displays a confirmation message...
Similar Questions


Hi My Benq Projector Has So Much Dots Like A Mold.
(Posted by familybellans 12 years ago)

Benq Projector Switches On But Then Turns Off In About 10 Seconds Automatically
(Posted by angelanu84 12 years ago)

Vertical Lines On Screen
My projector shows vertical lines when first turned on but disappear after 5 mins or if I turn it of...
My projector shows vertical lines when first turned on but disappear after 5 mins or if I turn it of...
(Posted by pf 13 years ago)
Benq Mp511 Projector Model Fails. Vertical Lines Like Bars
my projector vertical lines appear glossy. svga-signal or no signal. If this is the main logic board...
my projector vertical lines appear glossy. svga-signal or no signal. If this is the main logic board...
(Posted by aislas8a 13 years ago)