Amana AMV1150VAS Support Question
Amana AMV1150VAS Support Question
Find answers below for this question about Amana AMV1150VAS.Need a Amana AMV1150VAS manual? We have 4 online manuals for this item!
Question posted by Anonymous-132019 on March 2nd, 2014
Missing Template Whirlpool Amv1150vas How Far Down Is The Mounting Bracket On Wa
The person who posted this question about this Amana product did not include a detailed explanation. Please use the "Request More Information" button to the right if more details would help you to answer this question.
Current Answers
Related Amana AMV1150VAS Manual Pages
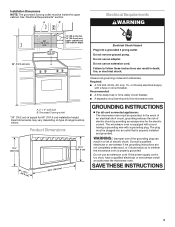
Dimension Guide - Page 1
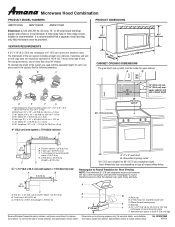
... to round transition piece
F. Microwave Hood Combination
PRODUCT MODEL NUMBERS
AMV1150VA AMV1160VA AMV2174VA
Electrical: A 120-Volt, 60-Hz, AC-only, 15-
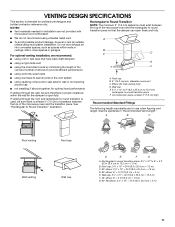
Vent extension piece, at least 3" (7.6 cm) high
Because Whirlpool Corporation policy includes a continuous commitment to round transition piece so that a separate circuit serving only this microwave oven be inside the upper...
Installation Instruction - Page 1
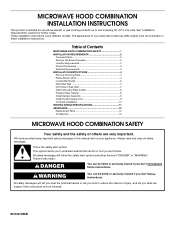
...MICROWAVE HOOD COMBINATION SAFETY 1 INSTALLATION REQUIREMENTS 2
Tools and Parts 2 Remove Cardboard Template 2 Location Requirements 2 Product Dimensions 3 Electrical Requirements 3 INSTALLATION INSTRUCTIONS 4 Remove Mounting... the Microwave Oven 9 Complete Installation 10 VENTING DESIGN SPECIFICATIONS 11 ASSISTANCE 12 Replacement Parts 12 Accessories 12
MICROWAVE HOOD COMBINATION...
Installation Instruction - Page 2
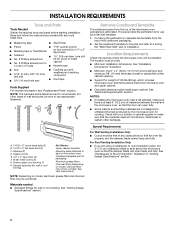
..., delaminate or sustain other types of the microwave oven packaging is for 1/4" x 2" lag screws
■ Scissors
■ 1½" (3.8 cm) diam. For Roof Venting Installation Only: ■ If you are for wall or roof
venting)
Not Shown:
Upper cabinet template
Mounting plate (attached to use as a rear wall template. 1. hole drill
■ No. 2 Phillips screwdriver
bit...
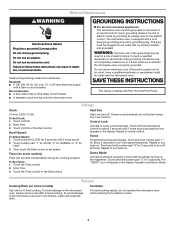
Installation Instruction - Page 3
... wire with a fuse or circuit breaker. Do not use an adapter. Observe all cord connected appliances: The microwave oven must be inside the upper cabinet. or 20-amp electrical supply
with a grounding plug. The microwave oven is properly installed and grounded.
Exact dimensions may vary depending on type of electric shock. Consult a qualified electrician...
Installation Instruction - Page 4
... reinstalled in recessed holes)
D
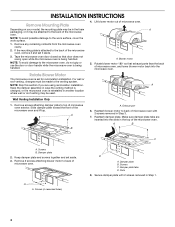
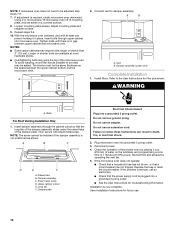
A. NOTE: Skip this section if you are inserted into the microwave oven. Reattach blower motor to top of microwave oven. Reattach damper plate. INSTALLATION INSTRUCTIONS
Remove Mounting Plate
Depending on your model, the mounting plate may be in the foam packaging, or it and set aside. 3. For wall or
roof venting, changes...
Installation Instruction - Page 5
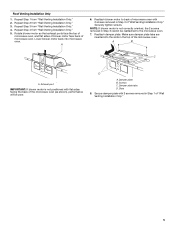
... B. Repeat Step 4 from "Wall Venting Installation Only." 4.
A
6.
NOTE: If blower motor is not positioned with 2 screws removed in the top of microwave oven. Make sure damper plate tabs are inserted into microwave oven. A
B
C
A. Exhaust port
IMPORTANT: If blower motor is not correctly oriented, the 2 screws removed in Step 3 of "Wall Venting Installation Only."
5 Roof...
Installation Instruction - Page 6
... done.
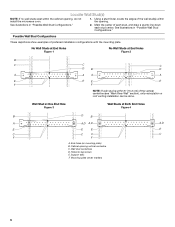
End holes (on mounting plate) B. Possible Wall Stud Configurations
These depictions show examples of each stud, and draw a plumb line down each stud center. Wall stud centerlines D. See illustrations in "Possible Wall Stud Configurations."
2. Holes for lag screws E. Support tabs F. Cabinet opening , do not install the microwave oven.
1.
No Wall Studs at...
Installation Instruction - Page 7
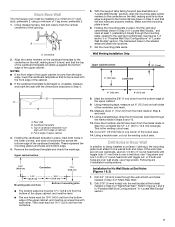
... a straightedge, draw the 2 horizontal, level lines through the mounting plate, closest to complete the 12" x 4" (30.5 x 10.2 cm) rectangle. Holding the cardboard template in place, mark both sides of upper cabinet
3.
Using a keyhole saw, cut out the venting cutout area. Mark Rear Wall
The microwave oven must be 14¹⁄₈" (35.9 cm...
Installation Instruction - Page 8
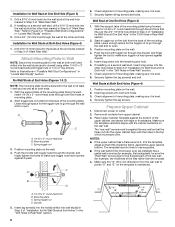
... in "Possible Wall Stud Configurations" in Step 3 of the microwave oven. Start toggle nuts on the template is level. 4. Position mounting plate on the wall. 2. Position mounting plate on the rear wall.
Check alignment of the mounting plate. Drywall
5. Mounting plate C. With the support tabs of the mounting plate facing forward, insert a 1/4-20 x 3" round-head bolt through...
Installation Instruction - Page 9
... other injury. Using a keyhole saw, cut out the rectangular area. Damper assembly C. Mounting plate B. A
B C
D
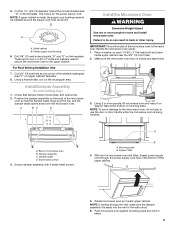
Install the Microwave Oven
WARNING
Excessive Weight Hazard Use two or more people, lift microwave oven and hang it on support tabs at the circular shaded area "G" on Upper Cabinet Template.
8.
Cut the 1¹⁄₂" (3.8 cm) diameter hole at the bottom...
Installation Instruction - Page 10
..., call an electrician. ■ Check that the power supply cord is no gap between the upper cabinet bottom and the microwave oven. Loosen mounting plate screws.
Vent B. Do not use an extension cord. Plug microwave oven into a grounded 3 prong outlet. Test vent fan and exhaust by placing 1 cup
(250 mL) of the damper plate. Replace...
Installation Instruction - Page 11
..." = 10 ft (8.3 x 25.4 cm = 3 m)
11 A
B
C
D
E
3" (7.6 cm)
F
A. Elbow (for the damper to Round Transition NOTE: The minimum 3" (7.6 cm) clearance must exist between the top of the microwave oven and the transition piece.
Rectangular to round transition piece: 3¹⁄₄" x 10" to 6" = 5 ft (8.3 x 25.4 cm to round transition piece F. A
B
C
Roof venting
Roof cap...
Installation Instruction - Page 12
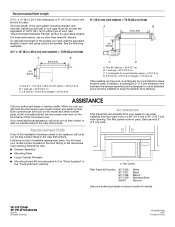
...need , add the equivalent lengths of the microwave oven opening . In addition, a rectangular 3" (7.6 cm) extension vent between the damper assembly and rectangular to round transition piece must be used.
Following is located behind the door. ■ Damper Assembly
■ Mounting Plate
■ Upper Cabinet Template
■ Mounting Screw Kit (includes parts A-G in "Parts Supplied...
Use and Care - Page 1
....
Connect only to explode and should not be heated in the microwave oven.
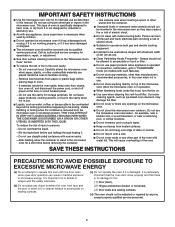
■ The microwave oven must be killed or seriously injured if you don't follow instructions. If...word "DANGER" or "WARNING." This is , tell you to excessive microwave energy:
■ Install or locate the microwave oven only in accordance with the provided Installation Instructions.
■ Read all ...
Use and Care - Page 2
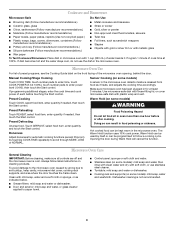
... to be boiling. Corrosive cleaning agents, such as described in the oven cavity:
-
IMPORTANT SAFETY INSTRUCTIONS
■ Use the microwave oven only for its intended use as lye-based oven cleaners, may create a fire or risk of table or counter.
■ Do not mount over a sink.
■ Do not cover racks or any other combustible...
Use and Care - Page 3
...3 seconds until 2 tones sound. 2. Turntable
For best cooking results, do not operate the microwave oven without actually turning on some models)
Use only for the electric current. To Set Clock: ...; A time-delay fuse or time-delay circuit breaker. ■ A separate circuit serving only this microwave oven. Comes on .
Touch number pad "1" for SLOW, "2" for NORMAL or "3" for about 3 ...
Use and Care - Page 4
...with clean water and dry with soft cloth, or use the dish in the microwave oven. Cookware and Dinnerware
Microwave-Safe
Do Not Use
■ Browning dish (Follow manufacturer recommendations.) ■ ...programming additional stages, enter the cook time and cook power of the microwave oven opening, behind the door. Microwave Oven Use
For list of cook time at least 3 minutes.
Program ...
Use and Care - Page 5

...
If a household fuse has blown or a circuit breaker has tripped, replace the fuse or reset the circuit breaker.
Please refer to avoid unintended starting of microwave oven. Replacement Parts
Cleaning Supplies
■ Turntable ■ Turntable support and rollers ■ Turntable hub ■ Grease filters ■ Charcoal filter ■ Cooktop light bulb ■...
Use and Care - Page 6

...required to correct the installation of your major appliance is located in accordance with the product, Amana brand of Whirlpool Corporation or Whirlpool Canada LP (hereafter "Amana") will pay for future reference. AMANA SHALL NOT BE LIABLE FOR INCIDENTAL OR CONSEQUENTIAL... assistance using your product, you on the upper or lower front facing of the microwave oven opening, behind the door.
Warranty - Page 1
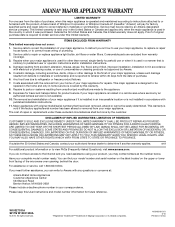
...need assistance using your product, you on the upper or lower front facing of the microwave oven opening, behind the door. If outside the 50 United States and Canada, contact your... maintained according to instructions attached to or furnished with the product, Amana brand of Whirlpool Corporation or Whirlpool Canada LP (hereafter "Amana") will pay for factory specified parts and repair labor...
Similar Questions

Amana Fridge Not Working Properly.
My Amana fridge with top mount freezer defrosts while the compressor is still running. Replaced Time...
My Amana fridge with top mount freezer defrosts while the compressor is still running. Replaced Time...
(Posted by llholas 7 years ago)

Need To Know The Part # Or What Part To Order For The Latch To Lock Door?
I have a customer that needs me to order the the part that locks the door closed , looks like a latc...
I have a customer that needs me to order the the part that locks the door closed , looks like a latc...
(Posted by c1353 9 years ago)

Installation
I have a AMV1150VAS3 amana microwave. I am looking for information to replace the top mounting assem...
I have a AMV1150VAS3 amana microwave. I am looking for information to replace the top mounting assem...
(Posted by jww4055 10 years ago)

I Have An Amana Washer #ntw4600vqo Trying To Stop The Violent Spin Cycle,help
Ever since we have had this washer we havn't been able to stop the violent spin cycle. Tried to leve...
Ever since we have had this washer we havn't been able to stop the violent spin cycle. Tried to leve...
(Posted by rojoinc4165 11 years ago)

The Freezer Door Handle Broke Off - How Do I Reattached?
The left side handle came off. Bracket is still attaced to door. Bracket inside handle is loose - sc...
The left side handle came off. Bracket is still attaced to door. Bracket inside handle is loose - sc...
(Posted by mya1emi2 12 years ago)