Dimension Guide
Page 1
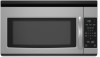
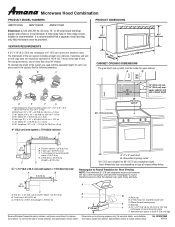
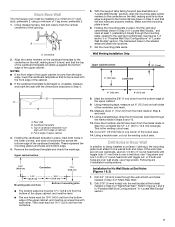
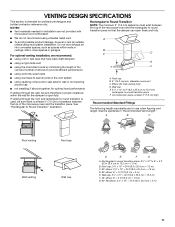
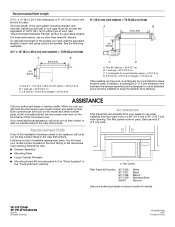
Microwave Hood Combination PRODUCT MODEL NUMBERS AMV1150VA AMV1160VA AMV2174VA Electrical: A 120-Volt, 60-Hz, AC-only, 15- A time-delay fuse or time-delay circuit breaker is recommended that the damper can open freely and fully. 2 ft A (0.6 m) C A. PRODUCT DIMENSIONS 17 " (43.8 cm) 16 " (41.3 cm) VENTING REQUIREMENTS A 3¹⁄₄" x 10" (8.3 x 25.4 cm) rectangular or 6" (15.2 cm) round vent should be inside the upper cabinet. The total length of the...
Microwave Hood Combination PRODUCT MODEL NUMBERS AMV1150VA AMV1160VA AMV2174VA Electrical: A 120-Volt, 60-Hz, AC-only, 15- A time-delay fuse or time-delay circuit breaker is recommended that the damper can open freely and fully. 2 ft A (0.6 m) C A. PRODUCT DIMENSIONS 17 " (43.8 cm) 16 " (41.3 cm) VENTING REQUIREMENTS A 3¹⁄₄" x 10" (8.3 x 25.4 cm) rectangular or 6" (15.2 cm) round vent should be inside the upper cabinet. The total length of the...
Installation Instruction
Page 1
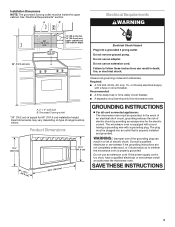
... Table of Contents MICROWAVE HOOD COMBINATION SAFETY 1 INSTALLATION REQUIREMENTS 2 Tools and Parts 2 Remove Cardboard Template 2 Location Requirements 2 Product Dimensions 3 Electrical Requirements 3 INSTALLATION INSTRUCTIONS 4 Remove Mounting Plate 4 Rotate Blower Motor 4 Locate Wall Stud(s 6 Mark Rear Wall 7 Drill Holes in Rear Wall 7 Attach Mounting Plate to reduce the chance of others . These installation instructions cover different models. All safety messages will follow instructions. See "Installation Requirements" section for use above electric or gas cooking...
... Table of Contents MICROWAVE HOOD COMBINATION SAFETY 1 INSTALLATION REQUIREMENTS 2 Tools and Parts 2 Remove Cardboard Template 2 Location Requirements 2 Product Dimensions 3 Electrical Requirements 3 INSTALLATION INSTRUCTIONS 4 Remove Mounting Plate 4 Rotate Blower Motor 4 Locate Wall Stud(s 6 Mark Rear Wall 7 Drill Holes in Rear Wall 7 Attach Mounting Plate to reduce the chance of others . These installation instructions cover different models. All safety messages will follow instructions. See "Installation Requirements" section for use above electric or gas cooking...
Installation Instruction
Page 2
.... See User Instructions.) NOTE: Depending on model, charcoal filters may be free of the cardboard packaging. 2. The location must be combined. For Roof Venting Installation Only: ■ If you are not designed to withstand the heat produced by the microwave oven for wall or roof venting) Not Shown: Upper cabinet template Mounting plate (attached to back of microwave oven) Cardboard template (part of 150 lbs (68 kg), which includes microwave oven and items placed inside the microwave oven and upper cabinet...
.... See User Instructions.) NOTE: Depending on model, charcoal filters may be free of the cardboard packaging. 2. The location must be combined. For Roof Venting Installation Only: ■ If you are not designed to withstand the heat produced by the microwave oven for wall or roof venting) Not Shown: Upper cabinet template Mounting plate (attached to back of microwave oven) Cardboard template (part of 150 lbs (68 kg), which includes microwave oven and items placed inside the microwave oven and upper cabinet...
Installation Instruction
Page 3
... dimensions may vary depending on type of electric shock. The plug must be grounded. Do not remove ground prong. Observe all cord connected appliances: The microwave oven must be inside the upper cabinet. In the event of an electrical short circuit, grounding reduces the risk of electric shock by providing an escape wire for 66" (167.6 cm) installation height. Failure to whether the microwave oven...
... dimensions may vary depending on type of electric shock. The plug must be grounded. Do not remove ground prong. Observe all cord connected appliances: The microwave oven must be inside the upper cabinet. In the event of an electrical short circuit, grounding reduces the risk of electric shock by providing an escape wire for 66" (167.6 cm) installation height. Failure to whether the microwave oven...
Installation Instruction
Page 4
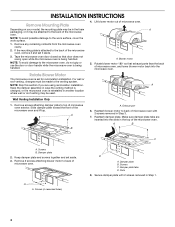
... of microwave oven, and lower blower motor back into the slots in Step 1. 4 A B C A. Keep damper plate and screws together and set aside. 3. Damper plate B. INSTALLATION INSTRUCTIONS Remove Mounting Plate Depending on your model, the mounting plate may be in another location where wall or roof venting may be attached to the back of the microwave oven. Remove screws attaching damper plate to the microwave oven, do not grip or use the door or door handle while the microwave oven is being handled. 4. A Keep the damper assembly in...
... of microwave oven, and lower blower motor back into the slots in Step 1. 4 A B C A. Keep damper plate and screws together and set aside. 3. Damper plate B. INSTALLATION INSTRUCTIONS Remove Mounting Plate Depending on your model, the mounting plate may be in another location where wall or roof venting may be attached to the back of the microwave oven. Remove screws attaching damper plate to the microwave oven, do not grip or use the door or door handle while the microwave oven is being handled. 4. A Keep the damper assembly in...
Installation Instruction
Page 5
... "Wall Venting Installation Only." 5 Damper plate tabs D. Repeat Step 2 from "Wall Venting Installation Only." 2. A 6. Reattach damper plate. Screws C. Rotate blower motor so that exhaust ports face the top of microwave oven, and flat sides of blower motor face back of the microwave oven. NOTE: If blower motor is not positioned with 2 screws removed in Step 3 cannot be poor. Make sure damper plate tabs are inserted into microwave oven. Secure damper plate with 2 screws removed in the top of microwave oven. Roof Venting Installation...
... "Wall Venting Installation Only." 5 Damper plate tabs D. Repeat Step 2 from "Wall Venting Installation Only." 2. A 6. Reattach damper plate. Screws C. Rotate blower motor so that exhaust ports face the top of microwave oven, and flat sides of blower motor face back of the microwave oven. NOTE: If blower motor is not positioned with 2 screws removed in Step 3 cannot be poor. Make sure damper plate tabs are inserted into microwave oven. Secure damper plate with 2 screws removed in the top of microwave oven. Roof Venting Installation...
Installation Instruction
Page 6
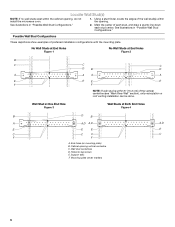
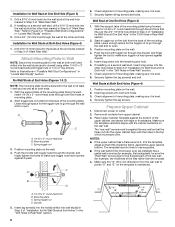
... center. Cabinet opening , do not install the microwave oven. 1. Support tabs F. See illustrations in "Possible Wall Stud Configurations." 2. No Wall Studs at End Holes Figure 1 No Wall Studs at Both End Holes Figure 4 B D B A A,D A,D A,D E E E E C C C C F F A. Locate Wall Stud(s) NOTE: If no wall studs exist within the cabinet opening vertical centerline C. See illustrations in "Possible Wall Stud Configurations." Wall stud centerlines D. End holes (on mounting plate) B. Holes for lag screws E. Wall Stud at...
... center. Cabinet opening , do not install the microwave oven. 1. Support tabs F. See illustrations in "Possible Wall Stud Configurations." 2. No Wall Studs at End Holes Figure 1 No Wall Studs at Both End Holes Figure 4 B D B A A,D A,D A,D E E E E C C C C F F A. Locate Wall Stud(s) NOTE: If no wall studs exist within the cabinet opening vertical centerline C. See illustrations in "Possible Wall Stud Configurations." Wall stud centerlines D. End holes (on mounting plate) B. Holes for lag screws E. Wall Stud at...
Installation Instruction
Page 7
... hole(s) marked in Rear Wall In addition to the centerline on a level line with the front edge of "Mark Rear Wall." 2. A A. Using a keyhole saw, cut out the venting cutout area. D A C B A. Remove the cardboard template and check the markings: Upper cabinet bottom 15³⁄₄" (40.0 cm) Centerline 17¹⁄₄" (43.8 cm) 14¹⁄₈" (35.9 cm) Mounting plate end hole 14...
... hole(s) marked in Rear Wall In addition to the centerline on a level line with the front edge of "Mark Rear Wall." 2. A A. Using a keyhole saw, cut out the venting cutout area. D A C B A. Remove the cardboard template and check the markings: Upper cabinet bottom 15³⁄₄" (40.0 cm) Centerline 17¹⁄₄" (43.8 cm) 14¹⁄₈" (35.9 cm) Mounting plate end hole 14...
Installation Instruction
Page 8
... wall and to the thickest part of the rear wall (for example, the thickness of the microwave oven. Securely tighten all contents from the rear wall to make sure toggle nuts have opened against the upper cabinet bottom. Position mounting plate on the wall. 4. Insert lag screws into the upper cabinet align with the holes in Rear Wall" section. 8 Upper-cabinet template D 10" (25.4 cm) F E 10" G (25.4 cm) The "rear wall...
... wall and to the thickest part of the rear wall (for example, the thickness of the microwave oven. Securely tighten all contents from the rear wall to make sure toggle nuts have opened against the upper cabinet bottom. Position mounting plate on the wall. 4. Insert lag screws into the upper cabinet align with the holes in Rear Wall" section. 8 Upper-cabinet template D 10" (25.4 cm) F E 10" G (25.4 cm) The "rear wall...
Installation Instruction
Page 9
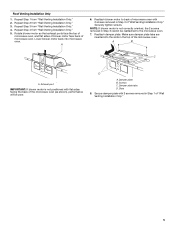
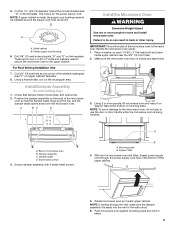
... Cabinet Template. 8. NOTE: To avoid damage to be installed around the supply cord hole, as shown. Mounting plate B. Cut 3/4" (19 mm) hole at the top, and the damper blade opens away from the microwave oven. Position the damper assembly on the template. Handle the microwave oven gently. 1. Damper blade D. Drill 3/8" (10 mm) holes at the bottom of the upper cabinet. 5. Using a keyhole saw, cut out the rectangular area. A. Secure damper assembly with 2 sheet metal screws. A B A. Power...
... Cabinet Template. 8. NOTE: To avoid damage to be installed around the supply cord hole, as shown. Mounting plate B. Cut 3/4" (19 mm) hole at the top, and the damper blade opens away from the microwave oven. Position the damper assembly on the template. Handle the microwave oven gently. 1. Damper blade D. Drill 3/8" (10 mm) holes at the bottom of the upper cabinet. 5. Using a keyhole saw, cut out the rectangular area. A. Secure damper assembly with 2 sheet metal screws. A B A. Power...
Installation Instruction
Page 10
... electrical shock. 2. A B C D E F A. Upper cabinet cutout E. Do not remove ground prong. Plug microwave oven into a grounded 3 prong outlet. Reconnect power. 4. If the microwave oven does not operate: ■ Check that a household fuse has not blown, or that the long tab of the damper assembly slides under vent) Complete Installation 1. Installation is plugged into microwave oven. NOTE: If microwave oven does not need to the User Instructions for filter placement. A 2. Damper assembly (under the raised tabs of mounting plate, and set aside...
... electrical shock. 2. A B C D E F A. Upper cabinet cutout E. Do not remove ground prong. Plug microwave oven into a grounded 3 prong outlet. Reconnect power. 4. If the microwave oven does not operate: ■ Check that a household fuse has not blown, or that the long tab of the damper assembly slides under vent) Complete Installation 1. Installation is plugged into microwave oven. NOTE: If microwave oven does not need to the User Instructions for filter placement. A 2. Damper assembly (under the raised tabs of mounting plate, and set aside...
Installation Instruction
Page 11
NOTES: ■ Vent materials needed for installation are for the damper to open freely and fully. Do not vent exhaust air into concealed spaces, such as spaces within the wall for use when figuring vent length. Rectangular to Round Transition NOTE: The minimum 3" (7.6 cm) clearance must exist between the top of elbows to provide efficient performance ■ using uniformly sized vents ■ using duct tape to...
NOTES: ■ Vent materials needed for installation are for the damper to open freely and fully. Do not vent exhaust air into concealed spaces, such as spaces within the wall for use when figuring vent length. Rectangular to Round Transition NOTE: The minimum 3" (7.6 cm) clearance must exist between the top of elbows to provide efficient performance ■ using uniformly sized vents ■ using duct tape to...
Installation Instruction
Page 12
...) wide opening , behind the door. ■ Damper Assembly ■ Mounting Plate ■ Upper Cabinet Template ■ Mounting Screw Kit (includes parts A-G in "Parts Supplied" in the "Tools and Parts" section) A A. For best performance, use when installing this microwave oven in China In addition, a rectangular 3" (7.6 cm) extension vent between the damper assembly and rectangular to round transition piece must be installed to keep the damper from your model number located on the front frame of vent. Replacement Parts If any...
...) wide opening , behind the door. ■ Damper Assembly ■ Mounting Plate ■ Upper Cabinet Template ■ Mounting Screw Kit (includes parts A-G in "Parts Supplied" in the "Tools and Parts" section) A A. For best performance, use when installing this microwave oven in China In addition, a rectangular 3" (7.6 cm) extension vent between the damper assembly and rectangular to round transition piece must be installed to keep the damper from your model number located on the front frame of vent. Replacement Parts If any...
Use and Care
Page 1
... specific "PRECAUTIONS TO AVOID POSSIBLE EXPOSURE TO EXCESSIVE MICROWAVE ENERGY" found in this manual and on your model and serial number located on the front facing of burns, electric shock, fire, injury to persons, or exposure to explode and should be killed or seriously injured if you still need your appliance. IMPORTANT SAFETY INSTRUCTIONS When using the microwave oven. ■ Read and follow instructions...
... specific "PRECAUTIONS TO AVOID POSSIBLE EXPOSURE TO EXCESSIVE MICROWAVE ENERGY" found in this manual and on your model and serial number located on the front facing of burns, electric shock, fire, injury to persons, or exposure to explode and should be killed or seriously injured if you still need your appliance. IMPORTANT SAFETY INSTRUCTIONS When using the microwave oven. ■ Read and follow instructions...
Use and Care
Page 2
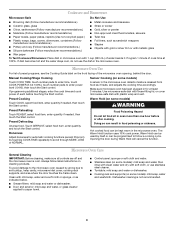
... THESE INSTRUCTIONS PRECAUTIONS TO AVOID POSSIBLE EXPOSURE TO EXCESSIVE MICROWAVE ENERGY (a) Do not attempt to operate this microwave oven outdoors. Remove wire twist-ties from heated surfaces. ■ Do not let cord hang over edge of table or counter. ■ Do not mount over a sink. ■ Do not cover racks or any materials, other combustible materials are able to be adjusted or repaired by qualified service...
... THESE INSTRUCTIONS PRECAUTIONS TO AVOID POSSIBLE EXPOSURE TO EXCESSIVE MICROWAVE ENERGY (a) Do not attempt to operate this microwave oven outdoors. Remove wire twist-ties from heated surfaces. ■ Do not let cord hang over edge of table or counter. ■ Do not mount over a sink. ■ Do not cover racks or any materials, other combustible materials are able to be adjusted or repaired by qualified service...
Use and Care
Page 3
..., clean rack supports often. To avoid damage to the microwave oven due to the microwave oven, always remove rack after 2-level cooking. Recommended: ■ A time-delay fuse or time-delay circuit breaker. ■ A separate circuit serving only this microwave oven. If the power supply cord is too short, have a qualified electrician or serviceman install an outlet near the microwave oven. Touch CLOCK. 2. Timer (on . Vent Fan High, low and off programming tones. Control Lock Activate to whether the microwave oven is properly grounded. Touch...
..., clean rack supports often. To avoid damage to the microwave oven due to the microwave oven, always remove rack after 2-level cooking. Recommended: ■ A time-delay fuse or time-delay circuit breaker. ■ A separate circuit serving only this microwave oven. If the power supply cord is too short, have a qualified electrician or serviceman install an outlet near the microwave oven. Touch CLOCK. 2. Timer (on . Vent Fan High, low and off programming tones. Control Lock Activate to whether the microwave oven is properly grounded. Touch...
Use and Care
Page 4
.... Manual Cooking/Stage Cooking Sensor Cooking (on some models): mild soap and water, then rinse with clean water and dry with soft cloth, or use the dish in the microwave oven. Preset Defrosting Unwrap food. Doing so can be programmed to soil buildup, keep cavity, microwave inlet cover, cooking rack supports, and area where the door touches the frame clean. Opening the door during Warm Hold will cancel the function. If dish becomes hot...
.... Manual Cooking/Stage Cooking Sensor Cooking (on some models): mild soap and water, then rinse with clean water and dry with soft cloth, or use the dish in the microwave oven. Preset Defrosting Unwrap food. Doing so can be programmed to soil buildup, keep cavity, microwave inlet cover, cooking rack supports, and area where the door touches the frame clean. Opening the door during Warm Hold will cancel the function. If dish becomes hot...

Use and Care
Page 5
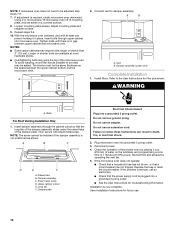
... 5 The charcoal filter cannot be cleaned, and should be purchased separately. Replace bulb, close door. Troubleshooting First try the steps in "Microwave Oven Care" section. Make sure Control Lock is off to avoid unintended starting of the door, remove it toward the tab area. ■ Charcoal filter: The charcoal filter is behind the vent grille at the beginning of the cycle. Make sure Demo Mode (on cavity walls, microwave inlet cover, cooking rack supports, and area where the door touches the...
... 5 The charcoal filter cannot be cleaned, and should be purchased separately. Replace bulb, close door. Troubleshooting First try the steps in "Microwave Oven Care" section. Make sure Control Lock is off to avoid unintended starting of the door, remove it toward the tab area. ■ Charcoal filter: The charcoal filter is behind the vent grille at the beginning of the cycle. Make sure Demo Mode (on cavity walls, microwave inlet cover, cooking rack supports, and area where the door touches the...

Use and Care
Page 6
... specified parts and repair labor to published user or operator instructions and/or installation instructions. 4. Major appliances with the product, Amana brand of Whirlpool Corporation or Whirlpool Canada LP (hereafter "Amana") will pay for repairs. You can write to use your major appliance is covered by an Amana designated service company. If you need assistance using your product, you can find your model number and serial number on the label located...
... specified parts and repair labor to published user or operator instructions and/or installation instructions. 4. Major appliances with the product, Amana brand of Whirlpool Corporation or Whirlpool Canada LP (hereafter "Amana") will pay for repairs. You can write to use your major appliance is covered by an Amana designated service company. If you need assistance using your product, you can find your model number and serial number on the label located...
Warranty
Page 1
... to Amana with original model/serial numbers that is contrary to published user or operator instructions and/or installation instructions. 4. This limited warranty is valid only in the United States or Canada and applies only when the major appliance is used in the country in -home service is covered by the customer. Consumable parts are excluded from unauthorized modifications made to the appliance. 9. Repairs to parts...
... to Amana with original model/serial numbers that is contrary to published user or operator instructions and/or installation instructions. 4. This limited warranty is valid only in the United States or Canada and applies only when the major appliance is used in the country in -home service is covered by the customer. Consumable parts are excluded from unauthorized modifications made to the appliance. 9. Repairs to parts...


