Get support for Acer S202HL

Acer S202HL Support Question

Acer S202HL Support Question

Find answers below for this question about Acer S202HL.
Need a Acer S202HL manual? We have 2 online manuals for this item!
Question posted by nancy26525 on May 2nd, 2011

How Do I Adjust The Screen To Make It Easier On Eyes Its Hard On My Eyes

The person who posted this question about this Acer product did not include a detailed explanation. Please use the "Request More Information" button to the right if more details would help you to answer this question.

Current Answers

Answer #1: Posted by bpshbp on May 28th, 2011 5:28 AM
This answer was accepted by the poster of the original question.
bpshbp

Member since:
November 18th, 2010

Points: 130,470
1,060
points
    • 1

      Set the computer contrast to it's highest setting. Images and words that are clearly visible will not require you to strain your eyes to view them.

    • 2

      Adjust the height of your chair and/or the height of your computer monitor so that you look downward toward the monitor. You can tilt the computer monitor upward, but your gaze should rest slightly downward.

    • 3

      Make sure you are sitting at least 2 feet from the computer monitor to reduce eye strain.

    • 4

      Avoid glare on the computer screen by lowering window blinds, or getting a anti-glare screen if necessary. Ideally the windows in your home or office should be to the side of your monitor, not to the front or the back of the monitor.

    • 5

      Keep the computer monitor clean. Smudges, smears and dust will interfere with your ability to focus easily on the screen.

    • 6

      Increase the font size, to allow you to see words more easily and reduce eye strain.

    • 7

      If your computer monitor has a noticeable flicker, consider upgrading your monitor to an LCD screen. That flicker contributes dramatically to eye strain.


Related Acer S202HL Manual Pages

Quick Start Guide - Page 1

... video cable to the computer. 1-2 (only Dual-Input Model) Connect one end of the cabinet. Try another power cable on the monitor. No Video - Make sure no image on the screen. Do not allow anything to rest on the power cable, and keep the cable away from it carefully. To prevent overheating, these...
Quick Start Guide - Page 2

... numérique de la classe B est conforme a la norme NMB-003 du Canada. LCD Monitor Quick Setup Guide CE declaration of conformity Hereby, Acer Inc., declares that to which the receiver is...be determined by turning the device off and on a circuit different from that this LCD monitor is encouraged to try to correct the interference by the Federal Communications Commission, to operate...
Quick Start Guide - Page 3

... Household in a manner that this product must not be disposed of with your waste equipment for the recycling of waste electrical and electronic equipment. LCD Monitor Quick Setup Guide English Disposal of W aste Equipment by handing it over to a designated collection point for recycling, please contact your local city office, your...
User Manual - Page 1

TABLE OF CONTENTS Special notes on LCD monitors 1 Information for your safety and comfort 2 Unpacking 5 Attaching/Removing the base 6 Screen position adjustment 6 Connecting the power cord 7 Safety precaution 7 Cleaning your monitor 7 Power saving 8 DDC 8 Connector Pin Assignment 9 Standard Timing Table 11 Installation 12 User controls 13 Troubleshooting 19
User Manual - Page 2

...screen depending on the desktop pattern you use . In this case, the screen is displayed for hours. SPECIAL NOTES ON LCD MONITORS The following symptoms are normal with LCD monitor...screen has effective pixels of the previous screen may remain after switching the image, when the same image is recovered slowly by changing the image or turning off the Power Switch and then turn it on again to make...
User Manual - Page 3

... liquid of any kind into the product. • To avoid damage of internal components and to prevent battery leakage, do not increase it afteryour ears adjust. • Limit the amount of time listening to music at high volume. • Avoid turning up the volume to block out noisy surroundings. • Turn...
User Manual - Page 4

...height to achieve maximum comfort. Long work periods, bad posture, poor work by adjusting the viewing angle of physical injury. Finding your comfort zone Find your company's health...to carpal tunnel syndrome, tendonitis, tenosynovitis or other factors greatly increase the risk of the monitor, using a footrest, or raising your leg muscles EN-3 Tips and information for more comfortable...
User Manual - Page 5

... If this is unavoidable, work habits to make your eyes from drying out. For more information and...monitor and focusing on how to keep your computer use more than the top edge of the display so your eyes point downward when looking at the middle of the display. • Adjust...glare, excessive room lighting, poorly focused screens, very small typefaces and low-contrast ...
User Manual - Page 7

... by using both of your hands to 15 degrees up or 5 degrees down on a stable surface -- The monitor can adjust the tilt of the monitor as indi- Carefully place the monitor face-down as shown in the figure below . 55 155 EN-6 SCREEN POSITION ADJUSTMENT In oder to optimize the best viewing position, you can be...
User Manual - Page 8

... where there is fragile. Place the monitor just below guidelines when cleaning the monitor. · Always unplug the monitor before cleaning. · Use a soft cloth to the screen, as screen is adequate ventilation. · Avoid placing the monitor against a bright background or where sun- CLEANING YOUR MONITOR Please carefully follow the below eye level. · Handle with care...
User Manual - Page 9

DDC To make your installation easier, the monitor is a communication protocol through which the monitor automatically informs the host system about its capabilities, for example, supported resolutions and corresponding timing. EN-8 The monitor supports DDC2B standard. State ON Power Saving Mode LED Light Blue Amber The power saving states will be kept until a control signal has...
User Manual - Page 10

CONNECTOR PIN ASSIGNMENT 15-Pin Color Display Signal Cable PIN NO. 1. 2. 3. 4. 5. 6. 7. 8. DESCRIPTION Red Green Blue Monitor Ground DDC-return R-Ground G-Ground B-Ground PIN NO. 9. 10. 11. 12. 13. 14. 15. DESCRIPTION +5V Logic Ground Monitor Ground DDC-Serial Data H-Sync V-Sync DDC-Serial Clock EN-9
User Manual - Page 13

Make sure both the monitor and computer are powered-OFF. Cao. Connect the adapter a Connect the AC cord to the computer. Power-ON Monitor and Computer Power-ON the monitor first, then power-ON the computer. Connect the VGA video cable to the adapter. This sequence is very important. 4. DC D-Sub DVI DVI D-Sub DC...
User Manual - Page 14

...lets you will see the following messages on right top side of screen to indicate currently selected input source. The Auto Adjustment function is selected ,but the VGA and DVI cables are not ...LED: To turn the monitor ON or OFF. AUTO Auto Adjust: Press this botton to activate the Auto Adjustment function. Using the Shortcut Menu Press the function button to your monitor. (a) VGA input (b)...
User Manual - Page 15

... d isp lay mode capability N/A Grahpic mode Enhances colors and emphasize fine detail. EN-14 Settings can be fine-tuned to suit any situation N/A ECO mode Adjusts the settings to confirm the mode and exit the eColor menu. Presents great visuals, even in clearest detail. N/A Standard D efau lt Settin g . N/A Movie mode Displays...
User Manual - Page 16

.... EN-15 Press the MENU key to open the OSD. For advanced settings, please refer to following content is for adjusting the settings of your LCD Monitor. You can be used to adjust the current Brightness, Contrast, Colour Temp, Auto Config and other image-related qualities. Then navigate to the picture element you...
User Manual - Page 17

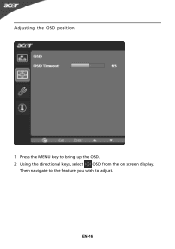
EN-16 Then navigate to the feature you wish to bring up the OSD. 2 Using the directional keys, select OSD from the on screen display. Adjusting the OSD position 1 Press the MENU key to adjust.
User Manual - Page 18

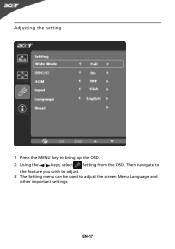
Adjusting the setting 1 Press the MENU key to adjust the screen Menu Language and other important settings. Then navigate to the feature you wish to adjust. 3 The Setting menu can be used to bring up the OSD. 2 Using the / keys, select Setting from the OSD. EN-17
User Manual - Page 20

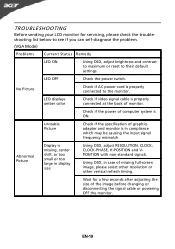
...-screen size image, please select other resolution or other vertical refresh timing. · Wait for servicing, please check the troubleshooting list below to see if you can self-diagnose the problem. (VGA Mode) Problems Current Status Remedy LED ON · Using OSD, adjust brightness and contrast to maximum or reset to the monitor...
User Manual - Page 21

LED displays amber color · Check if video signal cable is properly connected at the back of monitor. · Check if the power of computer system is properly connected to their default settings. LED OFF · ... cord is ON. EN-20 (DVI mode) Problems No Picture Current Status Remedy LED ON · Using OSD, adjust brightness and contrast to maximum or reset to the monitor.

Similar Questions

Ask a New Question
Use the box below to post a new question about this Acer product .
Points & Prizes
  • You can earn points for nearly everything you do on HelpOwl.com
  • You can trade in those points for gift cards at leading retailers such as Amazon.com and Walmart
  • It's that simple!
See How it Works
Create a Free Account

Acer Manuals

Find free Acer S202HL manuals and user guides available at ManualOwl.com. Try out our unique manual viewer allowing you to interact with manuals from directly within your browser!

Acer Reviews

View thousands of Acer user reviews and customer ratings available at ReviewOwl.com.

Contact Information

Complete Acer customer service contact information including steps to reach representatives, hours of operation, customer support links and more from ContactHelp.com.

Scoreboard Ratings

See detailed Acer customer service rankings, employee comments and much more from our sister site.

Acer Recalls

Find comprehensive Acer recall information updated hourly on RecallOwl.com.