
Acer S202HL Support Question
Acer S202HL Support Question
Find answers below for this question about Acer S202HL.Need a Acer S202HL manual? We have 2 online manuals for this item!
Question posted by Lee71834 on November 10th, 2011
Osd Buttons
I see the 5 buttons under the right side of the display.
Which button does what? I see no labels.
Current Answers
Related Acer S202HL Manual Pages
Quick Start Guide - Page 1
...and keep
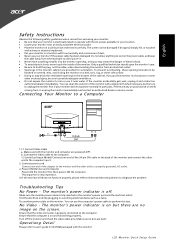
the cable away from it . · Never insert anything metallic into the monitor openings.
Ensure that the video connector is on and functioning properly. b. Connect power ...a qualified technician should not be sure to hold the plug, not the cable, when disconnecting the monitor from an electrical outlet. · Openings in CD-ROM packaged with a damp cloth when necessary, ...
Quick Start Guide - Page 2
...numérique de la classe B est conforme a la norme NMB-003 du Canada. LCD Monitor Quick Setup Guide
If this equipment.
Notice: Canadian users
This Class B digital apparatus complies with the...digital
device pursuant to Part 15 of conformity Hereby, Acer Inc., declares that this LCD monitor is likely to result in interference to radio and TV reception. Operation conditions
This device ...
Quick Start Guide - Page 3
For more information about where you purchased the product. LCD Monitor Quick Setup Guide Instead, it is your responsibility to dispose of your house hold waste disposal service or the shop where you can drop off ...
User Manual - Page 1
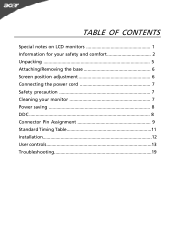
TABLE OF CONTENTS
Special notes on LCD monitors 1 Information for your safety and comfort 2 Unpacking 5 Attaching/Removing the base 6 Screen position adjustment 6 Connecting the power cord 7 Safety precaution 7 Cleaning your monitor 7 Power saving 8 DDC 8 Connector Pin Assignment 9 Standard Timing Table 11 Installation 12 User controls 13 Troubleshooting 19
User Manual - Page 2
... slightly uneven brightness on the screen depending on the desktop pattern you use . In this case, the screen is displayed for hours. SPECIAL NOTES ON LCD MONITORS
The following symptoms are normal with LCD monitor and do not indicate a problem.
Turn off the Power Switch for hours. NOTES
· Due to the nature...
User Manual - Page 7

... the tilt of your hands to 15 degrees up or 5 degrees down on a stable surface -- Attaching the Base
Note: Remove the monitor and monitor base from its packaging. Carefully place the monitor face-down as shown in the figure below .
55 155
EN-6 use a cloth to avoid scratching the screen.
1 Attach the the...
User Manual - Page 8
...-7
light or other heavy object, on the face of the monitor. Place the monitor just below guidelines when cleaning the monitor. · Always unplug the monitor before cleaning. · Use a soft cloth to the screen, as screen is adequate ventilation. · Avoid placing the monitor against a bright background or where sun-
No user-adjustment is...
User Manual - Page 9
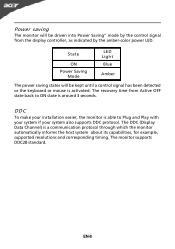
...seconds. EN-8 DDC
To make your system also supports DDC protocol. The recovery time from the display controller, as indicated by the amber-color power LED. State
ON Power Saving
Mode
LED Light ... a control signal has been detected or the keyboard or mouse is activated.
Power saving
The monitor will be driven into Power Saving" mode by the control signal from Active OFF state back ...
User Manual - Page 10
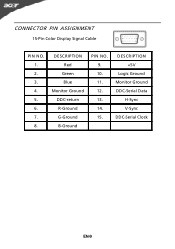
DESCRIPTION Red
Green Blue Monitor Ground DDC-return R-Ground G-Ground B-Ground
PIN NO. 9. 10. 11. 12. 13. 14. 15. DESCRIPTION +5V
Logic Ground Monitor Ground DDC-Serial Data
H-Sync V-Sync DDC-Serial Clock
EN-9
CONNECTOR PIN ASSIGNMENT
15-Pin Color Display Signal Cable
PIN NO. 1. 2. 3. 4. 5. 6. 7. 8.
User Manual - Page 13
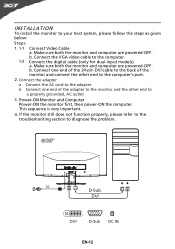
... the computer. This sequence is very important.
4. b. Cao. b Connect one end of the 24-pin DVI cable to the back of the adapter to the monitor and the other end to
a properly grounded, AC outlet .
3.
Mnnaekcet stuhreedbiogtithatlhceabmleo(noitnolyr afonrddcuoaml-pinupteurt amreodpeolws).ered-OFF. Connect the adapter
a Connect the AC cord to...
User Manual - Page 14
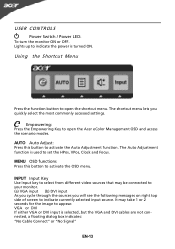
...button to open the shortcut menu. The shortcut menu lets you will see the following messages on right top side of screen to activate the OSD menu. Empowering: Press the Empowering Key to open the Acer eColor Management OSD... the power is turned ON. MENU OSD functions Press this button to set the HPos, VPos, Clock and Focus. It may be connected to your monitor. (a) VGA input (b) DVI input ...
User Manual - Page 15
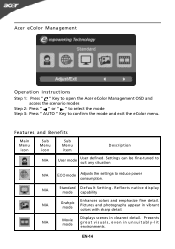
...eColor Management
Operation instructions
Step 1: Press " " Key to open the Acer eColor Management OSD and access the scenario modes
Step 2: Press " " or " " to select the...tive d isp lay mode capability
N/A
Grahpic mode
Enhances colors and emphasize fine detail. N/A
Movie mode
Displays scenes in unsuitably-lit environments. Features and Benefits
Main Menu icon
Sub Menu icon
Sub Menu item
...
User Manual - Page 16
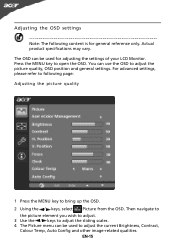
...content is for adjusting the settings of your LCD Monitor. You can be used for general reference only. Press the MENU key to adjust the picture quality, OSD position and general settings. Then navigate to
the picture...Config and other image-related qualities. EN-15 Adjusting the OSD settings
Note: The following page: Adjusting the picture quality
1 Press the MENU key to bring up the...
User Manual - Page 17
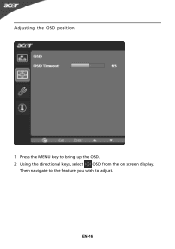
EN-16 Adjusting the OSD position
1 Press the MENU key to adjust.
Then navigate to the feature you wish to bring up the OSD. 2 Using the directional keys, select OSD from the on screen display.
User Manual - Page 18
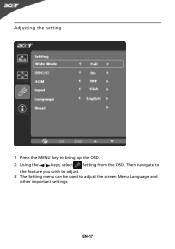
Then navigate to
the feature you wish to adjust. 3 The Setting menu can be used to bring up the OSD. 2 Using the / keys, select Setting from the OSD. Adjusting the setting
1 Press the MENU key to adjust the screen Menu Language and
other important settings.
EN-17
User Manual - Page 19
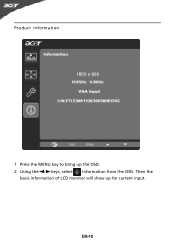
Then the
basic information of LCD monitor will show up the OSD. 2 Using the / keys, select Information from the OSD. Product information
1 Press the MENU key to bring up for current input. EN-18
User Manual - Page 20
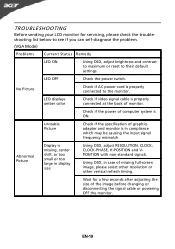
shift, or too
POSITION with non-standard signals. Unstable Picture
· Check if the specification of graphics adapter and monitor is
· Using OSD, adjust RESOLUTION, CLOCK,
missing, center
CLOCK-PHASE, H-POSITION and V-
Abnormal Picture
Display is in case of missing full-screen
size
image, please select other resolution or
other vertical refresh timing...
User Manual - Page 21
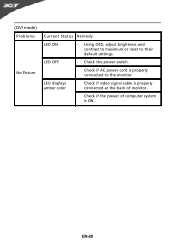
... Check if AC power cord is ON. EN-20
LED displays amber color
· Check if video signal cable is properly connected at the back of monitor.
· Check if the power of computer system is ...properly connected to their default settings. (DVI mode) Problems
No Picture
Current Status Remedy
LED ON
· Using OSD, adjust ...
User Manual - Page 22
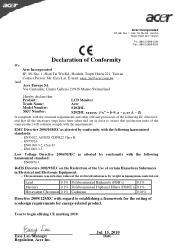
... Lai, E-mail: [email protected] And,
Acer Europe SA Via Cantonale, Centro Galleria 2 6928 Manno Switzerland
Hereby declare that:
Product:
LCD Monitor
Trade Name:
Acer
Model Number: SKU Number:
S202HL S202HL xxxxxx ("x" = 0~9, a ~ z, or A ~ Z)
Is compliant with the essential requirements and other relevant provisions of the following EC directives,
and that production units...
User Manual - Page 23
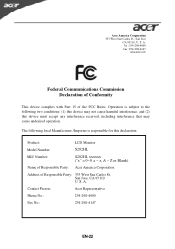
... following local Manufacturer /Importer is subject to the following two conditions: (1) this device may not cause harmful interference, and (2) this declaration:
Product:
LCD Monitor
Model Number:
S202HL
SKU Number:
S202HL xxxxxx ("x" = 0~9, a ~ z, A ~ Z or Blank)
Name of Responsible Party: Acer America Corporation
Address of the FCC Rules.
A. Tel : 254-298-4000 Fax : 254-298-4147...
Similar Questions


How Do I Adjust The Brightness Osd Button It Does Not Stay On Screen Long
(Posted by joyceann 10 years ago)