
Acer PD525 Support Question
Acer PD525 Support Question
Find answers below for this question about Acer PD525.Need a Acer PD525 manual? We have 3 online manuals for this item!
Current Answers
Answer #1: Posted by BusterDoogen on December 21st, 2016 5:49 PM
BusterDoogen

Member since:
October 30th, 2011 Points: 28,565,427

Member since:
October 30th, 2011 Points: 28,565,427
No fuse shown in the SM. Go to service mode by Pressing: "Power", "Left", "Left", "Menu" button when the Unit under search status. Go to page 64 for the reset info.
I hope this is helpful to you!
Please respond to my effort to provide you with the best possible solution by using the "Acceptable Solution" and/or the "Helpful" buttons when the answer has proven to be helpful. Please feel free to submit further info for your question, if a solution was not provided. I appreciate the opportunity to serve you!
Related Acer PD525 Manual Pages
PD525 Service Guide - Page 1

for more information,
please refer to http://csd.acer.com.tw
PRINTED IN TAIWAN PD525
Service Guide
Service guide files and updates are available on the AIPG/CSD web;
PD525 Service Guide - Page 2

Date
Chapter
Updates
II Revision History
Please refer to the table below for the updates made on PD525 service guide.
PD525 Service Guide - Page 12
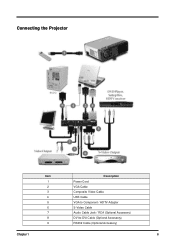
Connecting the Projector
Item 1 2 3 4 5 6 7 8 9
Description Power Cord VGA Cable Composite Video Cable USB Cable VGA to Component / HDTV Adapter S-Video Cable Audio Cable Jack / RCA (Optional Accessory) DVI to DVI Cable (Optional Accessory) RS232 Cable (Optional Accessory)
Chapter 1
6
PD525 Service Guide - Page 14

USB Cable
Chapter 2
USB Port
8 Connect USB of PC and USB port of PD525 projector. Equipment Needed
Item Software
Hardware
Description DLP Composer PD525 Firmware Power Cord USB Cable (P/N : 42.86006.001) PC or Laptop PD525 Projector
Setup Procedure
1.
Chapter 2
Firmware Upgrade
This chapter provides the equipment needed, setup and upgrading procedure for Firmware upgrade.
PD525 Service Guide - Page 18

....
2 1
3.
Type any key to turn on .
2. Execute the C:\Program files\DLP Composer\usbupdata.cmd. Chapter 2
12 Then wait about a minute. After linking the PC and PD525 projector with a USB cable, press and hold the menu button, then push the power button to continue. USB Driver Upgrade Procedure
1.
PD525 Service Guide - Page 23
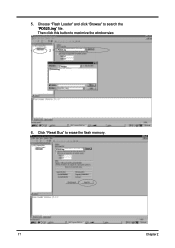
5. Choose "Flash Loader" and click "Browse" to erase the flash memory. PD525.ing
17
Chapter 2 Click "Reset Bus" to search the "PD525.ing" file. Then click this button to maximize the window size.
1
2
PD525.ing
PD525 PD525.ing
6.
PD525 Service Guide - Page 24

If the firmware is ready, then click "Start Download" to check the F/W version of PD525. Please to restart the unit and enter the service mode to process the firmware upgrade.
8. 7. Note
Note : Press the "Power" and "Left" and "Left" and "Menu" button to erase the flash memory.
10. Chapter 2
18 Click "Yes" to enter Service Mode.
After file was download.
PD525 Service Guide - Page 25

Equipment Needed
Item
Hardware
Description EDID Fixture (P/N : 80.00001.001) DFP to DVI Cable (P/N : 42.81702.001) RS-232 Cable (P/N : 42.55708.001) VGA Cable (P/N : 42.53001.051) Power Adapter (P/N : 47.53402.001) PC Power Cord PD525 Projector DDC Driver
19
Chapter 2
EDID Upgrade
This chapter provides the equipment needed, setup and upgrading procedure for EDID upgrade.
PD525 Service Guide - Page 26

...
P2 P4
marked as “Generic” JP3
Chapter 2
VGA port
20
Step3. Step2. Step4. Connect P2 or P4 of the fixture with COM1 of PD525 cable. Connect P1 of the fixture with VGA in port of PC/Laptop by RS232 cable. Plug Power Adapter to the fixture and connect the...
PD525 Service Guide - Page 29
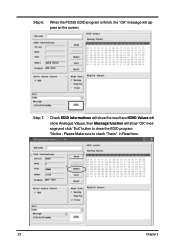
When the PD525 EDID program is finish, the "OK" message will show "OK" message and click "Exit" button to close the EDID program. *Notice : Please Make sure to check "Trans" in Read item.
1
2
4
3
23
Chapter 2 Step 6. Check EDID Informations will show the result and EDID Values will show Analogue Values, then Message function will appear on the screen. Step 7.
PD525 Service Guide - Page 30

... and signal cables from the electrical outlet. Chapter 3
Machine Disassembly and Replacement
This section provides disassembly procedures for PD525 Micro Portable XGA DMD Projector. Before you do the following precedures: 1. Moreover, when you disassemble the projector, be sure to their category.
Turn off the power, computer system, and other attached devices; then disconnect...
PD525 Service Guide - Page 50

... DVI Cable PC (Personal Computer) with analog and digital signal output DVD Player for Video Signal and Audio Signal PD525 Remote Control
45
Chapter 4 Audio Troubleshooting 6. Function Troubleshooting 5. Remote Control Troubleshooting
Equipment Needed
Item PD525 Projector VESA VGA Cable/VESA DVI to solve some complicated problems of component repairing and professional problems.
The...
PD525 Service Guide - Page 54
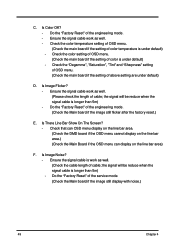
... cable is longer than 5m) - Do the "Factory Reset" of the engineering mode. (Check the Main board if the image still flicker after the factory reset.)
E. Ensure the signal cable is under default)
D. ...Check the cable length of above setting are under default) - Do the "Factory Reset" of the service mode. (Check the Main board if the image still display with noise.)
49
Chapter 4...
PD525 Service Guide - Page 57
... Mode & Pattern
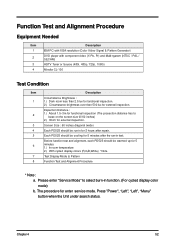
Function Test and Alignment Procedure
* Note : a. Before function test and alignment, each PD525 should be warmed up for 5 minutes after repair. Press "Power", "Left", "Left", "Menu" button...external inspection. Chapter 4
52 Screen Size : 60 inches diagonal (wide)
Each PD525 should be run-in for external inspection. Inspection Distance : 1.) About 1.5~3m for functional ...
PD525 Service Guide - Page 64

... settings and restore the original factory setting. Item
Keypad Function 1 (Including Remote
Control)
2 Factory Reset
3
R, G, B and white color contrast
4 Screen Uniformity
5 Dead Pixel (Bright pixel)
6...
No.
Please check and ensure the control function of "Service Mode", then ensure the reset function is under the
spec. (Cannot accept any bright pixel) - This action will allow...
PD525 Service Guide - Page 66

... access to order FRU parts for demonstration purpose, Acer Corporation does not provide these parts. Please be noted in Chapter 3 for repair and service of PD525. You MUST use the local FRU list provided by your regional Acer office on your regional Acer office to the website for RMA (Return Merchandise...
PD525 User's Guide - Page 2

... to maximize the life of your eyes. Do not look into the projector's lens when the lamp is in this happens, the projector will not turn back on until the lamp module has been replaced. .... To reduce the risk of the lamp itself. Warning- Please be sure to page 26). Reset the "Lamp Hour Reset" function from the On Screen Display "Management" menu after replacing the lamp module (refer to ...
PD525 User's Guide - Page 26

... OSD menu, the new setting will take effect.
4Acer : The default start-up screen of Acer projector. 4User : The user customized start -up Screen utility (refer to 0 hours. Lamp Reminding
Choose ..."Source" button on remote control for other signals if the current input signal is lost. Lamp Hour Reset
Press the button after choosing "Yes "to turn the lamp hour counter to the description of life...
PD525 User's Guide - Page 27

.... When "Temp" and "Lamp" LEDs turn off the projector. 3. User Controls
Management (Computer / Video Mode)
My Start Screen Acer My Start-up Screen is blinking. 4. You can install My Start-up Screen from your projector. Press and hold "Menu/Enter" button then press " " button. 5. Reset
Press the button after choosing "Yes" to return...
PD525 User's Guide - Page 28
... Main group. 2. Appendices
English ... 28
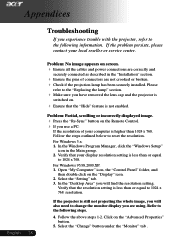
Troubleshooting
If you experience trouble with the projector, refer to the following steps. 4.
Please
refer to the "Replacing the lamp" section.
4 Make...have removed the lens cap and the projector is less than or equal
to change the monitor display you will also need to 1024 x 768. If the projector is not enabled.
For Windows 3.x: ...
Similar Questions

Parts Number For Acer Pd525. Elevator Module, Elevator Base Holder, Etc.
(Posted by fllorach 8 years ago)

I Would Like To Know How To Reset My Acer Pd525d Projector To Factory Settings
(Posted by nicov 10 years ago)

How To Reset Password On Acer P3250 Projector Security Card
(Posted by steveBitl 10 years ago)

How Can I Access The Power Fuse For My Acer Projector X1161p. It Shows No Light
we were using the acer x1161p lcd projector for the second time when it suddenly went dead. it shows...
we were using the acer x1161p lcd projector for the second time when it suddenly went dead. it shows...
(Posted by sky25240 11 years ago)

Wrong Colors On Pd525
colors are ok on vga monitor - when projector is plugged in from same cable the colors are incomple...
colors are ok on vga monitor - when projector is plugged in from same cable the colors are incomple...
(Posted by sospooky04 12 years ago)