
Acer M220HQMF Support Question
Acer M220HQMF Support Question
Find answers below for this question about Acer M220HQMF.Need a Acer M220HQMF manual? We have 1 online manual for this item!
Question posted by eakissiedu on July 24th, 2011
I Cant Get The Sound For My Acer M220hqmf When In Tv Mode
Current Answers
Answer #1: Posted by ehjohnson7 on July 24th, 2011 2:04 AM

Member since:
July 17th, 2011 Points: 294,933

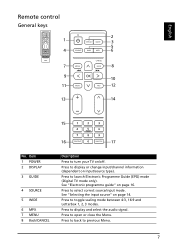
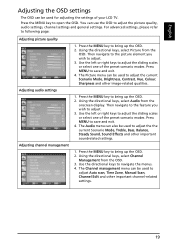
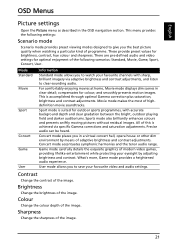
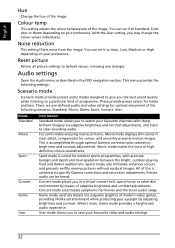
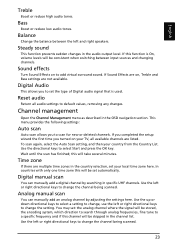
1. Press the MENU key to bring up the OSD.2. Using the directional keys, select Audio from the onscreen display. Then navigate to the feature you wish to adjust.3. Use the left or right keys to adjust the sliding scales or select one of the preset scenario modes. Press MENU to save and exit.4. The Audio menu can also be used to adjust the the current Scenario Mode, Treble, Bass, Balance, Steady Sound, Sound Effects and other important soundrelated settings. then if you still cannot get sound http://acer.custhelp.com/app/chat/chat_launch/session/L3NpZC9EQm1Td016aw%3D%3D Available daily: 5AM to 2AM CST
Answer #2: Posted by ehjohnson7 on July 24th, 2011 2:05 AM
Member since:
July 17th, 2011 Points: 294,933
1. Press the MENU key to bring up the OSD.2. Using the directional keys, select Audio from the onscreen display. Then navigate to the feature you wish to adjust.3. Use the left or right keys to adjust the sliding scales or select one of the preset scenario modes. Press MENU to save and exit.4. The Audio menu can also be used to adjust the the current Scenario Mode, Treble, Bass, Balance, Steady Sound, Sound Effects and other important soundrelated settings. then if you still cannot get sound http://acer.custhelp.com/app/chat/chat_launch/session/L3NpZC9EQm1Td016aw%3D%3D Available daily: 5AM to 2AM CST
Answer #3: Posted by ehjohnson7 on July 24th, 2011 2:06 AM
Member since:
July 17th, 2011 Points: 294,933
1. Press the MENU key to bring up the OSD.2. Using the directional keys, select Audio from the onscreen display. Then navigate to the feature you wish to adjust.3. Use the left or right keys to adjust the sliding scales or select one of the preset scenario modes. Press MENU to save and exit.4. The Audio menu can also be used to adjust the the current Scenario Mode, Treble, Bass, Balance, Steady Sound, Sound Effects and other important soundrelated settings. then if you still cannot get sound http://acer.custhelp.com/app/chat/chat_launch/session/L3NpZC9EQm1Td016aw%3D%3D Available daily: 5AM to 2AM CST
Related Acer M220HQMF Manual Pages

Similar Questions

There is an annoying fringe, coming every time either from the top either from the bottom, and we do...


I bought an ACER M220HQMF today. The picture is worse than on my 15 years old monitor. In the menu I...

I am in Pakistan and have an acer LCD tv whom remote is not working. kindly intimate me from where i...

I am in dubai UAE we have acer lcd tv AV PIN problemwe need sparts part no-AV PIN -EVMO3070176040057...