
Acer Aspire M3910 Support Question
Acer Aspire M3910 Support Question
Find answers below for this question about Acer Aspire M3910.Need a Acer Aspire M3910 manual? We have 2 online manuals for this item!
Question posted by rabee21 on March 10th, 2012
Remove Expansion Slot
trying to install wireless express adapor but cannot remove the expansion slot
Current Answers
Related Acer Aspire M3910 Manual Pages
Acer Desktop User's Guide - Page 3
.... iii
Information for cleaning. Turning the product off before cleaning
Unplug this product through cabinet slots as possible. Do not use this product near or over a radiator or heat register, or...of the product and to the power supply unit: Install the power supply unit before cleaning. Unplug the power cord before removing the power supply unit from the power supplies. ...
Acer Desktop User's Guide - Page 5
... personnel when:
• the power cord or plug is incorrectly replaced.
Telephone line safety • Disconnect all servicing to this product yourself, as opening or removing covers may expose you need
for purchase options. For safety reasons, do not connect
the telephone line to qualified service personnel. Additional safety information
Your...
Acer Desktop User's Guide - Page 7
.... The following symptoms may appear in one fixed posture • avoid slouching forward and/or leaning backward • stand up and walk around regularly to remove the strain on your leg
muscles
• take short rests to relax your neck and shoulders • avoid tensing your muscles or shrugging your shoulders...
Acer Desktop User's Guide - Page 13
... navigation interface (selected models only) RCA jack (selected models only) PS/2 keyboard connector
IEEE 1394/FireWire jack (selected models only)
Backup button (selected models only)
Removable hard drivecarriers (selected models only)
S/PDIF port (selected models only)
PS/2 mouse connector
VGA port
Printer connector (selected models only) Microphone-in jack
Serial port...
Acer Desktop User's Guide - Page 16
... can expand your AcerSystem system quickly and easily by adding components.
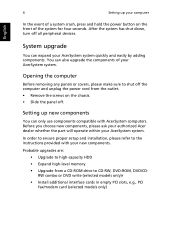
Opening the computer
Before removing any panels or covers, please make sure to shut off the computer and unplug the ...DVD-ROM, DVD/CDRW combo or DVD write (selected models only)r • Install additional interface cards in empty PCI slots, e.g., PCI fax/modem card (selected models only)
System upgrade
You can also ...
Acer Desktop User's Guide - Page 17
... your dealer or the technical support center for assistance.
If pressing a key does not work .
A: Check the LED located above the power switch. If yes,
remove or replace it is plugged in the floppy drive? Q: The printer does not work , you created during the use of the
computer is followed by...
Service Guide - Page 1
Acer Aspire M3910(G) Service Guide
PRINTED IN TAIWAN
Service Guide - Page 7
... Removing the Side Panel Removing the Heat Sink Fan Assembly Removing the Processor Removing the VGA Card Removing the TV Card Removing the Mode Card Removing the Hard Disk Drive Removing the Front Bezel Removing the Optical Drive Removing the Rear USB Board Removing the Cables Removing the System FAN Removing the Power Supply Removing the Memory Modules Removing the removable HDD bay Removing...
Service Guide - Page 9

...
•
Super I/O: ITE8720
• •
PCB
•
uATX / 244*244mm / 4 Layers
Memory subsystem
•
Socket Type: DDR III connector
• • •
Socket Quantity: 4 Channel A: slot 0, 1; Chapter 1
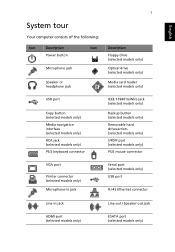
System Tour
Features
Below is a brief summary of the system depends on the model purchased.
The exact configuration of the computer's many feature: NOTE...
Service Guide - Page 10

...
Graphics card
•
No mechanical retriction to support for double slot, full length graphics cards in the single PSIe X16 slot
On-Board Graphic solution
•
Intel HD Graphics (Clarkdale series...VGA port on rear 1 HDMI port on rear Dual View function support
Serial ATA controller
• •
Slot Type: SATA connector Six SATA ports:
• •
4 for HDD 2 for ODD 1.HDD : ...
Service Guide - Page 11
... 4 ports for front daughter board Connector Pin: standard Intel FPIO pin definition
•
Data transfer rate support: USB 2.0/1.1
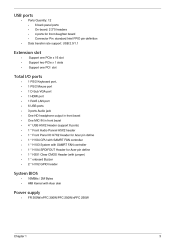
Extension slot
• • •
Support one PCIe x 16 slot Support two PCIe x 1 slots Support one PCI slot
Total I/O ports
1 PS/2 Keyboard port, 1 PS/2 Mouse port 1 D-Sub VGA port 1 HDMI port 1 RJ45 LAN port 6 USB ports...
Service Guide - Page 14
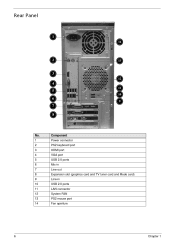
Rear Panel
1
14
2
13
3
12
4
11
5
10
6 7 8
9
No. 1 2 3 4 5 6 7 8 9 10 11 12 13 14
Component Power connector PS2 keyboard port HDMI port VGA port USB 2.0 ports Mic-in Line-out Expansion slot (graphics card and TV tuner card and Mode card) Line-in USB 2.0 ports LAN connector System FAN PS2 mouse port Fan aperture
6
Chapter 1
Service Guide - Page 36
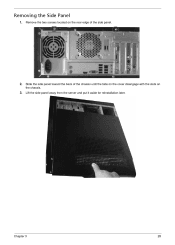
Chapter 3
28
Remove the two screws located on the rear edge of the chassis until the tabs on the cover disengage with the slots on the chassis. Lift the side panel away from the server and put it aside for reinstallation later. Slide the side panel toward the back of the side panel.
2. 3. Removing the Side Panel
1.
Service Guide - Page 39
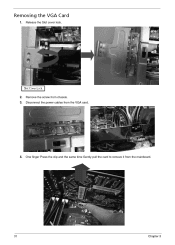
Release the Slot cover lock.
2. 3. Remove the screw from the VGA card.
4. Disconnect the power cables from chassis. One finger Press the clip and the same time Gently pull the card to remove it from the mainboard.
31
Chapter 3 Removing the VGA Card
1.
Service Guide - Page 46
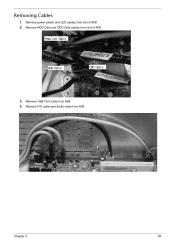
Remove power switch and LED cables from slot of M/B. Pow e- Remove USB1/2/3 cable from slot of M/B Remove HDD Data and ODD Data cables from M/B. Led Cabl e
HDD Cabl e
O DD Cabl e
3. 4. Removing Cables
1. 2.
Remove FIO cable and Audio cable from M/B
Chapter 3
38
Service Guide - Page 49
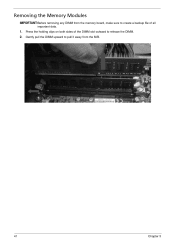
Removing the Memory Modules
IMPORTANT:Before removing any DIMM from the M/B.
41
Chapter 3 Press the holding clips on both sides of the DIMM slot outward to create a backup file of all important data. 1. 2. Gently pull the DIMM upward to pull it away from the memory board, make sure to release the DIMM.
Service Guide - Page 68
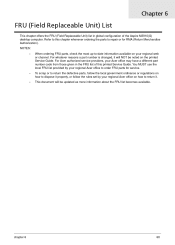
... repair or for service. Chapter 6
FRU (Field Replaceable Unit) List
This chapter offers the FRU (Field Replaceable Unit) list in the FRU list of the Aspire M3910(G) desktop computer.
Service Guide - Page 69
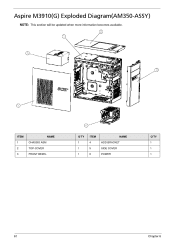
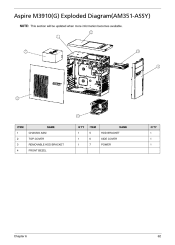
ITEM 1 2 3 CHASSIS ASM TOP-COVER FRONT BEZEL
NAME
Q'TY 1 1 1
ITEM 4 5 6
NAME HDD BRACKET SIDE COVER POWER
Q'TY 1 1 1
61
Chapter 6 Aspire M3910(G) Exploded Diagram(AM350-ASSY)
NOTE: This section will be updated when more information becomes available.
Service Guide - Page 70
ITEM 1 2 3 4 CHASSIS ASM TOP-COVER
NAME
Q'TY 1 1 1
ITEM 5 6 7
NAME HDD BRACKET SIDE COVER POWER
Q'TY 1 1 1
REMOVABLE HDD BRACKET FRONT BEZEL
Chapter 6
62 Aspire M3910(G) Exploded Diagram(AM351-ASSY)
NOTE: This section will be updated when more information becomes available.
Service Guide - Page 71
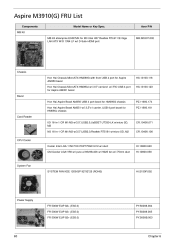
Aspire M3910(G) FRU List
Components MB Kit MB Kit aSampras EIH57MK for HM090J chassis Card Reader IOI 16-in... Chassis MicroATX HM090G with front USB 4 port for Aspire AM350 bezel Hon Hai Chassis MicroATX HM090J w/i 3.5" carrierx1 w/i FIO USB 4 port for Aspire AM351 bezel Bezel Hon Hai Aspire Bezel AM350 USB 4 port bezel for HM090G chassis Hon Hai Aspire Bezel AM351 w/i 3,5"x1 carrier ,USB 4 port ...
Similar Questions

How To Disable The Function Of Sata Pc Model Aspire M3910
(Posted by mgolikm 9 years ago)

Hello,aspire M3910 (mobo: H57h-am2 V:2.0) Will Geforce Gtx 750 Ti 2gb Work On It
(Posted by ussr80 9 years ago)


M3910 Doesnot Shut Down Or Uses Screen Saver Any More Just Keeps Showing Fulls
(Posted by ericjoyingman 10 years ago)