Acer A231HL Support Question
Acer A231HL Support Question
Find answers below for this question about Acer A231HL.Need a Acer A231HL manual? We have 2 online manuals for this item!
Question posted by ftn807 on October 8th, 2012
Acer A231hl Screen Displayed Image Has 1' Border Between Displayed Image & Edge.
I went through the user manual and I do not have "H position" nor "V position". I have tried all other options and nothing affected size of image on screen.
Current Answers
Answer #1: Posted by oxycodon on November 24th, 2013 12:11 PM
oxycodon

Member since:
November 24th, 2013 Points: 10
Member since:
November 24th, 2013 Points: 10
I had the same problem with a black 1 inch border, the problem is not with the monitor but your grafix card. Mine is an AMD, you must use Amd catalyst control prg. Go into my digital flat panel, then into scaling options, then slide the scale from 10% to 0% overscan and apply. Aparently the AMD grafix cards default to 10% overscan thus the black border. If you dont have Amd catalyst control, you can download it from many places. This should solve your problem.
Related Acer A231HL Manual Pages
Quick Start Guide - Page 1

... electrical outlet. • Openings in the bottom of the monitor. b. Connect the Audio Cable(Only Audio-Input Model)(Optional)
3. Troubleshooting Tips
No Power - Test the electrical oulet by plugging in the monitor's power port and the electrical outlet.
Make sure no image on the monitor.
The screen can be sure to provide adequate ventilation. • Do...
Quick Start Guide - Page 2

... of Conformity
Hereby, Acer Inc., declares that protects...the European Union
This symbol on the product or on , the user is encouraged to try to correct the interference by handing it is connected.
•... EMC regulations. Operation is likely to result in a residential installation.
LCD Monitor Quick Setup Guide
English
Regulations and safety notices
FCC notice
This device has ...
User Manual - Page 1

TABLE OF CONTENTS
Special notes on LCD monitors 1 Information for your safety and comfort 2 Unpacking 5 Attaching/Removing the base 6 Screen position adjustment 6 Connecting the power cord 7 Safety precaution 7 Cleaning your monitor 7 Power saving 8 DDC 8 Connector Pin Assignment 9 Standard Timing Table 11 Installation 12 User controls 13 Troubleshooting 19
User Manual - Page 2

... may remain after switching the image, when the same image is recovered slowly by changing the image or turning off the Power Switch and then turn it on again to the nature of the LCD screen, an afterimage of 99.99% or more. EN-1 SPECIAL NOTES ON LCD MONITORS
The following symptoms are normal with...
User Manual - Page 4

... recurring or persistent discomfort and/or pain
related to computer use .
Users are covered by adjusting the viewing angle of the monitor, using a footrest,
or raising your leg muscles
EN-3 The following...backward
•
stand up and walk around regularly to remove the strain on the recorded image and does not constitute a malfunction. This has no effect on your sitting height to...
User Manual - Page 5

...display, keyboard and mouse properly and within comfort
able reach
•
if you view your monitor more than the top edge of the display so your eyes
point downward when looking away from drying out. Display
•
Keep your display...acer-group.com/public/Sustainability/sustainability01.htm
http://www.acer...screens, very small typefaces and low-contrast displays could
stress your display...
User Manual - Page 7

... adjust the tilt of the monitor as shown in the figure below . SCREEN POSITION ADJUSTMENT
In oder to optimize the best viewing position, you can be adjusted to hold the edges of the monitor by arrow below . EN-6 Carefully place the monitor face-down as indicated first before removing the base and follow the arrow direction to...
User Manual - Page 8
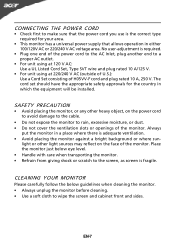
... or openings of the monitor. Place the monitor just below guidelines when cleaning the monitor. • Always unplug the monitor before cleaning. • Use a soft cloth to the screen, as screen is fragile.
Always
put the monitor in a place where ...V AC (outside of U.S.): Use a Cord Set consisting of the monitor. No user-adjustment is adequate ventilation. • Avoid placing the...
User Manual - Page 9

... host system about its capabilities, for example, supported resolutions and corresponding timing.
The monitor supports DDC2B standard. EN-8 DDC
To make your system also supports DDC protocol. The DDC (Display Data Channel) is activated. The recovery time from the display controller, as indicated by the control signal from Active OFF state back to...
User Manual - Page 10
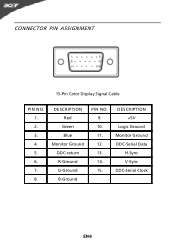
DESCRIPTION Red
Green Blue Monitor Ground DDC-return R-Ground G-Ground B-Ground
PIN NO. 9. 10. 11. 12. 13. 14. 15.
DESCRIPTION +5V
Logic Ground Monitor Ground DDC-Serial Data
H-Sync V-Sync DDC-Serial Clock
EN-9 CONNECTOR PIN ASSIGNMENT
15-Pin Color Display Signal Cable
PIN NO. 1. 2. 3. 4. 5. 6. 7. 8.
User Manual - Page 11

...TMDS Data 0/5 Shield
NC NC TMDS Clock Shield TMDS Clock+ DDC TMDS Clock-
19-Pin color display signal cable*
PIN
Meaning
PIN
1.
TMDS Data2-
12.
4. TMDS Data1+
13.
5.
TMDS ... Shield
15.
4. TMDS Data1-
21.
10.
CEC
Reserved (N.C. TMDS Data1+
22.
11. 24-Pin Color Display Signal Cable*
PIN
Meaning
PIN
1. TMDS Data2-
13.
2.
NC
17.
6.
DDC Data
19.
8.
TMDS Data...
User Manual - Page 14

...scre en to open the Acer eColor Management OSD and access the scenario modes. USER CONTROLS
Power Switch / Power LED: To turn the monitor ON or OFF. Empowering:... Press the Empowering Key to ap pear. The Auto Adjustment function is turned ON. Volume Up / Down Press to adjust volume (Only Audio-Input Model)(Optional...
User Manual - Page 15

...
Operation instructions
Step 1: Press " " Key to open the Acer eColor Management OSD and access the scenario modes
Step 2: Press " " or " " to select the mode Step 3: Press " AUTO " Key to reduce power consumption.
N/A
Movie mode
Displays scenes in vibrant colors with sharp detail. EN-14 Settings can be fine-tuned to suit any...
User Manual - Page 16

... quality, OSD position and general settings. The OSD can use the OSD to adjust the current Brightness, Contrast,
Colour Temp, Auto Config and other image-related qualities. ...Pressthe MENU key to bring up the OSD. 2 Using the / keys, select Picture from the OSD. For advanced settings, please refer to following content is for adjusting the settings of your LCD Monitor...
User Manual - Page 17

Adjusting the OSD position
1 Press the MENU key to adjust. Then navigate to the feature you wish to bring up the OSD. 2 Using the directional keys, select OSD from the on screen display. EN-16
User Manual - Page 18

Adjusting the setting
1 Press the MENU key to adjust the screen Menu Language and
other important settings. Then navigate to
the feature you wish to adjust. 3 The Setting menu can be used to bring up the OSD. 2 Using the / keys, select Setting from the OSD. EN-17
User Manual - Page 20

...small or too
large in display · Using OSD, in case of missing full-screen
size
image, please select other resolution or...position and try to the monitor. TROUBLESHOOTING
Before sending your LCD monitor for a few seconds after adjusting the size of the image before changing or disconnecting the signal cable or powering OFF the monitor.
Abnormal Sound (Only AudioInput model) (Optional...
User Manual - Page 21
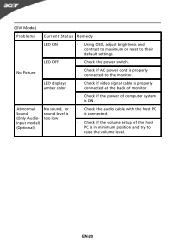
... OSD, adjust brightness and contrast to maximum or reset to the monitor. LED displays amber color
· Check if video signal cable is properly connected at the back of monitor.
· Check if the power of the host PC is in minimum position and try to raise the volume level. No Picture
· Check if...
User Manual - Page 22

... certain Hazardous Substances in force to assure that : Product: Trade Name: Model Number:
SKU Number:
LCD Monitor Acer $23H/ $23H/xxxxxx("x" = 0~9, a ~ z, or A ~ Z)
Is compliant with the following ...Cadmium
0.01%
Directive 2009/125/EC with the requirements. Easy Lai /Manager Regulation, Acer Inc. it
Hereby declare that production units of the following harmonized standard:
-. EMC ...
User Manual - Page 23

...subject to the following two conditions: (1) this device may cause undesired operation. Contact Person:
Acer Representative
Phone No.:
254-298-4000
Fax No.:
254-298-4147
Federal Communications Commission Declaration of... (2) this declaration:
Product:
LCD Monitor
Trade Name: Acer
Model Number: A231HL
SKU Number: A231HLxxxxxx ("x" = 0~9, a ~ z, A ~ Z or Blank)
Name of Responsible...
Similar Questions

My Acer Da220hql Smart Display Is Stuck On The Acer Start Up Screen.
I cant do anything cause it wont finish loading it just stays on that screen. I have unplugged it bu...
I cant do anything cause it wont finish loading it just stays on that screen. I have unplugged it bu...
(Posted by pmf219598 8 years ago)

How Do I Connect A Wireless Mouse To An Acer Da220hql Smart Display
(Posted by locosa 9 years ago)

I Had Bought My Acer Da220hql Smart Display. For Got Password
I had bought my acer DA220HQL Smart Display. And all was good, at some point I created a password. U...
I had bought my acer DA220HQL Smart Display. And all was good, at some point I created a password. U...
(Posted by Weswho 10 years ago)

Acer P166hql No Display When Installing Windows Xp, But With 7 No Problem, Why?
input not supported in DOS mode
input not supported in DOS mode
(Posted by aris212 12 years ago)

My Acerx173 Powers On ,but After Acer Logo It Displays Abnormal Coulous.
it slowly blinks with different colours does it power supply problem or disply problem?
it slowly blinks with different colours does it power supply problem or disply problem?
(Posted by taxi 12 years ago)