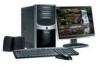
8512161 - eMachines Desktop Hardware Reference Guide
Page 6
Contents Recovering pre-installed software and drivers 95 Using Microsoft System Restore 99 Recovering your system to its factory condition . . . . 102 Recovering your system using the Windows DVD . . . 103 Telephone support 104 Before calling Customer Care 104 eMachines contact information 105 Self-help 106 Appendix A: Legal Notices 107 Index 117 iv
8512161 - eMachines Desktop Hardware Reference Guide
Page 23
... computer into Sleep mode is much faster than turning on the power button flashes. Waking your computer after it does turn off . 17 www.emachines.com 5 To open your computer, certain components in the power supply and system board remain energized. Turning off your computer Warning When you have...For more information on the keyboard, or press the power button to remove all electrical power from your desktop layout so the next time you restore power, the programs are laid out just as you can run programs and search for about changing the power button mode, see "Using Windows...
8512161 - eMachines Desktop Hardware Reference Guide
Page 36
... the volume, click Start, then click Help and Support. Tip Adjust the Windows Sounds slider to decrease volume. 3 To mute the volume, click (Mute). To restore volume, click it .
8512161 - eMachines Desktop Hardware Reference Guide
Page 55
... the heat sink and processor: 1 Remove the side panel by following the instructions in "Removing the side panel" on page 35. 2 For more information on restoring your system, see "Recovering your system" on page 94. If you are replacing a drive, use your notes from Step 2. 11 Replace the side panel by... more stability, place your computer on its side. Replacing the heat sink and processor Tools You need a Phillips screwdriver to replace the heat sink. www.emachines.com 8 Line up the tabs on the right side of the cage with your computer.
8512161 - eMachines Desktop Hardware Reference Guide
Page 60
.... The battery pops out of the socket. 9 Make sure that the positive (+) side of the BIOS Setup utility opens. 14 In the BIOS Setup utility, restore any settings that the battery type and model number are etched into), then press the battery into the socket until it snaps into place. 10...
8512161 - eMachines Desktop Hardware Reference Guide
Page 85
www.emachines.com Your Ethernet network is running at the slowest component speed. For more information about restoring deleted files, click Start, then click Help and Support. You need to restore your computer to restore a file, the file cannot be standard Ethernet (10 Mbps), Fast Ethernet (100 Mbps ...100/1000 Mbps). Expansion cards The computer does not recognize an expansion card • Shut down the SHIFT key, the file cannot be restored. To restore deleted files: 1 Double-click the Recycle Bin icon. 2 Right-click the file you have installed the required software. A file was ...
8512161 - eMachines Desktop Hardware Reference Guide
Page 100
... about sound troubleshooting, click Start, then click Help and Support. Type the phrase sound troubleshooter in the technical support pages at www.emachines.com. For instructions, see "Adjusting the volume" on page 29. • Make sure that the universal jacks are configured correctly.... system recovery options, you should create a set of the computer's software (also called recovering or restoring your computer for software and device driver recovery" on page 31. eMachines provides everything you are using external speakers: • Make sure that the volume controls are turned up...
8512161 - eMachines Desktop Hardware Reference Guide
Page 101
...103. • To re-install your pre-installed software and device drivers using recovery discs, see "Recovering pre-installed software and drivers using eMachines Recovery Center. 95 For instructions on reinstalling software and drivers that were not pre-installed, see "Recovering pre-installed software and drivers" on... at the factory. To recover software and drivers that did not come pre-installed on page 95. For instructions, see "Using Microsoft System Restore" on page 99. • If nothing else has solved the problem and you want to return your system to factory condition, see ...
8512161 - eMachines Desktop Hardware Reference Guide
Page 105
..." on page 101. Help For more information about using Microsoft System Restore: 1 Click (Start), Control Panel, System and Maintenance, then click Backup and Restore Center. www.emachines.com Using Microsoft System Restore Microsoft System Restore periodically takes "snapshots" of your system running again. In most cases of hard-to-resolve software problems, you install software...
8512161 - eMachines Desktop Hardware Reference Guide
Page 106
A confirmation message box appears. 4 Click Yes. Your system is restored using System Restore, then click Next. The Choose a restore point dialog box opens. 3 Click the restore point you specified. This process may take several minutes, and may restart your computer. 100 Chapter 6: Troubleshooting 2 On the left side of the window, click Repair Windows using the restore point you want, click Next, then click Finish.
8512161 - eMachines Desktop Hardware Reference Guide
Page 107
The Backup and Restore Center opens. 2 On the left side of the window, click Create a restore point or change settings, then click Next. The restore point is created. 5 Click OK. 101 The System Properties dialog box opens to the System Protection tab. 3 Click Create. The Create a restore point dialog box opens. 4 Type a description for the restore point (such as the date and time), then click Create. www.emachines.com Manually creating a restore point To manually create a restore point: 1 Click (Start), Control Panel, System and Maintenance, then click Backup and Restore Center.
8512161 - eMachines Desktop Hardware Reference Guide
Page 108
... on your hard drive, back them up , repeatedly press F8 until the Recovery Options screen opens. b Click Recovery, then click Next. eMachines System Recovery starts, and the System Recovery Options dialog box opens. 4 Select a language and keyboard layout, then click Next. 5 Click the... then click eMachines Recovery Center. If Windows starts to load instead, restart the computer and try again. 3 Press the arrow keys on your hard drive, then reinstalls Windows and any pre-installed software and device drivers. The System Recovery Options menu opens. 6 Click Restore Application. Your...
8512161 - eMachines Desktop Hardware Reference Guide
Page 128
... port 9 setting default 92 troubleshooting 92 USB port 7, 9 programs closing unresponsive 19 opening 23 recovery discs 96, 98 re-installing 95 PS/2 port keyboard 8 mouse 9 R RAM See memory rebooting computer 19 recordable drive 7 recording audio files 27 optical discs 27 recovering defaults 102 drivers 95 programs 95 software 95 system 94...
8512161 - eMachines Desktop Hardware Reference Guide
Page 129
...95 programs 94, 95 software 94, 95 Windows 94, 95 with eMachines Recovery Center 97 with Windows DVD 103 with Windows System Restore 99 removing files and folders 65 resetting computer 19 restarting computer 19 restoring defaults 102 drivers 95 files from Recycle Bin 79 programs 95 software 95... system 94 Windows 95 with eMachines Recovery Center 97 with Windows DVD 103 with Windows System Restore 99 Resume mode 7 right-clicking 23 S safety avoiding repetitive strain 14 general precautions 108 guidelines for troubleshooting 74 ...
8512161 - eMachines Desktop Hardware Reference Guide
Page 131
www.emachines.com Windows key 21 Windows Media Center troubleshooting 83 Windows System Restore 95 creating restore point 101 Windows Update 62 wired Ethernet troubleshooting 78 working safely 12 X xD 28 Z Zip drive 68 125
8512780 - eMachines Desktop PC User Guide
Page 15
Clicking the maximize button again restores the window to its own menus, icons, and controls. Clicking an item on the taskbar. Clicking the minimize button reduces the active window to fit ... windows include these items: Window item Description The title bar is the horizontal bar at the top of a window that shows the window title. www.emachines.com Every program window looks a little different because each has its former size.
8512780 - eMachines Desktop PC User Guide
Page 18
... the Windows trash can is removed from the file cabinet and put them to select multiple files and folders, see "Shortcuts" on page 17. 3 Click Restore. Windows returns the deleted files or folders to the Recycle Bin. The file or folder you throw away files and folders by first moving them... Bin as long as the bin has not been emptied. Eventually the trash can , called the Recycle Bin, where they remain until you want to restore. For instructions on how to delete, see "Shortcuts" on page 17. To recover files or folders from the Recycle Bin: 1 Double-click the Recycle Bin...
8512780 - eMachines Desktop PC User Guide
Page 19
... Recycle Bin window opens. 2 Click Empty the Recycle Bin. Windows permanently deletes all of the file and folder names containing the letters you can be restored. 1 Double-click the Recycle Bin icon on your computer by file or folder name, type in all or part of the file or folder name... and folders of that you want to empty the bin. 3 Click Yes. Files and folders found using the Search: 1 Click (Start), then click Search. www.emachines.com To empty the Recycle Bin: Caution Emptying the Recycle Bin permanently erases any files or folders in the Search Help box, then press ENTER...
8512780 - eMachines Desktop PC User Guide
Page 93
www.emachines.com starting 60 updating 60 O online help 2, 3 opening documents 16 files 7 files across network 54 folders 10 programs 7 optical disc creating data 39 playing 31 ... and folders 12 remote control Windows Media Center 42 removing files and folders 6, 12, 13, 17 renaming files and folders 17 resolution changing screen 66 restoring files and folders 12 router configuring 50 example network 44 setting up 46, 47 using 44 S saving documents 15 scheduling computer use 80 screen adjusting...
8512795 - eMachines Starter Guide
Page 1
Starter Guide for your eMachines computer Look inside for helpful hints on: • Using Windows • Using multimedia • Protecting your computer • Restoring your computer