
User Guide
Page 4
... your computer 41 Cleaning the exterior 41 Cleaning the keyboard 42 Cleaning the computer display 42 Cleaning the mouse 42 Cleaning CDs or DVDs 44 Restoring your system 44 Preventing static electricity discharge 45 Opening the case 46 Removing the side panel 46 Removing the front bezel 47 Closing the case... DVD drives 57 Computer 59 Diskette drive 59 DVD drives 60 File management 60 Hard drive 61 Internet 62 Keyboard 63 Memory 64 ii www.eMachines.com
... your computer 41 Cleaning the exterior 41 Cleaning the keyboard 42 Cleaning the computer display 42 Cleaning the mouse 42 Cleaning CDs or DVDs 44 Restoring your system 44 Preventing static electricity discharge 45 Opening the case 46 Removing the side panel 46 Removing the front bezel 47 Closing the case... DVD drives 57 Computer 59 Diskette drive 59 DVD drives 60 File management 60 Hard drive 61 Internet 62 Keyboard 63 Memory 64 ii www.eMachines.com
User Guide
Page 27
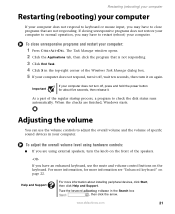
... speakers, turn it . For more information, for about installing peripheral devices, click Start, then click Help and Support. If closing unresponsive programs does not restore your computer does not respond, turn it off , press and hold the power button for more information about five seconds, then release it on page... 22. The Task Manager window opens. 2 Click the Applications tab, then click the program that are finished, Windows starts. www.eMachines.com 21 Type the keyword adjusting volume in your computer. When the checks are not responding.
... speakers, turn it . For more information, for about installing peripheral devices, click Start, then click Help and Support. If closing unresponsive programs does not restore your computer does not respond, turn it off , press and hold the power button for more information about five seconds, then release it on page... 22. The Task Manager window opens. 2 Click the Applications tab, then click the program that are finished, Windows starts. www.eMachines.com 21 Type the keyword adjusting volume in your computer. When the checks are not responding.
User Guide
Page 43
Chapter 5 Maintaining Your Computer • Caring for your computer • Updating Windows • Protecting your computer from viruses • Cleaning your computer • Restoring your system • Opening the computer case • Adding memory and replacing the battery 37
Chapter 5 Maintaining Your Computer • Caring for your computer • Updating Windows • Protecting your computer from viruses • Cleaning your computer • Restoring your system • Opening the computer case • Adding memory and replacing the battery 37
User Guide
Page 50
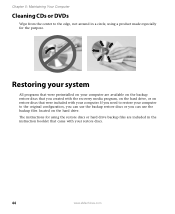
... that came with your computer are included in a circle, using a product made especially for using the restore discs or hard drive backup files are available on the backup restore discs that you can use the backup files located on the hard drive. Chapter 5: Maintaining Your Computer Cleaning CDs or DVDs Wipe ...from the center to the original configuration, you can use the backup restore discs or you created with the recovery media program, on the hard drive, or on your computer. If you need to...
... that came with your computer are included in a circle, using a product made especially for using the restore discs or hard drive backup files are available on the backup restore discs that you can use the backup files located on the hard drive. Chapter 5: Maintaining Your Computer Cleaning CDs or DVDs Wipe ...from the center to the original configuration, you can use the backup restore discs or you created with the recovery media program, on the hard drive, or on your computer. If you need to...
User Guide
Page 59
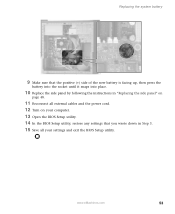
Replacing the system battery 9 Make sure that the positive (+) side of the new battery is facing up, then press the battery into the socket until it snaps into place. 10 Replace the side panel by following the instructions in "Replacing the side panel" on page 48. 11 Reconnect all external cables and the power cord. 12 Turn on your computer. 13 Open the BIOS Setup utility. 14 In the BIOS Setup utility, restore any settings that you wrote down in Step 3. 15 Save all your settings and exit the BIOS Setup utility. www.eMachines.com 53
Replacing the system battery 9 Make sure that the positive (+) side of the new battery is facing up, then press the battery into the socket until it snaps into place. 10 Replace the side panel by following the instructions in "Replacing the side panel" on page 48. 11 Reconnect all external cables and the power cord. 12 Turn on your computer. 13 Open the BIOS Setup utility. 14 In the BIOS Setup utility, restore any settings that you wrote down in Step 3. 15 Save all your settings and exit the BIOS Setup utility. www.eMachines.com 53
User Guide
Page 66
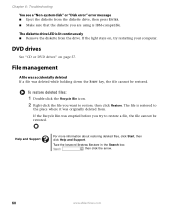
...press ENTER. ■ Make sure that the diskette you want to restore a file, the file cannot be restored. Type the keyword System Restore in the Search box , then click the arrow. 60 www.eMachines.com The file is restored to the place where it was deleted while holding down the SHIFT ...key, the file cannot be restored. Chapter 6: Troubleshooting You see a "Non-system disk" or "Disk error" error message ■ Eject the diskette...
...press ENTER. ■ Make sure that the diskette you want to restore a file, the file cannot be restored. Type the keyword System Restore in the Search box , then click the arrow. 60 www.eMachines.com The file is restored to the place where it was deleted while holding down the SHIFT ...key, the file cannot be restored. Chapter 6: Troubleshooting You see a "Non-system disk" or "Disk error" error message ■ Eject the diskette...
NG3 Hardware Reference
Page 5
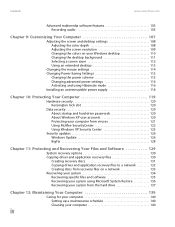
Contents www.emachines.com Advanced multimedia software features 105 Recording audio 105 Chapter 9: Customizing Your Computer 107 Adjusting the screen and desktop settings 108 Adjusting the color depth ... 132 Creating discs from recovery files on a network 133 Recovering your system 134 Recovering specific files and software 135 Recovering your system using Microsoft System Restore 136 Recovering your system from the hard drive 137 Chapter 12: Maintaining Your Computer 139 Caring for your computer 140 Setting up a maintenance schedule 140...
Contents www.emachines.com Advanced multimedia software features 105 Recording audio 105 Chapter 9: Customizing Your Computer 107 Adjusting the screen and desktop settings 108 Adjusting the color depth ... 132 Creating discs from recovery files on a network 133 Recovering your system 134 Recovering specific files and software 135 Recovering your system using Microsoft System Restore 136 Recovering your system from the hard drive 137 Chapter 12: Maintaining Your Computer 139 Caring for your computer 140 Setting up a maintenance schedule 140...
NG3 Hardware Reference
Page 27
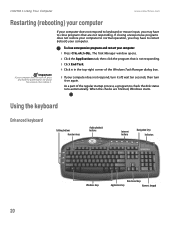
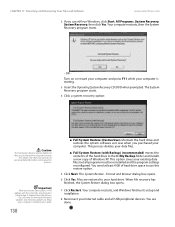
...-right corner of the regular startup process, a program to restart (reboot) your computer does not respond, turn it . If closing unresponsive programs does not restore your computer to normal operation, you may have to close unresponsive programs and restart your computer does not turn off , wait ten seconds, then turn... 20 The Task Manager window opens. 2 Click the Applications tab, then click the program that are finished, Windows starts. CHAPTER 3: Using Your Computer www.emachines.com Restarting (rebooting) your computer Important If your computer: 1 Press CTRL+ALT+DEL.
...-right corner of the regular startup process, a program to restart (reboot) your computer does not respond, turn it . If closing unresponsive programs does not restore your computer to normal operation, you may have to close unresponsive programs and restart your computer does not turn off , wait ten seconds, then turn... 20 The Task Manager window opens. 2 Click the Applications tab, then click the program that are finished, Windows starts. CHAPTER 3: Using Your Computer www.emachines.com Restarting (rebooting) your computer Important If your computer: 1 Press CTRL+ALT+DEL.
NG3 Hardware Reference
Page 36
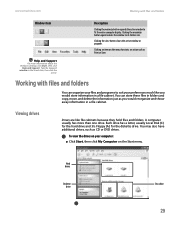
... active window or program. To view the drives on the menu bar starts an action such as Print or Save. Clicking the maximize button again restores the window to fit the entire computer display. Each drive has a letter, usually Local Disk (C:) for the hard drive and 3½ Floppy (A:) ...for the diskette drive. Description Clicking the maximize button expands the active window to its former size. Hard drives Diskette drive Disc drive 29 www.emachines.com Working with files and folders You can store these files in folders and copy, move, and delete the information just as you would ...
... active window or program. To view the drives on the menu bar starts an action such as Print or Save. Clicking the maximize button again restores the window to fit the entire computer display. Each drive has a letter, usually Local Disk (C:) for the hard drive and 3½ Floppy (A:) ...for the diskette drive. Description Clicking the maximize button expands the active window to its former size. Hard drives Diskette drive Disc drive 29 www.emachines.com Working with files and folders You can store these files in folders and copy, move, and delete the information just as you would ...
NG3 Hardware Reference
Page 39
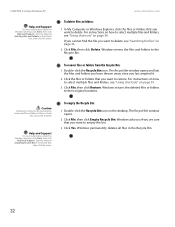
... last emptied it. 2 Click the files or folders that you want to their original locations. Windows returns the deleted files or folders to restore. Caution Emptying the Recycle Bin permanently erases any files or folders in the Search box, then click the arrow. Help and Support For more...on page 33. 2 Click File, then click Delete. For instructions on page 39. 3 Click File, then click Restore. Type the keyword deleting files and folders in the bin. www.emachines.com To delete files or folders: 1 In My Computer or Windows Explorer, click the files or folders that you want...
... last emptied it. 2 Click the files or folders that you want to their original locations. Windows returns the deleted files or folders to restore. Caution Emptying the Recycle Bin permanently erases any files or folders in the Search box, then click the arrow. Help and Support For more...on page 33. 2 Click File, then click Delete. For instructions on page 39. 3 Click File, then click Restore. Type the keyword deleting files and folders in the bin. www.emachines.com To delete files or folders: 1 In My Computer or Windows Explorer, click the files or folders that you want...
NG3 Hardware Reference
Page 137
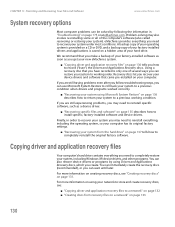
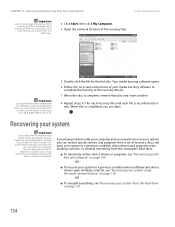
...is only one of the computer's software (also called recovering or restoring your system to completely reinstall the original factory software. For more information on page 175 or at eMachines.com. eMachines provides everything you need to record ("burn") the Drivers and Applications ...solving may need to reinstall everything you need to a previous working order. Using a recovery disc that came pre-installed on your new eMachines system. ■ "Copying driver and application recovery files" on creating recovery discs, see : ■ "Copying driver and application ...
...is only one of the computer's software (also called recovering or restoring your system to completely reinstall the original factory software. For more information on page 175 or at eMachines.com. eMachines provides everything you need to record ("burn") the Drivers and Applications ...solving may need to reinstall everything you need to a previous working order. Using a recovery disc that came pre-installed on your new eMachines system. ■ "Copying driver and application recovery files" on creating recovery discs, see : ■ "Copying driver and application ...
NG3 Hardware Reference
Page 138
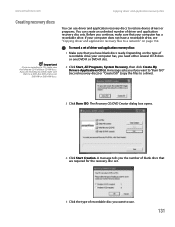
... a network" on the type of recordable drive your computer has, you want to use driver and application recovery discs to restore device drivers or programs. You can use . 131 www.emachines.com Copying driver and application recovery files Creating recovery discs Important If you want to "Burn ISO" (record recovery discs) or...
... a network" on the type of recordable drive your computer has, you want to use driver and application recovery discs to restore device drivers or programs. You can use . 131 www.emachines.com Copying driver and application recovery files Creating recovery discs Important If you want to "Burn ISO" (record recovery discs) or...
NG3 Hardware Reference
Page 141
... - OR - ■ To recover your system to restore your hard drive has failed and you can restore specific drivers and programs from the hard drive, contact eMachines Customer Care for a DVD, make sure you remove each disc "eMachines Driver and Application Recovery." As you use the marker to ...complete the burning of your computer. For example, if the recovery (ISO) file was created for help , you cannot restore the software from a set of recovery discs to...
... - OR - ■ To recover your system to restore your hard drive has failed and you can restore specific drivers and programs from the hard drive, contact eMachines Customer Care for a DVD, make sure you remove each disc "eMachines Driver and Application Recovery." As you use the marker to ...complete the burning of your computer. For example, if the recovery (ISO) file was created for help , you cannot restore the software from a set of recovery discs to...
NG3 Hardware Reference
Page 142
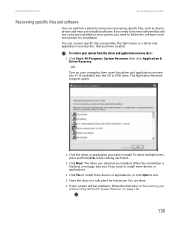
...drivers and most pre-installed software. Turn on your system Recovering specific files and software You can recover specific files using Microsoft System Restore" on your system from the driver and application recovery discs: 1 Click Start, All Programs, System Recovery, then click Application & ...Driver Recovery. - To select multiple items, press and hold CTRL while clicking each item. 3 Click Next. OR - www.emachines.com Recovering your computer, then insert the driver and application recovery disc #1 (if available) into the CD or DVD drive. When the installation...
...drivers and most pre-installed software. Turn on your system Recovering specific files and software You can recover specific files using Microsoft System Restore" on your system from the driver and application recovery discs: 1 Click Start, All Programs, System Recovery, then click Application & ...Driver Recovery. - To select multiple items, press and hold CTRL while clicking each item. 3 Click Next. OR - www.emachines.com Recovering your computer, then insert the driver and application recovery disc #1 (if available) into the CD or DVD drive. When the installation...
NG3 Hardware Reference
Page 143
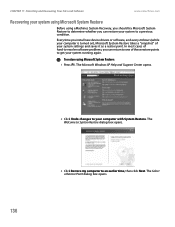
....emachines.com Recovering your system using Microsoft System Restore Before using Microsoft System Restore: 1 Press F1. The Select a Restore Point dialog box opens. Every time you install new device drivers or software, and every 24 hours (while your computer is turned on), Microsoft System Restore takes a "snapshot" of these restore... Support Center opens. 2 Click Undo changes to your system to one of your system settings and saves it as a restore point. To restore using eMachines System Recovery, you should try Microsoft System Restore to an earlier time, then click Next.
....emachines.com Recovering your system using Microsoft System Restore Before using Microsoft System Restore: 1 Press F1. The Select a Restore Point dialog box opens. Every time you install new device drivers or software, and every 24 hours (while your computer is turned on), Microsoft System Restore takes a "snapshot" of these restore... Support Center opens. 2 Click Undo changes to your system to one of your system settings and saves it as a restore point. To restore using eMachines System Recovery, you should try Microsoft System Restore to an earlier time, then click Next.
NG3 Hardware Reference
Page 144
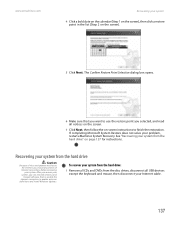
...Click Next, then follow the on-screen instructions to use the restore point you selected, and read all USB devices except the keyboard and mouse, then disconnect your problem, restart eMachines System Recovery. www.emachines.com Recovering your system from the hard drive" on page ...137 for instructions. The Confirm Restore Point Selection dialog box opens. 6 Make sure that you want to finish the restoration. See "Recovering your system 4 ...
...Click Next, then follow the on-screen instructions to use the restore point you selected, and read all USB devices except the keyboard and mouse, then disconnect your problem, restart eMachines System Recovery. www.emachines.com Recovering your system from the hard drive" on page ...137 for instructions. The Confirm Restore Point Selection dialog box opens. 6 Make sure that you want to finish the restoration. See "Recovering your system 4 ...
NG3 Hardware Reference
Page 145
...space to bring your computer. You are restored to date. 138 ■ Full System Restore (Destructive) reformats the hard drive and restores the system software as it shipped from the factory. CHAPTER 11: Protecting and Recovering Your Files and Software www.emachines.com 2 If you purchased your computer's... software up all files on or restart your computer and press F11 while your data files. ■ Full System Restore (with the same files and programs it had when it...
...space to bring your computer. You are restored to date. 138 ■ Full System Restore (Destructive) reformats the hard drive and restores the system software as it shipped from the factory. CHAPTER 11: Protecting and Recovering Your Files and Software www.emachines.com 2 If you purchased your computer's... software up all files on or restart your computer and press F11 while your data files. ■ Full System Restore (with the same files and programs it had when it...
NG3 Hardware Reference
Page 157
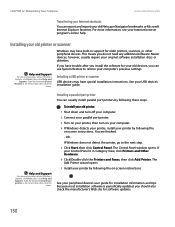
... Printer wizard opens. 7 Install your printer by following the on -screen instructions. Installing a parallel port printer You can use System Restore to the next step. 5 Click Start, then click Control Panel. Installing a USB printer or scanner USB devices may have special ...instructions. Type the keyword installing a printer in the Search box, then click the arrow. CHAPTER 12: Maintaining Your Computer www.emachines.com Transferring your Internet shortcuts You can export and import your USB device's installation guide. For more information about Windows Update,...
... Printer wizard opens. 7 Install your printer by following the on -screen instructions. Installing a parallel port printer You can use System Restore to the next step. 5 Click Start, then click Control Panel. Installing a USB printer or scanner USB devices may have special ...instructions. Type the keyword installing a printer in the Search box, then click the arrow. CHAPTER 12: Maintaining Your Computer www.emachines.com Transferring your Internet shortcuts You can export and import your USB device's installation guide. For more information about Windows Update,...

NG3 Hardware Reference
Page 158
...some programs that may be required for important program updates. Your original discs and guides should contain any programs you can restore your original program installation discs and installation guides. Remember to check the publisher's Web site for program installation and registration....newer version than to reinstall the old one. Locate your computer's previous settings using System Restore. 151 Type the keyword System Restore in the Search box, then click the arrow. www.emachines.com Moving from your old computer Installing your old programs Tips & Tricks If your new...
...some programs that may be required for important program updates. Your original discs and guides should contain any programs you can restore your original program installation discs and installation guides. Remember to check the publisher's Web site for program installation and registration....newer version than to reinstall the old one. Locate your computer's previous settings using System Restore. 151 Type the keyword System Restore in the Search box, then click the arrow. www.emachines.com Moving from your old computer Installing your old programs Tips & Tricks If your new...
NG3 Hardware Reference
Page 167
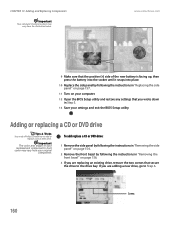
... 10 Replace the side panel by following the instructions in Step 3. 13 Save your computer. 12 Open the BIOS Setup utility and restore any settings that secure the drive to the drive bay. CHAPTER 13: Adding and Replacing Components Important Your computer's battery location may ...vary from the illustration below. www.emachines.com 9 Make sure that the positive (+) side of your replacement component's front cover may vary from your original component. To add replace ...
... 10 Replace the side panel by following the instructions in Step 3. 13 Save your computer. 12 Open the BIOS Setup utility and restore any settings that secure the drive to the drive bay. CHAPTER 13: Adding and Replacing Components Important Your computer's battery location may ...vary from the illustration below. www.emachines.com 9 Make sure that the positive (+) side of your replacement component's front cover may vary from your original component. To add replace ...


