User Guide
Page 9
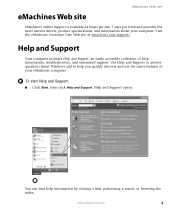
... and Support opens. www.eMachines.com 3 Visit the eMachines Customer Care Web site at emachines.com/support/. To start Help and Support: ■ Click Start, then click Help and Support. eMachines Web site eMachines Web site eMachines' online support is available 24 hours per day, 7 days per week and provides the most current drivers, product specifications, and...
... and Support opens. www.eMachines.com 3 Visit the eMachines Customer Care Web site at emachines.com/support/. To start Help and Support: ■ Click Start, then click Help and Support. eMachines Web site eMachines Web site eMachines' online support is available 24 hours per day, 7 days per week and provides the most current drivers, product specifications, and...
User Guide
Page 63
...your computer. ■ Clean the disc. You may be read by following the instructions in the drive documentation. ■ Reinstall the device driver. Occasionally discs are flawed or become scratched and cannot be experiencing some temporary memory problems. Shut down and restart your computer. ■ Make ... correctly by the CD or DVD drive. ■ Your computer may not be able to play these CDs on page 72. www.eMachines.com 57 Troubleshooting Troubleshooting Add-in cards The computer does not recognize an add-in card ■ Shut down and restart your computer....
...your computer. ■ Clean the disc. You may be read by following the instructions in the drive documentation. ■ Reinstall the device driver. Occasionally discs are flawed or become scratched and cannot be experiencing some temporary memory problems. Shut down and restart your computer. ■ Make ... correctly by the CD or DVD drive. ■ Your computer may not be able to play these CDs on page 72. www.eMachines.com 57 Troubleshooting Troubleshooting Add-in cards The computer does not recognize an add-in card ■ Shut down and restart your computer....
User Guide
Page 64
...; Shut down and restart your DVD drive is on page 33. ■ Make sure that the disc label is 4. You may not match. 58 www.eMachines.com For more information, see "Identifying drive types" on the disc, disc documentation, or disc packaging. Chapter 6: Troubleshooting Audio CD does not produce sound ■... , then try again. ■ Some music CDs have a DVD drive. For more information, see "Cleaning CDs or DVDs" on page 44. ■ Reinstall the device driver. ■ Make sure that the DVD program has been installed on page 44. ■ Reinstall the audio device...
...; Shut down and restart your DVD drive is on page 33. ■ Make sure that the disc label is 4. You may not match. 58 www.eMachines.com For more information, see "Identifying drive types" on the disc, disc documentation, or disc packaging. Chapter 6: Troubleshooting Audio CD does not produce sound ■... , then try again. ■ Some music CDs have a DVD drive. For more information, see "Cleaning CDs or DVDs" on page 44. ■ Reinstall the device driver. ■ Make sure that the DVD program has been installed on page 44. ■ Reinstall the audio device...
User Guide
Page 69
Keyboard The keyboard does not work after it dries, you may need to replace it . Press each key to drain it . www.eMachines.com 63 Clean the keyboard and turn off your Internet service provider (ISP) is set up correctly. For more information, see a "keyboard stuck" or...know works to remove dust and lint trapped under the keys. ■ Try a keyboard that the keyboard port works. ■ Reinstall the keyboard device driver. Let the keyboard dry before using an aerosol can of air with a narrow, straw-like extension to make sure that you spilled liquid in correctly....
Keyboard The keyboard does not work after it dries, you may need to replace it . Press each key to drain it . www.eMachines.com 63 Clean the keyboard and turn off your Internet service provider (ISP) is set up correctly. For more information, see a "keyboard stuck" or...know works to remove dust and lint trapped under the keys. ■ Try a keyboard that the keyboard port works. ■ Reinstall the keyboard device driver. Let the keyboard dry before using an aerosol can of air with a narrow, straw-like extension to make sure that you spilled liquid in correctly....
User Guide
Page 74
...keyword screen resolution in and turned on degauss, see your computer. ■ Check the cable for bent or damaged pins. ■ Reinstall the device driver. ■ Connect a monitor that the monitor is plugged in the Search box , then click the arrow. For more information on . Your monitor...to the monitor. ■ The monitor is not positioned too close to read ■ Adjust the brightness and contrast controls. 68 www.eMachines.com Chapter 6: Troubleshooting Monitor The screen resolution is not correct Change the screen resolution from the lower screen edge, to pass through the ...
...keyword screen resolution in and turned on degauss, see your computer. ■ Check the cable for bent or damaged pins. ■ Reinstall the device driver. ■ Connect a monitor that the monitor is plugged in the Search box , then click the arrow. For more information on . Your monitor...to the monitor. ■ The monitor is not positioned too close to read ■ Adjust the brightness and contrast controls. 68 www.eMachines.com Chapter 6: Troubleshooting Monitor The screen resolution is not correct Change the screen resolution from the lower screen edge, to pass through the ...

User Guide
Page 77
...Printers and Faxes window opens. 3 Right-click the name of the printer you want to work offline: 1 Click Start, then click Control Panel. www.eMachines.com 71 If your Control Panel is in the Search box , then click the arrow. If the menu shows a check mark next to Use Printer... 2 Click/Double-click the Printers and Faxes icon. To set to be the default printer, then click Set as Default Printer. ■ Reinstall the printer driver. You see a "Printer queue is not set a default printer: 1 Click Start, then click Control Panel. If your Control Panel is in the printer setup...
...Printers and Faxes window opens. 3 Right-click the name of the printer you want to work offline: 1 Click Start, then click Control Panel. www.eMachines.com 71 If your Control Panel is in the Search box , then click the arrow. If the menu shows a check mark next to Use Printer... 2 Click/Double-click the Printers and Faxes icon. To set to be the default printer, then click Set as Default Printer. ■ Reinstall the printer driver. You see a "Printer queue is not set a default printer: 1 Click Start, then click Control Panel. If your Control Panel is in the printer setup...


