
NG3 Hardware Reference
Page 6
www.emachines.com Contents Updating Windows 142 BigFix 142 Managing hard drive space 143 Checking hard drive space 143 Using Disk Cleanup 143 Checking the hard drive ... Wizard 147 Transferring files 148 Transferring Internet settings 149 Installing your old printer or scanner 150 Installing your old programs 151 Chapter 13: Adding and Replacing Components 153 Preventing static electricity discharge 154 Opening the case 154 Removing the side panel 154 Removing the front bezel 156 Closing the case 157...
www.emachines.com Contents Updating Windows 142 BigFix 142 Managing hard drive space 143 Checking hard drive space 143 Using Disk Cleanup 143 Checking the hard drive ... Wizard 147 Transferring files 148 Transferring Internet settings 149 Installing your old printer or scanner 150 Installing your old programs 151 Chapter 13: Adding and Replacing Components 153 Preventing static electricity discharge 154 Opening the case 154 Removing the side panel 154 Removing the front bezel 156 Closing the case 157...
NG3 Hardware Reference
Page 59
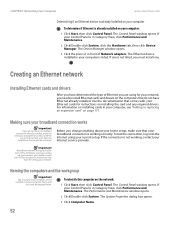
CHAPTER 6: Networking Your Computer www.emachines.com Determining if an Ethernet device is already installed on your computer To determine if Ethernet is already installed on your computer, see "Adding or replacing an expansion card" on page 171. If one is not listed, you have determined the type of Network adapters. For information...
CHAPTER 6: Networking Your Computer www.emachines.com Determining if an Ethernet device is already installed on your computer To determine if Ethernet is already installed on your computer, see "Adding or replacing an expansion card" on page 171. If one is not listed, you have determined the type of Network adapters. For information...
NG3 Hardware Reference
Page 127
... second step in your computer to keep other people from being stolen. About startup and hard drive passwords Tips & Tricks Make sure that you cannot replace the information stored on your computer or access your files. If you forget your password, you will have to guess. Use a startup and hard drive... we can remember. About Windows XP user accounts Windows lets you can reset it . CHAPTER 10: Protecting Your Computer www.emachines.com Hardware security Although you may be hard for someone else to enter your password when you turn on your computer. Attach a cable lock to ...
... second step in your computer to keep other people from being stolen. About startup and hard drive passwords Tips & Tricks Make sure that you cannot replace the information stored on your computer or access your files. If you forget your password, you will have to guess. Use a startup and hard drive... we can remember. About Windows XP user accounts Windows lets you can reset it . CHAPTER 10: Protecting Your Computer www.emachines.com Hardware security Although you may be hard for someone else to enter your password when you turn on your computer. Attach a cable lock to ...
NG3 Hardware Reference
Page 148
... careful not to clean the monitor screen. Cleaning the mouse If the mouse pointer begins moving erratically across the computer screen or becomes difficult to replace it dries, you may need to control precisely, cleaning the mouse will likely improve its accuracy. Let the liquid drain, then let the keyboard dry... any components. Squirt a little water on the cloth (never directly on the case, so keep the vents free of the mouse with the cloth. www.emachines.com Caring for your computer Warning When you shut down .
... careful not to clean the monitor screen. Cleaning the mouse If the mouse pointer begins moving erratically across the computer screen or becomes difficult to replace it dries, you may need to control precisely, cleaning the mouse will likely improve its accuracy. Let the liquid drain, then let the keyboard dry... any components. Squirt a little water on the cloth (never directly on the case, so keep the vents free of the mouse with the cloth. www.emachines.com Caring for your computer Warning When you shut down .
NG3 Hardware Reference
Page 160
CHAPTER 13 Adding and Replacing Components • Preventing static electricity discharge • Opening the case • Closing the case • Installing memory • Replacing the system battery • Adding or replacing a CD or DVD drive • Replacing the memory card reader • Adding or replacing a hard drive • Replacing the rear fan • Replacing the power supply • Replacing the heat sink • Replacing the front I/O panel • Adding or replacing an expansion card • Replacing the system board
CHAPTER 13 Adding and Replacing Components • Preventing static electricity discharge • Opening the case • Closing the case • Installing memory • Replacing the system battery • Adding or replacing a CD or DVD drive • Replacing the memory card reader • Adding or replacing a hard drive • Replacing the rear fan • Replacing the power supply • Replacing the heat sink • Replacing the front I/O panel • Adding or replacing an expansion card • Replacing the system board
NG3 Hardware Reference
Page 161
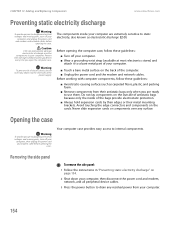
...; Wear a grounding wrist strap (available at most electronics stores) and attach it to a bare metal part of the power supply. CHAPTER 13: Adding and Replacing Components www.emachines.com Preventing static electricity discharge Warning To avoid exposure to dangerous electrical voltages and moving parts, turn off your computer, then unplug the power...
...; Wear a grounding wrist strap (available at most electronics stores) and attach it to a bare metal part of the power supply. CHAPTER 13: Adding and Replacing Components www.emachines.com Preventing static electricity discharge Warning To avoid exposure to dangerous electrical voltages and moving parts, turn off your computer, then unplug the power...
NG3 Hardware Reference
Page 163
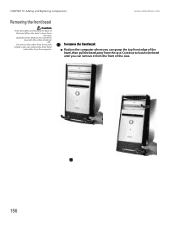
... to loosen the bezel until you can remove the front bezel and cables from the front of the case. 156 CHAPTER 13: Adding and Replacing Components www.emachines.com Removing the front bezel Caution There are cables connected to the back of the case with the cables attached. - When the bezel is...
... to loosen the bezel until you can remove the front bezel and cables from the front of the case. 156 CHAPTER 13: Adding and Replacing Components www.emachines.com Removing the front bezel Caution There are cables connected to the back of the case with the cables attached. - When the bezel is...

NG3 Hardware Reference
Page 164
... the bezel with the computer latch holes. 3 Press the bezel firmly into place. 3 Replace the side panel thumbscrews. 4 Reconnect the cables and power cord. 157 www.emachines.com Closing the case Closing the case Replacing the front bezel To replace the front bezel: 1 If you disconnected the bezel cables when you close the case...
... the bezel with the computer latch holes. 3 Press the bezel firmly into place. 3 Replace the side panel thumbscrews. 4 Reconnect the cables and power cord. 157 www.emachines.com Closing the case Closing the case Replacing the front bezel To replace the front bezel: 1 If you disconnected the bezel cables when you close the case...
NG3 Hardware Reference
Page 165
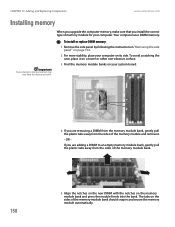
... on the new DIMM with the notches on the memory module bank and press the module firmly into the bank. CHAPTER 13: Adding and Replacing Components www.emachines.com Installing memory Important Your computer's memory location may vary from the sides of the memory module bank should snap in "Removing the side.... OR If you are adding a DIMM to an empty memory module bank, gently pull the plastic tabs away from the illustration below. To install or replace DIMM memory: 1 Remove the side panel by following the instructions in and secure the memory module automatically.
... on the new DIMM with the notches on the memory module bank and press the module firmly into the bank. CHAPTER 13: Adding and Replacing Components www.emachines.com Installing memory Important Your computer's memory location may vary from the sides of the memory module bank should snap in "Removing the side.... OR If you are adding a DIMM to an empty memory module bank, gently pull the plastic tabs away from the illustration below. To install or replace DIMM memory: 1 Remove the side panel by following the instructions in and secure the memory module automatically.
NG3 Hardware Reference
Page 166
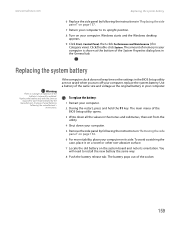
...case, place it on a towel or other non-abrasive surface. 7 Locate the old battery on the system board and note its orientation. Replace the battery only with the same or equivalent type recommended by the manufacturer. If the computer clock does not keep time or the settings ... computer. Click/Double-click System. You will need to its upright position. 8 Turn on your computer. www.emachines.com Replacing the system battery 6 Replace the side panel by following the instructions in "Replacing the side panel" on page 157. 7 Return your computer to install the new battery the same way. 8...
...case, place it on a towel or other non-abrasive surface. 7 Locate the old battery on the system board and note its orientation. Replace the battery only with the same or equivalent type recommended by the manufacturer. If the computer clock does not keep time or the settings ... computer. Click/Double-click System. You will need to its upright position. 8 Turn on your computer. www.emachines.com Replacing the system battery 6 Replace the side panel by following the instructions in "Replacing the side panel" on page 157. 7 Return your computer to install the new battery the same way. 8...
NG3 Hardware Reference
Page 167
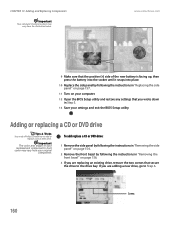
... the new battery is facing up, then press the battery into the socket until it snaps into place. 10 Replace the side panel by following the instructions in "Replacing the side panel" on page 157. 11 Turn on your computer. 12 Open the BIOS Setup utility and restore... instructions in Step 3. 13 Save your original component. Screws 160 Adding or replacing a CD or DVD drive Tips & Tricks You need a Phillips screwdriver to Step 6. www.emachines.com 9 Make sure that the positive (+) side of your replacement component's front cover may vary from your settings and exit the BIOS Setup...
... the new battery is facing up, then press the battery into the socket until it snaps into place. 10 Replace the side panel by following the instructions in "Replacing the side panel" on page 157. 11 Turn on your computer. 12 Open the BIOS Setup utility and restore... instructions in Step 3. 13 Save your original component. Screws 160 Adding or replacing a CD or DVD drive Tips & Tricks You need a Phillips screwdriver to Step 6. www.emachines.com 9 Make sure that the positive (+) side of your replacement component's front cover may vary from your settings and exit the BIOS Setup...
NG3 Hardware Reference
Page 168
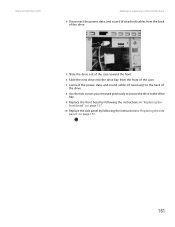
www.emachines.com Adding or replacing a CD or DVD drive 4 Disconnect the power, data, and sound (if attached) cables from the back of the drive. 5 Slide the drive out of the ... the back of the drive. 8 Use the two screws you removed previously to secure the drive to the drive bay. 9 Replace the front bezel by following the instructions in "Replacing the front bezel" on page 157. 10 Replace the side panel by following the instructions in "Replacing the side panel" on page 157. 161
www.emachines.com Adding or replacing a CD or DVD drive 4 Disconnect the power, data, and sound (if attached) cables from the back of the drive. 5 Slide the drive out of the ... the back of the drive. 8 Use the two screws you removed previously to secure the drive to the drive bay. 9 Replace the front bezel by following the instructions in "Replacing the front bezel" on page 157. 10 Replace the side panel by following the instructions in "Replacing the side panel" on page 157. 161
NG3 Hardware Reference
Page 169
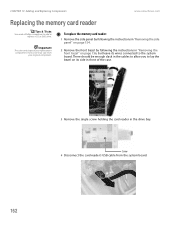
...instructions in "Removing the front bezel" on its wires connected to the system board. Screw 4 Disconnect the card reader's USB cable from your replacement component's front cover may vary from the system board. 162 Important The color and shape of the case. 3 Remove the single screw holding... in the drive bay. There should be enough slack in the cables to allow you to add or replace a CD or DVD drive. CHAPTER 13: Adding and Replacing Components www.emachines.com Replacing the memory card reader Tips & Tricks You need a Phillips screwdriver to lay the bezel on page 156...
...instructions in "Removing the front bezel" on its wires connected to the system board. Screw 4 Disconnect the card reader's USB cable from your replacement component's front cover may vary from the system board. 162 Important The color and shape of the case. 3 Remove the single screw holding... in the drive bay. There should be enough slack in the cables to allow you to add or replace a CD or DVD drive. CHAPTER 13: Adding and Replacing Components www.emachines.com Replacing the memory card reader Tips & Tricks You need a Phillips screwdriver to lay the bezel on page 156...
NG3 Hardware Reference
Page 170
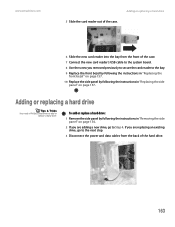
... Slide the new card reader into the bay from the back of the hard drive. 163 Adding or replacing a hard drive Tips & Tricks You need a Phillips screwdriver to add or replace a hard drive. www.emachines.com 5 Slide the card reader out of the case. 7 Connect the new card reader's USB cable... to the system board. 8 Use the screw you removed previously to secure the card reader to the bay. 9 Replace the front bezel by following ...
... Slide the new card reader into the bay from the back of the hard drive. 163 Adding or replacing a hard drive Tips & Tricks You need a Phillips screwdriver to add or replace a hard drive. www.emachines.com 5 Slide the card reader out of the case. 7 Connect the new card reader's USB cable... to the system board. 8 Use the screw you removed previously to secure the card reader to the bay. 9 Replace the front bezel by following ...
NG3 Hardware Reference
Page 171
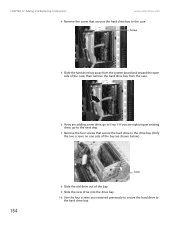
... you are shown below.) Screws 8 Slide the old drive out of the bay are adding a new drive, go to Step 9. CHAPTER 13: Adding and Replacing Components www.emachines.com 4 Remove the screw that secure the hard drive to the drive bay. (Only the two screws on one side of the bay. 9 Slide... the new drive into the drive bay. 10 Use the four screws you are replacing an existing drive, go to the next step. 7 Remove the four...
... you are shown below.) Screws 8 Slide the old drive out of the bay are adding a new drive, go to Step 9. CHAPTER 13: Adding and Replacing Components www.emachines.com 4 Remove the screw that secure the hard drive to the drive bay. (Only the two screws on one side of the bay. 9 Slide... the new drive into the drive bay. 10 Use the four screws you are replacing an existing drive, go to the next step. 7 Remove the four...
NG3 Hardware Reference
Page 172
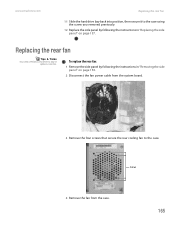
...screws that secure the rear cooling fan to add or replace a rear fan. www.emachines.com Replacing the rear fan 11 Slide the hard drive bay back into position, then secure it to the case using the screw you removed previously. 12 Replace the side panel by following the instructions in "Removing ...the side panel" on page 157. Replacing the rear fan Tips & ...
...screws that secure the rear cooling fan to add or replace a rear fan. www.emachines.com Replacing the rear fan 11 Slide the hard drive bay back into position, then secure it to the case using the screw you removed previously. 12 Replace the side panel by following the instructions in "Removing ...the side panel" on page 157. Replacing the rear fan Tips & ...
NG3 Hardware Reference
Page 173
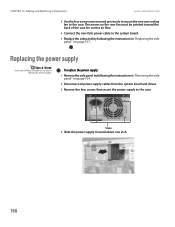
... arrows on page 157. Replacing the power supply Tips & Tricks You need a Phillips screwdriver to the case. CHAPTER 13: Adding and Replacing Components www.emachines.com 5 Use the four screws you removed previously to secure the new rear cooling fan to add or replace the power supply. Screws ...4 Slide the power supply forward about one inch. 166 To replace the power supply: 1 Remove ...
... arrows on page 157. Replacing the power supply Tips & Tricks You need a Phillips screwdriver to the case. CHAPTER 13: Adding and Replacing Components www.emachines.com 5 Use the four screws you removed previously to secure the new rear cooling fan to add or replace the power supply. Screws ...4 Slide the power supply forward about one inch. 166 To replace the power supply: 1 Remove ...
NG3 Hardware Reference
Page 174
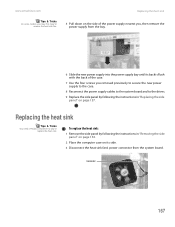
Connector 167 www.emachines.com Tips & Tricks On some models, you , then remove the power supply from the system board. To replace the heat sink: 1 Remove the side panel by following the instructions in "Removing the side panel" on page 154. 2 Place the computer case on its ... secure the new power supply to the case. 8 Reconnect the power supply cables to the system board and to the drives. 9 Replace the side panel by following the instructions in "Replacing the side panel" on the side of the power supply nearest you may first need a Phillips screwdriver to remove the heat...
Connector 167 www.emachines.com Tips & Tricks On some models, you , then remove the power supply from the system board. To replace the heat sink: 1 Remove the side panel by following the instructions in "Removing the side panel" on page 154. 2 Place the computer case on its ... secure the new power supply to the case. 8 Reconnect the power supply cables to the system board and to the drives. 9 Replace the side panel by following the instructions in "Replacing the side panel" on the side of the power supply nearest you may first need a Phillips screwdriver to remove the heat...
NG3 Hardware Reference
Page 175
... from your replacement component's front cover may vary from the system board. Screws 5 Remove the heat sink. Replacing the front I /O panel: 1 Remove the side panel by following the instructions in "Replacing the side...and equally tighten each captive screw until each connector's location as you disconnect it. 168 To replace the front I /O panel Important The color and shape of each is firmly tightened. Do ...the processor out of it easier to reconnect the cables to the system board. 10 Replace the side panel by following the instructions in "Removing the side panel" on the...
... from your replacement component's front cover may vary from the system board. Screws 5 Remove the heat sink. Replacing the front I /O panel: 1 Remove the side panel by following the instructions in "Replacing the side...and equally tighten each captive screw until each connector's location as you disconnect it. 168 To replace the front I /O panel Important The color and shape of each is firmly tightened. Do ...the processor out of it easier to reconnect the cables to the system board. 10 Replace the side panel by following the instructions in "Removing the side panel" on the...

NG3 Hardware Reference
Page 176
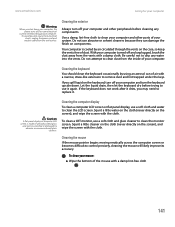
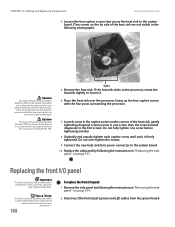
www.emachines.com Replacing the front I/O panel 3 Pry the front bezel away from the front of the case. 4 Slide the front bezel's power and LED cables through the hole in the front of the case, then remove the bezel completely. 169
www.emachines.com Replacing the front I/O panel 3 Pry the front bezel away from the front of the case. 4 Slide the front bezel's power and LED cables through the hole in the front of the case, then remove the bezel completely. 169


