Service Guide
Page 7
... Basics 10 Using the Keyboard 11 Lock Keys and embedded numeric keypad 11 Windows Keys 12 Hot Keys 13 Special Key 14 Hardware Specifications and Configurations 15 System Utilities 21 BIOS Setup Utility 21 Navigating the BIOS Utility 21 eMachines G630/G430 BIOS 22 Information 22 Main 23 Security 24 Boot 27 Exit...
... Basics 10 Using the Keyboard 11 Lock Keys and embedded numeric keypad 11 Windows Keys 12 Hot Keys 13 Special Key 14 Hardware Specifications and Configurations 15 System Utilities 21 BIOS Setup Utility 21 Navigating the BIOS Utility 21 eMachines G630/G430 BIOS 22 Information 22 Main 23 Security 24 Boot 27 Exit...
Service Guide
Page 9
... Crisis Disk 142 FRU (Field Replaceable Unit) List 143 eMachines G630/G430 Exploded Diagrams 144 Main Assembly 144 Base Assembly 146 Rear Assembly 147 eMachines G630/G430 FRU List 148 Model Definition and Configuration 156 eMachines G430 156 eMachines G630G 157 eMachines G630 166 Test Compatible Components 177 Microsoft® Windows® 7 Environment Test 178 Online Support Information 183...
... Crisis Disk 142 FRU (Field Replaceable Unit) List 143 eMachines G630/G430 Exploded Diagrams 144 Main Assembly 144 Base Assembly 146 Rear Assembly 147 eMachines G630/G430 FRU List 148 Model Definition and Configuration 156 eMachines G430 156 eMachines G630G 157 eMachines G630 166 Test Compatible Components 177 Microsoft® Windows® 7 Environment Test 178 Online Support Information 183...
Service Guide
Page 11
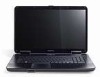
System Specifications Chapter 1 Features Below is a brief summary of the computer's many features: Operating System • Genuine Windows® 7™ Platform • AMD Turion™ II dual-core processor* • AMD Athlon™ 64 II dual-core processor* • AMD Sempron™ processor* &#...
System Specifications Chapter 1 Features Below is a brief summary of the computer's many features: Operating System • Genuine Windows® 7™ Platform • AMD Turion™ II dual-core processor* • AMD Athlon™ 64 II dual-core processor* • AMD Sempron™ processor* &#...

Service Guide
Page 21
... one line up or down arrow keys respectively. Using the Keyboard The keyboard has full-sized keys and an embedded numeric keypad, separate cursor, lock, Windows, function and special keys. Use this mode when you press the up or down when you need to connect an external keypad.
... one line up or down arrow keys respectively. Using the Keyboard The keyboard has full-sized keys and an embedded numeric keypad, separate cursor, lock, Windows, function and special keys. Use this mode when you press the up or down when you need to connect an external keypad.

Service Guide
Page 22
... users (if you're not connected to the front and select Windows Sidebar + < > + : Search for a file or folder < > + : Cycle through programs on the taskbar by using Windows Flip 3-D Note: Depending on the Windows Start button; it launches the Start menu. Key Description Windows key Pressed alone, this key has the same effect as clicking...
... users (if you're not connected to the front and select Windows Sidebar + < > + : Search for a file or folder < > + : Cycle through programs on the taskbar by using Windows Flip 3-D Note: Depending on the Windows Start button; it launches the Start menu. Key Description Windows key Pressed alone, this key has the same effect as clicking...
Service Guide
Page 30
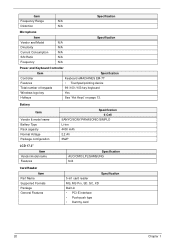
... 1 Item Frequency Range N/A Distortion N/A Specification Microphone Item Vendor and Model N/A Directivity N/A Current Consumption N/A S/N Ratio N/A Frequency N/A Specification Power and Keyboard Controller Item Specification Controller Keyboard eMACHINES EM-7T Features • Touchpad pointing device Total number of keypads 99-/100-/103-key keyboard Windows logo key Yes Hotkeys See "Hot Keys" on page 13.
... 1 Item Frequency Range N/A Distortion N/A Specification Microphone Item Vendor and Model N/A Directivity N/A Current Consumption N/A S/N Ratio N/A Frequency N/A Specification Power and Keyboard Controller Item Specification Controller Keyboard eMACHINES EM-7T Features • Touchpad pointing device Total number of keypads 99-/100-/103-key keyboard Windows logo key Yes Hotkeys See "Hot Keys" on page 13.
Service Guide
Page 45
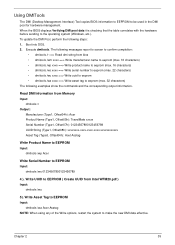
... Intel WFM20.pdf ) Input: dmitools /wu 5). Chapter 2 35 Using DMITools The DMI (Desktop Management Interface) Tool copies BIOS information to EEPROM to the operating system (Windows, etc.). When the BIOS displays Verifying DMI pool data it is checking that the table correlates with the hardware before sending to be used in...
... Intel WFM20.pdf ) Input: dmitools /wu 5). Chapter 2 35 Using DMITools The DMI (Desktop Management Interface) Tool copies BIOS information to EEPROM to the operating system (Windows, etc.). When the BIOS displays Verifying DMI pool data it is checking that the table correlates with the hardware before sending to be used in...
Service Guide
Page 130
... alone as this may be defective and should be replaced. See the User Manual for instructions on page 38. 4. Minimize or close all Windows. b. d. Roll back the video driver to its highest level. If the computer is faulty and should be replaced. Reboot the computer. ... in the application. If the Issue is still not resolved, see "Online Support Information" on page 183. 120 Chapter 4 Run the Windows Memory Diagnostic from the BIOS, the drive may reduce display brightness. c. Abnormal Video Display If video displays abnormally, perform the following actions ...
... alone as this may be defective and should be replaced. See the User Manual for instructions on page 38. 4. Minimize or close all Windows. b. d. Roll back the video driver to its highest level. If the computer is faulty and should be replaced. Reboot the computer. ... in the application. If the Issue is still not resolved, see "Online Support Information" on page 183. 120 Chapter 4 Run the Windows Memory Diagnostic from the BIOS, the drive may reduce display brightness. c. Abnormal Video Display If video displays abnormally, perform the following actions ...

Service Guide
Page 134
...4. Restore system and file settings from a command prompt. Disconnect all cables and jumpers on the HDD and ODD are required. insert the Windows 7 Operating System DVD in the ODD and restart the computer. When prompted, press any recently added hardware and associated software. 8. e.... the operating system DVD. Remove any key to start to enter the BIOS Utility. c. f. Select Startup Repair. h. For more information see Windows Help and Support. 10. The System Recovery Options screen displays. Click Next. Replace the HDD. See "Disassembly Process" on the Boot menu....
...4. Restore system and file settings from a command prompt. Disconnect all cables and jumpers on the HDD and ODD are required. insert the Windows 7 Operating System DVD in the ODD and restart the computer. When prompted, press any recently added hardware and associated software. 8. e.... the operating system DVD. Remove any key to start to enter the BIOS Utility. c. f. Select Startup Repair. h. For more information see Windows Help and Support. 10. The System Recovery Options screen displays. Click Next. Replace the HDD. See "Disassembly Process" on the Boot menu....
Service Guide
Page 136
... that the software used for the media inserted in the drive. e. Select Use AutoPlay for the selected media: IMPORTANT:Region can not be changed even Windows is reinstalled or the drive is set to correct the problem. 1. In the Audio CD and DVD Movie fields, select the desired player from the...
... that the software used for the media inserted in the drive. e. Select Use AutoPlay for the selected media: IMPORTANT:Region can not be changed even Windows is reinstalled or the drive is set to correct the problem. 1. In the Audio CD and DVD Movie fields, select the desired player from the...
Service Guide
Page 137
... other discs. Replace the ODD. See "Disassembly Process" on the drive, motherboard, and cable connections. Try an alternate cable, if available. Drive Not Detected If Windows cannot detect the drive, perform the following actions one at a time to enter the BIOS Utility. 2. Retry reading the CD or DVD. Click Properties and...
... other discs. Replace the ODD. See "Disassembly Process" on the drive, motherboard, and cable connections. Try an alternate cable, if available. Drive Not Detected If Windows cannot detect the drive, perform the following actions one at a time to enter the BIOS Utility. 2. Retry reading the CD or DVD. Click Properties and...
Service Guide
Page 139
... is ok. 3. There are no red Xs or yellow exclamation marks. • There are no device conflicts. • No hardware is still not resolved, see Windows Help and Support. 10. External Mouse Failure If an external Mouse fails, perform the following general steps to check the events log for errors. Remove...
... is ok. 3. There are no red Xs or yellow exclamation marks. • There are no device conflicts. • No hardware is still not resolved, see Windows Help and Support. 10. External Mouse Failure If an external Mouse fails, perform the following general steps to check the events log for errors. Remove...

Service Guide
Page 152
.... Press Fn + ESC button then plug in the USB disk. 4. Press Power button to format the disk and click Start. When CRISIS is included with Windows XP OS.
.... Press Fn + ESC button then plug in the USB disk. 4. Press Power button to format the disk and click Start. When CRISIS is included with Windows XP OS.

Service Guide
Page 187
All of its system functions are tested under the Windows® 7 environment. Test Compatible Components Appendix B This computer's compatibility is tested and verified by the Acer Mobile System Testing Department. Refer to the eMachines G630/G430 Compatibility Test Report released by Acer's internal testing department. Appendix B 177 Regarding configuration, combination and test procedures, please refer to the following lists for components, adapter cards, and peripherals which have passed these tests.
All of its system functions are tested under the Windows® 7 environment. Test Compatible Components Appendix B This computer's compatibility is tested and verified by the Acer Mobile System Testing Department. Refer to the eMachines G630/G430 Compatibility Test Report released by Acer's internal testing department. Appendix B 177 Regarding configuration, combination and test procedures, please refer to the following lists for components, adapter cards, and peripherals which have passed these tests.

Service Guide
Page 188
Microsoft® Windows® 7 Environment Test Vendor Adapter DELTA HIPRO HIPRO LITE-ON LITE-ON Audio Codec Realtek Battery PANASONIC SAMSUNG SANYO SIMPLO SIMPLO SIMPLO SONY Camera Chicony ...
Microsoft® Windows® 7 Environment Test Vendor Adapter DELTA HIPRO HIPRO LITE-ON LITE-ON Audio Codec Realtek Battery PANASONIC SAMSUNG SANYO SIMPLO SIMPLO SIMPLO SONY Camera Chicony ...

Service Guide
Page 197
Troubleshooting Built-in KB Failure 121 EasyTouch Buttons 128 HDTV Switch 129 Internal Speakers 122 LCD Failure 121 No Display 119 ODD 125 Other Failures 129 Power On 118 Thermal Unit 128 TouchPad 122 WLAN 128 U Undetermined Problems 130 Upper Cover Removing 57 Replacing 100 utility BIOS 21-29 W Windows 2000 Environment Test 178 Wireless Function Failure 128 WLAN Module Removing 46 Replacing 112 187
Troubleshooting Built-in KB Failure 121 EasyTouch Buttons 128 HDTV Switch 129 Internal Speakers 122 LCD Failure 121 No Display 119 ODD 125 Other Failures 129 Power On 118 Thermal Unit 128 TouchPad 122 WLAN 128 U Undetermined Problems 130 Upper Cover Removing 57 Replacing 100 utility BIOS 21-29 W Windows 2000 Environment Test 178 Wireless Function Failure 128 WLAN Module Removing 46 Replacing 112 187


