User Guide
Page 9
... the trash when discarding. Disposal instructions Do not throw this product contain mercury and must be advised to local, state or federal laws. For lamp-specific disposal information, check www.lamprecycle.org.
... the trash when discarding. Disposal instructions Do not throw this product contain mercury and must be advised to local, state or federal laws. For lamp-specific disposal information, check www.lamprecycle.org.

User Guide
Page 18
... radio communication devices (RSS-210) 36 Exposure of humans to -disk recovery 20 Password 20 Using software 21 Playing DVD movies 21 Power management 22 eMachines Recovery Management 23 Burn backup discs 24 Restore 25 Restore Windows from backup discs 26 Troubleshooting 29 Troubleshooting tips 29 Error messages 29 Regulations and... Universal Serial Bus (USB) 18 Installing memory 19 BIOS utility 20 Boot sequence 20 Enable disk-to RF fields (RSS-102) 36 LCD panel ergonomic specifications 36
... radio communication devices (RSS-210) 36 Exposure of humans to -disk recovery 20 Password 20 Using software 21 Playing DVD movies 21 Power management 22 eMachines Recovery Management 23 Burn backup discs 24 Restore 25 Restore Windows from backup discs 26 Troubleshooting 29 Troubleshooting tips 29 Error messages 29 Regulations and... Universal Serial Bus (USB) 18 Installing memory 19 BIOS utility 20 Boot sequence 20 Enable disk-to RF fields (RSS-102) 36 LCD panel ergonomic specifications 36
User Guide
Page 21
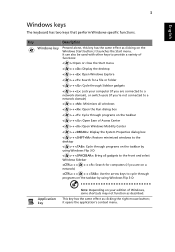
... button; This key has the same effect as described. it launches the Start menu. English 3 Windows keys The keyboard has two keys that perform Windows-specific functions. It can also be used with other keys to provide a variety of functions: < >: Open or close the Start menu < > + : Display the desktop < > + : Open Windows...
... button; This key has the same effect as described. it launches the Start menu. English 3 Windows keys The keyboard has two keys that perform Windows-specific functions. It can also be used with other keys to provide a variety of functions: < >: Open or close the Start menu < > + : Display the desktop < > + : Open Windows...

User Guide
Page 33
..., purchase a power cord that is compatible with you: • AC adapter • Power cords that the local AC voltage and the AC adapter power cord specifications are traveling • Spare, fully-charged battery packs • Additional printer driver files if you plan to use converter kits sold for traveling. Airport security...
..., purchase a power cord that is compatible with you: • AC adapter • Power cords that the local AC voltage and the AC adapter power cord specifications are traveling • Spare, fully-charged battery packs • Additional printer driver files if you plan to use converter kits sold for traveling. Airport security...
User Guide
Page 41
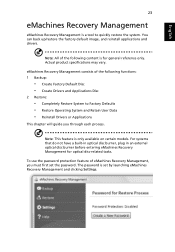
... Create Drivers and Applications Disc 2 Restore: • Completely Restore System to quickly restore the system. Actual product specifications may vary. English 23 eMachines Recovery Management eMachines Recovery Management is a tool to Factory Defaults • Restore Operating System and Retain User Data • Reinstall ...For systems that do not have a built-in optical disc burner, plug in an external optical disc burner before entering eMachines Recovery Management for general reference only. The password is set the password. To use the password protection feature of the ...
... Create Drivers and Applications Disc 2 Restore: • Completely Restore System to quickly restore the system. Actual product specifications may vary. English 23 eMachines Recovery Management eMachines Recovery Management is a tool to Factory Defaults • Restore Operating System and Retain User Data • Reinstall ...For systems that do not have a built-in optical disc burner, plug in an external optical disc burner before entering eMachines Recovery Management for general reference only. The password is set the password. To use the password protection feature of the ...
User Guide
Page 44
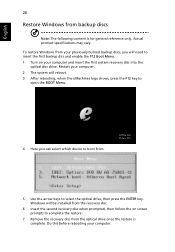
Restart your computer. 2 The system will reboot. 3 After rebooting, when the eMachines logo shows, press the F12 key to open the BOOT Menu. 4 Here you will be installed from the recovery disc. 6 Insert the second recovery disc ..., you can select which device to boot from. 5 Use the arrow keys to complete the restore. 7 Remove the recovery disc from your computer. Actual product specifications may vary.
Restart your computer. 2 The system will reboot. 3 After rebooting, when the eMachines logo shows, press the F12 key to open the BOOT Menu. 4 Here you will be installed from the recovery disc. 6 Insert the second recovery disc ..., you can select which device to boot from. 5 Use the arrow keys to complete the restore. 7 Remove the recovery disc from your computer. Actual product specifications may vary.
User Guide
Page 45
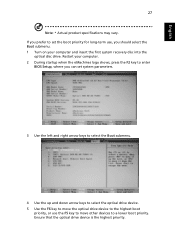
English 27 Note: * Actual product specifications may vary. Ensure that the optical drive device is the highest priority. Restart your computer and insert the first system recovery disc into the optical ..., where you can set the boot priority for long-term use, you should select the Boot submenu. 1 Turn on your computer. 2 During startup when the eMachines logo shows, press the F2 key to a lower boot priority.
English 27 Note: * Actual product specifications may vary. Ensure that the optical drive device is the highest priority. Restart your computer and insert the first system recovery disc into the optical ..., where you can set the boot priority for long-term use, you should select the Boot submenu. 1 Turn on your computer. 2 During startup when the eMachines logo shows, press the F2 key to a lower boot priority.

User Guide
Page 46
Press the ENTER key again to complete the restore. 9 Remove the recovery disc from the optical drive once the restore is complete. Do this before rebooting your computer. The system will reboot. 7 When you reboot, Windows will be installed from the recovery disc. 8 Insert the second recovery disc when prompted, then follow the onscreen prompts to select Yes. English 28 6 Press the ESC key to enter the Exit submenu, press the ENTER key to Exit Saving Changes. Note: * Actual product specifications may vary.
Press the ENTER key again to complete the restore. 9 Remove the recovery disc from the optical drive once the restore is complete. Do this before rebooting your computer. The system will reboot. 7 When you reboot, Windows will be installed from the recovery disc. 8 Insert the second recovery disc when prompted, then follow the onscreen prompts to select Yes. English 28 6 Press the ESC key to enter the Exit submenu, press the ENTER key to Exit Saving Changes. Note: * Actual product specifications may vary.

User Guide
Page 51
...conditions for connection to different numbers are dependent on the equipment (PC) associated with this device. Notice for compliance with Telecom's Specifications: a There shall be set to ensure that there is designed. Telecom will work correctly in the first instance. Notice for New... not less than 30 seconds between the individual PSTNs provided in such circumstances. 3 Some parameters required for compliance with Telecom's specifications, the associated equipment shall be set to "Regulations and safety notices" on every PSTN termination point. "TBR 21"] for ...
...conditions for connection to different numbers are dependent on the equipment (PC) associated with this device. Notice for compliance with Telecom's Specifications: a There shall be set to ensure that there is designed. Telecom will work correctly in the first instance. Notice for New... not less than 30 seconds between the individual PSTNs provided in such circumstances. 3 Some parameters required for compliance with Telecom's specifications, the associated equipment shall be set to "Regulations and safety notices" on every PSTN termination point. "TBR 21"] for ...

User Guide
Page 54
... of humans to 5.25 GHz frequency range. consult Safety Code 6, obtainable from Health Canada's website at www.hc-sc.gc.ca/rpb. LCD panel ergonomic specifications Design viewing distance Design inclination angle Design azimuth angle Viewing direction range class Screen tilt angle Design screen illuminance Reflection class of LCD panel (positive...
... of humans to 5.25 GHz frequency range. consult Safety Code 6, obtainable from Health Canada's website at www.hc-sc.gc.ca/rpb. LCD panel ergonomic specifications Design viewing distance Design inclination angle Design azimuth angle Viewing direction range class Screen tilt angle Design screen illuminance Reflection class of LCD panel (positive...