
User Manual
Page 3
Contents Using Your eMachines Flat-Panel Monitor 1 Unpacking the monitor 2 Connecting the monitor 2 Attaching the base 2 Connecting video and audio inputs 3 Connecting power 3 Adjusting monitor tilt 3 Starting the monitor 4 ...
Contents Using Your eMachines Flat-Panel Monitor 1 Unpacking the monitor 2 Connecting the monitor 2 Attaching the base 2 Connecting video and audio inputs 3 Connecting power 3 Adjusting monitor tilt 3 Starting the monitor 4 ...

User Manual
Page 5
Using Your eMachines Flat-Panel Monitor • Unpacking the monitor • Connecting the monitor • Starting the monitor • Adjusting monitor settings • Power management • Maintaining • Troubleshooting • Specifications 1
Using Your eMachines Flat-Panel Monitor • Unpacking the monitor • Connecting the monitor • Starting the monitor • Adjusting monitor settings • Power management • Maintaining • Troubleshooting • Specifications 1

User Manual
Page 6
.... For telephone numbers, see the label on a table top, then slide the monitor neck down onto the base until it clicks into place. 2 Using Your eMachines Flat-Panel Monitor Unpacking the monitor Your monitor box should contain the following items: • Monitor (with neck attached) • Base • This User Guide...
.... For telephone numbers, see the label on a table top, then slide the monitor neck down onto the base until it clicks into place. 2 Using Your eMachines Flat-Panel Monitor Unpacking the monitor Your monitor box should contain the following items: • Monitor (with neck attached) • Base • This User Guide...

User Manual
Page 7
... connect the power cord to the power connector under the back of the display. We recommend using a surge protector to protect your viewing comfort. 3 www.emachines.com Connecting video and audio inputs To connect video and audio inputs to your monitor: 1 Position your computer and the monitor so you can reach...
... connect the power cord to the power connector under the back of the display. We recommend using a surge protector to protect your viewing comfort. 3 www.emachines.com Connecting video and audio inputs To connect video and audio inputs to your monitor: 1 Position your computer and the monitor so you can reach...

User Manual
Page 8
... the best viewing angle. After your computer is running, the power LED (centered above the monitor buttons) should be tilted so your computer. Using Your eMachines Flat-Panel Monitor Ergonomic guidelines The recommended screen positioning is perpendicular to suit individual preference.
... the best viewing angle. After your computer is running, the power LED (centered above the monitor buttons) should be tilted so your computer. Using Your eMachines Flat-Panel Monitor Ergonomic guidelines The recommended screen positioning is perpendicular to suit individual preference.
User Manual
Page 9
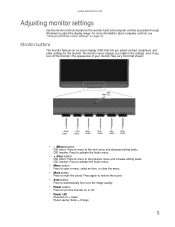
... - (Minus) button + (Plus) button Menu button Mute button Auto button Power button • - (Minus) button OSD active: Press to move to mute the sound. www.emachines.com Adjusting monitor settings Use the monitor controls (located on the monitor itself) and computer controls (accessible through Windows) to the next menu and decrease...
... - (Minus) button + (Plus) button Menu button Mute button Auto button Power button • - (Minus) button OSD active: Press to move to mute the sound. www.emachines.com Adjusting monitor settings Use the monitor controls (located on the monitor itself) and computer controls (accessible through Windows) to the next menu and decrease...
User Manual
Page 10
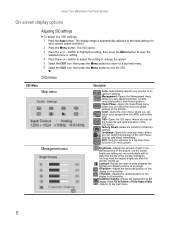
.... You may need to open the selected menu or setting. 4 Press the + or - Customer Scaling-Adjusts the aspect ratio of the monitor backlights. Using Your eMachines Flat-Panel Monitor On-screen display options Adjusting OSD settings To adjust the OSD settings: 1 Press the Auto button. Language-Opens the Language menu, where...
.... You may need to open the selected menu or setting. 4 Press the + or - Customer Scaling-Adjusts the aspect ratio of the monitor backlights. Using Your eMachines Flat-Panel Monitor On-screen display options Adjusting OSD settings To adjust the OSD settings: 1 Press the Auto button. Language-Opens the Language menu, where...
User Manual
Page 11
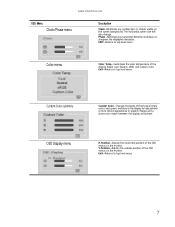
... Color Temp-Customizes the color temperature of the OSD menus on the monitor. OSD Display menu H.Position-Adjusts the horizontal position of the display. www.emachines.com OSD Menu Clock/Phase menu Description Clock-Minimizes any horizontal distortion and clears or sharpens the displayed characters.
... Color Temp-Customizes the color temperature of the OSD menus on the monitor. OSD Display menu H.Position-Adjusts the horizontal position of the display. www.emachines.com OSD Menu Clock/Phase menu Description Clock-Minimizes any horizontal distortion and clears or sharpens the displayed characters.
User Manual
Page 12
... executed auto setup for a particular mode, the display will change color and appear to jitter during auto setup. This starts the auto setup. Using Your eMachines Flat-Panel Monitor OSD Menu Factory Recall Description Press the + or - button to change the refresh rate. Settings take effect immediately.
... executed auto setup for a particular mode, the display will change color and appear to jitter during auto setup. This starts the auto setup. Using Your eMachines Flat-Panel Monitor OSD Menu Factory Recall Description Press the + or - button to change the refresh rate. Settings take effect immediately.

User Manual
Page 13
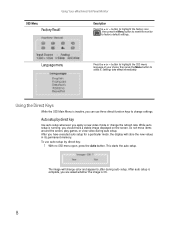
..., press the + or - buttons. Audio setup by direct key To adjust the volume by pressing the + or - The Phase bar opens to a comfortable level. 9 www.emachines.com 2 If the image looks correct, choose Yes.
..., press the + or - buttons. Audio setup by direct key To adjust the volume by pressing the + or - The Phase bar opens to a comfortable level. 9 www.emachines.com 2 If the image looks correct, choose Yes.

User Manual
Page 14
... 5 To change the screen resolution, drag the Screen resolution slider to open the Color quality list, then click the color depth you want . Using Your eMachines Flat-Panel Monitor Changing Windows screen settings Color depth and screen resolution are two of the most basic monitor settings you may need to change...
... 5 To change the screen resolution, drag the Screen resolution slider to open the Color quality list, then click the color depth you want . Using Your eMachines Flat-Panel Monitor Changing Windows screen settings Color depth and screen resolution are two of the most basic monitor settings you may need to change...
User Manual
Page 15
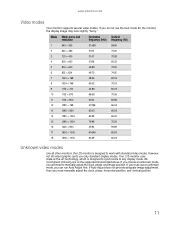
..., horizontal position, and vertical position. 11 If you can run Auto Adjust first. Your LCD monitor uses state-of the supported modes listed above. www.emachines.com Video modes Your monitor supports several video modes. Mode Mode name and resolution Horizontal Vertical frequency (kHz) frequency (Hz) 1 640 × 350 31.469...
..., horizontal position, and vertical position. 11 If you can run Auto Adjust first. Your LCD monitor uses state-of the supported modes listed above. www.emachines.com Video modes Your monitor supports several video modes. Mode Mode name and resolution Horizontal Vertical frequency (kHz) frequency (Hz) 1 640 × 350 31.469...
User Manual
Page 16
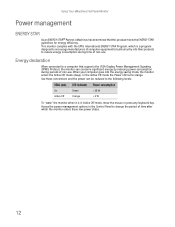
... to the following levels: VESA state LED indicator Power consumption On Active Off Green Orange < 55 W Using Your eMachines Flat-Panel Monitor Power management ENERGY STAR As an ENERGY STAR® Partner, eMachines has determined that supports the VESA Display Power Management Signaling (DPMS) Protocol, the monitor can be reduced to reduce...
... to the following levels: VESA state LED indicator Power consumption On Active Off Green Orange < 55 W Using Your eMachines Flat-Panel Monitor Power management ENERGY STAR As an ENERGY STAR® Partner, eMachines has determined that supports the VESA Display Power Management Signaling (DPMS) Protocol, the monitor can be reduced to reduce...

User Manual
Page 17
... been spilled or objects have an FN key combination that the power cord is connected correctly to your notebook's video port, you solve them. www.emachines.com Maintaining To keep the monitor in extended desktop multi-monitor mode. Wipe the cabinet, screen, and controls. For more information about connecting the video...
... been spilled or objects have an FN key combination that the power cord is connected correctly to your notebook's video port, you solve them. www.emachines.com Maintaining To keep the monitor in extended desktop multi-monitor mode. Wipe the cabinet, screen, and controls. For more information about connecting the video...

User Manual
Page 18
...; Restart your computer with the monitor turned on page 5. 14 Color is connected securely to the back of the monitor and your computer. Using Your eMachines Flat-Panel Monitor • If the power LED is orange: • Make sure that your computer is turned on. • Move the mouse or press...
...; Restart your computer with the monitor turned on page 5. 14 Color is connected securely to the back of the monitor and your computer. Using Your eMachines Flat-Panel Monitor • If the power LED is orange: • Make sure that your computer is turned on. • Move the mouse or press...

User Manual
Page 19
...should switch off the monitor for example, the image was displayed. The monitor has pixels that are unacceptably numerous or dense on your display, contact eMachines Customer Care to erase the image. • We recommend the use of a screen saver whenever the screen is idle. The message "No Input ... image remains on the back of the monitor. • Make sure that the other end is correctly plugged into the VGA port of your computer. eMachines' inspection standards keep these to a supported video mode, preferably 1680 x 1050 at least one hour and a "ghost" remains, you feel these pixels ...
...should switch off the monitor for example, the image was displayed. The monitor has pixels that are unacceptably numerous or dense on your display, contact eMachines Customer Care to erase the image. • We recommend the use of a screen saver whenever the screen is idle. The message "No Input ... image remains on the back of the monitor. • Make sure that the other end is correctly plugged into the VGA port of your computer. eMachines' inspection standards keep these to a supported video mode, preferably 1680 x 1050 at least one hour and a "ghost" remains, you feel these pixels ...

User Manual
Page 20
... analog VGA (included) Audio cable with mini-plug Audio power output 2 W/channel @ PC 1 Vrms Speaker (R/L) 2 W/16 ohm speaker Power consumption Normal operation: Many products for eMachines are subject to change without notice or obligation. Using Your eMachines Flat-Panel Monitor Specifications Specifications are custom engineered by our suppliers to...
... analog VGA (included) Audio cable with mini-plug Audio power output 2 W/channel @ PC 1 Vrms Speaker (R/L) 2 W/16 ohm speaker Power consumption Normal operation: Many products for eMachines are subject to change without notice or obligation. Using Your eMachines Flat-Panel Monitor Specifications Specifications are custom engineered by our suppliers to...
User Manual
Page 23
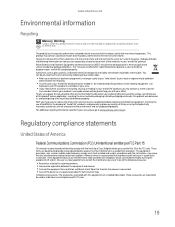
www.emachines.com Environmental information Recycling Mercury Warning Lamp(s) inside this product contain mercury and must be recycled or disposed of life" product, you may contact us ...
www.emachines.com Environmental information Recycling Mercury Warning Lamp(s) inside this product contain mercury and must be recycled or disposed of life" product, you may contact us ...

User Manual
Page 24
... Gateway Web site at any time. Notices © 2007 Gateway, Inc. The information in the United States and other reproductive harm. Trademark acknowledgments Gateway and eMachines are made periodically. California Proposition 65 warning This product contains chemicals known to the State of this device must accept any defect or omission in...
... Gateway Web site at any time. Notices © 2007 Gateway, Inc. The information in the United States and other reproductive harm. Trademark acknowledgments Gateway and eMachines are made periodically. California Proposition 65 warning This product contains chemicals known to the State of this device must accept any defect or omission in...


