
User Manual
Page 3
Contents Using Your eMachines Flat-Panel Monitor 1 Unpacking the monitor 2 Setting up the monitor 2 Attaching the base 2 Connecting cables 3 Connecting a security cable 4 Turning on the monitor 4 Adjusting monitor settings 5 Monitor buttons 5 On-screen display options 6 Changing Windows screen settings 8 Power management 9 Energy declaration 9 ...Picture has shadows or "ghosts 11 Color is not uniform 11 Image is not sized or centered correctly 11 The monitor has pixels that are always dark or too bright 12 Connecting a game console 12 Video modes 13 Safety, Regulatory...
Contents Using Your eMachines Flat-Panel Monitor 1 Unpacking the monitor 2 Setting up the monitor 2 Attaching the base 2 Connecting cables 3 Connecting a security cable 4 Turning on the monitor 4 Adjusting monitor settings 5 Monitor buttons 5 On-screen display options 6 Changing Windows screen settings 8 Power management 9 Energy declaration 9 ...Picture has shadows or "ghosts 11 Color is not uniform 11 Image is not sized or centered correctly 11 The monitor has pixels that are always dark or too bright 12 Connecting a game console 12 Video modes 13 Safety, Regulatory...

User Manual
Page 5
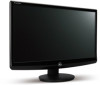
Using Your eMachines Flat-Panel Monitor • Unpacking the monitor • Setting up the monitor • Turning on the monitor • Adjusting monitor settings • Power management • Maintaining • Troubleshooting 1
Using Your eMachines Flat-Panel Monitor • Unpacking the monitor • Setting up the monitor • Turning on the monitor • Adjusting monitor settings • Power management • Maintaining • Troubleshooting 1

User Manual
Page 6
... a table top, then press the base's release button while you are missing any items, call Customer Care. Using Your eMachines Flat-Panel Monitor Unpacking the monitor Your monitor box should contain the following items: • Monitor (with neck attached) • Base (to connect to the neck) • ThisUser Guide • VGA cable (Option) • DVI...
... a table top, then press the base's release button while you are missing any items, call Customer Care. Using Your eMachines Flat-Panel Monitor Unpacking the monitor Your monitor box should contain the following items: • Monitor (with neck attached) • Base (to connect to the neck) • ThisUser Guide • VGA cable (Option) • DVI...

User Manual
Page 7
www.emachines.com Connecting cables To connect video and power cables: 1 Position your computer and the monitor so you can reach the back of each, then connect the blue VGA video cable to the blue VGA video connector under the back of the monitor. 2 Connect Digital Cable (Only Dual-Input Model) Position your computer... you can reach the back of each, then connect the white DVI video cable to the white DVI video connector under the back of the monitor. 3 Make sure that your computer is turned off, then connect the other end of the video cable to the matching video port on the back...
www.emachines.com Connecting cables To connect video and power cables: 1 Position your computer and the monitor so you can reach the back of each, then connect the blue VGA video cable to the blue VGA video connector under the back of the monitor. 2 Connect Digital Cable (Only Dual-Input Model) Position your computer... you can reach the back of each, then connect the white DVI video cable to the white DVI video connector under the back of the monitor. 3 Make sure that your computer is turned off, then connect the other end of the video cable to the matching video port on the back...

User Manual
Page 8
Cable lock slot Turning on the monitor To turn on the monitor: 1 Press the power button on your computer. 4 Using Your eMachines Flat-Panel Monitor 5 If you want to have your computer's audio played through your monitor's speakers, connect the included audio cable to your computer's headphones or line out...connect a cable lock, follow the cable lock's instructions to connect it to protect your monitor from that shown.) Power button Important Turn on your monitor before turning on the front of your monitor may vary from voltage spikes. We recommend using a surge protector to the lock slot...
Cable lock slot Turning on the monitor To turn on the monitor: 1 Press the power button on your computer. 4 Using Your eMachines Flat-Panel Monitor 5 If you want to have your computer's audio played through your monitor's speakers, connect the included audio cable to your computer's headphones or line out...connect a cable lock, follow the cable lock's instructions to connect it to protect your monitor from that shown.) Power button Important Turn on your monitor before turning on the front of your monitor may vary from voltage spikes. We recommend using a surge protector to the lock slot...

User Manual
Page 9
... < and > buttons Press to appear. If the power LED is not on or is amber, or you turn off the monitor. (The appearance of the monitor for the monitor. While the Scenario Mode menu is open , press to highlight and adjust settings. • Menu Press once to adjust the display...image position, clock, and focus settings. The monitor saves changes you make to the settings, even if you do not see "Changing Windows screen settings" on pag.e 8. For more information about computer controls, see a display image, check the connections. www.emachines.com 2 Turn on your computer is running,...
... < and > buttons Press to appear. If the power LED is not on or is amber, or you turn off the monitor. (The appearance of the monitor for the monitor. While the Scenario Mode menu is open , press to highlight and adjust settings. • Menu Press once to adjust the display...image position, clock, and focus settings. The monitor saves changes you make to the settings, even if you do not see "Changing Windows screen settings" on pag.e 8. For more information about computer controls, see a display image, check the connections. www.emachines.com 2 Turn on your computer is running,...

User Manual
Page 10
...a color mode (by selecting Scenario Mode). The OSD opens. 3 Press < and > to highlight a setting, then press Menu to defaults. Using Your eMachines Flat-Panel Monitor On-screen display options Adjusting OSD settings To adjust the OSD settings: 1 Press Auto. Reset to Defaults Resets all adjustments, press Auto repeatedly to... Turns DDC/CI support on or off. Color Temperature Selects a warm, cool, or user-defined color temperature. Mode Information Displays the monitor's current resolution, timing, input type, and serial number. The display image is automatically adjusted to exit. 6
...a color mode (by selecting Scenario Mode). The OSD opens. 3 Press < and > to highlight a setting, then press Menu to defaults. Using Your eMachines Flat-Panel Monitor On-screen display options Adjusting OSD settings To adjust the OSD settings: 1 Press Auto. Reset to Defaults Resets all adjustments, press Auto repeatedly to... Turns DDC/CI support on or off. Color Temperature Selects a warm, cool, or user-defined color temperature. Mode Information Displays the monitor's current resolution, timing, input type, and serial number. The display image is automatically adjusted to exit. 6

User Manual
Page 12
... eMachines Flat-Panel Monitor Changing Windows screen settings Color depth and screen resolution are two of colors available. Type adjusting monitor settings in Windows XP: 1 Click Start, then click Control Panel. If the new settings do not look best displayed with the maximum number of the most basic monitor ...you want . 5 To change the color depth and screen resolution in the Search Help box, then press ENTER. If the color in your monitor. Help For more information and screen components (such as icons and menu bars) can be displayed on your Windows desktop, then click Properties. ...
... eMachines Flat-Panel Monitor Changing Windows screen settings Color depth and screen resolution are two of colors available. Type adjusting monitor settings in Windows XP: 1 Click Start, then click Control Panel. If the new settings do not look best displayed with the maximum number of the most basic monitor ...you want . 5 To change the color depth and screen resolution in the Search Help box, then press ENTER. If the color in your monitor. Help For more information and screen components (such as icons and menu bars) can be displayed on your Windows desktop, then click Properties. ...

User Manual
Page 13
www.emachines.com Power management Energy declaration When connected to change the period of non-use. In the Active Off mode the power LED turns amber. Access the power management options in Active Off mode, move the mouse or press any keyboard key. To "wake" the monitor when it is ...in the Control Panel to a computer that supports the VESA Display Power Management Signaling (DPMS) protocol, the monitor can conserve significant energy by reducing power consumption during periods of time after which the...
www.emachines.com Power management Energy declaration When connected to change the period of non-use. In the Active Off mode the power LED turns amber. Access the power management options in Active Off mode, move the mouse or press any keyboard key. To "wake" the monitor when it is ...in the Control Panel to a computer that supports the VESA Display Power Management Signaling (DPMS) protocol, the monitor can conserve significant energy by reducing power consumption during periods of time after which the...

User Manual
Page 14
... 2. No power • Make sure that the monitor has warmed up for more information about the picture quality. For more information. 10 Wipe the cabinet, screen, and controls. Using Your eMachines Flat-Panel Monitor Maintaining To keep the monitor in optimal working order: • Do not block... the ventilation holes. • Do not expose the monitor to both the back of the monitor and an AC power outlet.
... 2. No power • Make sure that the monitor has warmed up for more information about the picture quality. For more information. 10 Wipe the cabinet, screen, and controls. Using Your eMachines Flat-Panel Monitor Maintaining To keep the monitor in optimal working order: • Do not block... the ventilation holes. • Do not expose the monitor to both the back of the monitor and an AC power outlet.

User Manual
Page 15
...video cable for at least 30 minutes before making a final judgment about connecting the video cable, see "Adjusting monitor settings" on page 5. 11 For instructions on how to the ideal settings. • Change the position settings... might be bent or pushed in. • Turn off the monitor and unplug the video cable from the back of your computer. www.emachines.com • If the power LED is amber: • ...Make sure that your computer is turned on. • Move the mouse or press any key on the keyboard to bring the monitor ...
...video cable for at least 30 minutes before making a final judgment about connecting the video cable, see "Adjusting monitor settings" on page 5. 11 For instructions on how to the ideal settings. • Change the position settings... might be bent or pushed in. • Turn off the monitor and unplug the video cable from the back of your computer. www.emachines.com • If the power LED is amber: • ...Make sure that your computer is turned on. • Move the mouse or press any key on the keyboard to bring the monitor ...

User Manual
Page 16
... before changing the System Registry. Connecting a game console • To determine the type of pixels affected. eMachines' inspection standards keep these pixels are trying to select your monitor's native resolution but it is justified based on page 8. • If you to make changes to the... Windows System Registry. You can display at your monitor's native resolution. • This may require you are unacceptably numerous or dense on your computer. Using Your eMachines Flat-Panel Monitor • If the image looks stretched or fuzzy, you need, see "...
... before changing the System Registry. Connecting a game console • To determine the type of pixels affected. eMachines' inspection standards keep these pixels are trying to select your monitor's native resolution but it is justified based on page 8. • If you to make changes to the... Windows System Registry. You can display at your monitor's native resolution. • This may require you are unacceptably numerous or dense on your computer. Using Your eMachines Flat-Panel Monitor • If the image looks stretched or fuzzy, you need, see "...

User Manual
Page 19
Setting up your system ■ Read and follow these openings. The plug on the product and in the monitor case are provided for ventilation. Your eMachines product is set up the system on it to your product has a voltage selector switch, make sure that the product is damaged. ...instructions to help guard against personal injury and damage to dry for 24 hours. No user serviceable parts inside. Call eMachines Customer Care for advice on whether the monitor is safe to avoid spills is turned off, a small amount of power source indicated on the products plugged into ...
Setting up your system ■ Read and follow these openings. The plug on the product and in the monitor case are provided for ventilation. Your eMachines product is set up the system on it to your product has a voltage selector switch, make sure that the product is damaged. ...instructions to help guard against personal injury and damage to dry for 24 hours. No user serviceable parts inside. Call eMachines Customer Care for advice on whether the monitor is safe to avoid spills is turned off, a small amount of power source indicated on the products plugged into ...
User Manual
Page 21
... received, including interference that may not cause harmful interference, and (2) this declaration: Product: LCD Monitor Model Number: SKU Number: E183H/E193HQ/E183HV /E193HQV E183H xxx;E193HQ xxx;E183HV xxx; Tel : 254-298-4000 Fax : 254-298-4147 www.acer.com Federal Communications Commission... appareils nudmeériques Classe B prescrites dans le règlement sur le brouillage radioélectrique édicté par Industrie Canada. 17 S. www.emachines.com Acer America Corporation 333 West San Carlos St., San Jose CA 95110, U. E193HQV xxx; ("x" = 0~9, a ~ z, A ~ Z or Blank...
... received, including interference that may not cause harmful interference, and (2) this declaration: Product: LCD Monitor Model Number: SKU Number: E183H/E193HQ/E183HV /E193HQV E183H xxx;E193HQ xxx;E183HV xxx; Tel : 254-298-4000 Fax : 254-298-4147 www.acer.com Federal Communications Commission... appareils nudmeériques Classe B prescrites dans le règlement sur le brouillage radioélectrique édicté par Industrie Canada. 17 S. www.emachines.com Acer America Corporation 333 West San Carlos St., San Jose CA 95110, U. E193HQV xxx; ("x" = 0~9, a ~ z, A ~ Z or Blank...

User Manual
Page 22
... 2006/95/EC as attested by conformity with the following harmonized standards: -. Easy Lai /Manager Regulation, Acer Inc. European Union www.emachines.com Acer Incorporated 8F, 88, Sec. 1, Hsin Tai Wu Rd., Hsichih Taipei Hsien 221, Taiwan Tel : 886-2-2696-1234 [email protected] And, Acer Europe SA Via Cantonale, Centro Galleria 2 6928 Manno Switzerland Hereby declare that: Product: LCD Monitor Trade Name: Model Number: SKU Number: Acer E183H;E193HQ;E183HV;E193HQV E183H xxxxxx;E193HQ xxxxxx;E183HVxxxxxx ;E193HQVxxxxxx ("x" = 0~9, a ~ z, or A ~ Z) Is compliant with the essential...
... 2006/95/EC as attested by conformity with the following harmonized standards: -. Easy Lai /Manager Regulation, Acer Inc. European Union www.emachines.com Acer Incorporated 8F, 88, Sec. 1, Hsin Tai Wu Rd., Hsichih Taipei Hsien 221, Taiwan Tel : 886-2-2696-1234 [email protected] And, Acer Europe SA Via Cantonale, Centro Galleria 2 6928 Manno Switzerland Hereby declare that: Product: LCD Monitor Trade Name: Model Number: SKU Number: Acer E183H;E193HQ;E183HV;E193HQV E183H xxxxxx;E193HQ xxxxxx;E183HVxxxxxx ;E193HQVxxxxxx ("x" = 0~9, a ~ z, or A ~ Z) Is compliant with the essential...


