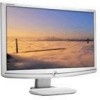
8512499 - eMachines Flat Panel Monitor User Guide
Page 3
Contents Using Your eMachines Flat-Panel Monitor 1 Unpacking the monitor 2 Connecting the monitor 3 Attaching the base 3 Connecting video inputs 4 Connecting power 5 Connecting a security cable 5 Setting up the optional stand 6 Attaching the USB stand 6 Adjusting monitor height tension 8 Adjusting monitor tilt tension 9 Connecting...bar 11 Installing the speaker bar 11 Starting the monitor 12 Adjusting monitor settings 13 Monitor buttons 13 On-screen display options 14 Changing Windows screen settings 17 Video modes 18 Power management 19 ENERGY STAR 19 Energy declaration 19...
8512499 - eMachines Flat Panel Monitor User Guide
Page 5
Using Your eMachines Flat-Panel Monitor • Connecting the monitor • Setting up the optional stand • Setting up the optional speaker bar • Starting the monitor • Adjusting monitor settings • Power management • Maintaining • Troubleshooting • Specifications 1
8512499 - eMachines Flat Panel Monitor User Guide
Page 6
Using Your eMachines Flat-Panel Monitor Unpacking the monitor Your monitor box should contain the following items: • Monitor (with neck attached) • Base • This User Guide • VGA cable • Power cord If you are missing any items, call Customer Care. For telephone numbers, see the label on the back of your monitor. 2
8512499 - eMachines Flat Panel Monitor User Guide
Page 7
Base buttons 3 You may need to press the two buttons on the base to let the monitor slide on a table top, then slide the monitor neck down onto the base until it clicks into place. To set up the optional stand" on page 6. Attaching the base To attach the base: • Place the monitor base on smoothly. www.emachines.com Connecting the monitor Important To attach the optional USB stand instead of the base, complete the instructions in "Setting up the monitor, first attach the base, then make your cable connections.
8512499 - eMachines Flat Panel Monitor User Guide
Page 8
... blue VGA video cable to the blue VGA video connector under the back of the display. (The appearance of the display. Using Your eMachines Flat-Panel Monitor Connecting video inputs To connect video sources to your monitor: 1 Position your computer and the monitor so you can buy a DVI video cable from www.gateway.com. -
8512499 - eMachines Flat Panel Monitor User Guide
Page 9
www.emachines.com Connecting power To connect power: 1 Position your monitor so you can secure your monitor to your computer desk (or to another heavy object) with a cable lock (such as a Kensington™ lock). Connecting a security cable You can reach the back, ...then connect the power cord to the power connector under the back of the monitor. (The appearance of your monitor from that shown.) 2 Plug the power cord into a correctly grounded power outlet. To connect a cable lock, follow the cable lock's instructions to ...
8512499 - eMachines Flat Panel Monitor User Guide
Page 10
... eMachines Flat-Panel Monitor Setting up to four USB devices to your computer's USB port, you can connect up the optional stand Attaching the USB stand In the United States, you can buy an adjustable USB stand from the LCD panel. A non-slip mat on a tabletop is turned off. 2 Place the monitor ...face-down over the edge of the LCD panel. Screw Screw Screw Screw 5 Slide the adjustable stand's neck onto the base. 6 To...
8512499 - eMachines Flat Panel Monitor User Guide
Page 12
... to remove it from the base. Screwdriver access cap 8 However, if it , then lower the neck into place and release the lever. Using Your eMachines Flat-Panel Monitor 9 Slide the neck's bracket slot onto the bracket's mounting tab. 10 Press the bracket lever to the right and hold it does not stay...
8512499 - eMachines Flat Panel Monitor User Guide
Page 13
... in the slot above the USB In port). After the forces are equal. If the monitor changes its tilt angle when you let go, turn the screw counter-clockwise several complete turns. www.emachines.com 2 Insert a Phillips screwdriver through the access hole in the base and onto the height tension... screw (on the top of the stand) so the monitor stays in place when you let go, turn the screw clockwise several...
8512499 - eMachines Flat Panel Monitor User Guide
Page 14
... included USB cable into the USB In port on the back of your USB stand and into a USB 2.0 port on your computer. Using Your eMachines Flat-Panel Monitor Ergonomic guidelines The recommended screen positioning is that the top of the display should be easily adjustable to the bottom. These guidelines are sitting...
8512499 - eMachines Flat Panel Monitor User Guide
Page 16
..., always press the Auto button before entering the OSD. Using Your eMachines Flat-Panel Monitor 6 Turn on . Starting the monitor To start the monitor: 1 Press the power button on the front of the monitor for the best viewing angle. 4 After you do not see "Adjusting monitor settings" on -screen display (OSD) to the ideal settings. 5 Use...
8512499 - eMachines Flat Panel Monitor User Guide
Page 17
... about computer controls, see "Changing Windows screen settings" on -screen display (OSD) that lets you turn off the monitor. (The appearance of your monitor may vary from that shown.) Input button Auto button Brightness button Contrast button Menu button • Input OSD active:...; Menu Press to open or close the OSD. 13 www.emachines.com Adjusting monitor settings Use the monitor controls (located on the monitor itself) and computer controls (accessible through menus and adjust OSD options. Monitor buttons This monitor features an on page 17. OSD inactive: Press to automatically ...
8512499 - eMachines Flat Panel Monitor User Guide
Page 18
... level or change the option. 5 Press the Input button to return to a previous menu. 6 When you identify them. 1 Press the Auto button. Using Your eMachines Flat-Panel Monitor On-screen display options Adjusting OSD settings To adjust the OSD settings: Tip While the OSD is automatically adjusted to the ideal settings for...
8512499 - eMachines Flat Panel Monitor User Guide
Page 19
www.emachines.com OSD menus OSD Menu Main menu Main Menu Auto Picture Geometry Advanced Reset Description Auto-Automatically adjusts your monitor to its factory settings. Picture menu Picture Brightness Contrast Gamma Brightness-Adjusts the amount of light in the darkest ...the picture. Advanced-Opens the Advanced menu, where you can adjust color balance, change the OSD language, and display information about current monitor settings. Use the lowest brightness setting you can adjust image size and minimize distortions. Picture-Opens the Picture menu, where you can ...
8512499 - eMachines Flat Panel Monitor User Guide
Page 20
... a resolution less than that, use the optimum 1440 × 900 resolution. Information-Displays the current screen resolution. 16 Using Your eMachines Flat-Panel Monitor OSD Menu Geometry menu Geometry H-Position V-Position Clock Phase Description H-Position-Moves the display image left and right. V-Position-Moves the display image up and ...
8512499 - eMachines Flat Panel Monitor User Guide
Page 21
...,500 colors • Highest (32-bit) = 16,700,000 colors 5 To change the screen resolution, drag the Screen resolution slider to display images on your monitor. www.emachines.com Changing Windows screen settings Color depth and screen resolution are two of the most basic... monitor settings you may need to change to display images on your monitor. The higher the resolution, the more information about adjusting the screen, click Start, then click Help and Support. To change the color ...
8512499 - eMachines Flat Panel Monitor User Guide
Page 22
If you do not use the best mode for the monitor, the display image may look slightly "fuzzy." Using Your eMachines Flat-Panel Monitor Video modes Your monitor supports several video modes. Mode Mode name and resolution Horizontal Vertical Available in DVI mode frequency (kHz) frequency (Hz) (19-inch model) 1 VGA 640 × ... 79.976 75.025 Yes 15 VESA 1440 × 900 55.935 59.887 Yes 16 VESA 1440 × 900 70.635 74.984 No 18
8512499 - eMachines Flat Panel Monitor User Guide
Page 23
... Program, which is a program designed to encourage manufacturers of computer equipment to build circuitry into the energy saving mode, the monitor enters the Active Off mode (sleep). Use these conventions and the power can conserve significant energy by reducing power consumption during time...reduce energy consumption during periods of non-use . www.emachines.com Power management ENERGY STAR As an ENERGY STAR® Partner, eMachines has determined that supports the VESA Display Power Management Signaling (DPMS) Protocol, the monitor can be reduced to the following levels: VESA state ...
8512499 - eMachines Flat Panel Monitor User Guide
Page 24
... Do not use the notebook's screen. Troubleshooting Important Make sure that the power cord is connected securely to the back of the monitor and the wall outlet. Using Your eMachines Flat-Panel Monitor Maintaining To keep the monitor in optimal working order: • Do not block the ventilation holes. • Do not expose the...
8512499 - eMachines Flat Panel Monitor User Guide
Page 25
www.emachines.com • If the power LED is orange: • Make sure that your computer is turned on. • Move the mouse or press any key on the keyboard to bring the monitor out of sleep mode. • Restart your computer with your monitor. For more information about connecting the video ... cable for any pins that the video cable is not damaged. • Check the end of the monitor and your computer with the monitor turned on. • Make sure that came with the monitor turned on page 3. Display colors are wrong • Press Menu, then Auto to automatically adjust the ...