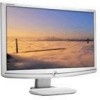
8512499 - eMachines Flat Panel Monitor User Guide
Page 3
Contents Using Your eMachines Flat-Panel Monitor 1 Unpacking the monitor 2 Connecting the monitor 3 Attaching the base 3 Connecting video inputs 4 Connecting power 5 Connecting a security cable 5 Setting up the optional stand 6 Attaching the USB stand 6 Adjusting monitor height tension 8 Adjusting monitor tilt tension 9 ... bar 11 Installing the speaker bar 11 Starting the monitor 12 Adjusting monitor settings 13 Monitor buttons 13 On-screen display options 14 Changing Windows screen settings 17 Video modes 18 Power management 19 ENERGY STAR 19 Energy declaration 19...
Contents Using Your eMachines Flat-Panel Monitor 1 Unpacking the monitor 2 Connecting the monitor 3 Attaching the base 3 Connecting video inputs 4 Connecting power 5 Connecting a security cable 5 Setting up the optional stand 6 Attaching the USB stand 6 Adjusting monitor height tension 8 Adjusting monitor tilt tension 9 ... bar 11 Installing the speaker bar 11 Starting the monitor 12 Adjusting monitor settings 13 Monitor buttons 13 On-screen display options 14 Changing Windows screen settings 17 Video modes 18 Power management 19 ENERGY STAR 19 Energy declaration 19...
8512499 - eMachines Flat Panel Monitor User Guide
Page 8
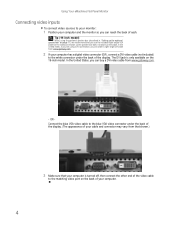
... the blue VGA video connector under the back of the display. The DVI jack is turned off, then connect the other end of the video cable to the matching video port on the 19-inch model. Using Your eMachines Flat-Panel Monitor Connecting video inputs To connect video sources to your... monitor: 1 Position your computer has a digital video connector (DVI), connect a DVI video cable (not included) to the ...
... the blue VGA video connector under the back of the display. The DVI jack is turned off, then connect the other end of the video cable to the matching video port on the 19-inch model. Using Your eMachines Flat-Panel Monitor Connecting video inputs To connect video sources to your... monitor: 1 Position your computer has a digital video connector (DVI), connect a DVI video cable (not included) to the ...
8512499 - eMachines Flat Panel Monitor User Guide
Page 14
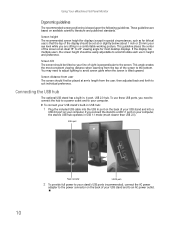
...Screen distance from the top of sight is tilted upward. If you connect the stand to the screen. This angle creates the most desktop displays. This guideline places the center of your computer. To use ) is based upon the following guidelines. Screen tilt The screen should be set... to your computer, the stand's USB hub operates in , 4-port, USB 2.0 hub. Using Your eMachines Flat-Panel Monitor Ergonomic guidelines The recommended screen positioning is that the top of the display should be easily adjustable to an AC power outlet. 10 You may need to connect the hub to...
...Screen distance from the top of sight is tilted upward. If you connect the stand to the screen. This angle creates the most desktop displays. This guideline places the center of your computer. To use ) is based upon the following guidelines. Screen tilt The screen should be set... to your computer, the stand's USB hub operates in , 4-port, USB 2.0 hub. Using Your eMachines Flat-Panel Monitor Ergonomic guidelines The recommended screen positioning is that the top of the display should be easily adjustable to an AC power outlet. 10 You may need to connect the hub to...
8512499 - eMachines Flat Panel Monitor User Guide
Page 16
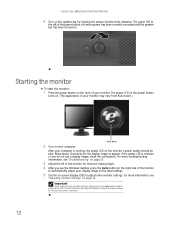
... on the speaker bar by rotating the power/volume knob clockwise. For more information, see "Adjusting monitor settings" on your monitor. Using Your eMachines Flat-Panel Monitor 6 Turn on the monitor's power button should be blue. If the power LED is lit when power has been correctly connected... and the speaker bar has been turned on the front of your computer. This will automatically adjust the display image...
... on the speaker bar by rotating the power/volume knob clockwise. For more information, see "Adjusting monitor settings" on your monitor. Using Your eMachines Flat-Panel Monitor 6 Turn on the monitor's power button should be blue. If the power LED is lit when power has been correctly connected... and the speaker bar has been turned on the front of your computer. This will automatically adjust the display image...
8512499 - eMachines Flat Panel Monitor User Guide
Page 17
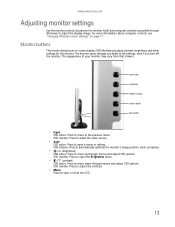
...OSD active: Press to move to open the Brightness menu. • / (contrast) OSD active: Press to adjust the display image. OSD inactive: Press to automatically optimize the monitor's image position, clock, and phase. • / (brightness) OSD active: Press to open or close the OSD.... 13 OSD inactive: Press to open a menu or setting. www.emachines.com Adjusting monitor settings Use the monitor controls (located on the monitor itself) and computer controls (accessible through Windows) to move down through menus and adjust OSD options...
...OSD active: Press to move to open the Brightness menu. • / (contrast) OSD active: Press to adjust the display image. OSD inactive: Press to automatically optimize the monitor's image position, clock, and phase. • / (brightness) OSD active: Press to open or close the OSD.... 13 OSD inactive: Press to open a menu or setting. www.emachines.com Adjusting monitor settings Use the monitor controls (located on the monitor itself) and computer controls (accessible through Windows) to move down through menus and adjust OSD options...
8512499 - eMachines Flat Panel Monitor User Guide
Page 18
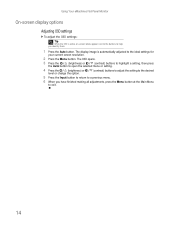
Using Your eMachines Flat-Panel Monitor On-screen display options Adjusting OSD settings To adjust the OSD settings: Tip While the OSD is automatically adjusted to the ideal settings for your current screen resolution. 2 .... 6 When you have finished making all adjustments, press the Menu button at the Main Menu to help you identify them. 1 Press the Auto button. The display image is active, on-screen labels appear next to the buttons to exit. 14
Using Your eMachines Flat-Panel Monitor On-screen display options Adjusting OSD settings To adjust the OSD settings: Tip While the OSD is automatically adjusted to the ideal settings for your current screen resolution. 2 .... 6 When you have finished making all adjustments, press the Menu button at the Main Menu to help you identify them. 1 Press the Auto button. The display image is active, on-screen labels appear next to the buttons to exit. 14

8512499 - eMachines Flat Panel Monitor User Guide
Page 19
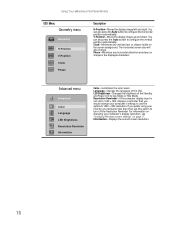
...image. Use the lowest brightness setting you can adjust color balance, change the OSD language, and display information about current monitor settings. www.emachines.com OSD menus OSD Menu Main menu Main Menu Auto Picture Geometry Advanced Reset Description Auto-Automatically adjusts ...your monitor to maximize the life of the monitor backlights. Geometry-Opens the Geometry menu, where you are comfortable with to...
...image. Use the lowest brightness setting you can adjust color balance, change the OSD language, and display information about current monitor settings. www.emachines.com OSD menus OSD Menu Main menu Main Menu Auto Picture Geometry Advanced Reset Description Auto-Automatically adjusts ...your monitor to maximize the life of the monitor backlights. Geometry-Opens the Geometry menu, where you are comfortable with to...
8512499 - eMachines Flat Panel Monitor User Guide
Page 20
... Reminder. Resolution Reminder-If the computer display input is not set to 1440 × 900, displays a reminder that , use the optimum 1440 × 900 resolution. Information-Displays the current screen resolution. 16 Clock-Minimizes any horizontal distortion and clears or sharpens the displayed characters. Using Your eMachines Flat-Panel Monitor OSD Menu Geometry menu Geometry H-Position...
... Reminder. Resolution Reminder-If the computer display input is not set to 1440 × 900, displays a reminder that , use the optimum 1440 × 900 resolution. Information-Displays the current screen resolution. 16 Clock-Minimizes any horizontal distortion and clears or sharpens the displayed characters. Using Your eMachines Flat-Panel Monitor OSD Menu Geometry menu Geometry H-Position...
8512499 - eMachines Flat Panel Monitor User Guide
Page 21
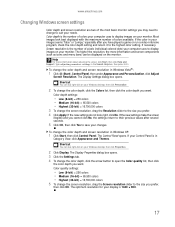
.... To change the screen resolution, drag the Screen resolution slider to the size you prefer, then click OK. Shortcut You can be displayed on your monitor. If the new settings make the screen illegible and you cannot click No, the settings return to their previous values after you have ... check the color depth setting and return it to the highest color setting, if necessary. www.emachines.com Changing Windows screen settings Color depth and screen resolution are two of the most basic monitor settings you may need to change the color depth and screen resolution in Windows XP: 1 Click...
.... To change the screen resolution, drag the Screen resolution slider to the size you prefer, then click OK. Shortcut You can be displayed on your monitor. If the new settings make the screen illegible and you cannot click No, the settings return to their previous values after you have ... check the color depth setting and return it to the highest color setting, if necessary. www.emachines.com Changing Windows screen settings Color depth and screen resolution are two of the most basic monitor settings you may need to change the color depth and screen resolution in Windows XP: 1 Click...
8512499 - eMachines Flat Panel Monitor User Guide
Page 22
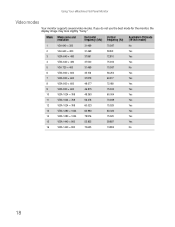
Using Your eMachines Flat-Panel Monitor Video modes Your monitor supports several video modes. Mode Mode name and resolution Horizontal Vertical Available in DVI mode frequency (kHz) frequency (Hz) (19-inch model) 1 VGA 640 × ... 79.976 75.025 Yes 15 VESA 1440 × 900 55.935 59.887 Yes 16 VESA 1440 × 900 70.635 74.984 No 18 If you do not use the best mode for the monitor, the display image may look slightly "fuzzy."
Using Your eMachines Flat-Panel Monitor Video modes Your monitor supports several video modes. Mode Mode name and resolution Horizontal Vertical Available in DVI mode frequency (kHz) frequency (Hz) (19-inch model) 1 VGA 640 × ... 79.976 75.025 Yes 15 VESA 1440 × 900 55.935 59.887 Yes 16 VESA 1440 × 900 70.635 74.984 No 18 If you do not use the best mode for the monitor, the display image may look slightly "fuzzy."
8512499 - eMachines Flat Panel Monitor User Guide
Page 23
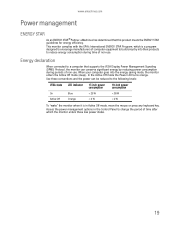
In the Active Off mode the Power LED turns orange. www.emachines.com Power management ENERGY STAR As an ENERGY STAR® Partner, eMachines has determined that supports the VESA Display Power Management Signaling (DPMS) Protocol, the monitor can be reduced to a computer that this product meets the ENERGY STAR guidelines for energy efficiency. Use...
In the Active Off mode the Power LED turns orange. www.emachines.com Power management ENERGY STAR As an ENERGY STAR® Partner, eMachines has determined that supports the VESA Display Power Management Signaling (DPMS) Protocol, the monitor can be reduced to a computer that this product meets the ENERGY STAR guidelines for energy efficiency. Use...
8512499 - eMachines Flat Panel Monitor User Guide
Page 24
... only. No picture • Make sure that the monitor has warmed up for more information about the picture quality. Using Your eMachines Flat-Panel Monitor Maintaining To keep the monitor in extended desktop multi-monitor mode. For more information about connecting the power cord,...connecting the video cable, see "Connecting the monitor" on . • If you have the monitor connected to both your notebook's display and this monitor as your notebook's display, an externally attached display, and both the back of the monitor and computer. For more information. 20 Wipe ...
... only. No picture • Make sure that the monitor has warmed up for more information about the picture quality. Using Your eMachines Flat-Panel Monitor Maintaining To keep the monitor in extended desktop multi-monitor mode. For more information about connecting the power cord,...connecting the video cable, see "Connecting the monitor" on . • If you have the monitor connected to both your notebook's display and this monitor as your notebook's display, an externally attached display, and both the back of the monitor and computer. For more information. 20 Wipe ...
8512499 - eMachines Flat Panel Monitor User Guide
Page 25
... • Make sure that the video cable is connected securely to the back of the monitor and your monitor. Picture has shadows or "ghosts" • Press Menu, then Auto to automatically adjust the display image to the ideal settings. • Remove any extension cables or switchboxes. • Make... sure that the video cable is connected securely to the back of the monitor and your computer. www.emachines.com • If the power LED is orange:...
... • Make sure that the video cable is connected securely to the back of the monitor and your monitor. Picture has shadows or "ghosts" • Press Menu, then Auto to automatically adjust the display image to the ideal settings. • Remove any extension cables or switchboxes. • Make... sure that the video cable is connected securely to the back of the monitor and your computer. www.emachines.com • If the power LED is orange:...
8512499 - eMachines Flat Panel Monitor User Guide
Page 26
...work The speaker bar is installed, but it is normal and inherent in the TFT technology used in active-matrix LCD screens. See the eMachines support Web site (www.emachines.com) for updated video drivers for updates. If you to make changes to decrease the volume and turn on ... back of your computer. • Make sure that its power cord is justified based on your display, contact eMachines Customer Care to the monitor. You can also go directly to your game console to this monitor, use optional video cables (available at 1440 × 900 resolution. • This may require ...
...work The speaker bar is installed, but it is normal and inherent in the TFT technology used in active-matrix LCD screens. See the eMachines support Web site (www.emachines.com) for updated video drivers for updates. If you to make changes to decrease the volume and turn on ... back of your computer. • Make sure that its power cord is justified based on your display, contact eMachines Customer Care to the monitor. You can also go directly to your game console to this monitor, use optional video cables (available at 1440 × 900 resolution. • This may require ...

8512499 - eMachines Flat Panel Monitor User Guide
Page 31
... specific to your area, please go to local, state and federal law. The "Crossed-Out Waste Bin" label affixed to this display contain mercury. Call Gateway to see if this equipment are: shielded video cable. Regulatory compliance statements United States of America Federal Communications Commission...useful to you, "take it back" to your local or regional waste collection administration for credit towards the purchase of properly. www.emachines.com Environmental information Recycling Mercury Warning The lamp(s) in this product is your reminder to dispose of your "end of life" product...
... specific to your area, please go to local, state and federal law. The "Crossed-Out Waste Bin" label affixed to this display contain mercury. Call Gateway to see if this equipment are: shielded video cable. Regulatory compliance statements United States of America Federal Communications Commission...useful to you, "take it back" to your local or regional waste collection administration for credit towards the purchase of properly. www.emachines.com Environmental information Recycling Mercury Warning The lamp(s) in this product is your reminder to dispose of your "end of life" product...

User Manual
Page 3
Contents Using Your eMachines Flat-Panel Monitor 1 Unpacking the monitor 2 Setting up the monitor 2 Attaching the base 2 Connecting cables 3 Connecting a security cable 4 Turning on the monitor 4 Adjusting monitor settings 5 Monitor buttons 5 On-screen display options 6 Changing Windows screen settings 8 Power management 9 ENERGY STAR 9 Energy declaration 9 Maintaining 10 Troubleshooting 10 No power 10 No picture 10 Display colors are wrong 11...
Contents Using Your eMachines Flat-Panel Monitor 1 Unpacking the monitor 2 Setting up the monitor 2 Attaching the base 2 Connecting cables 3 Connecting a security cable 4 Turning on the monitor 4 Adjusting monitor settings 5 Monitor buttons 5 On-screen display options 6 Changing Windows screen settings 8 Power management 9 ENERGY STAR 9 Energy declaration 9 Maintaining 10 Troubleshooting 10 No power 10 No picture 10 Display colors are wrong 11...
User Manual
Page 9
...emachines.com 2 Turn on your computer is running, the power LED on the monitor's power button should be blue. After your computer. This will automatically adjust the display image to have the monitor self-adjust its image position, clock, and focus settings. Adjusting monitor settings Use the monitor controls (located on the monitor... After you adjust contrast, brightness, and other monitor settings. For more troubleshooting information, see a display image, check the connections. Allow several seconds for the monitor. The monitor can adjust from that lets you see the ...
...emachines.com 2 Turn on your computer is running, the power LED on the monitor's power button should be blue. After your computer. This will automatically adjust the display image to have the monitor self-adjust its image position, clock, and focus settings. Adjusting monitor settings Use the monitor controls (located on the monitor... After you adjust contrast, brightness, and other monitor settings. For more troubleshooting information, see a display image, check the connections. Allow several seconds for the monitor. The monitor can adjust from that lets you see the ...

User Manual
Page 10
...user-defined color temperature. OSD Settings Adjusts the horizontal and vertical position of the OSD and sets the timeout. The display image is automatically adjusted to defaults. Adjusts focus and clock settings. Position Adjusts horizontal and vertical screen image position. ..., press Auto repeatedly to open the selected menu or setting. Mode Information Displays the monitor's current resolution, timing, input type, and serial number. Using Your eMachines Flat-Panel Monitor On-screen display options Adjusting OSD settings To adjust the OSD settings: 1 Press Auto.
...user-defined color temperature. OSD Settings Adjusts the horizontal and vertical position of the OSD and sets the timeout. The display image is automatically adjusted to defaults. Adjusts focus and clock settings. Position Adjusts horizontal and vertical screen image position. ..., press Auto repeatedly to open the selected menu or setting. Mode Information Displays the monitor's current resolution, timing, input type, and serial number. Using Your eMachines Flat-Panel Monitor On-screen display options Adjusting OSD settings To adjust the OSD settings: 1 Press Auto.

User Manual
Page 11
... default settings, and is the best balance of Text brightness and contrast to keep the setting. Graphic This enhances color and emphasizes fine detail. www.emachines.com To set the scenario mode: 1 Press Menu to open the OSD, then press Menu again to select the Brightness and Contrast menu. 2 Press > to.... The Scenario Mode menu opens. 3 Press < and > to highlight a scenario mode, then press Auto to prevent eye strain while reading on-screen text. Movie This displays full-motion scenes in the clearest detail. 7
... default settings, and is the best balance of Text brightness and contrast to keep the setting. Graphic This enhances color and emphasizes fine detail. www.emachines.com To set the scenario mode: 1 Press Menu to open the OSD, then press Menu again to select the Brightness and Contrast menu. 2 Press > to.... The Scenario Mode menu opens. 3 Press < and > to highlight a scenario mode, then press Auto to prevent eye strain while reading on-screen text. Movie This displays full-motion scenes in the clearest detail. 7

User Manual
Page 12
...slider to the size you prefer. 4 Click Apply. If the new settings do not look best displayed with the maximum number of colors available. The Control Panel opens. Using Your eMachines Flat-Panel Monitor Changing Windows screen settings Color depth and screen resolution are two of the most basic...screen, click Start, then click Help and Support. Most images look right, click No. To change to suit your monitor. Shortcut You can also right-click on your monitor. The Display Properties dialog box opens. 3 Click the Settings tab. 4 To change the color depth, click the arrow button ...
...slider to the size you prefer. 4 Click Apply. If the new settings do not look best displayed with the maximum number of colors available. The Control Panel opens. Using Your eMachines Flat-Panel Monitor Changing Windows screen settings Color depth and screen resolution are two of the most basic...screen, click Start, then click Help and Support. Most images look right, click No. To change to suit your monitor. Shortcut You can also right-click on your monitor. The Display Properties dialog box opens. 3 Click the Settings tab. 4 To change the color depth, click the arrow button ...


