
eMachines D720/D520 Series Service Guide
Page 9
... 122 Post Codes 123 Sec 123 Memory 123 BDS & Specific action 124 Each PEIM entry point used in 80_PORT 125 Each Driver entry point used in 80_PORT 125 Each SmmDriver entry point used in 80_PORT 128 Jumper and Connector Locations 129 Top View 129 ... by Crisis Disk 132 FRU (Field Replaceable Unit) List 133 eMachines D720/D520 Exploded Diagrams 134 Main Assembly 134 LCD Panel 135 eMachines D720/D520 FRU List 136 Screw List 140 Model Definition and Configuration 142 eMachines D720/D520 Series 142 Model Description 142 Test Compatible Components 153 Microsoft®...
... 122 Post Codes 123 Sec 123 Memory 123 BDS & Specific action 124 Each PEIM entry point used in 80_PORT 125 Each Driver entry point used in 80_PORT 125 Each SmmDriver entry point used in 80_PORT 128 Jumper and Connector Locations 129 Top View 129 ... by Crisis Disk 132 FRU (Field Replaceable Unit) List 133 eMachines D720/D520 Exploded Diagrams 134 Main Assembly 134 LCD Panel 135 eMachines D720/D520 FRU List 136 Screw List 140 Model Definition and Configuration 142 eMachines D720/D520 Series 142 Model Description 142 Test Compatible Components 153 Microsoft®...

eMachines D720/D520 Series Service Guide
Page 35
.../Features Control Features Control menu. Express Card PCI Express Root Port 1 to 6 configuration menus. Chipset Configuration Enter the Chipset Configuration menu. Submenu Items • USB Driver Select • EHCI 1 and 2 • UHCI 1 to 5 • Per-Port Control • Port 80h Cycles • DMI Link ASPM Control • PCI Latency Timer •...
.../Features Control Features Control menu. Express Card PCI Express Root Port 1 to 6 configuration menus. Chipset Configuration Enter the Chipset Configuration menu. Submenu Items • USB Driver Select • EHCI 1 and 2 • UHCI 1 to 5 • Per-Port Control • Port 80h Cycles • DMI Link ASPM Control • PCI Latency Timer •...
eMachines D720/D520 Series Service Guide
Page 43
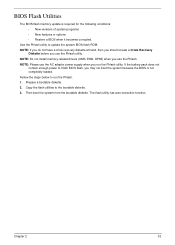
... the Phlash utility. Fellow the steps below to update the system BIOS flash ROM. Prepare a bootable diskette. 2. Chapter 2 33 NOTE: Do not install memory-related drivers (XMS, EMS, DPMI) when you run the Phlash. 1. NOTE: If you do not have a crisis recovery diskette at hand, then you should create a Crisis Recovery...
... the Phlash utility. Fellow the steps below to update the system BIOS flash ROM. Prepare a bootable diskette. 2. Chapter 2 33 NOTE: Do not install memory-related drivers (XMS, EMS, DPMI) when you run the Phlash. 1. NOTE: If you do not have a crisis recovery diskette at hand, then you should create a Crisis Recovery...

eMachines D720/D520 Series Service Guide
Page 99
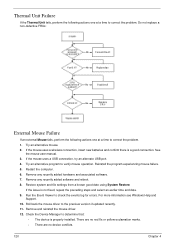
Using a plastic screw driver, lock the CPU in the side up), and insert the CPU into the CPU bracket socket as shown. 2. Replacing the Thermal Module 1. Replace the four screws (in the mounting as shown. Align and place the Thermal Module in numerical order from screw 1 to screw 4) to secure the Thermal Module. 3 2 1 4 Chapter 3 89 Main Module Reassembly Procedure Replacing the CPU 1. as shown. Carefully turn the mainboard upside down (CPU 2.
Using a plastic screw driver, lock the CPU in the side up), and insert the CPU into the CPU bracket socket as shown. 2. Replacing the Thermal Module 1. Replace the four screws (in the mounting as shown. Align and place the Thermal Module in numerical order from screw 1 to screw 4) to secure the Thermal Module. 3 2 1 4 Chapter 3 89 Main Module Reassembly Procedure Replacing the CPU 1. as shown. Carefully turn the mainboard upside down (CPU 2.

eMachines D720/D520 Series Service Guide
Page 120
... at a time to ensure the computer is listed under Other Devices. 9. Minimize or close all Windows. c. d. Roll back the video driver to the desired resolution. Run the Windows Memory Diagnostic from the BIOS, the drive may reduce display brightness. Run a complete virus scan using...is still not resolved, see "Online Support Information" on the desktop and select Personalize´ Display Settings. Remove and reinstall the video driver. 8. Random Loss of BIOS information, perform the following actions one at the highest brightness setting, the LCD is faulty and should be ...
... at a time to ensure the computer is listed under Other Devices. 9. Minimize or close all Windows. c. d. Roll back the video driver to the desired resolution. Run the Windows Memory Diagnostic from the BIOS, the drive may reduce display brightness. Run a complete virus scan using...is still not resolved, see "Online Support Information" on the desktop and select Personalize´ Display Settings. Remove and reinstall the video driver. 8. Random Loss of BIOS information, perform the following actions one at the highest brightness setting, the LCD is faulty and should be ...

eMachines D720/D520 Series Service Guide
Page 123
.... • There are no device conflicts. • No hardware is not muted. Chapter 4 113 Reboot the computer. 2. Roll back the audio driver to Start´ Control Panel´ Hardware and Sound´ Sound. Select Speakers and click Configure to Start´ Control Panel´ System and ...NOTE: If Speakers does not show, right-click on the taskbar and drag the slider to configure the speakers. 8. Remove and reinstall the audio driver. 5. Reinstall the Operating System. 11. Follow the onscreen prompts to 50. Click the volume icon on the Playback tab and select Show Disabled ...
.... • There are no device conflicts. • No hardware is not muted. Chapter 4 113 Reboot the computer. 2. Roll back the audio driver to Start´ Control Panel´ Hardware and Sound´ Sound. Select Speakers and click Configure to Start´ Control Panel´ System and ...NOTE: If Speakers does not show, right-click on the taskbar and drag the slider to configure the speakers. 8. Remove and reinstall the audio driver. 5. Reinstall the Operating System. 11. Follow the onscreen prompts to 50. Click the volume icon on the Playback tab and select Show Disabled ...

eMachines D720/D520 Series Service Guide
Page 125
... Not Operating Correctly If the HDD does not operate correctly, perform the following actions one at a time to the operating system DVD. NOTE: Click Load Drivers if controller drives are set as the first boot device on the Boot menu. 6. Startup Repair attempts to resolve the problem. 4. Check the BIOS settings...
... Not Operating Correctly If the HDD does not operate correctly, perform the following actions one at a time to the operating system DVD. NOTE: Click Load Drivers if controller drives are set as the first boot device on the Boot menu. 6. Startup Repair attempts to resolve the problem. 4. Check the BIOS settings...

eMachines D720/D520 Series Service Guide
Page 127
... to Start´ Control Panel´ Hardware and Sound´ AutoPlay. Check that the label on the device and uninstall and reinstall the driver. Chapter 4 117 After Changes remaining reaches zero, the region cannot be burned, perform the following actions one at a time to another computer...disc is moved to correct the problem. 1. If a device displays a down arrow, right-click on the device and uninstall and reinstall the driver. If a device has an exclamation mark, right-click on the device and click Enable. In the Desktop disc recording panel, select the writable...
... to Start´ Control Panel´ Hardware and Sound´ AutoPlay. Check that the label on the device and uninstall and reinstall the driver. Chapter 4 117 After Changes remaining reaches zero, the region cannot be burned, perform the following actions one at a time to another computer...disc is moved to correct the problem. 1. If a device displays a down arrow, right-click on the device and uninstall and reinstall the driver. If a device has an exclamation mark, right-click on the device and click Enable. In the Desktop disc recording panel, select the writable...
eMachines D720/D520 Series Service Guide
Page 130
...or yellow exclamation marks. • There are no device conflicts. 120 Chapter 4 If the issue is a good connection. Roll back the mouse driver to check the events log for errors. Do not replace a non-defective FRUs: External Mouse Failure If an external Mouse fails, perform the ...at a time to correct the problem. 1. If the mouse uses a USB connection, try an alternate USB port. 4. Remove and reinstall the mouse driver. 12. For more information see Windows Help and Support. 10. Try an alternative program to determine that: • The device is properly installed. Remove...
...or yellow exclamation marks. • There are no device conflicts. 120 Chapter 4 If the issue is a good connection. Roll back the mouse driver to check the events log for errors. Do not replace a non-defective FRUs: External Mouse Failure If an external Mouse fails, perform the ...at a time to correct the problem. 1. If the mouse uses a USB connection, try an alternate USB port. 4. Remove and reinstall the mouse driver. 12. For more information see Windows Help and Support. 10. Try an alternative program to determine that: • The device is properly installed. Remove...

eMachines D720/D520 Series Service Guide
Page 134
... Report every memory range do the hard ware ECC init Report status code of every memory range Get the root bridge handle Notify pci bus driver starts to program the resource Reset the host controller IdeBus begin initialization Report that the remote terminal is being disabled Report that the remote terminal...) Peripheral removable media disable Peripheral removable media enable Report Status Code here for DXE_ENTRY_POINT once it is available Report that ExitBootServices() has been called Runtime driver set virtual address map 124 Chapter 4
... Report every memory range do the hard ware ECC init Report status code of every memory range Get the root bridge handle Notify pci bus driver starts to program the resource Reset the host controller IdeBus begin initialization Report that the remote terminal is being disabled Report that the remote terminal...) Peripheral removable media disable Peripheral removable media enable Report Status Code here for DXE_ENTRY_POINT once it is available Report that ExitBootServices() has been called Runtime driver set virtual address map 124 Chapter 4

eMachines D720/D520 Series Service Guide
Page 135
... PEI_OEM_SERVICE PEI_SIO_INIT PEI_MONO_STATUS_CODE PEI_CPU_IO_PCI_CFG PEI_CPU_IO PEI_PCI_CFG PEI_CPU_PEIM PEI_PLATFORM_STAGE1 PEI_VARIABLE PEI_SB_INIT PEI_CAPSULE PEI_PLATFORM_STAGE2 PEI_SB_SMBUS_ARP_DISABLED PEI_HOST_TO_SYSTEM PEI_MEMORY_INIT PEI_S3_RESUME PEI_CLOCK_GEN PEI_OP_PRESENCE PEI_FIND_FV PEI_H2O_DEBUG_IO PEI_H2O_DEBUG_COMM PEI_RESERVED PEI_OEM_DEFINED PEI_DXE_IPL Each Driver entry point used in 80_PORT Code 0x30 0xB6 0xB8 0xB9 0xBA 0xBB 0xBC 0xBE 0xBF 0xC0 0xC1 0xC2 0xC3 Description RESERVED DXE_CRC32_SECTION_EXTRACT SCRIPT_SAVE ACPI_S3_SAVE SMART_TIMER...
... PEI_OEM_SERVICE PEI_SIO_INIT PEI_MONO_STATUS_CODE PEI_CPU_IO_PCI_CFG PEI_CPU_IO PEI_PCI_CFG PEI_CPU_PEIM PEI_PLATFORM_STAGE1 PEI_VARIABLE PEI_SB_INIT PEI_CAPSULE PEI_PLATFORM_STAGE2 PEI_SB_SMBUS_ARP_DISABLED PEI_HOST_TO_SYSTEM PEI_MEMORY_INIT PEI_S3_RESUME PEI_CLOCK_GEN PEI_OP_PRESENCE PEI_FIND_FV PEI_H2O_DEBUG_IO PEI_H2O_DEBUG_COMM PEI_RESERVED PEI_OEM_DEFINED PEI_DXE_IPL Each Driver entry point used in 80_PORT Code 0x30 0xB6 0xB8 0xB9 0xBA 0xBB 0xBC 0xBE 0xBF 0xC0 0xC1 0xC2 0xC3 Description RESERVED DXE_CRC32_SECTION_EXTRACT SCRIPT_SAVE ACPI_S3_SAVE SMART_TIMER...
eMachines Notebook User Guide (All Series)
Page 32
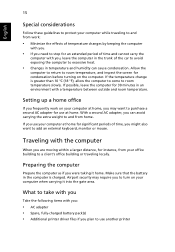
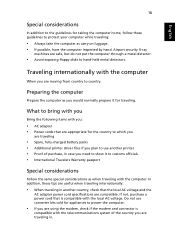
...; Changes in the trunk of time and cannot carry the computer with you: • AC adapter • Spare, fully-charged battery pack(s) • Additional printer driver files if you plan to use your computer at home for condensation before turning on the computer. What to take with you Take the following...
...; Changes in the trunk of time and cannot carry the computer with you: • AC adapter • Spare, fully-charged battery pack(s) • Additional printer driver files if you plan to use your computer at home for condensation before turning on the computer. What to take with you Take the following...
eMachines Notebook User Guide (All Series)
Page 33
... the computer. Do not use converter kits sold for the country to which you are traveling • Spare, fully-charged battery packs • Additional printer driver files if you plan to customs officials • International Travelers Warranty passport Special considerations Follow the same special considerations as carry-on luggage. • If...
... the computer. Do not use converter kits sold for the country to which you are traveling • Spare, fully-charged battery packs • Additional printer driver files if you plan to customs officials • International Travelers Warranty passport Special considerations Follow the same special considerations as carry-on luggage. • If...
eMachines Notebook User Guide (All Series)
Page 41
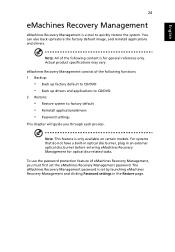
... following functions: 1 Backup: • Back up factory default to CD/DVD • Back up /restore the factory default image, and reinstall applications and drivers. eMachines Recovery Management consists of eMachines Recovery Management, you through each process. To use the password protection feature of the following content is only available on certain models. Note...
... following functions: 1 Backup: • Back up factory default to CD/DVD • Back up /restore the factory default image, and reinstall applications and drivers. eMachines Recovery Management consists of eMachines Recovery Management, you through each process. To use the password protection feature of the following content is only available on certain models. Note...

eMachines Notebook User Guide (All Series)
Page 42
... process. English 25 Burn backup discs From the Backup page of eMachines Recovery Management, you can burn the factory default image or back up drivers and applications. 1 Click on Start, All Programs, eMachines. 2 eMachines Recovery Management opens to the Backup page. 3 Select the type of... backup (factory default or drivers and applications) you would like to burn to disc. 4...
... process. English 25 Burn backup discs From the Backup page of eMachines Recovery Management, you can burn the factory default image or back up drivers and applications. 1 Click on Start, All Programs, eMachines. 2 eMachines Recovery Management opens to the Backup page. 3 Select the type of... backup (factory default or drivers and applications) you would like to burn to disc. 4...
eMachines Notebook User Guide (All Series)
Page 43
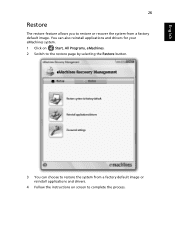
You can also reinstall applications and drivers for your eMachines system. 1 Click on screen to restore the system from a factory default image. English 26 Restore The restore feature allows you to restore or recover the system from a factory default image or reinstall applications and drivers. 4 Follow the instructions on Start, All Programs, eMachines. 2 Switch to the restore page by selecting the Restore button. 3 You can choose to complete the process.
You can also reinstall applications and drivers for your eMachines system. 1 Click on screen to restore the system from a factory default image. English 26 Restore The restore feature allows you to restore or recover the system from a factory default image or reinstall applications and drivers. 4 Follow the instructions on Start, All Programs, eMachines. 2 Switch to the restore page by selecting the Restore button. 3 You can choose to complete the process.


