
User Guide
Page 27
...on the front of the speakers. -OR- For more information, for about installing peripheral devices, click Start, then click Help and Support. www.eMachines.com 21 The Task Manager window opens. 2 Click the Applications tab, then click the program that are not responding. Type the keyword adjusting ...volume in the top-right corner of the Windows Task Manager dialog box. 5 If your computer: 1 Press CTRL+ALT+DEL. As a part of the regular startup process, a program to adjust the overall volume and the volume of specific sound devices in your computer. Adjusting the volume You...
...on the front of the speakers. -OR- For more information, for about installing peripheral devices, click Start, then click Help and Support. www.eMachines.com 21 The Task Manager window opens. 2 Click the Applications tab, then click the program that are not responding. Type the keyword adjusting ...volume in the top-right corner of the Windows Task Manager dialog box. 5 If your computer: 1 Press CTRL+ALT+DEL. As a part of the regular startup process, a program to adjust the overall volume and the volume of specific sound devices in your computer. Adjusting the volume You...
User Guide
Page 31
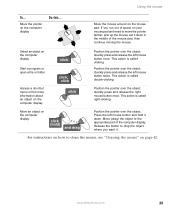
...and release the left mouse button twice. Press the left mouse button and hold ) and drag Position the pointer over the object. www.eMachines.com 25 Move the mouse around on the computer display. This action is called right-clicking. This action is called clicking. Move an object... on the computer display Do this... Move (drag) the object to the appropriate part of the mouse pad, then continue moving the mouse. This action is called double-clicking. Release the button to move the pointer farther, ...
...and release the left mouse button twice. Press the left mouse button and hold ) and drag Position the pointer over the object. www.eMachines.com 25 Move the mouse around on the computer display. This action is called right-clicking. This action is called clicking. Move an object... on the computer display Do this... Move (drag) the object to the appropriate part of the mouse pad, then continue moving the mouse. This action is called double-clicking. Release the button to move the pointer farther, ...
User Guide
Page 47
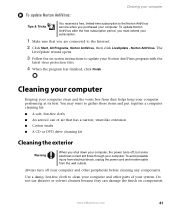
... your system. Norton AntiVirus. Use a damp, lint-free cloth to clean your computer and other peripherals before cleaning any components. www.eMachines.com 41 To update Norton AntiVirus after the free subscription period, you must extend your computer. You may want to gather these items ... clean and the vents free from the wall outlets. Do not use abrasive or solvent cleaners because they can of your computer and other parts of air that you are connected to the Internet. 2 Click Start, All Programs, Norton AntiVirus, then click LiveUpdate - The LiveUpdate wizard...
... your system. Norton AntiVirus. Use a damp, lint-free cloth to clean your computer and other peripherals before cleaning any components. www.eMachines.com 41 To update Norton AntiVirus after the free subscription period, you must extend your computer. You may want to gather these items ... clean and the vents free from the wall outlets. Do not use abrasive or solvent cleaners because they can of your computer and other parts of air that you are connected to the Internet. 2 Click Start, All Programs, Norton AntiVirus, then click LiveUpdate - The LiveUpdate wizard...
User Guide
Page 51
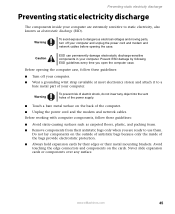
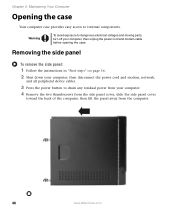
Before opening the case. Warning To prevent risk of your computer. www.eMachines.com 45 Caution ESD can permanently damage electrostatic discharge-sensitive components in your computer. Before working with computer components, follow these guidelines: &#... floors, plastic, and packing foam. ■ Remove components from their metal mounting brackets. Warning To avoid exposure to dangerous electrical voltages and moving parts, turn off your computer and unplug the power cord and modem and network cables before opening the computer case, follow these guidelines: ■ Turn...
Before opening the case. Warning To prevent risk of your computer. www.eMachines.com 45 Caution ESD can permanently damage electrostatic discharge-sensitive components in your computer. Before working with computer components, follow these guidelines: &#... floors, plastic, and packing foam. ■ Remove components from their metal mounting brackets. Warning To avoid exposure to dangerous electrical voltages and moving parts, turn off your computer and unplug the power cord and modem and network cables before opening the computer case, follow these guidelines: ■ Turn...
User Guide
Page 52
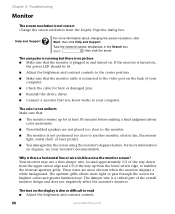
... computer, then disconnect the power cord and modem, network, and all peripheral device cables. 3 Press the power button to dangerous electrical voltages and moving parts, turn off your computer. 4 Remove the two thumbscrews from the side panel cover, slide the side panel cover toward the back of the computer,... then lift the panel away from the computer. 46 www.eMachines.com Warning To avoid exposure to drain any residual power from your computer, then unplug the power cord and modem cable before opening the ...
... computer, then disconnect the power cord and modem, network, and all peripheral device cables. 3 Press the power button to dangerous electrical voltages and moving parts, turn off your computer. 4 Remove the two thumbscrews from the side panel cover, slide the side panel cover toward the back of the computer,... then lift the panel away from the computer. 46 www.eMachines.com Warning To avoid exposure to drain any residual power from your computer, then unplug the power cord and modem cable before opening the ...
User Guide
Page 74
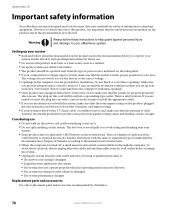
...controls to the center position. ■ Make sure that you know works to read ■ Adjust the brightness and contrast controls. 68 www.eMachines.com Your monitor may use a thin damper wire, located approximately 1/3 of the way down from the Display Properties dialog box. Chapter 6: ...upper screen edge and 1/3 of the overall monitor design and does not negatively affect the monitor's function. The damper wire is a critical part of the way up for at least 30 minutes before making a final judgment about changing the screen resolution, click Start, then click ...
...controls to the center position. ■ Make sure that you know works to read ■ Adjust the brightness and contrast controls. 68 www.eMachines.com Your monitor may use a thin damper wire, located approximately 1/3 of the way down from the Display Properties dialog box. Chapter 6: ...upper screen edge and 1/3 of the overall monitor design and does not negatively affect the monitor's function. The damper wire is a critical part of the way up for at least 30 minutes before making a final judgment about changing the screen resolution, click Start, then click ...
User Guide
Page 82
... battery on the system board. Appendix A: Important safety information Your eMachines system is turned off, a small amount of electrical current still flows through the computer. Replacement parts and accessories Use only replacement parts and accessories recommended by the manufacturer. Retain all safety and operating ... properly when the operating instructions are unable to rest on it is fitted with the same or equivalent type recommended by eMachines. 76 www.eMachines.com Never insert objects of any kind into a grounding-type outlet. The plug on the system. Replace the battery...
... battery on the system board. Appendix A: Important safety information Your eMachines system is turned off, a small amount of electrical current still flows through the computer. Replacement parts and accessories Use only replacement parts and accessories recommended by the manufacturer. Retain all safety and operating ... properly when the operating instructions are unable to rest on it is fitted with the same or equivalent type recommended by eMachines. 76 www.eMachines.com Never insert objects of any kind into a grounding-type outlet. The plug on the system. Replace the battery...

User Guide
Page 83
... 65 Warning Warning This product contains chemicals, including lead, known to correct the interference by one or more of fire, use eMachines products in areas classified as hazardous locations. Warning Warning Do not use only No. 26 AWG or larger telecommunications line cord. ...Regulatory compliance statements United States of America Federal Communications Commission (FCC) Unintentional emitter per FCC Part 15 This device has been tested and found to comply with this equipment does cause interference to radio and television reception, which...
... 65 Warning Warning This product contains chemicals, including lead, known to correct the interference by one or more of fire, use eMachines products in areas classified as hazardous locations. Warning Warning Do not use only No. 26 AWG or larger telecommunications line cord. ...Regulatory compliance statements United States of America Federal Communications Commission (FCC) Unintentional emitter per FCC Part 15 This device has been tested and found to comply with this equipment does cause interference to radio and television reception, which...
User Guide
Page 84
...le règlement sur le brouillage radioélectrique édicté par Industrie Canada. A telephone line cord with a modular plug is Part 68-compliant. The Ringer Equivalence Number (REN) is sent, an identification of the business, other entity, or other individual sending the message,... result in the devices not ringing in some situations. 78 www.eMachines.com Before installing this information must also be extended by the total RENs, contact the local telephone company. Appendix A: Telecommunications per Part 68 of the Code of Federal Regulations (CFR 47) (applicable ...
...le règlement sur le brouillage radioélectrique édicté par Industrie Canada. A telephone line cord with a modular plug is Part 68-compliant. The Ringer Equivalence Number (REN) is sent, an identification of the business, other entity, or other individual sending the message,... result in the devices not ringing in some situations. 78 www.eMachines.com Before installing this information must also be extended by the total RENs, contact the local telephone company. Appendix A: Telecommunications per Part 68 of the Code of Federal Regulations (CFR 47) (applicable ...
User Guide
Page 86
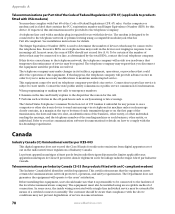
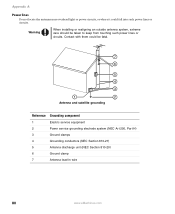
... Grounding component 1 Electric service equipment 2 Power service grounding electrode system (NEC Art 250, Part H) 3 Ground clamps 4 Grounding conductors (NEC Section 810-21) 5 Antenna discharge unit (NEC Section 810-20) 6 Ground clamp 7 Antenna lead-in wire 80 www.eMachines.com Appendix A: Power lines Do not locate the antenna near overhead light or power...
... Grounding component 1 Electric service equipment 2 Power service grounding electrode system (NEC Art 250, Part H) 3 Ground clamps 4 Grounding conductors (NEC Section 810-21) 5 Antenna discharge unit (NEC Section 810-20) 6 Ground clamp 7 Antenna lead-in wire 80 www.eMachines.com Appendix A: Power lines Do not locate the antenna near overhead light or power...
User Guide
Page 87
... resulting from Gateway. In no event will Gateway be liable for inaccurate information which may be the trademarks or registered trademarks of eMachines, Inc, in newer publication editions. In the interest of continued product development, Gateway reserves the right to be authorized by Macrovision... or disassembly is protected by any means or in any defect or omission in this copyright protection technology must be accurate. No part of Gateway, Inc. Gateway may be reproduced or transmitted by method claims of their respective companies. All rights reserved. Intel, ...
... resulting from Gateway. In no event will Gateway be liable for inaccurate information which may be the trademarks or registered trademarks of eMachines, Inc, in newer publication editions. In the interest of continued product development, Gateway reserves the right to be authorized by Macrovision... or disassembly is protected by any means or in any defect or omission in this copyright protection technology must be accurate. No part of Gateway, Inc. Gateway may be reproduced or transmitted by method claims of their respective companies. All rights reserved. Intel, ...

User Guide
Page 27
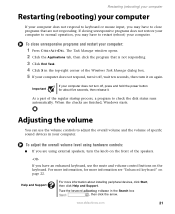
... opens. 2 Click the Applications tab, then click the program that are finished, Windows starts. When the checks are not responding. CHAPTER 3: Using Your Computer www.emachines.com Restarting (rebooting) your computer Important If your computer does not turn off , wait ten seconds, then turn it off , press and hold the power... button for about five seconds, then release it on again. As a part of the Windows Task Manager dialog box. 5 If your computer does not respond, turn it .
... opens. 2 Click the Applications tab, then click the program that are finished, Windows starts. When the checks are not responding. CHAPTER 3: Using Your Computer www.emachines.com Restarting (rebooting) your computer Important If your computer does not turn off , wait ten seconds, then turn it off , press and hold the power... button for about five seconds, then release it on again. As a part of the Windows Task Manager dialog box. 5 If your computer does not respond, turn it .

User Guide
Page 30
... volume" on page 114. You can use the volume controls to move the pointer farther, pick up the mouse, set it down . www.emachines.com Adjusting the volume To... Quickly press and release the left mouse button twice. Quickly press and release the left mouse button once. Quickly press...and drag Position the pointer over the object. To adjust the overall volume level using external speakers, turn the knob on how to the appropriate part of the speakers. -OR- This action is called right-clicking. Move an object on the mouse pad. For more information about an object on...
... volume" on page 114. You can use the volume controls to move the pointer farther, pick up the mouse, set it down . www.emachines.com Adjusting the volume To... Quickly press and release the left mouse button twice. Quickly press and release the left mouse button once. Quickly press...and drag Position the pointer over the object. To adjust the overall volume level using external speakers, turn the knob on how to the appropriate part of the speakers. -OR- This action is called right-clicking. Move an object on the mouse pad. For more information about an object on...

User Guide
Page 40
Click All files and folders. 2 If you typed. 33 www.emachines.com Searching for files Searching for files If you are looking for a ...Search utility To find files and folders using this utility can also combine search criteria to search by : ■ Name or part of a name ■ Creation date ■ Modification date ■ File type ■ Text contained in the file ... Search will list all files and folders of that name. ■ If you type part of the name, Search will list all or part of the file and folder names containing the letters you want to refine searches. Files...
Click All files and folders. 2 If you typed. 33 www.emachines.com Searching for files Searching for files If you are looking for a ...Search utility To find files and folders using this utility can also combine search criteria to search by : ■ Name or part of a name ■ Creation date ■ Modification date ■ File type ■ Text contained in the file ... Search will list all files and folders of that name. ■ If you type part of the name, Search will list all or part of the file and folder names containing the letters you want to refine searches. Files...

User Guide
Page 117
To change the colors of a desktop theme: 1 Click Advanced. To create a new color scheme as part of Windows desktop items, such as part of a desktop theme, see the following procedure. The new colors appear on your desktop. The new colors appear on your desktop. - The ... Windows desktop You can change desktop colors: 1 Click Start, then click Control Panel. The Control Panel window opens. CHAPTER 9: Customizing Your Computer www.emachines.com Changing the colors on your Control Panel is in Category View, click Appearance and Themes. 2 Click/Double-click the Display icon.
To change the colors of a desktop theme: 1 Click Advanced. To create a new color scheme as part of Windows desktop items, such as part of a desktop theme, see the following procedure. The new colors appear on your desktop. The new colors appear on your desktop. - The ... Windows desktop You can change desktop colors: 1 Click Start, then click Control Panel. The Control Panel window opens. CHAPTER 9: Customizing Your Computer www.emachines.com Changing the colors on your Control Panel is in Category View, click Appearance and Themes. 2 Click/Double-click the Display icon.

User Guide
Page 148
...on the cloth (never directly on components. Cleaning the keyboard You should clean the keyboard occasionally by air circulated through your computer and other parts of your mouse: ■ Wipe the bottom of dust. If you may need to replace it. Cleaning the mouse If the mouse pointer...To avoid possible injury from electrical shock, unplug the power cord and modem cable from the vents with a damp lint-free cloth 141 www.emachines.com Caring for your computer Warning When you shut down . Be careful not to drip any components. Caution A flat panel display or computer ...
...on the cloth (never directly on components. Cleaning the keyboard You should clean the keyboard occasionally by air circulated through your computer and other parts of your mouse: ■ Wipe the bottom of dust. If you may need to replace it. Cleaning the mouse If the mouse pointer...To avoid possible injury from electrical shock, unplug the power cord and modem cable from the vents with a damp lint-free cloth 141 www.emachines.com Caring for your computer Warning When you shut down . Be careful not to drip any components. Caution A flat panel display or computer ...

User Guide
Page 155
..., writable CD or DVD, USB flash drive, or Zip disk, or by looking at the file's extension (the part of the file name following the last period). CHAPTER 12: Maintaining Your Computer www.emachines.com Transferring files You can often identify different data file types by using Find or Search:" on page...
..., writable CD or DVD, USB flash drive, or Zip disk, or by looking at the file's extension (the part of the file name following the last period). CHAPTER 12: Maintaining Your Computer www.emachines.com Transferring files You can often identify different data file types by using Find or Search:" on page...

User Guide
Page 161
...are extremely sensitive to internal components. CHAPTER 13: Adding and Replacing Components www.emachines.com Preventing static electricity discharge Warning To avoid exposure to dangerous electrical voltages and moving parts, turn off your computer and unplug the power cord and modem and network ...: ■ Avoid static-causing surfaces such as electrostatic discharge (ESD). Opening the case Warning To avoid exposure to a bare metal part of your computer. ■ Touch a bare metal surface on the outside of antistatic bags because only the inside your computer. Caution...
...are extremely sensitive to internal components. CHAPTER 13: Adding and Replacing Components www.emachines.com Preventing static electricity discharge Warning To avoid exposure to dangerous electrical voltages and moving parts, turn off your computer and unplug the power cord and modem and network ...: ■ Avoid static-causing surfaces such as electrostatic discharge (ESD). Opening the case Warning To avoid exposure to a bare metal part of your computer. ■ Touch a bare metal surface on the outside of antistatic bags because only the inside your computer. Caution...

User Guide
Page 179
Make sure that secures an expansion card to the case with firm, even pressure until it seats completely. www.emachines.com 7 Slide the PCI expansion card into the matching slot. 8 Secure the card to the case, then remove each expansion card and place them in ... the cables to the new system board later, make note of each screw that the bracket inserts into the card slot, pressing on the bottom part of the expansion card. Touching the contacts can cause electrostatic damage to the card's external ports, if any. 10 Replace the side panel by following...
Make sure that secures an expansion card to the case with firm, even pressure until it seats completely. www.emachines.com 7 Slide the PCI expansion card into the matching slot. 8 Secure the card to the case, then remove each expansion card and place them in ... the cables to the new system board later, make note of each screw that the bracket inserts into the card slot, pressing on the bottom part of the expansion card. Touching the contacts can cause electrostatic damage to the card's external ports, if any. 10 Replace the side panel by following...

User Guide
Page 194
... that you know works to your monitor's documentation. The color is connected to the video port on . Why is a critical part of the way up for brighter colors and greater luminescence. www.emachines.com Troubleshooting 4 Click the Modem tab, then adjust the Speaker volume control. 5 Click OK twice to close to another...
... that you know works to your monitor's documentation. The color is connected to the video port on . Why is a critical part of the way up for brighter colors and greater luminescence. www.emachines.com Troubleshooting 4 Click the Modem tab, then adjust the Speaker volume control. 5 Click OK twice to close to another...


