
User Guide
Page 10
... Screen ...267 11.11.1 Restore: Step 1 ...268 11.11.2 Restore: Step 2 ...269 11.11.3 Restore: Step 3 ...270 11.11.4 Restore: Step 4 ...271 11.12 Polkast Setup ...271 11.13 Technical Reference ...275 11.13.1 S.M.A.R.T Attributes ...275 Chapter 12 Auto Upload ...279 10 Media Server User's Guide
... Screen ...267 11.11.1 Restore: Step 1 ...268 11.11.2 Restore: Step 2 ...269 11.11.3 Restore: Step 3 ...270 11.11.4 Restore: Step 4 ...271 11.12 Polkast Setup ...271 11.13 Technical Reference ...275 11.13.1 S.M.A.R.T Attributes ...275 Chapter 12 Auto Upload ...279 10 Media Server User's Guide
User Guide
Page 37
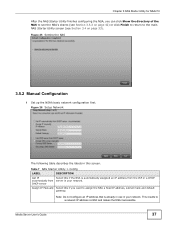
... a fixed IP address, subnet mask and default gateway. Figure 25 Setting the NAS 3.5.2 Manual Configuration 1 Set up the NSA's basic network configuration first. Figure 26 Setup Network The following table describes the labels in your network. Table 7 NAS Starter Utility > Config LABEL DESCRIPTION Get IP automatically from the ISP or a DHCP...
... a fixed IP address, subnet mask and default gateway. Figure 25 Setting the NAS 3.5.2 Manual Configuration 1 Set up the NSA's basic network configuration first. Figure 26 Setup Network The following table describes the labels in your network. Table 7 NAS Starter Utility > Config LABEL DESCRIPTION Get IP automatically from the ISP or a DHCP...
User Guide
Page 47
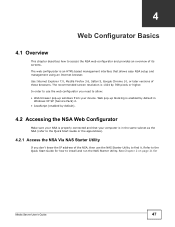
... to install and run the NAS Starter Utility. Web pop-up windows from your computer is an HTML-based management interface that allows easy NSA setup and management using an Internet browser. Use Internet Explorer 7.0, Mozilla Firefox 3.6, Safari 5, Google Chrome 10, or later versions of its screens. See Chapter 2 on page...
... to install and run the NAS Starter Utility. Web pop-up windows from your computer is an HTML-based management interface that allows easy NSA setup and management using an Internet browser. Use Internet Explorer 7.0, Mozilla Firefox 3.6, Safari 5, Google Chrome 10, or later versions of its screens. See Chapter 2 on page...
User Guide
Page 87
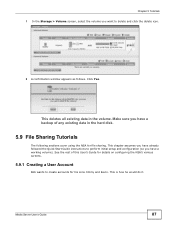
... have a working volume). Click Yes. Media Server User's Guide 87 This chapter assumes you have already followed the Quick Start Guide instructions to perform initial setup and configuration (so you want to create accounts for file sharing. Chapter 5 Tutorials 1 In the Storage > Volume screen, select the volume you have a backup of...
... have a working volume). Click Yes. Media Server User's Guide 87 This chapter assumes you have already followed the Quick Start Guide instructions to perform initial setup and configuration (so you want to create accounts for file sharing. Chapter 5 Tutorials 1 In the Storage > Volume screen, select the volume you have a backup of...
User Guide
Page 121
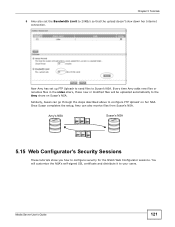
You will be uploaded automatically to the Amy share on her Internet connection. Once Susan completes the setup, Amy can go through the steps described above to configure FTP Uploadr on Susan's NSA. Every time Amy adds new files or renames files in ...
You will be uploaded automatically to the Amy share on her Internet connection. Once Susan completes the setup, Amy can go through the steps described above to configure FTP Uploadr on Susan's NSA. Every time Amy adds new files or renames files in ...
User Guide
Page 159
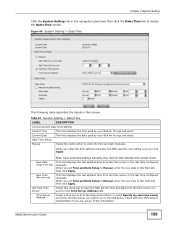
... you enter the time settings manually, the NSA uses the new setting once you are unsure of this information. When you set Time and Date Setup to Manual, enter the new date in this field and then click Apply. This field displays the last updated time from the time server or... the last date configured manually. When you set Time and Date Setup to Manual, enter the new time in this field and then click Apply. Chapter 7 System Setting Click the System Setting link in the navigation panel...
... you enter the time settings manually, the NSA uses the new setting once you are unsure of this information. When you set Time and Date Setup to Manual, enter the new date in this field and then click Apply. This field displays the last updated time from the time server or... the last date configured manually. When you set Time and Date Setup to Manual, enter the new time in this field and then click Apply. Chapter 7 System Setting Click the System Setting link in the navigation panel...
User Guide
Page 171
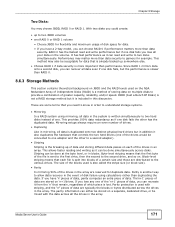
... provides 100% data redundancy as if one disk fails the other to allow data recovery in the event of the drives in an array. Mirroring setups always require an even number of drives. • Duplexing Like in mirroring, all data is written simultaneously to the second drive, and so on. Striping...
... provides 100% data redundancy as if one disk fails the other to allow data recovery in the event of the drives in an array. Mirroring setups always require an even number of drives. • Duplexing Like in mirroring, all data is written simultaneously to the second drive, and so on. Striping...

User Guide
Page 271
... to install the Polkast package. Table 89 Protect > Restore: Step 4 LABEL DESCRIPTION Step 3. Click this to go back to the Backup screen. 11.12 Polkast Setup Use the Package Management screen to install the Polkast package. Previous Done • Volume - Set a restore target and start restoring Browse Click this to select...
... to install the Polkast package. Table 89 Protect > Restore: Step 4 LABEL DESCRIPTION Step 3. Click this to go back to the Backup screen. 11.12 Polkast Setup Use the Package Management screen to install the Polkast package. Previous Done • Volume - Set a restore target and start restoring Browse Click this to select...
User Guide
Page 390
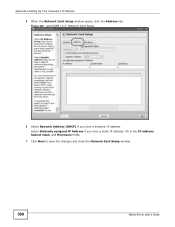
Appendix A Setting Up Your Computer's IP Address 5 When the Network Card Setup window opens, click the Address tab Figure 223 openSUSE 10.3: Network Card Setup 6 Select Dynamic Address (DHCP) if you have a dynamic IP address. Select Statically assigned IP Address if you have a static IP address. Fill in the IP address, Subnet mask, and Hostname fields. 7 Click Next to save the changes and close the Network Card Setup window. 390 Media Server User's Guide
Appendix A Setting Up Your Computer's IP Address 5 When the Network Card Setup window opens, click the Address tab Figure 223 openSUSE 10.3: Network Card Setup 6 Select Dynamic Address (DHCP) if you have a dynamic IP address. Select Statically assigned IP Address if you have a static IP address. Fill in the IP address, Subnet mask, and Hostname fields. 7 Click Next to save the changes and close the Network Card Setup window. 390 Media Server User's Guide
User Guide
Page 573
... level, Flickr 285 scanning volumes 168 schedule, power management 322 scheduling, download service 200 secure connections 127 server entry, FTP Uploadr 289 server name 158 setup COPY/SYNC button 215 download service 194 Flickr 284 FTP Uploadr 290 media server 190 P2P download 201 print server 214 YouTube 285, 286 share...
... level, Flickr 285 scanning volumes 168 schedule, power management 322 scheduling, download service 200 secure connections 127 server entry, FTP Uploadr 289 server name 158 setup COPY/SYNC button 215 download service 194 Flickr 284 FTP Uploadr 290 media server 190 P2P download 201 print server 214 YouTube 285, 286 share...

Quick Start Guide
Page 13
ENGLISH To turn off the NSA, press the power button in the screen that displays. Access the NSA 1. The installation wizard begins. Follow the installer instructions. Click Setup in and hold it until you hear a beep. Insert the included CD into your CD-ROM drive. Double-click setup.exe. 2. Click Finish to the CD-ROM. Then release the button. Then click the NAS Starter Utility link. If this screen does not display, use Windows Explorer (My Computer) to go to complete the installation. 15
ENGLISH To turn off the NSA, press the power button in the screen that displays. Access the NSA 1. The installation wizard begins. Follow the installer instructions. Click Setup in and hold it until you hear a beep. Insert the included CD into your CD-ROM drive. Double-click setup.exe. 2. Click Finish to the CD-ROM. Then release the button. Then click the NAS Starter Utility link. If this screen does not display, use Windows Explorer (My Computer) to go to complete the installation. 15
