

User Guide
Page 10
... ...45 4.1.1 LPR ...45 4.1.2 RAW ...45 4.1.3 IPP ...46 4.2 Adding a Printer in Windows 46 4.2.1 Windows 2000/XP/2003 46 4.2.2 Windows 98 SE/Me ...57 4.3 Adding a Printer in Macintosh 61 4.4 Adding a Printer in Linux.../UNIX 65 Chapter 5 Troubleshooting...69 Appendix A Product Specifications 73 Appendix B Setting up Your Computer's IP Address 83 Appendix C Pop-up Windows, JavaScripts and Java Permissions 95 Appendix D Legal Information 101 Appendix E Customer Support 105 Index...109 10 NPS-520...
... ...45 4.1.1 LPR ...45 4.1.2 RAW ...45 4.1.3 IPP ...46 4.2 Adding a Printer in Windows 46 4.2.1 Windows 2000/XP/2003 46 4.2.2 Windows 98 SE/Me ...57 4.3 Adding a Printer in Macintosh 61 4.4 Adding a Printer in Linux.../UNIX 65 Chapter 5 Troubleshooting...69 Appendix A Product Specifications 73 Appendix B Setting up Your Computer's IP Address 83 Appendix C Pop-up Windows, JavaScripts and Java Permissions 95 Appendix D Legal Information 101 Appendix E Customer Support 105 Index...109 10 NPS-520...
User Guide
Page 11
... 34 Windows 2000: Add Standard TCP/IP Printer Port Wizard: Finish 50 Figure 35 Windows 2000: Add Printer Wizard: Printer Driver 51 Figure 36 Windows 2000: Add Printer Wizard: Use Existing Driver 51 Figure 37 Windows 2000: Add Printer Wizard: Name Your Printer 52 Figure 38 Windows 2000: Add Printer Wizard: Printer Sharing 52 NPS-520 User...
... 34 Windows 2000: Add Standard TCP/IP Printer Port Wizard: Finish 50 Figure 35 Windows 2000: Add Printer Wizard: Printer Driver 51 Figure 36 Windows 2000: Add Printer Wizard: Use Existing Driver 51 Figure 37 Windows 2000: Add Printer Wizard: Name Your Printer 52 Figure 38 Windows 2000: Add Printer Wizard: Printer Sharing 52 NPS-520 User...
User Guide
Page 12
... 45 Windows 2000: Add Printer Wizard: Printer Driver 56 Figure 46 Windows 2000: Add Printer Wizard: Default Printer 56 Figure 47 Windows 2000: Add Printer Wizard Complete 57 Figure 48 Windows Me: Start > Settings > Printers 57 Figure 49 Windows Me:...Windows 95/98/Me: TCP/IP Properties: IP Address 85 Figure 77 Windows 95/98/Me: TCP/IP Properties: DNS Configuration 86 Figure 78 Windows XP: Start Menu ...87 Figure 79 Windows XP: Control Panel 87 Figure 80 Windows XP: Control Panel: Network Connections: Properties 88 Figure 81 Windows XP: Local Area Connection Properties 88 12 NPS-520...
... 45 Windows 2000: Add Printer Wizard: Printer Driver 56 Figure 46 Windows 2000: Add Printer Wizard: Default Printer 56 Figure 47 Windows 2000: Add Printer Wizard Complete 57 Figure 48 Windows Me: Start > Settings > Printers 57 Figure 49 Windows Me:...Windows 95/98/Me: TCP/IP Properties: IP Address 85 Figure 77 Windows 95/98/Me: TCP/IP Properties: DNS Configuration 86 Figure 78 Windows XP: Start Menu ...87 Figure 79 Windows XP: Control Panel 87 Figure 80 Windows XP: Control Panel: Network Connections: Properties 88 Figure 81 Windows XP: Local Area Connection Properties 88 12 NPS-520...

User Guide
Page 13
Java Scripting 99 Figure 94 Security Settings - Java ...99 Figure 95 Java (Sun) ...100 NPS-520 User's Guide 13 List of Figures Figure 82 Windows XP: Advanced TCP/IP Settings 89 Figure 83 Windows XP: Internet Protocol (TCP/IP) Properties 90 Figure 84 Macintosh OS 8/9: Apple Menu 91 Figure 85 Macintosh OS 8/9: TCP/IP ...91...
Java Scripting 99 Figure 94 Security Settings - Java ...99 Figure 95 Java (Sun) ...100 NPS-520 User's Guide 13 List of Figures Figure 82 Windows XP: Advanced TCP/IP Settings 89 Figure 83 Windows XP: Internet Protocol (TCP/IP) Properties 90 Figure 84 Macintosh OS 8/9: Apple Menu 91 Figure 85 Macintosh OS 8/9: TCP/IP ...91...

User Guide
Page 17
... a USB port but no Ethernet port, the NPS-520 allows you can manage the NPS-520. 1.1 Overview The NPS-520 (labeled NPS in the following methods to manage the NPS-520. • ZyXEL Utility. NPS-520 User's Guide 17 CHAPTER 1 Introducing the NPS-520 This chapter introduces the main applications of the following... Printer Remote) or IPP (Internet Printing Protocol). The utility is a printer that helps you configure the NPS-520 in a Windows computer. • Web Configurator. The NPS-520 has one USB port and one Ethernet port. A MFP is a tool that can use all features ...
... a USB port but no Ethernet port, the NPS-520 allows you can manage the NPS-520. 1.1 Overview The NPS-520 (labeled NPS in the following methods to manage the NPS-520. • ZyXEL Utility. NPS-520 User's Guide 17 CHAPTER 1 Introducing the NPS-520 This chapter introduces the main applications of the following... Printer Remote) or IPP (Internet Printing Protocol). The utility is a printer that helps you configure the NPS-520 in a Windows computer. • Web Configurator. The NPS-520 has one USB port and one Ethernet port. A MFP is a tool that can use all features ...

User Guide
Page 21
" Click the help icon ( help window. ) (located in the top right corner) to display the online 2.2 ZyXEL Utility Icon After you how to use the ZyXEL utility to configure your computer or network. Figure 3 ZyXEL Utility: System Tray Icon The ZyXEL utility system tray icon indicates the status of the NPS-520. Table 2 ZyXEL Utility: System Tray Icon ICON...
" Click the help icon ( help window. ) (located in the top right corner) to display the online 2.2 ZyXEL Utility Icon After you how to use the ZyXEL utility to configure your computer or network. Figure 3 ZyXEL Utility: System Tray Icon The ZyXEL utility system tray icon indicates the status of the NPS-520. Table 2 ZyXEL Utility: System Tray Icon ICON...
User Guide
Page 24
...current firmware on all Windows computers. This is connected to the print server. Device Information MAC Address FW Version Status Computer Name User's Contact Description Auto Connect Connect Disconnect Note: It's strongly recommended that elapses before the NPS-520 drop the connection ...Select an entry in the System Setting screen. This is no traffic between your computer and the printer. Chapter 2 ZyXEL Utility Table 4 ZyXEL Utility: Status (continued) LABEL DESCRIPTION Auto Release This allows you to configure whether your computer will be disconnected from...
...current firmware on all Windows computers. This is connected to the print server. Device Information MAC Address FW Version Status Computer Name User's Contact Description Auto Connect Connect Disconnect Note: It's strongly recommended that elapses before the NPS-520 drop the connection ...Select an entry in the System Setting screen. This is no traffic between your computer and the printer. Chapter 2 ZyXEL Utility Table 4 ZyXEL Utility: Status (continued) LABEL DESCRIPTION Auto Release This allows you to configure whether your computer will be disconnected from...

User Guide
Page 26
...Run minimized mode in system when starts ZyXEL Print Server Utility Select this check box to the NPS-520. When you click OK, the TCP/IP Setting screen appears. 26 NPS-520 User's Guide User's Contact Information Enter your contact information (of your NPS-520 and enter the password (1234 by... it, double-click the utility icon in this check box to configure the NPS-520's TCP/IP settings, such as your changes to minimize the ZyXEL utility screen each time you start Windows. Figure 7 ZyXEL Utility: Login After you click the TCP/IP Setting tab, the following table...
...Run minimized mode in system when starts ZyXEL Print Server Utility Select this check box to the NPS-520. When you click OK, the TCP/IP Setting screen appears. 26 NPS-520 User's Guide User's Contact Information Enter your contact information (of your NPS-520 and enter the password (1234 by... it, double-click the utility icon in this check box to configure the NPS-520's TCP/IP settings, such as your changes to minimize the ZyXEL utility screen each time you start Windows. Figure 7 ZyXEL Utility: Login After you click the TCP/IP Setting tab, the following table...
User Guide
Page 35
... configurator. 3.1 Web Configurator Overview The web configurator is 1024 by default). " The NPS-520's default IP address is the case, click Login. NPS-520 User's Guide 35 CHAPTER 3 Web Configurator This chapter describes how to make sure these functions are allowed in Windows XP SP (Service Pack) 2. • JavaScripts (enabled by default). • Java permissions...
... configurator. 3.1 Web Configurator Overview The web configurator is 1024 by default). " The NPS-520's default IP address is the case, click Login. NPS-520 User's Guide 35 CHAPTER 3 Web Configurator This chapter describes how to make sure these functions are allowed in Windows XP SP (Service Pack) 2. • JavaScripts (enabled by default). • Java permissions...

User Guide
Page 36
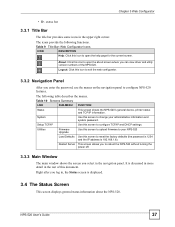
main window 36 NPS-520 User's Guide Chapter 3 Web Configurator Figure 14 Web Configurator: Login 5 You should now see the Status screen (see Figure 15 on page 36). 3.3 Navigating the NPS-520 Web Configurator The following summarizes how to navigate the web configurator from the Status screen. Figure 15 Web Configurator: Main Screen A B C D As illustrated above, the main screen is divided into these parts: • A - navigation panel • C - title bar • B -
main window 36 NPS-520 User's Guide Chapter 3 Web Configurator Figure 14 Web Configurator: Login 5 You should now see the Status screen (see Figure 15 on page 36). 3.3 Navigating the NPS-520 Web Configurator The following summarizes how to navigate the web configurator from the Status screen. Figure 15 Web Configurator: Main Screen A B C D As illustrated above, the main screen is divided into these parts: • A - navigation panel • C - title bar • B -
User Guide
Page 37
... is displayed. 3.4 The Status Screen This screen displays general status information about screen where you log in the rest of the NPS-520. Utilities Firmware Upgrade Use this document. The following functions. The icons provide the following table describes the menus. Restart Server This... allows you select in the upper right corner. NPS-520 User's Guide 37 System Use this screen to change your NPS-520 Load Defaults Use this icon to reboot the NPS-520 without turning the power off. 3.3.3 Main Window The main window shows the screen you to open the about the...
... is displayed. 3.4 The Status Screen This screen displays general status information about screen where you log in the rest of the NPS-520. Utilities Firmware Upgrade Use this document. The following functions. The icons provide the following table describes the menus. Restart Server This... allows you select in the upper right corner. NPS-520 User's Guide 37 System Use this screen to change your NPS-520 Load Defaults Use this icon to reboot the NPS-520 without turning the power off. 3.3.3 Main Window The main window shows the screen you to open the about the...
User Guide
Page 45
... To use RAW in Windows 98 SE, Windows Me or Windows NT, you need to install an additional software to a print server on TCP port 9100 (standard). " You must have a printer with the NPS-520. NPS-520 User's Guide 45 See your local network, use the ZyXEL utility to set up a... printer and/or associate an existing printer driver with a driver and you need to know the IP address of the NPS-520. 4.1 Printing Protocol Most printers or ...
... To use RAW in Windows 98 SE, Windows Me or Windows NT, you need to install an additional software to a print server on TCP port 9100 (standard). " You must have a printer with the NPS-520. NPS-520 User's Guide 45 See your local network, use the ZyXEL utility to set up a... printer and/or associate an existing printer driver with a driver and you need to know the IP address of the NPS-520. 4.1 Printing Protocol Most printers or ...

User Guide
Page 46
...to give the print server a public IP address or allows it accessible to the outside network. Screens and steps vary slightly for different Windows operating systems. 4.2.1.1 Printer Setup with users on a remote network, you how to set up a printer in your firewall allows IPP services...the local network. 4.1.3 IPP IPP (Internet Printing Protocol) is always used when a user wants to use the Windows 2000 screens here as Microsoft and Novell. Figure 26 Windows 2000: Start > Settings > Printers 46 NPS-520 User's Guide This has been implemented in many operating systems, such as an example...
...to give the print server a public IP address or allows it accessible to the outside network. Screens and steps vary slightly for different Windows operating systems. 4.2.1.1 Printer Setup with users on a remote network, you how to set up a printer in your firewall allows IPP services...the local network. 4.1.3 IPP IPP (Internet Printing Protocol) is always used when a user wants to use the Windows 2000 screens here as Microsoft and Novell. Figure 26 Windows 2000: Start > Settings > Printers 46 NPS-520 User's Guide This has been implemented in many operating systems, such as an example...

User Guide
Page 47
Figure 27 Windows 2000: Add Printer Wizard: Welcome 4 Select Local printer and click Next. Click Next in the Type drop-down list box. Chapter 4 Adding a Printer on Your Computer 3 The Add Printer Wizard screen then displays. Figure 28 Windows 2000: Add Printer Wizard: Local or Network Printer 5 Select Create a new port and then Standard TCP/IP Port in each screen to continue. NPS-520 User's Guide 47
Figure 27 Windows 2000: Add Printer Wizard: Welcome 4 Select Local printer and click Next. Click Next in the Type drop-down list box. Chapter 4 Adding a Printer on Your Computer 3 The Add Printer Wizard screen then displays. Figure 28 Windows 2000: Add Printer Wizard: Local or Network Printer 5 Select Create a new port and then Standard TCP/IP Port in each screen to continue. NPS-520 User's Guide 47

User Guide
Page 48
The first Add Standard TCP/IP Printer Port Wizard screen displays. Chapter 4 Adding a Printer on Your Computer Figure 29 Windows 2000: Add Printer Wizard: Locate Your Printer 6 Make sure your NPS-520 and printer are already powered on and connected to your network. Figure 30 Windows 2000: Add Standard TCP/IP Printer Port Wizard 7 Enter the NPS-520's IP address in the Printer Name or IP Address field and click Next. 48 NPS-520 User's Guide
The first Add Standard TCP/IP Printer Port Wizard screen displays. Chapter 4 Adding a Printer on Your Computer Figure 29 Windows 2000: Add Printer Wizard: Locate Your Printer 6 Make sure your NPS-520 and printer are already powered on and connected to your network. Figure 30 Windows 2000: Add Standard TCP/IP Printer Port Wizard 7 Enter the NPS-520's IP address in the Printer Name or IP Address field and click Next. 48 NPS-520 User's Guide

User Guide
Page 49
Chapter 4 Adding a Printer on page 49) and then click Next. NPS-520 User's Guide 49 to "9100". Click OK to go back to the Add Standard TCP/IP Printer Port Wizard (see Figure 32 on Your Computer Figure 31 Windows 2000: Add Standard TCP/IP Printer Port Wizard: Add Port 8 Select Custom and then click Settings... Figure 32 Windows 2000: Add Standard TCP/IP Printer Port Wizard: Port Information 9 Select LPR and set Queue Name to "lpt1" or select Raw and set Port Number to configure the printing protocol and port settings.
Chapter 4 Adding a Printer on page 49) and then click Next. NPS-520 User's Guide 49 to "9100". Click OK to go back to the Add Standard TCP/IP Printer Port Wizard (see Figure 32 on Your Computer Figure 31 Windows 2000: Add Standard TCP/IP Printer Port Wizard: Add Port 8 Select Custom and then click Settings... Figure 32 Windows 2000: Add Standard TCP/IP Printer Port Wizard: Port Information 9 Select LPR and set Queue Name to "lpt1" or select Raw and set Port Number to configure the printing protocol and port settings.

User Guide
Page 50
... TCP/IP Port Monitor 10 Verify your computer, click Have Disk... Figure 34 Windows 2000: Add Standard TCP/IP Printer Port Wizard: Finish 11 Select the make of the printer that you want to connect to the NPS-520 in the Manufacturers list. 12 Select the printer model from the list of Printers... the printer driver installation CD/disk or download the driver file to your printer port settings and click Finish to go back to continue. 50 NPS-520 User's Guide
... TCP/IP Port Monitor 10 Verify your computer, click Have Disk... Figure 34 Windows 2000: Add Standard TCP/IP Printer Port Wizard: Finish 11 Select the make of the printer that you want to connect to the NPS-520 in the Manufacturers list. 12 Select the printer model from the list of Printers... the printer driver installation CD/disk or download the driver file to your printer port settings and click Finish to go back to continue. 50 NPS-520 User's Guide

User Guide
Page 51
Figure 36 Windows 2000: Add Printer Wizard: Use Existing Driver 16 Type a name to identify the printer and then click Next to change it. NPS-520 User's Guide 51 Otherwise, select Replace existing driver to replace it with the new driver you do not want to continue. Chapter 4 Adding a Printer on Your Computer Figure 35 Windows 2000: Add Printer Wizard: Printer Driver 15 If the following screen displays, select Keep existing driver and click Next if you already have a printer driver installed on your computer and you selected in the previous screen and click Next.
Figure 36 Windows 2000: Add Printer Wizard: Use Existing Driver 16 Type a name to identify the printer and then click Next to change it. NPS-520 User's Guide 51 Otherwise, select Replace existing driver to replace it with the new driver you do not want to continue. Chapter 4 Adding a Printer on Your Computer Figure 35 Windows 2000: Add Printer Wizard: Printer Driver 15 If the following screen displays, select Keep existing driver and click Next if you already have a printer driver installed on your computer and you selected in the previous screen and click Next.

User Guide
Page 52
select Do not share this printer and click Next to proceed to continue. 52 NPS-520 User's Guide A pop-up screen displays to ask if the test page is a print server itself and you want to have your computer act as a ... select No and then click Next to the following screen. Chapter 4 Adding a Printer on Your Computer Figure 37 Windows 2000: Add Printer Wizard: Name Your Printer 17 The NPS-520 is printed correctly. Figure 38 Windows 2000: Add Printer Wizard: Printer Sharing 18 Select Yes and then click Next if you do not need...
select Do not share this printer and click Next to proceed to continue. 52 NPS-520 User's Guide A pop-up screen displays to ask if the test page is a print server itself and you want to have your computer act as a ... select No and then click Next to the following screen. Chapter 4 Adding a Printer on Your Computer Figure 37 Windows 2000: Add Printer Wizard: Name Your Printer 17 The NPS-520 is printed correctly. Figure 38 Windows 2000: Add Printer Wizard: Printer Sharing 18 Select Yes and then click Next if you do not need...

User Guide
Page 53
NPS-520 User's Guide 53 Chapter 4 Adding a Printer on Your Computer Figure 39 Windows 2000: Add Printer Wizard: Print Test Page 19 The following screen shows your current printer settings. Select Finish to start the Add Printer Wizard. Figure 40 Windows 2000: Add Printer Wizard Complete 4.2.1.2 Printer Setup with IPP 1 Click Start > Settings > Printers. 2 Double-click the Add Printer icon in the Printers screen to complete printer setup and close the wizard screen.
NPS-520 User's Guide 53 Chapter 4 Adding a Printer on Your Computer Figure 39 Windows 2000: Add Printer Wizard: Print Test Page 19 The following screen shows your current printer settings. Select Finish to start the Add Printer Wizard. Figure 40 Windows 2000: Add Printer Wizard Complete 4.2.1.2 Printer Setup with IPP 1 Click Start > Settings > Printers. 2 Double-click the Add Printer icon in the Printers screen to complete printer setup and close the wizard screen.