User Guide
Page 9
... 19 Language ...139 19.1 Language Screen ...139 Chapter 20 Troubleshooting...141 20.1 Power, Hardware Connections, and LEDs 141 20.2 NBG-418N Access and Login ...142 20.3 Internet Access ...143 20.4 Resetting the NBG-418N to Its Factory Defaults 144 20.5 Wireless Problems ...145 Appendix A IP Addresses and Subnetting 147 Appendix B Pop-up Windows, JavaScripts and Java...
... 19 Language ...139 19.1 Language Screen ...139 Chapter 20 Troubleshooting...141 20.1 Power, Hardware Connections, and LEDs 141 20.2 NBG-418N Access and Login ...142 20.3 Internet Access ...143 20.4 Resetting the NBG-418N to Its Factory Defaults 144 20.5 Wireless Problems ...145 Appendix A IP Addresses and Subnetting 147 Appendix B Pop-up Windows, JavaScripts and Java...
User Guide
Page 18
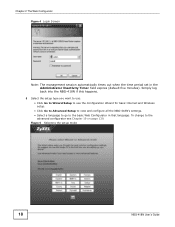
... the basic Web Configurator in the Administrator Inactivity Timer field expires (default five minutes). Chapter 2 The Web Configurator Figure 4 Login Screen Note: The management session automatically times out when the time period set in that language. Simply log back into the NBG-418N if this happens. 5 Select the setup type you want to ... Setup to use the Configuration Wizard for basic Internet and Wireless setup. • Click Go to Advanced Setup to view and configure all the NBG-418N's settings. • Select a language to go to the advanced configurator see Chapter 19 on page 139.
... the basic Web Configurator in the Administrator Inactivity Timer field expires (default five minutes). Chapter 2 The Web Configurator Figure 4 Login Screen Note: The management session automatically times out when the time period set in that language. Simply log back into the NBG-418N if this happens. 5 Select the setup type you want to ... Setup to use the Configuration Wizard for basic Internet and Wireless setup. • Click Go to Advanced Setup to view and configure all the NBG-418N's settings. • Select a language to go to the advanced configurator see Chapter 19 on page 139.
User Guide
Page 74
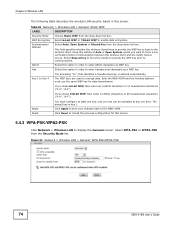
... field specifies whether the wireless clients have to provide the WEP key to login to encrypt data. The WEP keys are used to the wireless client. ... Key 1 to enter ASCII characters as a WEP key. Both the NBG-418N and the wireless stations must configure at least one key, only one time. The default key is entered automatically. Select WPA-PSK or WPA2-PSK from the ...to provide the WEP key prior to force a key verification before communication between the wireless client and the ZyXEL Device occurs. If you chose 64-bit WEP, then enter any one key can be activated at Auto ...
... field specifies whether the wireless clients have to provide the WEP key to login to encrypt data. The WEP keys are used to the wireless client. ... Key 1 to enter ASCII characters as a WEP key. Both the NBG-418N and the wireless stations must configure at least one key, only one time. The default key is entered automatically. Select WPA-PSK or WPA2-PSK from the ...to provide the WEP key prior to force a key verification before communication between the wireless client and the ZyXEL Device occurs. If you chose 64-bit WEP, then enter any one key can be activated at Auto ...
User Guide
Page 141
... 1 Make sure you are divided into the following categories. • Power, Hardware Connections, and LEDs • NBG-418N Access and Login • Internet Access • Resetting the NBG-418N to the NBG-418N. 5 If the problem continues, contact the vendor. One of the LEDs does not behave as expected. 1 Make.... Contact the vendor to replace any damaged cables. 4 Disconnect and re-connect the power adaptor to Its Factory Defaults • Wireless Problems 20.1 Power, Hardware Connections, and LEDs The NBG-418N does not turn on . 3 Disconnect and re-connect the power adaptor or cord to the...
... 1 Make sure you are divided into the following categories. • Power, Hardware Connections, and LEDs • NBG-418N Access and Login • Internet Access • Resetting the NBG-418N to the NBG-418N. 5 If the problem continues, contact the vendor. One of the LEDs does not behave as expected. 1 Make.... Contact the vendor to replace any damaged cables. 4 Disconnect and re-connect the power adaptor to Its Factory Defaults • Wireless Problems 20.1 Power, Hardware Connections, and LEDs The NBG-418N does not turn on . 3 Disconnect and re-connect the power adaptor or cord to the...
User Guide
Page 142
... the DHCP server. Chapter 20 Troubleshooting 20.2 NBG-418N Access and Login I don't know the IP address of my NBG-418N. 142 NBG-418N User's Guide I forgot the username and password. 1 The default username is admin and default password is 1234. 2 If this IP address in your Internet browser.Set your NBG-418N to change all settings back to its factory...
... the DHCP server. Chapter 20 Troubleshooting 20.2 NBG-418N Access and Login I don't know the IP address of my NBG-418N. 142 NBG-418N User's Guide I forgot the username and password. 1 The default username is admin and default password is 1234. 2 If this IP address in your Internet browser.Set your NBG-418N to change all settings back to its factory...
User Guide
Page 143
...the Quick Start Guide. 2 Make sure you have to reset the device to its factory defaults, and try one of the advanced suggestions. The default username is admin and default password is in to the NBG-418N. 1 Make sure you entered your last session. Chapter 20 Troubleshooting 2 Check the hardware .... 1 Check the hardware connections, and make sure [Caps Lock] is not on. 2 This can see the Login screen, but I can happen when you have entered the password correctly. NBG-418N User's Guide 143 See the Quick Start Guide. 3 Make sure your computer is 1234. See Appendix B on ...
...the Quick Start Guide. 2 Make sure you have to reset the device to its factory defaults, and try one of the advanced suggestions. The default username is admin and default password is in to the NBG-418N. 1 Make sure you entered your last session. Chapter 20 Troubleshooting 2 Check the hardware .... 1 Check the hardware connections, and make sure [Caps Lock] is not on. 2 This can see the Login screen, but I can happen when you have entered the password correctly. NBG-418N User's Guide 143 See the Quick Start Guide. 3 Make sure your computer is 1234. See Appendix B on ...