
User Guide
Page 12
...4 The Web Configurator ...39 4.1 Overview ...39 4.2 System Login ...39 4.3 The Status Screen ...40 4.3.1 Change Your Password ...44 4.4 Saving Your Configuration ...44 4.5 Switch Lockout ...44 4.6 Resetting the Switch ...45 4.6.1 Reload the Configuration File 45 4.7 Logging Out of the Web Configurator 46 4.8 Help ...46 Chapter 5 Initial Setup Example...47 5.1 Overview ...47 5.1.1 Creating... ...59 Chapter 7 System Status and Port Statistics...60 7.1 Overview ...60 7.1.1 What You Can Do ...60 7.2 Port Status Summary ...61 7.2.1 Status: Port Details ...63 12 GS2200-8/24 User's Guide
...4 The Web Configurator ...39 4.1 Overview ...39 4.2 System Login ...39 4.3 The Status Screen ...40 4.3.1 Change Your Password ...44 4.4 Saving Your Configuration ...44 4.5 Switch Lockout ...44 4.6 Resetting the Switch ...45 4.6.1 Reload the Configuration File 45 4.7 Logging Out of the Web Configurator 46 4.8 Help ...46 Chapter 5 Initial Setup Example...47 5.1 Overview ...47 5.1.1 Creating... ...59 Chapter 7 System Status and Port Statistics...60 7.1 Overview ...60 7.1.1 What You Can Do ...60 7.2 Port Status Summary ...61 7.2.1 Status: Port Details ...63 12 GS2200-8/24 User's Guide
User Guide
Page 26
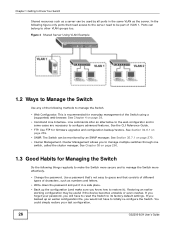
... and in some cases are necessary to manage multiple switches through one switch, called the cluster manager. Cluster Management allows you would not have to reset the Switch to manage the Switch. • Web Configurator. See Chapter 38 on page 270. • Cluster Management. If you backed up the...Guide. • FTP. The Switch can be useful if the device becomes unstable or even crashes. If you forget your last configuration. 26 GS2200-8/24 User's Guide In the following things regularly to make sure you will have to manage the Switch more secure and to totally re-configure...
... and in some cases are necessary to manage multiple switches through one switch, called the cluster manager. Cluster Management allows you would not have to reset the Switch to manage the Switch. • Web Configurator. See Chapter 38 on page 270. • Cluster Management. If you backed up the...Guide. • FTP. The Switch can be useful if the device becomes unstable or even crashes. If you forget your last configuration. 26 GS2200-8/24 User's Guide In the following things regularly to make sure you will have to manage the Switch more secure and to totally re-configure...
User Guide
Page 45
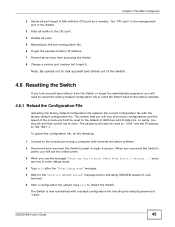
... Reload the Configuration File Uploading the factory-default configuration file replaces the current configuration file with the factory-default configuration file. The password will be reset to "1234" and the IP address to none. The Switch is the management port of the Switch. 3 Filter all traffic to the CPU ... of 9600 bps with the CPU port as a member. To upload the configuration file, do the following: 1 Connect to begin a session. GS2200-8/24 User's Guide 45 This means that you see the initial screen. 3 When you will lose all previous configurations and the speed of the ...
... Reload the Configuration File Uploading the factory-default configuration file replaces the current configuration file with the factory-default configuration file. The password will be reset to "1234" and the IP address to none. The Switch is the management port of the Switch. 3 Filter all traffic to the CPU ... of 9600 bps with the CPU port as a member. To upload the configuration file, do the following: 1 Connect to begin a session. GS2200-8/24 User's Guide 45 This means that you see the initial screen. 3 When you will lose all previous configurations and the speed of the ...
User Guide
Page 64
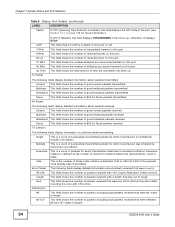
.... Late This is the number of times a late collision is detected, that were in length. 64 GS2200-8/24 User's Guide Broadcast This field shows the number of maximum collisions before the retransmission count is reset. TX Collision The following fields display detailed information about packets transmitted. Excessive This is a count of packets...
.... Late This is the number of times a late collision is detected, that were in length. 64 GS2200-8/24 User's Guide Broadcast This field shows the number of maximum collisions before the retransmission count is reset. TX Collision The following fields display detailed information about packets transmitted. Excessive This is a count of packets...
User Guide
Page 69
... is recommended that you use this format it is similar to 60 seconds. The Switch searches for the timeserver for up to 1970-1-1 0:0:0. GS2200-8/24 User's Guide 69 Figure 42 Basic Setting > General Setup The following table describes the labels in this menu (or refresh the menu). ...are the time format. spaces are allowed. Time (RFC-868) format displays a 4-byte integer giving the total number of this screen will be reset to 64 printable characters; This name consists of up to Time (RFC-868). Each time you select a timeserver that your geographical time zone....
... is recommended that you use this format it is similar to 60 seconds. The Switch searches for the timeserver for up to 1970-1-1 0:0:0. GS2200-8/24 User's Guide 69 Figure 42 Basic Setting > General Setup The following table describes the labels in this menu (or refresh the menu). ...are the time format. spaces are allowed. Time (RFC-868) format displays a 4-byte integer giving the total number of this screen will be reset to 64 printable characters; This name consists of up to Time (RFC-868). Each time you select a timeserver that your geographical time zone....
User Guide
Page 72
...are given the default priority of the Join Period timer for voice traffic that you are based on VLAN setup for outgoing traffic. 72 GS2200-8/24 User's Guide Level 6 Typically used for non-critical "background" traffic such as bulk transfers that contains bits to higher index queues...router configuration messages. Leave Timer Leave Time sets the duration of service. Leave All Timer must be larger than Join Timer; Cancel Click Cancel to reset the fields. 8.6 IP Setup Use the IP Setup screen to -physical queue mapping. Each port has a Join Period timer. Each port has...
...are given the default priority of the Join Period timer for voice traffic that you are based on VLAN setup for outgoing traffic. 72 GS2200-8/24 User's Guide Level 6 Typically used for non-critical "background" traffic such as bulk transfers that contains bits to higher index queues...router configuration messages. Leave Timer Leave Time sets the duration of service. Leave All Timer must be larger than Join Timer; Cancel Click Cancel to reset the fields. 8.6 IP Setup Use the IP Setup screen to -physical queue mapping. Each port has a Join Period timer. Each port has...
User Guide
Page 74
...can assign the Switch an IP address, subnet mask, a default gateway IP address and a domain name server IP address automatically. Cancel Click Cancel to reset the fields to the pre-defined VLAN(s). Chapter 8 Basic Setting Table 12 Basic Setting > IP Setup (continued) LABEL DESCRIPTION DHCP Client Select this .... IP Subnet Mask Enter the IP subnet mask of Management VLAN. The default is a member of your Switch in the Delete column. 74 GS2200-8/24 User's Guide IP Address Enter the IP address for example 192.168.1.1. The Switch loses these changes if it is not a member of...
...can assign the Switch an IP address, subnet mask, a default gateway IP address and a domain name server IP address automatically. Cancel Click Cancel to reset the fields to the pre-defined VLAN(s). Chapter 8 Basic Setting Table 12 Basic Setting > IP Setup (continued) LABEL DESCRIPTION DHCP Client Select this .... IP Subnet Mask Enter the IP subnet mask of Management VLAN. The default is a member of your Switch in the Delete column. 74 GS2200-8/24 User's Guide IP Address Enter the IP address for example 192.168.1.1. The Switch loses these changes if it is not a member of...
User Guide
Page 102
...so use the Save link on the top navigation panel to save your rule to activate your changes to clear the Delete check boxes. 102 GS2200-8/24 User's Guide This field displays the descriptive name for identification purposes for this static MAC address forwarding rule. Click Add to save your...the port where the MAC address shown in the next field will be forwarded. Click Clear to which the MAC address belongs. Click Cancel to reset the fields to remove the selected entry from the summary table. Click Delete to their last saved values. Click an index number to modify ...
...so use the Save link on the top navigation panel to save your rule to activate your changes to clear the Delete check boxes. 102 GS2200-8/24 User's Guide This field displays the descriptive name for identification purposes for this static MAC address forwarding rule. Click Add to save your...the port where the MAC address shown in the next field will be forwarded. Click Clear to which the MAC address belongs. Click Cancel to reset the fields to remove the selected entry from the summary table. Click Delete to their last saved values. Click an index number to modify ...
User Guide
Page 105
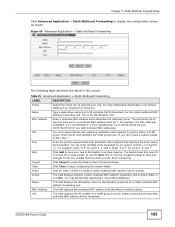
... MAC address forwarding rule is for ports 3, 4, and 5. This is active (Yes) or not (No). Cancel Click Cancel to reset the fields to display the configuration screen as shown. Name This field displays the descriptive name for identification purposes for port(s). Chapter 11 ...describes the labels in this screen afresh. Enter the ID that identifies a multicast group. For example, enter "3-5" for identification only. GS2200-8/24 User's Guide 105 You can forward frames with destination MAC address that matched the entry above are valid multicast MAC addresses. ...
... MAC address forwarding rule is for ports 3, 4, and 5. This is active (Yes) or not (No). Cancel Click Cancel to reset the fields to display the configuration screen as shown. Name This field displays the descriptive name for identification purposes for port(s). Chapter 11 ...describes the labels in this screen afresh. Enter the ID that identifies a multicast group. For example, enter "3-5" for identification only. GS2200-8/24 User's Guide 105 You can forward frames with destination MAC address that matched the entry above are valid multicast MAC addresses. ...
User Guide
Page 108
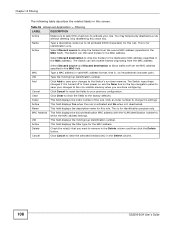
...frames to your changes to change the settings. The Switch loses these changes if it is it by deselecting this screen. Click Cancel to reset the fields to the destination MAC address (specified in the MAC address). This field displays Yes when the rule is activated and No ...-volatile memory when you want to /from the MAC address. Select Discard source to clear the selected checkbox(es) in the Delete column. 108 GS2200-8/24 User's Guide Type a MAC address in valid MAC address format, that you are done configuring. This field displays the VLAN group identification number...
...frames to your changes to change the settings. The Switch loses these changes if it is it by deselecting this screen. Click Cancel to reset the fields to the destination MAC address (specified in the MAC address). This field displays Yes when the rule is activated and No ...-volatile memory when you want to /from the MAC address. Select Discard source to clear the selected checkbox(es) in the Delete column. 108 GS2200-8/24 User's Guide Type a MAC address in valid MAC address format, that you are done configuring. This field displays the VLAN group identification number...

User Guide
Page 131
GS2200-8/24 User's Guide 131 Cancel Click Cancel to the Switch's run-time memory. Chapter 14 Bandwidth Control Table 37 Advanced Application > Bandwidth Control (continued) LABEL DESCRIPTION Apply Click Apply to save your changes to reset the fields. The Switch loses these changes if it is turned off or loses power, so use the Save link on the top navigation panel to save your changes to the non-volatile memory when you are done configuring.
GS2200-8/24 User's Guide 131 Cancel Click Cancel to the Switch's run-time memory. Chapter 14 Bandwidth Control Table 37 Advanced Application > Bandwidth Control (continued) LABEL DESCRIPTION Apply Click Apply to save your changes to reset the fields. The Switch loses these changes if it is turned off or loses power, so use the Save link on the top navigation panel to save your changes to the non-volatile memory when you are done configuring.
User Guide
Page 133
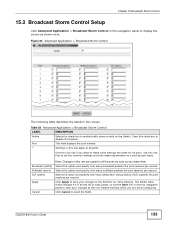
This field displays the port number. Select this check box to enable traffic storm control on a port-by-port basis. GS2200-8/24 User's Guide 133 Chapter 15 Broadcast Storm Control 15.2 Broadcast Storm Control Setup Click Advanced Application > Broadcast Storm Control in this option and specify ... the same for all ports. Select this screen. Clear this check box to disable this row first to display the screen as you want to reset the fields. Use this feature. The Switch loses these changes if it is turned off or loses power, so use the Save link on the...
This field displays the port number. Select this check box to enable traffic storm control on a port-by-port basis. GS2200-8/24 User's Guide 133 Chapter 15 Broadcast Storm Control 15.2 Broadcast Storm Control Setup Click Advanced Application > Broadcast Storm Control in this option and specify ... the same for all ports. Select this screen. Clear this check box to disable this row first to display the screen as you want to reset the fields. Use this feature. The Switch loses these changes if it is turned off or loses power, so use the Save link on the...
User Guide
Page 136
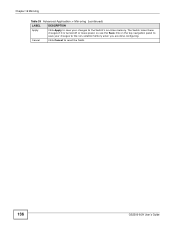
Chapter 16 Mirroring Table 39 Advanced Application > Mirroring (continued) LABEL DESCRIPTION Apply Click Apply to save your changes to the non-volatile memory when you are done configuring. The Switch loses these changes if it is turned off or loses power, so use the Save link on the top navigation panel to save your changes to the Switch's run-time memory. Cancel Click Cancel to reset the fields. 136 GS2200-8/24 User's Guide
Chapter 16 Mirroring Table 39 Advanced Application > Mirroring (continued) LABEL DESCRIPTION Apply Click Apply to save your changes to the non-volatile memory when you are done configuring. The Switch loses these changes if it is turned off or loses power, so use the Save link on the top navigation panel to save your changes to the Switch's run-time memory. Cancel Click Cancel to reset the fields. 136 GS2200-8/24 User's Guide
User Guide
Page 156
...Save link on page 158 for more information. To specify a destination, select the second choice and type a MAC address in the Index field. 156 GS2200-8/24 User's Guide Source IP Address/ Address Prefix Socket Number You may select Establish Only for more information. Select Any to apply the rule to...in decimal value. Specify the address prefix by entering the number of ones in this case results in a 32-bit notation. Click Cancel to reset the fields back to your changes to the Switch's run-time memory. IP Protocol Select an IP protocol type or select Other and enter the...
...Save link on page 158 for more information. To specify a destination, select the second choice and type a MAC address in the Index field. 156 GS2200-8/24 User's Guide Source IP Address/ Address Prefix Socket Number You may select Establish Only for more information. Select Any to apply the rule to...in decimal value. Specify the address prefix by entering the number of ones in this case results in a 32-bit notation. Click Cancel to reset the fields back to your changes to the Switch's run-time memory. IP Protocol Select an IP protocol type or select Other and enter the...
User Guide
Page 162
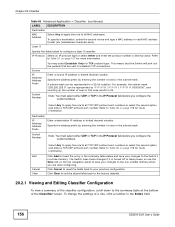
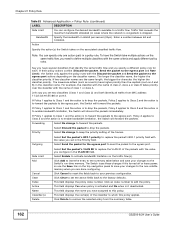
...port, Policy 2 applies to Class 2 and the action is to foward the packets to activate bandwidth limitation on port 3. Click Cancel to reset the fields back to your changes to remove the selected entry from MAC address 11:22:33:44:55:66 on the traffic flow(s). Traffic... policy rule for each. Click Clear to set two classifiers (Class 1 and Class 2) and both identify all traffic from the summary table. 162 GS2200-8/24 User's Guide Priority Select Discard the packet to the factory defaults. Click Delete to the Switch's run-time memory. Specify the action(s) the ...
...port, Policy 2 applies to Class 2 and the action is to foward the packets to activate bandwidth limitation on port 3. Click Cancel to reset the fields back to your changes to remove the selected entry from MAC address 11:22:33:44:55:66 on the traffic flow(s). Traffic... policy rule for each. Click Clear to set two classifiers (Class 1 and Class 2) and both identify all traffic from the summary table. 162 GS2200-8/24 User's Guide Priority Select Discard the packet to the factory defaults. Click Delete to the Switch's run-time memory. Specify the action(s) the ...
User Guide
Page 175
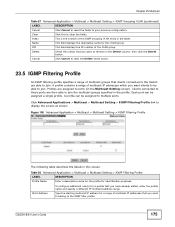
... Figure 108 Advanced Application > Multicast > Multicast Setting > IGMP Filtering Profile The following table describes the labels in the table. GS2200-8/24 User's Guide 175 Chapter 23 Multicast Table 57 Advanced Application > Multicast > Multicast Setting > IGMP Snooping VLAN (continued) LABEL ...DESCRIPTION Cancel Click Cancel to reset the fields to display the screen as shown. Name This field displays the descriptive name for identification purposes. Profiles are then...
... Figure 108 Advanced Application > Multicast > Multicast Setting > IGMP Filtering Profile The following table describes the labels in the table. GS2200-8/24 User's Guide 175 Chapter 23 Multicast Table 57 Advanced Application > Multicast > Multicast Setting > IGMP Snooping VLAN (continued) LABEL ...DESCRIPTION Cancel Click Cancel to reset the fields to display the screen as shown. Name This field displays the descriptive name for identification purposes. Profiles are then...

User Guide
Page 196
... of VLAN IDs by using a dash. If this binding applies to the MAC address in this , and click Delete to the right. Click this to reset the values above based on the last selected static binding or, if not applicable, to clear the fields above . Chapter 25 IP Source Guard The... describes the labels in the binding. Click this to clear the fields above . If this screen, click Advanced Application > IP Source Guard > DHCP Snooping. 196 GS2200-8/24 User's Guide
... of VLAN IDs by using a dash. If this binding applies to the MAC address in this , and click Delete to the right. Click this to reset the values above based on the last selected static binding or, if not applicable, to clear the fields above . Chapter 25 IP Source Guard The... describes the labels in the binding. Click this to clear the fields above . If this screen, click Advanced Application > IP Source Guard > DHCP Snooping. 196 GS2200-8/24 User's Guide
User Guide
Page 201
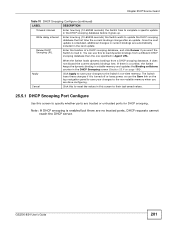
... DHCP snooping database than the one specified in this screen to their last-saved values. 25.5.1 DHCP Snooping Port Configure Use this to reset the values in Agent URL. GS2200-8/24 User's Guide 201 You can use the Save link on page 196). Once the next update is turned off or loses...
... DHCP snooping database than the one specified in this screen to their last-saved values. 25.5.1 DHCP Snooping Port Configure Use this to reset the values in Agent URL. GS2200-8/24 User's Guide 201 You can use the Save link on page 196). Once the next update is turned off or loses...
User Guide
Page 203
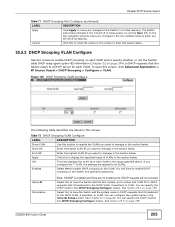
Cancel Click this to reset the values in this screen to their last-saved values. 25.5.2 DHCP Snooping VLAN Configure Use this screen to enable DHCP snooping on each VLAN ... and VLAN ID to DHCP requests that it is enabled and there are done configuring. Select this to the DHCP VLAN, if specified, or VLAN. GS2200-8/24 User's Guide 203 Figure 125 DHCP Snooping VLAN Configure The following table describes the labels in the range specified above. End VID Enter the...
Cancel Click this to reset the values in this screen to their last-saved values. 25.5.2 DHCP Snooping VLAN Configure Use this screen to enable DHCP snooping on each VLAN ... and VLAN ID to DHCP requests that it is enabled and there are done configuring. Select this to the DHCP VLAN, if specified, or VLAN. GS2200-8/24 User's Guide 203 Figure 125 DHCP Snooping VLAN Configure The following table describes the labels in the range specified above. End VID Enter the...
User Guide
Page 204
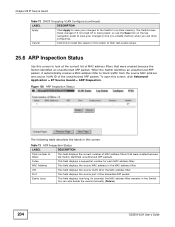
...Status Use this screen to look at the current list of the unauthorized ARP packet. You can also delete the record manually (Delete). 204 GS2200-8/24 User's Guide Figure 126 ARP Inspection Status The following table describes the labels in this screen, click Advanced Application > IP Source Guard... > ARP Inspection. Cancel Click this to reset the values in the MAC address filter. Expiry (sec) This field displays how long (in seconds) the MAC address filter remains in the...
...Status Use this screen to look at the current list of the unauthorized ARP packet. You can also delete the record manually (Delete). 204 GS2200-8/24 User's Guide Figure 126 ARP Inspection Status The following table describes the labels in this screen, click Advanced Application > IP Source Guard... > ARP Inspection. Cancel Click this to reset the values in the MAC address filter. Expiry (sec) This field displays how long (in seconds) the MAC address filter remains in the...


