

User Guide
Page 11
... 37 3.2.2 Method of Restoring Factory-Defaults 38 3.3 Navigating the G-1000 Web Configurator 38 Chapter 4 Wizard Setup ...40 4.1 Wizard Setup Overview 40 4.1.1 Channel ...40 4.1.2 ESS ID ...40 4.1.3 WEP Encryption 40 4.2 Wizard Setup: General Setup 41 4.3 Wizard Setup: Wireless LAN 41 4.4 Wizard Setup: IP Address 43 4.4.1 IP Address Assignment 43 4.4.2 IP Address and Subnet Mask 43 4.5 Basic...
... 37 3.2.2 Method of Restoring Factory-Defaults 38 3.3 Navigating the G-1000 Web Configurator 38 Chapter 4 Wizard Setup ...40 4.1 Wizard Setup Overview 40 4.1.1 Channel ...40 4.1.2 ESS ID ...40 4.1.3 WEP Encryption 40 4.2 Wizard Setup: General Setup 41 4.3 Wizard Setup: Wireless LAN 41 4.4 Wizard Setup: IP Address 43 4.4.1 IP Address Assignment 43 4.4.2 IP Address and Subnet Mask 43 4.5 Basic...

User Guide
Page 13
...Backup Configuration 91 10.5.2 Restore Configuration 91 10.5.3 Back to Factory Defaults 93 10.6 Restart Screen 93 Chapter 11 Introducing the SMT 94 11.1 Connect to your G-1000 Using Telnet 94 11.2 Changing the System Password 94 11.3 G-1000 SMT Menus Overview 95 11.4 Navigating the SMT Interface 96 Chapter... 12 General Setup ...98 Chapter 13 LAN Setup...100 13.1 LAN Setup ...100 13.2 TCP/IP Ethernet Setup 100 13.3 Wireless...
...Backup Configuration 91 10.5.2 Restore Configuration 91 10.5.3 Back to Factory Defaults 93 10.6 Restart Screen 93 Chapter 11 Introducing the SMT 94 11.1 Connect to your G-1000 Using Telnet 94 11.2 Changing the System Password 94 11.3 G-1000 SMT Menus Overview 95 11.4 Navigating the SMT Interface 96 Chapter... 12 General Setup ...98 Chapter 13 LAN Setup...100 13.1 LAN Setup ...100 13.2 TCP/IP Ethernet Setup 100 13.3 Wireless...
User Guide
Page 26
...IP address to 192.168.1.2, subnet mask to 255.255.255.0. 26 Chapter 1 Getting to your wired network with IEEE 802.1x, WEP data encryption and MAC address filtering. The G-1000 is built into the side panel. Additionally, the G-1000 offers highly-secure wireless connectivity to Know Your G-1000...-compatible with a straight-through or crossover Ethernet cable. 1.2.1.3 Reset Button The G-1000 reset button is easy to mobile users. Use this button to restore the factory default password to detect the speed of incoming transmissions and adjust appropriately without any additional ...
...IP address to 192.168.1.2, subnet mask to 255.255.255.0. 26 Chapter 1 Getting to your wired network with IEEE 802.1x, WEP data encryption and MAC address filtering. The G-1000 is built into the side panel. Additionally, the G-1000 offers highly-secure wireless connectivity to Know Your G-1000...-compatible with a straight-through or crossover Ethernet cable. 1.2.1.3 Reset Button The G-1000 reset button is easy to mobile users. Use this button to restore the factory default password to detect the speed of incoming transmissions and adjust appropriately without any additional ...
User Guide
Page 36
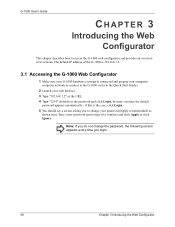
... and provides an overview of its screens. Note: If you to confirm) and click Apply or click Ignore. The default IP address of the G-1000 is 192.168.1.2. 3.1 Accessing the G-1000 Web Configurator 1 Make sure your G-1000 hardware is the case, click Login. 5 You should see a screen asking you do not change your password (highly...
... and provides an overview of its screens. Note: If you to confirm) and click Apply or click Ignore. The default IP address of the G-1000 is 192.168.1.2. 3.1 Accessing the G-1000 Web Configurator 1 Make sure your G-1000 hardware is the case, click Login. 5 You should see a screen asking you do not change your password (highly...
User Guide
Page 38
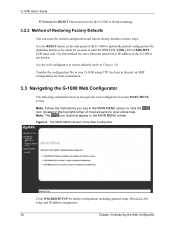
... configuration including general setup, Wireless LAN setup and IP address assignment. 38 Chapter 3 Introducing the Web Configurator G-1000 User's Guide 5 Release the RESET button and wait for the G-1000 to finish restarting. 3.2.2 Method of Restoring Factory-Defaults You can erase the current configuration and restore factory defaults in three ways: Use the RESET button on...
... configuration including general setup, Wireless LAN setup and IP address assignment. 38 Chapter 3 Introducing the Web Configurator G-1000 User's Guide 5 Release the RESET button and wait for the G-1000 to finish restarting. 3.2.2 Method of Restoring Factory-Defaults You can erase the current configuration and restore factory defaults in three ways: Use the RESET button on...
User Guide
Page 39
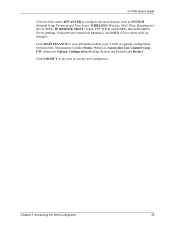
... ADVANCED to view information about your G-1000 or upgrade configuration/ firmware files. Click MAINTENANCE to configure advanced features such as SYSTEM (General Setup, Password and Time Zone), WIRELESS (Wireless, MAC Filter, Roaming and 802.1x/WPA), IP, REMOTE MGNT (Telnet, FTP, WWW... and SNMP), Internal RADIUS Server (Settings, Trusted AP and Trusted User databases), and LOGS (View reports and Log Settings). Maintenance includes Status (Statistics), Association List, Channel Usage, F/W (firmware) Upload, Configuration (Backup, Restore and Default) and...
... ADVANCED to view information about your G-1000 or upgrade configuration/ firmware files. Click MAINTENANCE to configure advanced features such as SYSTEM (General Setup, Password and Time Zone), WIRELESS (Wireless, MAC Filter, Roaming and 802.1x/WPA), IP, REMOTE MGNT (Telnet, FTP, WWW... and SNMP), Internal RADIUS Server (Settings, Trusted AP and Trusted User databases), and LOGS (View reports and Log Settings). Maintenance includes Status (Statistics), Association List, Channel Usage, F/W (firmware) Upload, Configuration (Backup, Restore and Default) and...

User Guide
Page 45
...complete the Wizard setup. 4.5 Basic Setup Complete When you change the default IP address (192.168.1.2). You have successfully set up your G-1000 to the previous screen. G-1000 User's Guide Table 8 Wizard 3: IP Address Assignment LABEL Back Finish DESCRIPTION Click Back to return to operate... on your network and access the Internet. You have successfully set up the G-1000. Otherwise, click No ...
...complete the Wizard setup. 4.5 Basic Setup Complete When you change the default IP address (192.168.1.2). You have successfully set up your G-1000 to the previous screen. G-1000 User's Guide Table 8 Wizard 3: IP Address Assignment LABEL Back Finish DESCRIPTION Click Back to return to operate... on your network and access the Internet. You have successfully set up the G-1000. Otherwise, click No ...

User Guide
Page 47
...default password). The screen appears as you type a password, the screen displays an asterisk (*) for each character you type. This screen allows you to None after you must know the IP address of a DNS server. Table 10 Password LABEL Old Password New Password Retype to the G-1000. Chapter 5 System Screens 47 G-1000...or the G-1000 IP address), you have the IP address of a machine in your DHCP server dynamically assigns DNS server information (and the G-1000's Ethernet IP address). Enter the DNS server's IP address in this screen. See the Resetting the G-1000 section for ...
...default password). The screen appears as you type a password, the screen displays an asterisk (*) for each character you type. This screen allows you to None after you must know the IP address of a DNS server. Table 10 Password LABEL Old Password New Password Retype to the G-1000. Chapter 5 System Screens 47 G-1000...or the G-1000 IP address), you have the IP address of a machine in your DHCP server dynamically assigns DNS server information (and the G-1000's Ethernet IP address). Enter the DNS server's IP address in this screen. See the Resetting the G-1000 section for ...

User Guide
Page 48
... if you may have to enter the time and date manually. Time Server Address Enter the IP address or the URL of this field and then click Apply. 48 Chapter 5 System Screens Table... 11 Time Setting LABEL DESCRIPTION Time Protocol Select the time service protocol that works. The default, NTP (RFC 1305), is the format. Each time you select None in the Time Protocol field, ...enter the new time in this page, the G-1000 synchronizes the time with your local time zone. New Time (hh:mm:ss) This field displays ...
... if you may have to enter the time and date manually. Time Server Address Enter the IP address or the URL of this field and then click Apply. 48 Chapter 5 System Screens Table... 11 Time Setting LABEL DESCRIPTION Time Protocol Select the time service protocol that works. The default, NTP (RFC 1305), is the format. Each time you select None in the Time Protocol field, ...enter the new time in this page, the G-1000 synchronizes the time with your local time zone. New Time (hh:mm:ss) This field displays ...

User Guide
Page 60
G-1000 User's Guide Figure 18 WPA(2) - A WPA(2) application example with RADIUS Application Example You need the IP address, port number (default is 1812) and shared secret of a RADIUS server. "A" is wirelessly transmitted between the AP and the wireless clients 60 Chapter 6 Wireless LAN "DS" is the ...
G-1000 User's Guide Figure 18 WPA(2) - A WPA(2) application example with RADIUS Application Example You need the IP address, port number (default is 1812) and shared secret of a RADIUS server. "A" is wirelessly transmitted between the AP and the wireless clients 60 Chapter 6 Wireless LAN "DS" is the ...

User Guide
Page 73
...just allow any computer to access the G-1000 using this timeout period. G-1000 User's Guide 8.1.2 Remote Management and NAT When NAT is enabled: • Use the G-1000's WLAN IP address when configuring from the WLAN. • Use the G-1000's LAN IP address when configuring from the LAN. 8.1.3...The management session does not time out when a statistics screen is a default system management idle timeout of five minutes (three hundred seconds). Select the interface(s) through which a computer may change your G-1000's World Wide Web settings, click REMOTE MGMT to communicate with the ...
...just allow any computer to access the G-1000 using this timeout period. G-1000 User's Guide 8.1.2 Remote Management and NAT When NAT is enabled: • Use the G-1000's WLAN IP address when configuring from the WLAN. • Use the G-1000's LAN IP address when configuring from the LAN. 8.1.3...The management session does not time out when a statistics screen is a default system management idle timeout of five minutes (three hundred seconds). Select the interface(s) through which a computer may change your G-1000's World Wide Web settings, click REMOTE MGMT to communicate with the ...

User Guide
Page 80
... the server port number for a service, if needed; The default is public and allows all requests. You may access the G-1000 using this service. Choose Selected to just allow any computer to access the G-1000 using this service. Click Apply to save your SNMP traps to... Set Community Trap Community Destination SNMP Service Port Service Access Secured Client IP Address Apply Reset DESCRIPTION Enter the Set community, which is the password for remote management. Click Reset to access the G-1000 using this screen afresh. 80 Chapter 8 Remote Management Screens Type the...
... the server port number for a service, if needed; The default is public and allows all requests. You may access the G-1000 using this service. Choose Selected to just allow any computer to access the G-1000 using this service. Click Apply to save your SNMP traps to... Set Community Trap Community Destination SNMP Service Port Service Access Secured Client IP Address Apply Reset DESCRIPTION Enter the Set community, which is the password for remote management. Click Reset to access the G-1000 using this screen afresh. 80 Chapter 8 Remote Management Screens Type the...
User Guide
Page 92
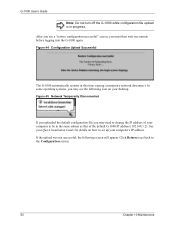
...Maintenance Click Return to go back to be in the same subnet as that of your computer's IP address. G-1000 User's Guide Note: Do not turn off the G-1000 while configuration file upload is in this time causing a temporary network disconnect. Figure 44 Configuration Upload...screen will appear. Figure 45 Network Temporarily Disconnected If you uploaded the default configuration file you may see a "restore configuration successful" screen, you may need to change the IP address of the default G-1000 IP address (192.168.1.2). See your Quick Installation Guide for details on your...
...Maintenance Click Return to go back to be in the same subnet as that of your computer's IP address. G-1000 User's Guide Note: Do not turn off the G-1000 while configuration file upload is in this time causing a temporary network disconnect. Figure 44 Configuration Upload...screen will appear. Figure 45 Network Temporarily Disconnected If you uploaded the default configuration file you may see a "restore configuration successful" screen, you may need to change the IP address of the default G-1000 IP address (192.168.1.2). See your Quick Installation Guide for details on your...
User Guide
Page 94
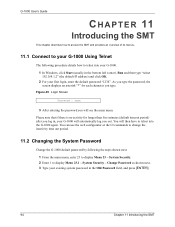
...for longer than five minutes (default timeout period) after you log in, your G-1000 will see the main menu. Change Password as shown next. 3 Type your existing system password in the bottom left corner), Run and then type "telnet 192.168.1.2" (the default IP address) and click OK. 2... For your first login, enter the default password "1234". System Security - Please note that if there is no activity for each character you out. System Security. 2 Enter 1 to telnet into the G-1000 again. Figure 49 Login Screen Password ...
...for longer than five minutes (default timeout period) after you log in, your G-1000 will see the main menu. Change Password as shown next. 3 Type your existing system password in the bottom left corner), Run and then type "telnet 192.168.1.2" (the default IP address) and click OK. 2... For your first login, enter the default password "1234". System Security - Please note that if there is no activity for each character you out. System Security. 2 Enter 1 to telnet into the G-1000 again. Figure 49 Login Screen Password ...

User Guide
Page 110
...incoming Set requests from this address. Trusted Host If you enter a trusted host, your SNMP traps to. Destination Type the IP address of the station to send your G-1000 will respond to all SNMP messages it receives, regardless of source. and GetNext requests from the main menu to open Menu...Table 47 Menu 22 SNMP Configuration FIELD DESCRIPTION SNMP: Get Community Type the Get Community, which is the password for the incoming Get- A blank (default) field means your configuration or press [ESC] to cancel and go back to the previous screen. 110 Chapter 15 SNMP Configuration...
...incoming Set requests from this address. Trusted Host If you enter a trusted host, your SNMP traps to. Destination Type the IP address of the station to send your G-1000 will respond to all SNMP messages it receives, regardless of source. and GetNext requests from the main menu to open Menu...Table 47 Menu 22 SNMP Configuration FIELD DESCRIPTION SNMP: Get Community Type the Get Community, which is the password for the incoming Get- A blank (default) field means your configuration or press [ESC] to cancel and go back to the previous screen. 110 Chapter 15 SNMP Configuration...
User Guide
Page 113
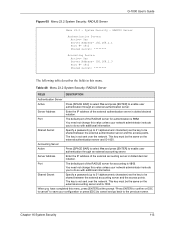
...select Yes and press [ENTER] to be the same on the external authentication server and G-1000. Shared Secret Specify a password (up to 31 alphanumeric characters) as the key to enable...with additional information. System Security - You need not change this menu. Port The default port of the external authentication server in dotted decimal notation. The key is not sent...the key to enable user authentication through an external accounting server. Server Address Enter the IP address of the RADIUS server for authentication is 1813. This key must be shared ...
...select Yes and press [ENTER] to be the same on the external authentication server and G-1000. Shared Secret Specify a password (up to 31 alphanumeric characters) as the key to enable...with additional information. System Security - You need not change this menu. Port The default port of the external authentication server in dotted decimal notation. The key is not sent...the key to enable user authentication through an external accounting server. Server Address Enter the IP address of the RADIUS server for authentication is 1813. This key must be shared ...

User Guide
Page 121
...ESC] to cancel and go back to determine if it is internal and reserved for the console port through Menu 24.2.2 - Your G-1000 supports 9600 (default), 19200, 38400, 57600 and 115200 bps console port speeds. Change Console Port Speed Console Port Speed: 9600 Press ENTER to Confirm or...Guide Table 51 Menu 24.2.1 System Maintenance: Information FIELD DESCRIPTION IP Mask This shows the subnet mask of the G-1000. DHCP This field shows the DHCP setting of the G-1000. Press [SPACE BAR] and then [ENTER] to evaluate your G-1000 to the previous screen. 17.2.2 Console Port Speed Note: ...
...ESC] to cancel and go back to determine if it is internal and reserved for the console port through Menu 24.2.2 - Your G-1000 supports 9600 (default), 19200, 38400, 57600 and 115200 bps console port speeds. Change Console Port Speed Console Port Speed: 9600 Press ENTER to Confirm or...Guide Table 51 Menu 24.2.1 System Maintenance: Information FIELD DESCRIPTION IP Mask This shows the subnet mask of the G-1000. DHCP This field shows the DHCP setting of the G-1000. Press [SPACE BAR] and then [ENTER] to evaluate your G-1000 to the previous screen. 17.2.2 Console Port Speed Note: ...
User Guide
Page 124
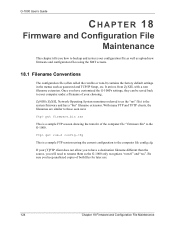
...rom-0) contains the factory default settings in the menus such as the G-1000 only recognizes "rom-0" and "ras". Be sure you to have customized the G-1000's settings, they can be saved back to rename them as password and TCP/IP Setup, etc. ZyNOS (ZyXEL Network Operating System sometimes referred... to as the "ras" file) is a sample FTP session saving the current configuration to the computer file config.cfg. With many FTP and TFTP clients, the filenames are similar to the G-1000. If your ...
...rom-0) contains the factory default settings in the menus such as the G-1000 only recognizes "rom-0" and "ras". Be sure you to have customized the G-1000's settings, they can be saved back to rename them as password and TCP/IP Setup, etc. ZyNOS (ZyXEL Network Operating System sometimes referred... to as the "ras" file) is a sample FTP session saving the current configuration to the computer file config.cfg. With many FTP and TFTP clients, the filenames are similar to the G-1000. If your ...
User Guide
Page 126
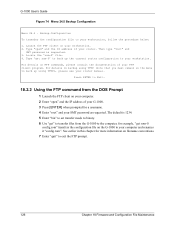
...password as requested. 3. Backup Configuration To transfer the configuration file to exit the FTP prompt. 126 Chapter 18 Firmware and Configuration File Maintenance The default is 1234. 5 Enter "bin" to set transfer mode to binary. 6 Use "get" to transfer files from the DOS Prompt 1 ...Launch the FTP client on the G-1000 to your router. Type 'get rom-0 config.rom" transfers the configuration file on your computer. 2 Enter "open " and the IP address of your G-1000. 3 Press [ENTER] when prompted for more information on backup using TFTP),...
...password as requested. 3. Backup Configuration To transfer the configuration file to exit the FTP prompt. 126 Chapter 18 Firmware and Configuration File Maintenance The default is 1234. 5 Enter "bin" to set transfer mode to binary. 6 Use "get" to transfer files from the DOS Prompt 1 ...Launch the FTP client on the G-1000 to your router. Type 'get rom-0 config.rom" transfers the configuration file on your computer. 2 Enter "open " and the IP address of your G-1000. 3 Press [ENTER] when prompted for more information on backup using TFTP),...

User Guide
Page 128
...use "get rom-0 config.rom where "i" specifies binary image transfer mode (use this mode when transferring binary files), "host" is the G-1000's default IP address when shipped. Enter the path and name of your computer. Set the transfer mode to binary before and during the TFTP transfer. For... consult the documentation of the firmware file (*.bin extension) or configuration file (*.rom extension) on the G-1000. Enter command "sys stdio 5" to restore the five-minute SMT timeout (default) when the file transfer is the filename on your TFTP client program. Note that you may see the...
...use "get rom-0 config.rom where "i" specifies binary image transfer mode (use this mode when transferring binary files), "host" is the G-1000's default IP address when shipped. Enter the path and name of your computer. Set the transfer mode to binary before and during the TFTP transfer. For... consult the documentation of the firmware file (*.bin extension) or configuration file (*.rom extension) on the G-1000. Enter command "sys stdio 5" to restore the five-minute SMT timeout (default) when the file transfer is the filename on your TFTP client program. Note that you may see the...


