Operating Guide
Page 5
... 40 Freeze 40 Screen Setup for PC mode 41 External Control Device Setup 42~47 IR Codes 48~49 Programming the Remote 50 Programming Codes 51~52 Troubleshooting Checklist 53 Maintenance 54 Product Specifications... 55 Warranty 59~60 Setup and Operation Checklist Setup and Operation Checklist (See pages 13~21 for available connection and operational setup options.) 1. Contents Warning/Caution 2 Safety Instructions 3~4 Introduction Controls 7 Connection Options 8 Remote Control...
... 40 Freeze 40 Screen Setup for PC mode 41 External Control Device Setup 42~47 IR Codes 48~49 Programming the Remote 50 Programming Codes 51~52 Troubleshooting Checklist 53 Maintenance 54 Product Specifications... 55 Warranty 59~60 Setup and Operation Checklist Setup and Operation Checklist (See pages 13~21 for available connection and operational setup options.) 1. Contents Warning/Caution 2 Safety Instructions 3~4 Introduction Controls 7 Connection Options 8 Remote Control...

Operating Guide
Page 7
Remote Control Sensor 3. MENU Button 6. This is a simplified representation of front panel. ENTER Button 7. CHANNEL (E, D) Buttons Z50PX2D Z42PX1D Operating Guide 7 Here shown may be somewhat different from your TV. TV/VIDEO Button 5. Controls - POWER Button 2. VOLUME (F , G) Buttons 8. Front Panel Controls Introduction TV/VIDEO MENU VOL CH 1 23 4 5 7 8 TV/VIDEO MENU ENTER VOL CH 2 1 456 7 8 1. Power Standby Indicator 4.
Remote Control Sensor 3. MENU Button 6. This is a simplified representation of front panel. ENTER Button 7. CHANNEL (E, D) Buttons Z50PX2D Z42PX1D Operating Guide 7 Here shown may be somewhat different from your TV. TV/VIDEO Button 5. Controls - POWER Button 2. VOLUME (F , G) Buttons 8. Front Panel Controls Introduction TV/VIDEO MENU VOL CH 1 23 4 5 7 8 TV/VIDEO MENU ENTER VOL CH 2 1 456 7 8 1. Power Standby Indicator 4.

Operating Guide
Page 8
... picture quality than the video input. RGB INPUT Power Cord Socket Connect the monitor This TV operates on Control Port the Specifications Connect your page. DC power. 8 Plasma TV Audio/Video Input Connect audio/video output from a PC to this jack. CABLE Input Connect cable ...S-VIDEO COMPONENT INPUT 2 COMPONENT INPUT 1 L R VIDEO AUDIO ANTENNA CABLE RGB/DVI AUDIO INPUT REMOTE CONTROL RGB/DVI AUDIO INPUT In RGB input or DVI input, this port will not work. The Remote voltage is indicated on output connector from an external device to these jacks. DVD/DTV Input ...
... picture quality than the video input. RGB INPUT Power Cord Socket Connect the monitor This TV operates on Control Port the Specifications Connect your page. DC power. 8 Plasma TV Audio/Video Input Connect audio/video output from a PC to this jack. CABLE Input Connect cable ...S-VIDEO COMPONENT INPUT 2 COMPONENT INPUT 1 L R VIDEO AUDIO ANTENNA CABLE RGB/DVI AUDIO INPUT REMOTE CONTROL RGB/DVI AUDIO INPUT In RGB input or DVI input, this port will not work. The Remote voltage is indicated on output connector from an external device to these jacks. DVD/DTV Input ...

Operating Guide
Page 9
...8226; Install two 1.5V AA batteries. Installing Batteries • Open the battery compartment cover on or off automatically. Remote Control Key Functions - Select a mode other than TV, for the remote to the screen. GUIDE DAY + EXIT TIMER CC FLASHBK FREEZE TV/VIDEO External input modes rotate in Component 1-2,... RGB and HDMI/DVI mode. (Refer to the recent channels. with +, - When using the remote control, aim it at the remote control sensor on top of time before your TV turns itself off .(Refer to TV viewing from any menu. MENU Brings up...
...8226; Install two 1.5V AA batteries. Installing Batteries • Open the battery compartment cover on or off automatically. Remote Control Key Functions - Select a mode other than TV, for the remote to the screen. GUIDE DAY + EXIT TIMER CC FLASHBK FREEZE TV/VIDEO External input modes rotate in Component 1-2,... RGB and HDMI/DVI mode. (Refer to the recent channels. with +, - When using the remote control, aim it at the remote control sensor on top of time before your TV turns itself off .(Refer to TV viewing from any menu. MENU Brings up...

Operating Guide
Page 10
... Selects available channels found with EZ scan. FLASHBK FREEZE NUMBER buttons SAP Selects MTS sound: Mono, Stereo, and SAP in DTV mode. 10 Plasma TV gram's character. GUIDE DAY + EXIT TIMER CC GUIDE Shows program schedule. erence. EZ SOUND Selects the sound appropriate for DVD players.) ...recorders or DVD players. ("RECORD" button is not available for the pro- VOLUME UP/DOWN Increases/decreases the sound level. Introduction Remote Control Key Functions POWER Turns your TV or any other programmed equipment on or off, depending on -screen menus and adjust the system settings...
... Selects available channels found with EZ scan. FLASHBK FREEZE NUMBER buttons SAP Selects MTS sound: Mono, Stereo, and SAP in DTV mode. 10 Plasma TV gram's character. GUIDE DAY + EXIT TIMER CC GUIDE Shows program schedule. erence. EZ SOUND Selects the sound appropriate for DVD players.) ...recorders or DVD players. ("RECORD" button is not available for the pro- VOLUME UP/DOWN Increases/decreases the sound level. Introduction Remote Control Key Functions POWER Turns your TV or any other programmed equipment on or off, depending on -screen menus and adjust the system settings...

Operating Guide
Page 11
... by joining it to the wall with strong strings or wire cables, (not supplied with the product), as shown. GUIDE DAY + EXIT TIMER CC FLASHBK Remote Control 2-Wall brackets 2-eye-bolts Installation Instructions Joining the TV assembly to the wall to protect the set will be sure the eye-bolts and the... brackets are included with your plasma display. Install the wall brackets on a desk top, insert the 2 eye-bolts and tighten them securely in the upper holes as shown...
... by joining it to the wall with strong strings or wire cables, (not supplied with the product), as shown. GUIDE DAY + EXIT TIMER CC FLASHBK Remote Control 2-Wall brackets 2-eye-bolts Installation Instructions Joining the TV assembly to the wall to protect the set will be sure the eye-bolts and the... brackets are included with your plasma display. Install the wall brackets on a desk top, insert the 2 eye-bolts and tighten them securely in the upper holes as shown...

Operating Guide
Page 14
...1 ANT OUT ANTENNA CABLE 2 RGB/DVI AUDIO INPUT ANT IN S-VIDEO OUT OUTPUT (R) AUDIO (L) SWITCH 3 4 IN VIDEO VCR Rear REM CON 14 Plasma TV Signal Amplifier • If the antenna is presumed that this TV finds the connected input sources automatically for a long period of the screen may... Antenna Bronze Wire RF Coaxial Wire (75 ohm) Cable TV Wall Jack Turn clockwise to avoid having a fixed image remain on the remote control. Select the input source with using the TV/VIDEO button on the screen for Video, Front Video and Component 1-2. ANTENNA Way Signal Splitter...
...1 ANT OUT ANTENNA CABLE 2 RGB/DVI AUDIO INPUT ANT IN S-VIDEO OUT OUTPUT (R) AUDIO (L) SWITCH 3 4 IN VIDEO VCR Rear REM CON 14 Plasma TV Signal Amplifier • If the antenna is presumed that this TV finds the connected input sources automatically for a long period of the screen may... Antenna Bronze Wire RF Coaxial Wire (75 ohm) Cable TV Wall Jack Turn clockwise to avoid having a fixed image remain on the remote control. Select the input source with using the TV/VIDEO button on the screen for Video, Front Video and Component 1-2. ANTENNA Way Signal Splitter...

Operating Guide
Page 15
... Turn on DVD player Y Pb Pr Y B-Y R-Y Y Cb Cr Y PB PR Operating Guide 15 Select the input source with using the TV/VIDEO button on the remote control to select Component 1 or Component 2. (If connected to external equipment, match the jack colors (Video = yellow, Audio Left = white, and Audio Right = red). ... the TV and connect the DVD audio outputs to the component input ports as shown in the figure. Use the TV/VIDEO button on the remote control. When connecting the TV to S-VIDEO, select the Video or Front Video external input source.) 3. How to the DVD player's manual for Video...
... Turn on DVD player Y Pb Pr Y B-Y R-Y Y Cb Cr Y PB PR Operating Guide 15 Select the input source with using the TV/VIDEO button on the remote control to select Component 1 or Component 2. (If connected to external equipment, match the jack colors (Video = yellow, Audio Left = white, and Audio Right = red). ... the TV and connect the DVD audio outputs to the component input ports as shown in the figure. Use the TV/VIDEO button on the remote control. When connecting the TV to S-VIDEO, select the Video or Front Video external input source.) 3. How to the DVD player's manual for Video...

Operating Guide
Page 16
... /DVI (VIDEO) INPUT DIGITAL AUDIO OPTICAL OUTPUT RS-232C INPUT (CONTROL/SERVICE) RGB/DVI AUDIO INPUT REMOTE CONTROL RGB INPUT AC INPUT DVD /DTV INPUT COMPONENT INPUT 2 COMPONENT INPUT 1 L R VIDEO AUDIO RGB / DVI AUDIO INPUT REMOTE CONTROL RGB INPUT AC INPUT (R) AUDIO (L) DIGITAL AUDIO OPTICAL DVI-DTV ...480p 720p 1080i Component 1/2 Yes Yes Yes Yes RGB-DTV , HDMI/DVI No Yes Yes Yes 16 Plasma TV Then, make the corresponding audio connections. Turn on the remote control to use 1. This TV can receive Digital Over-the-air/Cable signals without an external digital set ...
... /DVI (VIDEO) INPUT DIGITAL AUDIO OPTICAL OUTPUT RS-232C INPUT (CONTROL/SERVICE) RGB/DVI AUDIO INPUT REMOTE CONTROL RGB INPUT AC INPUT DVD /DTV INPUT COMPONENT INPUT 2 COMPONENT INPUT 1 L R VIDEO AUDIO RGB / DVI AUDIO INPUT REMOTE CONTROL RGB INPUT AC INPUT (R) AUDIO (L) DIGITAL AUDIO OPTICAL DVI-DTV ...480p 720p 1080i Component 1/2 Yes Yes Yes Yes RGB-DTV , HDMI/DVI No Yes Yes Yes 16 Plasma TV Then, make the corresponding audio connections. Turn on the remote control to use 1. This TV can receive Digital Over-the-air/Cable signals without an external digital set ...

Operating Guide
Page 21
... POWER button on the TV SET screen for a long period of time. Avoid keeping a fixed image on the TV SET and HDMI/DVI Source Devices remote control. 3. The fixed image may not fit to Screen. And In case of TV SET and contact an PC graphics card service center. - If noise is...
... POWER button on the TV SET screen for a long period of time. Avoid keeping a fixed image on the TV SET and HDMI/DVI Source Devices remote control. 3. The fixed image may not fit to Screen. And In case of TV SET and contact an PC graphics card service center. - If noise is...
Operating Guide
Page 22
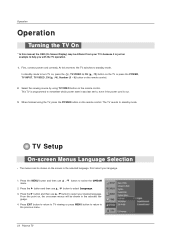
...the , TV/VIDEO , CH (D / E) button on the TV or press the POWER, TV INPUT, TV/VIDEO, CH (D / E), Number (0 ~ 9) button on the remote control. Press the G button and then use D / E button to select your language. 1. The menus can be shown in the selected language. This TV is programmed to...power state it is out. 3. When finished using TV/VIDEO button on the remote control. 2. First select your desired language. TV Setup On-screen Menus Language Selection - The TV reverts to the previous menu. 22 Plasma TV Operation Operation Turning the TV On * In this moment, the TV ...
...the , TV/VIDEO , CH (D / E) button on the TV or press the POWER, TV INPUT, TV/VIDEO, CH (D / E), Number (0 ~ 9) button on the remote control. Press the G button and then use D / E button to select your language. 1. The menus can be shown in the selected language. This TV is programmed to...power state it is out. 3. When finished using TV/VIDEO button on the remote control. 2. First select your desired language. TV Setup On-screen Menus Language Selection - The TV reverts to the previous menu. 22 Plasma TV Operation Operation Turning the TV On * In this moment, the TV ...

Operating Guide
Page 24
... button to return to TV viewing or press MENU button to return to the previous menu. DTV Signal Strength - Use the FAV button on the remote control when a channel is highlighted you can add or delete the channel to the small window at the top-left corner of them are to add... or delete scanned channels. Press EXIT button to return to TV viewing or press MENU button to return to the previous menu. 24 Plasma TV View the on the SETUP menu. - Press the MENU button and then use D / E button to select the SETUP menu. 2. DTV Signal: Only when the...
... button to return to TV viewing or press MENU button to return to the previous menu. DTV Signal Strength - Use the FAV button on the remote control when a channel is highlighted you can add or delete the channel to the small window at the top-left corner of them are to add... or delete scanned channels. Press EXIT button to return to TV viewing or press MENU button to return to the previous menu. 24 Plasma TV View the on the SETUP menu. - Press the MENU button and then use D / E button to select the SETUP menu. 2. DTV Signal: Only when the...

Operating Guide
Page 29
... TV viewing. Press the G button and then use D / E button to select your desired MTS mode in turn. • If other languages are available on the remote control, this TV can only receive the signal when the TV station transmits the proper signals. - Mono sound is automatically received if the broadcast is only...
... TV viewing. Press the G button and then use D / E button to select your desired MTS mode in turn. • If other languages are available on the remote control, this TV can only receive the signal when the TV station transmits the proper signals. - Mono sound is automatically received if the broadcast is only...

Operating Guide
Page 37
... the D / E button to block specific channels, ratings, and external viewing sources. - A password is set . The children rating does not apply to movies shown on the remote control. Note: • If you block certain TV programs intended for mature audiences in '7', '7', '7', '7' on TV, not TV programs, such as soap operas. • TV Rating...
... the D / E button to block specific channels, ratings, and external viewing sources. - A password is set . The children rating does not apply to movies shown on the remote control. Note: • If you block certain TV programs intended for mature audiences in '7', '7', '7', '7' on TV, not TV programs, such as soap operas. • TV Rating...

Operating Guide
Page 38
... EPG. 2. This function can be used only when the EPG information is only supported in DTV mode. 1. Press the GUIDE button to TV viewing. 38 Plasma TV The EPG supplies information such as program listings, start and end times for next 7 days. - Operation Remote Control EPG (Electronic Program Guide) (In DTV mode) -
... EPG. 2. This function can be used only when the EPG information is only supported in DTV mode. 1. Press the GUIDE button to TV viewing. 38 Plasma TV The EPG supplies information such as program listings, start and end times for next 7 days. - Operation Remote Control EPG (Electronic Program Guide) (In DTV mode) -

Operating Guide
Page 42
... A/V control system) and control the Monitor's functions externally. - Connect the RS-232C input jack to send) 9 No Connection RS-232C Configurations 7-Wire Configurations (Standard RS-232C cable) PC PDP RXD 2 TXD 3 GND 5 DTR 4 DSR 6 RTS 7 CTS 8 3 TXD 2 RXD 5 GND 6 DSR 4 DTR 8 CTS 7 RTS D-Sub 9 42 Plasma TV ... R VIDEO AUDIO HDMI /DVI (VIDEO) INPUT DIGITAL AUDIO OPTICAL OUTPUT RS-232C INPUT (CONTROL/SERVICE) ANTENNA CABLE RGB/DVI AUDIO INPUT REMOTE CONTROL RGB INPUT AC INPUT PC Type of the control device to the RS-232C jack on the Monitor back panel. - D-Sub 9-Pin Male ...
... A/V control system) and control the Monitor's functions externally. - Connect the RS-232C input jack to send) 9 No Connection RS-232C Configurations 7-Wire Configurations (Standard RS-232C cable) PC PDP RXD 2 TXD 3 GND 5 DTR 4 DSR 6 RTS 7 CTS 8 3 TXD 2 RXD 5 GND 6 DSR 4 DTR 8 CTS 7 RTS D-Sub 9 42 Plasma TV ... R VIDEO AUDIO HDMI /DVI (VIDEO) INPUT DIGITAL AUDIO OPTICAL OUTPUT RS-232C INPUT (CONTROL/SERVICE) ANTENNA CABLE RGB/DVI AUDIO INPUT REMOTE CONTROL RGB INPUT AC INPUT PC Type of the control device to the RS-232C jack on the Monitor back panel. - D-Sub 9-Pin Male ...
Operating Guide
Page 43
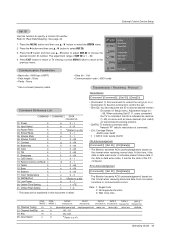
... : 8 bits • Parity : None • Stop bit : 1 bit • Communication code : ASCII code * Use a crossed (reverse) cable. Command Reference List COMMAND 1 COMMAND 2 DATA (Hexadecimal) 01. Remote Control Lock Mode k 14. Color Temperature k 18. Orbiter Pixel Setting j a 0 ~ 1 b 0 ~ 8 c *(Refer to p.44) d 0 ~ 1 e 0 ~ 1 f 0 ~ 64 g 0 ~ 64 h 0 ~ 64 i 0 ~ 64 j 0 ~ 64 k 0 ~ 64...desired monitor ID number. Input Select k 03. Volume Mute k 06. ISM Method j 19. External Control Device Setup Set ID Use this function to p.46) q 0 ~ 1 r 1 ~ FE s...
... : 8 bits • Parity : None • Stop bit : 1 bit • Communication code : ASCII code * Use a crossed (reverse) cable. Command Reference List COMMAND 1 COMMAND 2 DATA (Hexadecimal) 01. Remote Control Lock Mode k 14. Color Temperature k 18. Orbiter Pixel Setting j a 0 ~ 1 b 0 ~ 8 c *(Refer to p.44) d 0 ~ 1 e 0 ~ 1 f 0 ~ 64 g 0 ~ 64 h 0 ~ 64 i 0 ~ 64 j 0 ~ 64 k 0 ~ 64...desired monitor ID number. Input Select k 03. Volume Mute k 06. ISM Method j 19. External Control Device Setup Set ID Use this function to p.46) q 0 ~ 1 r 1 ~ FE s...

Operating Guide
Page 44
... ][Set ID][ ][OK][Data][x] 03. You can also adjust mute using the RATIO button on remote control. You can also adjust the screen format using the MUTE button on remote control or in the Option menu. You can also adjust brightness in the Video menu. Screen Mute (Command2...[a][ ][Set ID][ ][OK][Data][x] * In a like manner, if other functions transmit 'FF' data based on /off ) Acknowledgement [d][ ][Set ID][ ][OK][Data][x] 44 Plasma TV 05. Transmission [k][h][ ][Set ID][ ][Data][Cr] Data Min : 0 ~ Max : 64 • Refer to 'Real data mapping' as shown below . Aspect Ratio ...
... ][Set ID][ ][OK][Data][x] 03. You can also adjust mute using the RATIO button on remote control. You can also adjust the screen format using the MUTE button on remote control or in the Option menu. You can also adjust brightness in the Video menu. Screen Mute (Command2...[a][ ][Set ID][ ][OK][Data][x] * In a like manner, if other functions transmit 'FF' data based on /off ) Acknowledgement [d][ ][Set ID][ ][OK][Data][x] 44 Plasma TV 05. Transmission [k][h][ ][Set ID][ ][Data][Cr] Data Min : 0 ~ Max : 64 • Refer to 'Real data mapping' as shown below . Aspect Ratio ...

Operating Guide
Page 45
... OSD Select (Command2:l) G To select OSD (On Screen Display) on/off 1: OSD on Acknowledgement [l][ ][Set ID][ ][OK][Data][x] External Control Device Setup 13. You can also adjust color in the Audio menu. See page 44. Transmission [k][m][ ][Set ID][ ][Data][Cr] Data 0: ...][ ][Data][Cr] Data Min: 0 ~ Max: 64 • Refer to 'Real data mapping'. See page 44. Remote Control Lock Mode (Command2:m) G To lock the remote control and the front panel controls on Acknowledgement [m][ ][Set ID][ ][OK][Data][x] 14. Treble (Command2:r) G To adjust treble. See page 44.
... OSD Select (Command2:l) G To select OSD (On Screen Display) on/off 1: OSD on Acknowledgement [l][ ][Set ID][ ][OK][Data][x] External Control Device Setup 13. You can also adjust color in the Audio menu. See page 44. Transmission [k][m][ ][Set ID][ ][Data][Cr] Data 0: ...][ ][Data][Cr] Data Min: 0 ~ Max: 64 • Refer to 'Real data mapping'. See page 44. Remote Control Lock Mode (Command2:m) G To lock the remote control and the front panel controls on Acknowledgement [m][ ][Set ID][ ][OK][Data][x] 14. Treble (Command2:r) G To adjust treble. See page 44.

Operating Guide
Page 48
IR Codes IR Codes How to Connect G Connect your wired remote control to the Remote Control port on the TV. Tf Tf 0.56 ms 2.24 ms 48 Plasma TV Tf=108ms @455KHz Remote Control IR Codes G Output waveform Single pulse, modulated with 37.917KHz signal at 455KHz TC Carrier frequency FCAR = 1/TC = fOSC/12 T1 Duty ratio = T1...
IR Codes IR Codes How to Connect G Connect your wired remote control to the Remote Control port on the TV. Tf Tf 0.56 ms 2.24 ms 48 Plasma TV Tf=108ms @455KHz Remote Control IR Codes G Output waveform Single pulse, modulated with 37.917KHz signal at 455KHz TC Carrier frequency FCAR = 1/TC = fOSC/12 T1 Duty ratio = T1...

