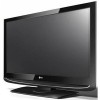
Brochure
Page 2
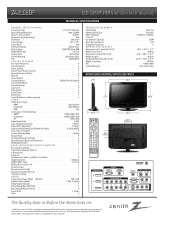
.../24p - RGB 60p Just Scan (1:1 Pixel Matching) - HDMIª 1080p/1080i/720p - Component 1080p/1080i/720p - HDMI 60p/30p/24p - Z42LC6DF LCD 1080p HDTV 42Ó Class (42.0Ó diagonal) TECHNICAL SPECIFICATIONS G E N E R A L S P E C I F I C A T I E S Cabinet Style Table Top Remote Control Type Universal VESA¨ Compliant ¥ (600mm x 400mm) POWER Consumption (Typical) 220W Stand-by Consumption
.../24p - RGB 60p Just Scan (1:1 Pixel Matching) - HDMIª 1080p/1080i/720p - Component 1080p/1080i/720p - HDMI 60p/30p/24p - Z42LC6DF LCD 1080p HDTV 42Ó Class (42.0Ó diagonal) TECHNICAL SPECIFICATIONS G E N E R A L S P E C I F I C A T I E S Cabinet Style Table Top Remote Control Type Universal VESA¨ Compliant ¥ (600mm x 400mm) POWER Consumption (Typical) 220W Stand-by Consumption
Operating Guide
Page 6
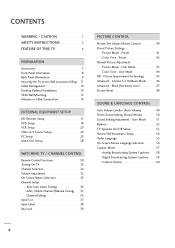
... - Cinema 3:2 Pulldown Mode 46 Advanced - Digital Broadcasting System Captions 59 - Picture Mode - Black (Darkness) Level 47 Picture Reset 48 SOUND & LANGUAGE CONTROL Auto Volume Leveller (Auto Volume) 49 Preset Sound Setting (Sound Mode 50 Sound Setting Adjustment - Auto Scan (Auto Tuning 34 - Picture Improvement Technology 45 ...DVD Setup 18 VCR Setup 20 Other A/V Source Setup 22 PC Setup 23 Audio Out Setup 28 WATCHING TV / CHANNEL CONTROL Remote Control Functions 30 Turning On TV 32 Channel Selection 32 Volume Adjustment 32 On-Screen Menus Selection 33 Channel Setup -
... - Cinema 3:2 Pulldown Mode 46 Advanced - Digital Broadcasting System Captions 59 - Picture Mode - Black (Darkness) Level 47 Picture Reset 48 SOUND & LANGUAGE CONTROL Auto Volume Leveller (Auto Volume) 49 Preset Sound Setting (Sound Mode 50 Sound Setting Adjustment - Auto Scan (Auto Tuning 34 - Picture Improvement Technology 45 ...DVD Setup 18 VCR Setup 20 Other A/V Source Setup 22 PC Setup 23 Audio Out Setup 28 WATCHING TV / CHANNEL CONTROL Remote Control Functions 30 Turning On TV 32 Channel Selection 32 Volume Adjustment 32 On-Screen Menus Selection 33 Channel Setup -
Operating Guide
Page 7
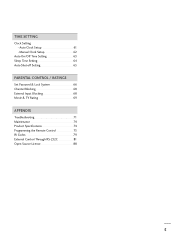
Auto Clock Setup 61 Manual Clock Setup 62 Auto On/Off Time Setting 63 Sleep Time Setting 64 Auto Shut-off Setting 65 PARENTAL CONTROL / RATINGS Set Password & Lock System 66 Channel Blocking 68 External Input Blocking 68 Movie & TV Rating 69 APPENDIX Troubleshooting 71 Maintenance 74 Product Specifications 74 Programming the Remote Control 75 IR Codes 79 External Control Through RS-232C 81 Open Source License 88 5 TIME SETTING Clock Setting -
Auto Clock Setup 61 Manual Clock Setup 62 Auto On/Off Time Setting 63 Sleep Time Setting 64 Auto Shut-off Setting 65 PARENTAL CONTROL / RATINGS Set Password & Lock System 66 Channel Blocking 68 External Input Blocking 68 Movie & TV Rating 69 APPENDIX Troubleshooting 71 Maintenance 74 Product Specifications 74 Programming the Remote Control 75 IR Codes 79 External Control Through RS-232C 81 Open Source License 88 5 TIME SETTING Clock Setting -

Operating Guide
Page 9
ENTER TIMER VOL FAV BRIGHT+ 1 MUTE 4 2 7 5 3 8 6 CH P A EG ADJUST PICTURE SOUND SAP 0 RATIO CC 9 FLASHBK Owner's Manual CD Manual Remote Control Power Cord Batteries Cable Management Clip * Only wipe spots on the exterior with ferrite cores to maintain standards compliance. 7 If an accessory is not available ...
ENTER TIMER VOL FAV BRIGHT+ 1 MUTE 4 2 7 5 3 8 6 CH P A EG ADJUST PICTURE SOUND SAP 0 RATIO CC 9 FLASHBK Owner's Manual CD Manual Remote Control Power Cord Batteries Cable Management Clip * Only wipe spots on the exterior with ferrite cores to maintain standards compliance. 7 If an accessory is not available ...
Operating Guide
Page 10
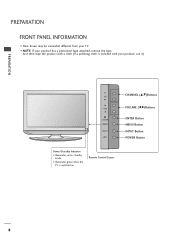
Remote Control Sensor 8 And then wipe the product with a cloth (If a polishing cloth is switched on. PREPARATION PREPARATION FRONT PANEL INFORMATION I VOLUME (F,G)Buttons ENTER Button MENU Button INPUT Button POWER Button Power/Standby Indicator • illuminates red in standby mode. • illuminates green when the TV is included with your product, use it). CHANNEL (D,E)Buttons CH VOL ENTER MENU INPUT /I Here shown may be somewhat different from your product has a protection tape attached, remove the tape. I NOTE: If your TV.
Remote Control Sensor 8 And then wipe the product with a cloth (If a polishing cloth is switched on. PREPARATION PREPARATION FRONT PANEL INFORMATION I VOLUME (F,G)Buttons ENTER Button MENU Button INPUT Button POWER Button Power/Standby Indicator • illuminates red in standby mode. • illuminates green when the TV is included with your product, use it). CHANNEL (D,E)Buttons CH VOL ENTER MENU INPUT /I Here shown may be somewhat different from your product has a protection tape attached, remove the tape. I NOTE: If your TV.
Operating Guide
Page 12
.... Note: In standby mode, these jacks. Or DVI (VIDEO) signal to this jack. S-VIDEO Connect S-Video out from a PC or DTV. 4 REMOTE CONTROL PORT Connect your wired remote control. 5 RS-232C IN (CONTROL & SERVICE) PORT Connect to the RS-232C port on DC power. 10 Caution: Never attempt to 1, 2 or 3. AUDIO (RGB/DVI) Connect the...
.... Note: In standby mode, these jacks. Or DVI (VIDEO) signal to this jack. S-VIDEO Connect S-Video out from a PC or DTV. 4 REMOTE CONTROL PORT Connect your wired remote control. 5 RS-232C IN (CONTROL & SERVICE) PORT Connect to the RS-232C port on DC power. 10 Caution: Never attempt to 1, 2 or 3. AUDIO (RGB/DVI) Connect the...

Operating Guide
Page 17
... This TV can receive Digital Over-the-air/Cable signals without an external digital set top box to the COMPONENT IN AUDIO 1 jacks on the remote control. operation) I /DVI IN RGB(PC) AUDIO (RGB/DVI) RE CONT 1 Connect the video outputs (Y, PB, PR) of the digital set-top box to the COMPONENT...
... This TV can receive Digital Over-the-air/Cable signals without an external digital set top box to the COMPONENT IN AUDIO 1 jacks on the remote control. operation) I /DVI IN RGB(PC) AUDIO (RGB/DVI) RE CONT 1 Connect the video outputs (Y, PB, PR) of the digital set-top box to the COMPONENT...

Operating Guide
Page 18
... to HDMI/DVI IN1, 2 or 3 jack on the set -top box.) I Select HDMI1, HDMI2 or HDMI3 input source with using the INPUT button on the remote control. HDMI supports both audio and video. ( ) 2. HDMI/DVI IN 3 2 RGB IN RGB(PC) AUDIO (RGB/DV COMPONENT IN 2 1 1 VIDEO 1 HDMI-DTV OUTPUT HDMI-DTV mode...
... to HDMI/DVI IN1, 2 or 3 jack on the set -top box.) I Select HDMI1, HDMI2 or HDMI3 input source with using the INPUT button on the remote control. HDMI supports both audio and video. ( ) 2. HDMI/DVI IN 3 2 RGB IN RGB(PC) AUDIO (RGB/DV COMPONENT IN 2 1 1 VIDEO 1 HDMI-DTV OUTPUT HDMI-DTV mode...

Operating Guide
Page 19
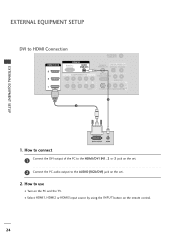
... set. 2 Connect the audio output of the digital set-top box to the AUDIO (RGB/DVI) jack on the set -top box.) I Turn on the remote control. 17 How to HDMI Connection HDMI/DVI IN 3 2 RGB IN RGB(PC) AUDIO (RGB/DVI) COMPONENT IN 2 1 1 VIDEO AUDIO ANTENNA/ CABLE IN...
... set. 2 Connect the audio output of the digital set-top box to the AUDIO (RGB/DVI) jack on the set -top box.) I Turn on the remote control. 17 How to HDMI Connection HDMI/DVI IN 3 2 RGB IN RGB(PC) AUDIO (RGB/DVI) COMPONENT IN 2 1 1 VIDEO AUDIO ANTENNA/ CABLE IN...

Operating Guide
Page 20
... outputs of the DVD to the COMPONENT IN AUDIO1 jacks on the set . 2. Component ports on the TV Y PB PR Video output ports on the remote control. COMPONENT IN R (CONT 2 1 VIDEO AUDIO S- ( 1 2 Y PB PR L R Component Input ports To get better picture quality, connect a DVD player to the DVD player's manual for operating...
... outputs of the DVD to the COMPONENT IN AUDIO1 jacks on the set . 2. Component ports on the TV Y PB PR Video output ports on the remote control. COMPONENT IN R (CONT 2 1 VIDEO AUDIO S- ( 1 2 Y PB PR L R Component Input ports To get better picture quality, connect a DVD player to the DVD player's manual for operating...

Operating Guide
Page 21
...to the DVD player's manual for operating instructions. S-VIDEO AUDIO L R UDIO B/DVI) T IN ANTENNA/ CABLE IN 1 2 REMOTE DIGITAL AUDIO OUT CONTROL IN OPTICAL COAXIAL RS-232C IN (CONTROL & SERVICE) AUDIO OUT AUDIO S-VIDEO VIDEO (MONO) AUDIO AV IN 1 HDMI Connection 1. I Select A V 1 input source...AUDIO (RGB/DVI COMPONENT IN 2 1 1 VIDEO A 1 HDMI-DVD OUTPUT 19 How to the HDMI/DVI IN 1, 2, or 3 jack on the remote control. HDMI supports both audio and video. ( ) 2. EXTERNAL EQUIPMENT SETUP S-Video Connection 1. How to connect 1 Connect the S-VIDEO output of the DVD...
...to the DVD player's manual for operating instructions. S-VIDEO AUDIO L R UDIO B/DVI) T IN ANTENNA/ CABLE IN 1 2 REMOTE DIGITAL AUDIO OUT CONTROL IN OPTICAL COAXIAL RS-232C IN (CONTROL & SERVICE) AUDIO OUT AUDIO S-VIDEO VIDEO (MONO) AUDIO AV IN 1 HDMI Connection 1. I Select A V 1 input source...AUDIO (RGB/DVI COMPONENT IN 2 1 1 VIDEO A 1 HDMI-DVD OUTPUT 19 How to the HDMI/DVI IN 1, 2, or 3 jack on the remote control. HDMI supports both audio and video. ( ) 2. EXTERNAL EQUIPMENT SETUP S-Video Connection 1. How to connect 1 Connect the S-VIDEO output of the DVD...

Operating Guide
Page 23
...Select A V 1 input source by using the INPUT button on the VCR. (Refer to the VCR owner's manual.) ANTENNA/ CABLE IN 1 REMOTE CONTROL IN DIGITAL A2UDIO OUT OPTIC(AL )COAXIAL RS-232C IN (CONTROL & SERVICE) AUDIO OUT AV IN 1 I If connected to use I Insert a video tape into the VCR and press PLAY on the... will work. 21 UDIO B/DVI) 2. CAUTION G Do not connect to use T IN I Insert a video tape into the VCR and press PLAY on the remote control. AV IN 1 S-Video Connection 1. ANT IN S-VIDEO VIDEO L R ANT OUT OUTPUT SWITCH 2 Connect the audio outputs of the set .
...Select A V 1 input source by using the INPUT button on the VCR. (Refer to the VCR owner's manual.) ANTENNA/ CABLE IN 1 REMOTE CONTROL IN DIGITAL A2UDIO OUT OPTIC(AL )COAXIAL RS-232C IN (CONTROL & SERVICE) AUDIO OUT AV IN 1 I If connected to use I Insert a video tape into the VCR and press PLAY on the... will work. 21 UDIO B/DVI) 2. CAUTION G Do not connect to use T IN I Insert a video tape into the VCR and press PLAY on the remote control. AV IN 1 S-Video Connection 1. ANT IN S-VIDEO VIDEO L R ANT OUT OUTPUT SWITCH 2 Connect the audio outputs of the set .
Operating Guide
Page 24
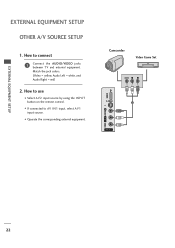
I Operate the corresponding external equipment. Match the jack colors. (Video = yellow, Audio Left = white, and Audio Right = red) 2. VIDEO L/MONO AUDIO R Camcorder Video Game Set VIDEO L R USB IN S-VIDEO 1 AV IN 2 22 I If connected to AV IN1 input, select A V 1 input source. EXTERNAL EQUIPMENT SETUP EXTERNAL EQUIPMENT SETUP OTHER A/V SOURCE SETUP 1. How to use I Select A V 2 input source by using the INPUT button on the remote control. How to connect 1 Connect the AUDIO/VIDEO jacks between TV and external equipment.
I Operate the corresponding external equipment. Match the jack colors. (Video = yellow, Audio Left = white, and Audio Right = red) 2. VIDEO L/MONO AUDIO R Camcorder Video Game Set VIDEO L R USB IN S-VIDEO 1 AV IN 2 22 I If connected to AV IN1 input, select A V 1 input source. EXTERNAL EQUIPMENT SETUP EXTERNAL EQUIPMENT SETUP OTHER A/V SOURCE SETUP 1. How to use I Select A V 2 input source by using the INPUT button on the remote control. How to connect 1 Connect the AUDIO/VIDEO jacks between TV and external equipment.
Operating Guide
Page 25
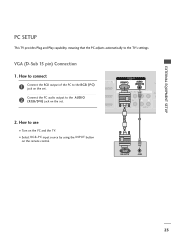
... 1. How to the RG B (P C) jack on the set . How to connect RGB IN 1 Connect the RGB output of the PC to use I Turn on the remote control. 1 2 RGB OUTPUT AUDIO ( 23 I Select RGB-PC input source by using the INPUT button on the PC and the TV. I /DVI IN RGB(PC) AUDIO...
... 1. How to the RG B (P C) jack on the set . How to connect RGB IN 1 Connect the RGB output of the PC to use I Turn on the remote control. 1 2 RGB OUTPUT AUDIO ( 23 I Select RGB-PC input source by using the INPUT button on the PC and the TV. I /DVI IN RGB(PC) AUDIO...
Operating Guide
Page 26
...How to use I Select HDMI1, HDMI2 or HDMI3 input source by using the INPUT button on the PC and the TV. I Turn on the remote control. 24 EXTERNAL EQUIPMENT SETUP DVI to the AUDIO (RGB/DVI) jack on the set. 2. How to connect 1 Connect the DVI output of the ...the PC audio output to HDMI Connection HDMI/DVI IN 3 2 RGB IN RGB(PC) AUDIO (RGB/DVI) COMPONENT IN 2 1 1 VIDEO AUDIO ANTENNA/ CABLE IN REMOTE DIGITAL AUDIO OUT CONTROL IN OPTICAL COAXIAL RS-232C IN (CONTROL & SERVICE) AUDIO OUT S-VIDEO VIDEO (MONO) AUDIO 2 1 AV IN 1 EXTERNAL EQUIPMENT SETUP DVI-PC OUTPUT AUDIO 1.
...How to use I Select HDMI1, HDMI2 or HDMI3 input source by using the INPUT button on the PC and the TV. I Turn on the remote control. 24 EXTERNAL EQUIPMENT SETUP DVI to the AUDIO (RGB/DVI) jack on the set. 2. How to connect 1 Connect the DVI output of the ...the PC audio output to HDMI Connection HDMI/DVI IN 3 2 RGB IN RGB(PC) AUDIO (RGB/DVI) COMPONENT IN 2 1 1 VIDEO AUDIO ANTENNA/ CABLE IN REMOTE DIGITAL AUDIO OUT CONTROL IN OPTICAL COAXIAL RS-232C IN (CONTROL & SERVICE) AUDIO OUT S-VIDEO VIDEO (MONO) AUDIO 2 1 AV IN 1 EXTERNAL EQUIPMENT SETUP DVI-PC OUTPUT AUDIO 1.

Operating Guide
Page 28
or button to a PC Output, Select RGB-PC with using the INPUT button on the remote control. or button 2 Press the button and then use to select the PICTURE menu. button to enter the screen adjustment Picture Mode Color Temperature DB Advanced ...
or button to a PC Output, Select RGB-PC with using the INPUT button on the remote control. or button 2 Press the button and then use to select the PICTURE menu. button to enter the screen adjustment Picture Mode Color Temperature DB Advanced ...

Operating Guide
Page 32
.... TV POWER DVD STB VCR RETURN MENU INPUT ENTER BRIGHT- MUTE Switch the sound on the TV. WATCHING TV / CHANNEL CONTROL WATCHING TV / CHANNEL CONTROL REMOTE CONTROL FUNCTIONS When using the remote control, aim it at the remote control sensor on or off automatically.G p.64 VOLUME UP /DOWN Increase/decrease the sound level. Adjust brightness on -screen menus...
.... TV POWER DVD STB VCR RETURN MENU INPUT ENTER BRIGHT- MUTE Switch the sound on the TV. WATCHING TV / CHANNEL CONTROL WATCHING TV / CHANNEL CONTROL REMOTE CONTROL FUNCTIONS When using the remote control, aim it at the remote control sensor on or off automatically.G p.64 VOLUME UP /DOWN Increase/decrease the sound level. Adjust brightness on -screen menus...
Operating Guide
Page 33
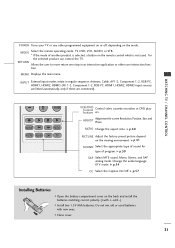
...compartment cover on the mode. I Install two 1.5V AAA batteries. RATIO Change the aspect ratio. G p.40 PICTURE Adjust the factory preset picture depend on the remote control which is selected, a button on the viewing environment. G p.50 SAP Select MTS sound: Mono, Stereo, and SAP analog mode. I Close cover. 31... G p.54 CC Select the Caption On/Off. MODE Select the remote operating mode: TV, DVD, VCR, AUDIO, or STB. * If the mode of sound for screen Resolution, Position, Size, and Phase. G p.41 SOUND ...
...compartment cover on the mode. I Install two 1.5V AAA batteries. RATIO Change the aspect ratio. G p.40 PICTURE Adjust the factory preset picture depend on the remote control which is selected, a button on the viewing environment. G p.50 SAP Select MTS sound: Mono, Stereo, and SAP analog mode. I Close cover. 31... G p.54 CC Select the Caption On/Off. MODE Select the remote operating mode: TV, DVD, VCR, AUDIO, or STB. * If the mode of sound for screen Resolution, Position, Size, and Phase. G p.41 SOUND ...

Operating Guide
Page 34
... Adjust the volume to suit your personal preference. 1 Press the VOL (+ or -) button to adjust the volume. 2 If you intend to be away on the remote control. ber. NOTE G If you want to turn TV on, press the , INPUT, CH (D or E) button on the TV or press the POWER, INPUT, CH ( or... ), Number (0~9) button on the remote control. 2 Select the viewing source by pressing the MUTE or VOL (+ or -) button. 32 I In standby mode to switch the sound off, press the MUTE button...
... Adjust the volume to suit your personal preference. 1 Press the VOL (+ or -) button to adjust the volume. 2 If you intend to be away on the remote control. ber. NOTE G If you want to turn TV on, press the , INPUT, CH (D or E) button on the TV or press the POWER, INPUT, CH ( or... ), Number (0~9) button on the remote control. 2 Select the viewing source by pressing the MUTE or VOL (+ or -) button. 32 I In standby mode to switch the sound off, press the MUTE button...

Operating Guide
Page 38
WATCHING TV / CHANNEL CONTROL WATCHING TV / CHANNEL CONTROL Channel Editing From the default channel list created from the Auto Tuning channel search, you can create two different types of the screen. or button 2 ... Custom List are displayed in black and the channels deleted from your own Favorite List. You can be created by toggling each channel on the remote control when a channel is highlighted you to /from the Custom List are displayed in gray. ing icon will now see a screen filled with ENTER button. or...
WATCHING TV / CHANNEL CONTROL WATCHING TV / CHANNEL CONTROL Channel Editing From the default channel list created from the Auto Tuning channel search, you can create two different types of the screen. or button 2 ... Custom List are displayed in black and the channels deleted from your own Favorite List. You can be created by toggling each channel on the remote control when a channel is highlighted you to /from the Custom List are displayed in gray. ing icon will now see a screen filled with ENTER button. or...