
Brochure
Page 1
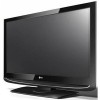
Z42LC6DF LCD 1080p HDTV 42Ó Class (42.0Ó diagonal) ¥ Full HD 1080p Resolution ¥ 10,000:1 Dynamic Contrast Ratio ¥ 500 cd/m2 Brightness &#... up to 20 years with 8 hours of use per day. MULTIPLE HD SOURCE CONNECTIVITY 3 HDMI and 2 HD component inputs. BUILT-IN TUNER ATSC/NTSC/QAM TV Tuner receives free over -the-air-HD broadcast, cable and satellite come alive. 10,000:1 Dynamic contrast ratio Provides deep blacks and richer colors.
Z42LC6DF LCD 1080p HDTV 42Ó Class (42.0Ó diagonal) ¥ Full HD 1080p Resolution ¥ 10,000:1 Dynamic Contrast Ratio ¥ 500 cd/m2 Brightness &#... up to 20 years with 8 hours of use per day. MULTIPLE HD SOURCE CONNECTIVITY 3 HDMI and 2 HD component inputs. BUILT-IN TUNER ATSC/NTSC/QAM TV Tuner receives free over -the-air-HD broadcast, cable and satellite come alive. 10,000:1 Dynamic contrast ratio Provides deep blacks and richer colors.

Operating Guide
Page 1
Installation and Operating Guide | Warranty Model Numbers | Z42LC6DF / Z47LC6DF | LCD TV ENERGY STAR is a set of power-saving guidelines issued by the U.S. A.,Inc. As an ENERGY STAR Partner LGE U. has determined that this product meets the ENERGY STAR guidelines for energy efficiency. © Copyright 2006, LG Electronics USA, Inc. S. Environmental Protection Agency(EPA).
Installation and Operating Guide | Warranty Model Numbers | Z42LC6DF / Z47LC6DF | LCD TV ENERGY STAR is a set of power-saving guidelines issued by the U.S. A.,Inc. As an ENERGY STAR Partner LGE U. has determined that this product meets the ENERGY STAR guidelines for energy efficiency. © Copyright 2006, LG Electronics USA, Inc. S. Environmental Protection Agency(EPA).
Operating Guide
Page 3
...compliance could void the user's authority to operate this product to the grounding system of the building, as practical. NOTE TO CABLE/TV INSTALLER This reminder is encouraged to try to correct the interference by the party responsible for proper grounding and, in the literature ... system installer's attention to Article 820-40 of the cable entry as close to operate the equipment. Consult the dealer or an experienced radio/TV technician for a Class B digital device, pursuant to persons. WARNING / CAUTION To prevent fire or shock hazards, do not expose this product...
...compliance could void the user's authority to operate this product to the grounding system of the building, as practical. NOTE TO CABLE/TV INSTALLER This reminder is encouraged to try to correct the interference by the party responsible for proper grounding and, in the literature ... system installer's attention to Article 820-40 of the cable entry as close to operate the equipment. Consult the dealer or an experienced radio/TV technician for a Class B digital device, pursuant to persons. WARNING / CAUTION To prevent fire or shock hazards, do not expose this product...
Operating Guide
Page 6
...15 DVD Setup 18 VCR Setup 20 Other A/V Source Setup 22 PC Setup 23 Audio Out Setup 28 WATCHING TV / CHANNEL CONTROL Remote Control Functions 30 Turning On TV 32 Channel Selection 32 Volume Adjustment 32 On-Screen Menus Selection 33 Channel Setup - Channel Editing 36 Input List...& LANGUAGE CONTROL Auto Volume Leveller (Auto Volume) 49 Preset Sound Setting (Sound Mode 50 Sound Setting Adjustment - User Mode 51 Balance 52 TV Speakers On/Off Setup 53 Stereo/SAP Broadcasts Setup 54 Audio Language 55 On-Screen Menus Language Selection 56 Caption Mode 57 - Digital Broadcasting ...
...15 DVD Setup 18 VCR Setup 20 Other A/V Source Setup 22 PC Setup 23 Audio Out Setup 28 WATCHING TV / CHANNEL CONTROL Remote Control Functions 30 Turning On TV 32 Channel Selection 32 Volume Adjustment 32 On-Screen Menus Selection 33 Channel Setup - Channel Editing 36 Input List...& LANGUAGE CONTROL Auto Volume Leveller (Auto Volume) 49 Preset Sound Setting (Sound Mode 50 Sound Setting Adjustment - User Mode 51 Balance 52 TV Speakers On/Off Setup 53 Stereo/SAP Broadcasts Setup 54 Audio Language 55 On-Screen Menus Language Selection 56 Caption Mode 57 - Digital Broadcasting ...
Operating Guide
Page 7
TIME SETTING Clock Setting - Auto Clock Setup 61 Manual Clock Setup 62 Auto On/Off Time Setting 63 Sleep Time Setting 64 Auto Shut-off Setting 65 PARENTAL CONTROL / RATINGS Set Password & Lock System 66 Channel Blocking 68 External Input Blocking 68 Movie & TV Rating 69 APPENDIX Troubleshooting 71 Maintenance 74 Product Specifications 74 Programming the Remote Control 75 IR Codes 79 External Control Through RS-232C 81 Open Source License 88 5
TIME SETTING Clock Setting - Auto Clock Setup 61 Manual Clock Setup 62 Auto On/Off Time Setting 63 Sleep Time Setting 64 Auto Shut-off Setting 65 PARENTAL CONTROL / RATINGS Set Password & Lock System 66 Channel Blocking 68 External Input Blocking 68 Movie & TV Rating 69 APPENDIX Troubleshooting 71 Maintenance 74 Product Specifications 74 Programming the Remote Control 75 IR Codes 79 External Control Through RS-232C 81 Open Source License 88 5
Operating Guide
Page 8
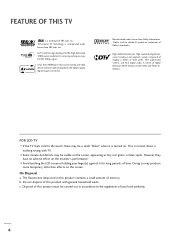
.... c. Manufactured under license from Dolby Laboratories. FEATURE OF THIS TV is incorporated under license from SRS Labs, Inc. LG TV with this product with general household waste. High-definition television. FOR LCD TV I If the TV feels cold to the regulations of roughly a million or more ...pixels, 16:9 aspect-ratio screens, and AC3 digital audio. It has three HDMI ports that connect audio and video devices with TV. This is normal, there is turned on the monitor's performance. High-resolution digital television broadcast and playback system composed of your finger...
.... c. Manufactured under license from Dolby Laboratories. FEATURE OF THIS TV is incorporated under license from SRS Labs, Inc. LG TV with this product with general household waste. High-definition television. FOR LCD TV I If the TV feels cold to the regulations of roughly a million or more ...pixels, 16:9 aspect-ratio screens, and AC3 digital audio. It has three HDMI ports that connect audio and video devices with TV. This is normal, there is turned on the monitor's performance. High-resolution digital television broadcast and playback system composed of your finger...

Operating Guide
Page 9
... polishing cloth. * Do not wipe roughly when removing Polishing Cloth (This feature is missing, please contact the dealer where you purchased the TV. Option Extras D-sub 15 pin Cable When using the VGA (D-sub 15 pin cable) PC connection, the user must use shielded signal ...interface cables with your TV. Owner's Manual TV RETURSNTB POWER MENU DVD INPUVTCR BRIGHT- Please be cautions of that the following accessories are included with ferrite cores to maintain standards compliance....
... polishing cloth. * Do not wipe roughly when removing Polishing Cloth (This feature is missing, please contact the dealer where you purchased the TV. Option Extras D-sub 15 pin Cable When using the VGA (D-sub 15 pin cable) PC connection, the user must use shielded signal ...interface cables with your TV. Owner's Manual TV RETURSNTB POWER MENU DVD INPUVTCR BRIGHT- Please be cautions of that the following accessories are included with ferrite cores to maintain standards compliance....
Operating Guide
Page 10
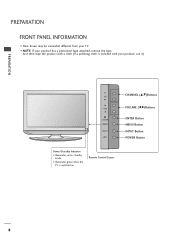
CHANNEL (D,E)Buttons CH VOL ENTER MENU INPUT /I NOTE: If your product has a protection tape attached, remove the tape. Remote Control Sensor 8 I VOLUME (F,G)Buttons ENTER Button MENU Button INPUT Button POWER Button Power/Standby Indicator • illuminates red in standby mode. • illuminates green when the TV is included with your TV. And then wipe the product with a cloth (If a polishing cloth is switched on. PREPARATION PREPARATION FRONT PANEL INFORMATION I Here shown may be somewhat different from your product, use it).
CHANNEL (D,E)Buttons CH VOL ENTER MENU INPUT /I NOTE: If your product has a protection tape attached, remove the tape. Remote Control Sensor 8 I VOLUME (F,G)Buttons ENTER Button MENU Button INPUT Button POWER Button Power/Standby Indicator • illuminates red in standby mode. • illuminates green when the TV is included with your TV. And then wipe the product with a cloth (If a polishing cloth is switched on. PREPARATION PREPARATION FRONT PANEL INFORMATION I Here shown may be somewhat different from your product, use it).
Operating Guide
Page 12
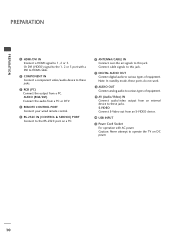
... power. Or DVI (VIDEO) signal to this jack. Note: In standby mode, these jacks. PREPARATION PREPARATION 1 HDMI/DVI IN Connect a HDMI signal to operate the TV on a PC. 6 ANTENNA/CABLE IN Connect over-the air signals to this jack. 7 DIGITAL AUDIO OUT Connect digital audio to these jacks. 3 RGB (PC) Connect...
... power. Or DVI (VIDEO) signal to this jack. Note: In standby mode, these jacks. PREPARATION PREPARATION 1 HDMI/DVI IN Connect a HDMI signal to operate the TV on a PC. 6 ANTENNA/CABLE IN Connect over-the air signals to this jack. 7 DIGITAL AUDIO OUT Connect digital audio to these jacks. 3 RGB (PC) Connect...
Operating Guide
Page 13
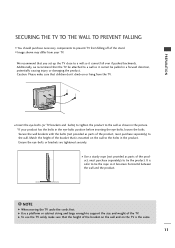
... eye-bolts, loosen the bolts. G Use a platform or cabinet string and large enough to support the size and weight of the stand. G To use the TV safely make sure that the height of the product, must purchase separately) to tie the product. Caution: Please make sure that children don't climb on... and bolts) to tighten the product to the wall as parts of the bracket on the wall and on or hang from the TV. We recommend that the TV be attached to a wall so it cannot be pulled in a forward direction, potentially causing injury or damaging the product. Ensure the eye-bolts...
... eye-bolts, loosen the bolts. G Use a platform or cabinet string and large enough to support the size and weight of the stand. G To use the TV safely make sure that the height of the product, must purchase separately) to tie the product. Caution: Please make sure that children don't climb on... and bolts) to tighten the product to the wall as parts of the bracket on the wall and on or hang from the TV. We recommend that the TV be attached to a wall so it cannot be pulled in a forward direction, potentially causing injury or damaging the product. Ensure the eye-bolts...
Operating Guide
Page 14
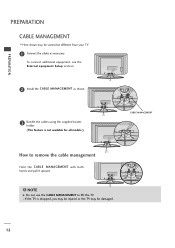
... cables as shown. 3 Bundle the cables using the supplied twister holder. (This feature is not available for all models.) CABLE MANAGEMENT How to lift the TV. - NOTE G Do not use the CABLE MANAGEMENT to remove the cable management Hold the CABLE MANAGEMENT with both hands and pull it upward. ! To connect... additional equipment, see the External equipment Setup section. 2 Install the CABLE MANAGEMENT as necessary. If the TV is dropped, you may be injured or the TV may be damaged. 12
... cables as shown. 3 Bundle the cables using the supplied twister holder. (This feature is not available for all models.) CABLE MANAGEMENT How to lift the TV. - NOTE G Do not use the CABLE MANAGEMENT to remove the cable management Hold the CABLE MANAGEMENT with both hands and pull it upward. ! To connect... additional equipment, see the External equipment Setup section. 2 Install the CABLE MANAGEMENT as necessary. If the TV is dropped, you may be injured or the TV may be damaged. 12
Operating Guide
Page 16
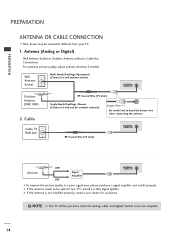
... IN I To improve the picture quality in a poor signal area, please purchase a signal amplifier and install properly. NOTE G The TV will let you know when the analog, cable, and digital channel scans are complete. 14 For optimum picture quality, adjust antenna direction ... UHF) 2. PREPARATION PREPARATION R ANTENNA OR CABLE CONNECTION I Here shown may be split for two TV's, install a 2-Way Signal Splitter. I If the antenna is not installed properly, contact your TV. 1. Cable Cable TV Wall Jack RF Coaxial Wire (75 ohm) Single-family Dwellings /Houses (Connect to wall jack for...
... IN I To improve the picture quality in a poor signal area, please purchase a signal amplifier and install properly. NOTE G The TV will let you know when the analog, cable, and digital channel scans are complete. 14 For optimum picture quality, adjust antenna direction ... UHF) 2. PREPARATION PREPARATION R ANTENNA OR CABLE CONNECTION I Here shown may be split for two TV's, install a 2-Way Signal Splitter. I If the antenna is not installed properly, contact your TV. 1. Cable Cable TV Wall Jack RF Coaxial Wire (75 ohm) Single-family Dwellings /Houses (Connect to wall jack for...

Operating Guide
Page 17
... for the digital set-top box. I If connected to the COMPONENT IN AUDIO 1 jacks on the remote control. HD RECEIVER SETUP EXTERNAL EQUIPMENT SETUP This TV can receive Digital Over-the-air/Cable signals without an external digital set-top box. However, if you have finished connecting all equipment. operation) I Select...
... for the digital set-top box. I If connected to the COMPONENT IN AUDIO 1 jacks on the remote control. HD RECEIVER SETUP EXTERNAL EQUIPMENT SETUP This TV can receive Digital Over-the-air/Cable signals without an external digital set-top box. However, if you have finished connecting all equipment. operation) I Select...

Operating Guide
Page 20
RGB IN Match the jack colors (Y = green, PB = blue, and PR = red). I Turn on the set . Component ports on the TV Y PB PR Video output ports on the remote control. EXTERNAL EQUIPMENT SETUP EXTERNAL EQUIPMENT SETUP DVD SETUP Component Connection 1. DVI IN RGB(PC) AUDIO (RGB/...
RGB IN Match the jack colors (Y = green, PB = blue, and PR = red). I Turn on the set . Component ports on the TV Y PB PR Video output ports on the remote control. EXTERNAL EQUIPMENT SETUP EXTERNAL EQUIPMENT SETUP DVD SETUP Component Connection 1. DVI IN RGB(PC) AUDIO (RGB/...

Operating Guide
Page 22
... ( ) EXTERNAL EQUIPMENT SETUP EXTERNAL EQUIPMENT SETUP VCR SETUP I Set VCR output switch to 3 or 4 and then tune TV to the same channel number. I Use the ISM feature in socket of time (Only Plasma TV model). Antenna Connection GB IN AUDIO (RGB/DVI) MPONENT IN ANTENNA/ CABLE IN REMOTE DIGITAL AUDIO OUT CONTROL... antenna cable to the RF antenna in the Option menu to use I To avoid picture noise (interference), leave an adequate distance between the VCR and TV. the fixed images on the sides of the screen may remain visible on the screen for a long period of the VCR. 2.
... ( ) EXTERNAL EQUIPMENT SETUP EXTERNAL EQUIPMENT SETUP VCR SETUP I Set VCR output switch to 3 or 4 and then tune TV to the same channel number. I Use the ISM feature in socket of time (Only Plasma TV model). Antenna Connection GB IN AUDIO (RGB/DVI) MPONENT IN ANTENNA/ CABLE IN REMOTE DIGITAL AUDIO OUT CONTROL... antenna cable to the RF antenna in the Option menu to use I To avoid picture noise (interference), leave an adequate distance between the VCR and TV. the fixed images on the sides of the screen may remain visible on the screen for a long period of the VCR. 2.

Operating Guide
Page 23
... both Video and the S-Video cables, only the S-Video will work. 21 How to use I If connected to connect 1 Connect the AUDIO/VIDEO jacks between TV and VCR. In the event that you have a mono VCR, connect the audio cable from the VCR to the VCR owner's manual.) I If connected to...
... both Video and the S-Video cables, only the S-Video will work. 21 How to use I If connected to connect 1 Connect the AUDIO/VIDEO jacks between TV and VCR. In the event that you have a mono VCR, connect the audio cable from the VCR to the VCR owner's manual.) I If connected to...
Operating Guide
Page 24
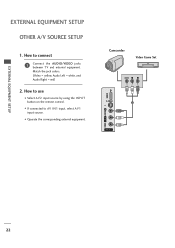
How to AV IN1 input, select A V 1 input source. I If connected to use I Operate the corresponding external equipment. How to connect 1 Connect the AUDIO/VIDEO jacks between TV and external equipment. Match the jack colors. (Video = yellow, Audio Left = white, and Audio Right = red) 2. VIDEO L/MONO AUDIO R Camcorder Video Game Set VIDEO L R USB IN S-VIDEO 1 AV IN 2 22 I Select A V 2 input source by using the INPUT button on the remote control. EXTERNAL EQUIPMENT SETUP EXTERNAL EQUIPMENT SETUP OTHER A/V SOURCE SETUP 1.
How to AV IN1 input, select A V 1 input source. I If connected to use I Operate the corresponding external equipment. How to connect 1 Connect the AUDIO/VIDEO jacks between TV and external equipment. Match the jack colors. (Video = yellow, Audio Left = white, and Audio Right = red) 2. VIDEO L/MONO AUDIO R Camcorder Video Game Set VIDEO L R USB IN S-VIDEO 1 AV IN 2 22 I Select A V 2 input source by using the INPUT button on the remote control. EXTERNAL EQUIPMENT SETUP EXTERNAL EQUIPMENT SETUP OTHER A/V SOURCE SETUP 1.
Operating Guide
Page 25
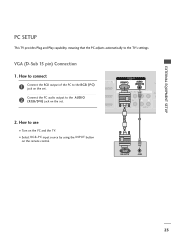
... COMPONENT IN (CO Connect the PC audio output to use I Turn on the PC and the TV. How to connect RGB IN 1 Connect the RGB output of the PC to the TV's settings. PC SETUP This TV provides Plug and Play capability, meaning that the PC adjusts automatically to the RG B (P C) jack on...
... COMPONENT IN (CO Connect the PC audio output to use I Turn on the PC and the TV. How to connect RGB IN 1 Connect the RGB output of the PC to the TV's settings. PC SETUP This TV provides Plug and Play capability, meaning that the PC adjusts automatically to the RG B (P C) jack on...
Operating Guide
Page 26
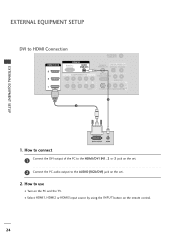
... the HDMI/DVI IN1, 2 or 3 jack on the set. 2 Connect the PC audio output to the AUDIO (RGB/DVI) jack on the PC and the TV. How to HDMI Connection HDMI/DVI IN 3 2 RGB IN RGB(PC) AUDIO (RGB/DVI) COMPONENT IN 2 1 1 VIDEO AUDIO ANTENNA/ CABLE IN REMOTE DIGITAL AUDIO OUT...
... the HDMI/DVI IN1, 2 or 3 jack on the set. 2 Connect the PC audio output to the AUDIO (RGB/DVI) jack on the PC and the TV. How to HDMI Connection HDMI/DVI IN 3 2 RGB IN RGB(PC) AUDIO (RGB/DVI) COMPONENT IN 2 1 1 VIDEO AUDIO ANTENNA/ CABLE IN REMOTE DIGITAL AUDIO OUT...
Operating Guide
Page 27
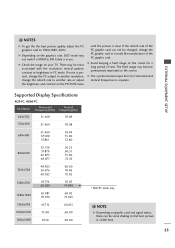
The fixed image may become permanently imprinted on your TV. NOTE G Depending on the screen for Horizontal and Vertical frequencies is clear. G Check the image on the screen. G Avoid keeping a fixed image on graphic card ...
The fixed image may become permanently imprinted on your TV. NOTE G Depending on the screen for Horizontal and Vertical frequencies is clear. G Check the image on the screen. G Avoid keeping a fixed image on graphic card ...


