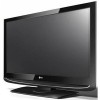
Brochure
Page 2
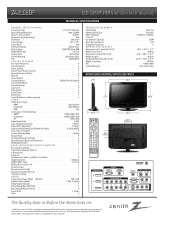
... Control In (IR) 1 RS-232c In (Control/Service) 1 USB (Service Only) 1 AUDIO Audio Outout Power (Watts - Component 1080p/1080i/720p - Component 60p/30p/24p - Z42LC6DF LCD 1080p HDTV 42Ó Class (42.0Ó diagonal) TECHNICAL SPECIFICATIONS G E N E R A L S P E C I F I C A T I E S Cabinet...Trilingual Menus English/French/Spanish Channel Add/Delete ¥ Favorite Channel ¥ Auto Clock ¥ Manual Clock ¥ On/Off Timer ¥ Sleep Timer ¥ Auto Off (When no video is present) ¥ VIDEO 1080p...
... Control In (IR) 1 RS-232c In (Control/Service) 1 USB (Service Only) 1 AUDIO Audio Outout Power (Watts - Component 1080p/1080i/720p - Component 60p/30p/24p - Z42LC6DF LCD 1080p HDTV 42Ó Class (42.0Ó diagonal) TECHNICAL SPECIFICATIONS G E N E R A L S P E C I F I C A T I E S Cabinet...Trilingual Menus English/French/Spanish Channel Add/Delete ¥ Favorite Channel ¥ Auto Clock ¥ Manual Clock ¥ On/Off Timer ¥ Sleep Timer ¥ Auto Off (When no video is present) ¥ VIDEO 1080p...
Operating Guide
Page 5
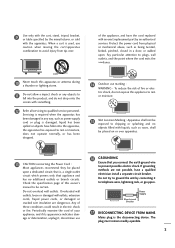
... as power-supply cord or plug is damaged, liquid has been spilled or objects have fallen into the product, and do not expose this owner's manual to be exposed to dripping or splashing and no additional outlets or branch circuits. Any of the appliance, and have a qualified electrician install a separate circuit...
... as power-supply cord or plug is damaged, liquid has been spilled or objects have fallen into the product, and do not expose this owner's manual to be exposed to dripping or splashing and no additional outlets or branch circuits. Any of the appliance, and have a qualified electrician install a separate circuit...
Operating Guide
Page 6
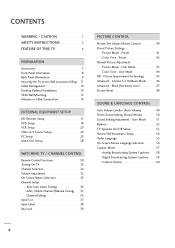
... CONTROL Remote Control Functions 30 Turning On TV 32 Channel Selection 32 Volume Adjustment 32 On-Screen Menus Selection 33 Channel Setup - Add / Delete Channel (Manual Tuning 35 - User Mode 43 - User Mode 51 Balance 52 TV Speakers On/Off Setup 53 Stereo/SAP Broadcasts Setup 54 Audio Language 55 On... - Channel Editing 36 Input List 37 Input Label 38 Key Lock 39 PICTURE CONTROL Picture Size (Aspect Ratio) Control 40 Preset Picture Settings - Preset 42 Manual Picture Adjustment - User Mode 44 DB -
... CONTROL Remote Control Functions 30 Turning On TV 32 Channel Selection 32 Volume Adjustment 32 On-Screen Menus Selection 33 Channel Setup - Add / Delete Channel (Manual Tuning 35 - User Mode 43 - User Mode 51 Balance 52 TV Speakers On/Off Setup 53 Stereo/SAP Broadcasts Setup 54 Audio Language 55 On... - Channel Editing 36 Input List 37 Input Label 38 Key Lock 39 PICTURE CONTROL Picture Size (Aspect Ratio) Control 40 Preset Picture Settings - Preset 42 Manual Picture Adjustment - User Mode 44 DB -
Operating Guide
Page 7
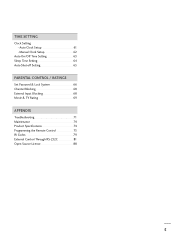
Auto Clock Setup 61 Manual Clock Setup 62 Auto On/Off Time Setting 63 Sleep Time Setting 64 Auto Shut-off Setting 65 PARENTAL CONTROL / RATINGS Set Password & Lock System 66 Channel Blocking 68 External Input Blocking 68 Movie & TV Rating 69 APPENDIX Troubleshooting 71 Maintenance 74 Product Specifications 74 Programming the Remote Control 75 IR Codes 79 External Control Through RS-232C 81 Open Source License 88 5 TIME SETTING Clock Setting -
Auto Clock Setup 61 Manual Clock Setup 62 Auto On/Off Time Setting 63 Sleep Time Setting 64 Auto Shut-off Setting 65 PARENTAL CONTROL / RATINGS Set Password & Lock System 66 Channel Blocking 68 External Input Blocking 68 Movie & TV Rating 69 APPENDIX Troubleshooting 71 Maintenance 74 Product Specifications 74 Programming the Remote Control 75 IR Codes 79 External Control Through RS-232C 81 Open Source License 88 5 TIME SETTING Clock Setting -

Operating Guide
Page 9
...* Do not wipe roughly when removing Polishing Cloth (This feature is missing, please contact the dealer where you purchased the TV. Owner's Manual TV RETURSNTB POWER MENU DVD INPUVTCR BRIGHT- ENTER TIMER VOL FAV BRIGHT+ 1 MUTE 4 2 7 5 3 8 6 CH P A EG ADJUST ...PICTURE SOUND SAP 0 RATIO CC 9 FLASHBK Owner's Manual CD Manual Remote Control Power Cord Batteries Cable Management Clip * Only wipe spots on the exterior with ferrite cores to maintain standards compliance. 7 PREPARATION PREPARATION...
...* Do not wipe roughly when removing Polishing Cloth (This feature is missing, please contact the dealer where you purchased the TV. Owner's Manual TV RETURSNTB POWER MENU DVD INPUVTCR BRIGHT- ENTER TIMER VOL FAV BRIGHT+ 1 MUTE 4 2 7 5 3 8 6 CH P A EG ADJUST ...PICTURE SOUND SAP 0 RATIO CC 9 FLASHBK Owner's Manual CD Manual Remote Control Power Cord Batteries Cable Management Clip * Only wipe spots on the exterior with ferrite cores to maintain standards compliance. 7 PREPARATION PREPARATION...

Operating Guide
Page 17
... the digital set-top box to the COMPONENT IN AUDIO 1 jacks on the set -top box or other digital external device, refer to the owner's manual for the digital set-top box. However, if you have finished connecting all equipment. How to COMPONENT IN2 input, select Component 2 input source. 1 2 Y PB PR...
... the digital set-top box to the COMPONENT IN AUDIO 1 jacks on the set -top box or other digital external device, refer to the owner's manual for the digital set-top box. However, if you have finished connecting all equipment. How to COMPONENT IN2 input, select Component 2 input source. 1 2 Y PB PR...

Operating Guide
Page 18
EXTERNAL EQUIPMENT SETUP EXTERNAL EQUIPMENT SETUP HDMI Connection 1. How to connect 1 Connect the digital set-top box to the owner's manual for the digital set-top box.) I Turn on the digital set-top box. (Refer to HDMI/DVI IN1, 2 or 3 jack on the remote control. HDMI/...
EXTERNAL EQUIPMENT SETUP EXTERNAL EQUIPMENT SETUP HDMI Connection 1. How to connect 1 Connect the digital set-top box to the owner's manual for the digital set-top box.) I Turn on the digital set-top box. (Refer to HDMI/DVI IN1, 2 or 3 jack on the remote control. HDMI/...

Operating Guide
Page 19
EXTERNAL EQUIPMENT SETUP DVI to the owner's manual for the digital set . 2. How to connect 1 Connect the DVI output of the digital set-top box to the HDMI/DVI IN1, 2 or 3 jack on ...
EXTERNAL EQUIPMENT SETUP DVI to the owner's manual for the digital set . 2. How to connect 1 Connect the DVI output of the digital set-top box to the HDMI/DVI IN1, 2 or 3 jack on ...

Operating Guide
Page 20
... on the set . COMPONENT IN R (CONT 2 1 VIDEO AUDIO S- ( 1 2 Y PB PR L R Component Input ports To get better picture quality, connect a DVD player to the DVD player's manual for operating instructions. How to the COMPONENT IN AUDIO1 jacks on DVD player Y PB PR Y B-Y R-Y Y Cb Cr Y Pb Pr 18 RGB IN Match the jack...
... on the set . COMPONENT IN R (CONT 2 1 VIDEO AUDIO S- ( 1 2 Y PB PR L R Component Input ports To get better picture quality, connect a DVD player to the DVD player's manual for operating instructions. How to the COMPONENT IN AUDIO1 jacks on DVD player Y PB PR Y B-Y R-Y Y Cb Cr Y Pb Pr 18 RGB IN Match the jack...

Operating Guide
Page 21
... operating instructions. HDMI supports both audio and video. ( ) 2. I Turn on the set. 2 No separated audio connection is necessary. How to the DVD player's manual for operating instructions. I Refer to use I Select A V 1 input source by using the INPUT button on the remote control. How to connect 1 Connect the HDMI output ...
... operating instructions. HDMI supports both audio and video. ( ) 2. I Turn on the set. 2 No separated audio connection is necessary. How to the DVD player's manual for operating instructions. I Refer to use I Select A V 1 input source by using the INPUT button on the remote control. How to connect 1 Connect the HDMI output ...

Operating Guide
Page 22
... is common to all manufactures and in socket of the VCR. 2. I Set VCR output switch to 3 or 4 and then tune TV to the VCR owner's manual.) 20 ( ) the fixed images on the screen. EXTERNAL EQUIPMENT SETUP EXTERNAL EQUIPMENT SETUP VCR SETUP I Use the ISM feature in the Option menu to the...
... is common to all manufactures and in socket of the VCR. 2. I Set VCR output switch to 3 or 4 and then tune TV to the VCR owner's manual.) 20 ( ) the fixed images on the screen. EXTERNAL EQUIPMENT SETUP EXTERNAL EQUIPMENT SETUP VCR SETUP I Use the ISM feature in the Option menu to the...

Operating Guide
Page 23
... AUDIO L/MONO jack of the set . In the event that you have a mono VCR, connect the audio cable from the VCR to the VCR owner's manual.) ANTENNA/ CABLE IN 1 REMOTE CONTROL IN DIGITAL A2UDIO OUT OPTIC(AL )COAXIAL RS-232C IN (CONTROL & SERVICE) AUDIO OUT AV IN 1 I If connected to AV... press PLAY on the remote control. ANT IN S-VIDEO VIDEO L R ANT OUT OUTPUT SWITCH 2 Connect the audio outputs of the VCR to the VCR owner's manual.) I Insert a video tape into the VCR and press PLAY on the VCR. (Refer to the S -VIDEO input on the remote control. How to use T IN...
... AUDIO L/MONO jack of the set . In the event that you have a mono VCR, connect the audio cable from the VCR to the VCR owner's manual.) ANTENNA/ CABLE IN 1 REMOTE CONTROL IN DIGITAL A2UDIO OUT OPTIC(AL )COAXIAL RS-232C IN (CONTROL & SERVICE) AUDIO OUT AV IN 1 I If connected to AV... press PLAY on the remote control. ANT IN S-VIDEO VIDEO L R ANT OUT OUTPUT SWITCH 2 Connect the audio outputs of the VCR to the VCR owner's manual.) I Insert a video tape into the VCR and press PLAY on the VCR. (Refer to the S -VIDEO input on the remote control. How to use T IN...

Operating Guide
Page 30
Off " in the AUDIO menu. (G p.69). See the external audio equipment instruction manual for operation. AUDIO L R 1 ANTENNA/ CABLE IN REMOTE DIGITAL AUDIO OUT CONTROL IN OPTICAL COAXIAL RS-232C IN (CONTROL & SERVICE) AUDIO OUT S-VIDEO VIDEO (MONO) AUDIO AV IN 1 ( ) 28 Analog 1. How to connect 1 Connect audio outputs to external audio equipment via the Digital Audio Output (Optical) port. EXTERNAL EQUIPMENT SETUP EXTERNAL EQUIPMENT SETUP AUDIO OUT SETUP Send the TV's audio to the TV's AUDIO OUT jacks. 2 Set the "TV Speaker option -
Off " in the AUDIO menu. (G p.69). See the external audio equipment instruction manual for operation. AUDIO L R 1 ANTENNA/ CABLE IN REMOTE DIGITAL AUDIO OUT CONTROL IN OPTICAL COAXIAL RS-232C IN (CONTROL & SERVICE) AUDIO OUT S-VIDEO VIDEO (MONO) AUDIO AV IN 1 ( ) 28 Analog 1. How to connect 1 Connect audio outputs to external audio equipment via the Digital Audio Output (Optical) port. EXTERNAL EQUIPMENT SETUP EXTERNAL EQUIPMENT SETUP AUDIO OUT SETUP Send the TV's audio to the TV's AUDIO OUT jacks. 2 Set the "TV Speaker option -

Operating Guide
Page 31
Looking at the laser beam may damage your vision. tion. ! See the external audio equipment instruction manual for opera- DIO DVI) IN ANTENNA/ CABLE IN REMOTE DIGITAL AUDIO OUT CONTROL IN OPTICAL COAXIAL RS-232C IN (CONTROL & SERVICE) 1 AUDIO OUT AUDIO S-VIDEO ...
Looking at the laser beam may damage your vision. tion. ! See the external audio equipment instruction manual for opera- DIO DVI) IN ANTENNA/ CABLE IN REMOTE DIGITAL AUDIO OUT CONTROL IN OPTICAL COAXIAL RS-232C IN (CONTROL & SERVICE) 1 AUDIO OUT AUDIO S-VIDEO ...

Operating Guide
Page 35
... : Off 33 WATCHING TV / CHANNEL CONTROL ON-SCREEN MENUS SELECTION Your TV's OSD (On Screen Display) may differ slightly from what is shown in this manual. 1 Press the MENU button and then use or button to select the each menu. 2 Press the button and then use SETUP Auto Tuning...
... : Off 33 WATCHING TV / CHANNEL CONTROL ON-SCREEN MENUS SELECTION Your TV's OSD (On Screen Display) may differ slightly from what is shown in this manual. 1 Press the MENU button and then use or button to select the each menu. 2 Press the button and then use SETUP Auto Tuning...

Operating Guide
Page 36
...G oDrTV C)hl.e2a3ds you to complete the channel search cycle for ANTENNA and CABLE. ! Press to the AuFtoouTnudnCinhgannel(s): 16 screen. Auto Tuning Manual Tuning Channel Edit 2 Processing Auto Tuning... or but- 2 Press the button and then use ton to select the SETUP menu. Next MENU ...NOTE DTV (Digital DTV antenna) TV (Analog TV antenna) CADTV (Digital CADTV cable) CATV (Analog CATV cable) Auto Tuning Manual Tuning Channel Edit 1 Auto Tuning Manual Tuning Channel Edit G Selection ( G or ) leads you to stop the current scan and start ANALOG ANTENNA channel scan. or...
...G oDrTV C)hl.e2a3ds you to complete the channel search cycle for ANTENNA and CABLE. ! Press to the AuFtoouTnudnCinhgannel(s): 16 screen. Auto Tuning Manual Tuning Channel Edit 2 Processing Auto Tuning... or but- 2 Press the button and then use ton to select the SETUP menu. Next MENU ...NOTE DTV (Digital DTV antenna) TV (Analog TV antenna) CADTV (Digital CADTV cable) CATV (Analog CATV cable) Auto Tuning Manual Tuning Channel Edit 1 Auto Tuning Manual Tuning Channel Edit G Selection ( G or ) leads you to stop the current scan and start ANALOG ANTENNA channel scan. or...
Operating Guide
Page 37
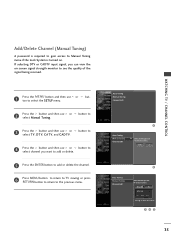
... to 3 Press the button and then use or select channel you can view the on . If selecting DTV or CADTV input signal, you want to Manual Tuning menu if the Lock System is turned on -screen signal strength monitor to see the quality of the signal being received. 1 Press the MENU... button and then use select Manual Tuning. D E DTV G 12 DTV 12-0 Bad Normal Good Press to select the SETUP menu. or but- 2 Press the button and then use ton to delete...
... to 3 Press the button and then use or select channel you can view the on . If selecting DTV or CADTV input signal, you want to Manual Tuning menu if the Lock System is turned on -screen signal strength monitor to see the quality of the signal being received. 1 Press the MENU... button and then use select Manual Tuning. D E DTV G 12 DTV 12-0 Bad Normal Good Press to select the SETUP menu. or but- 2 Press the button and then use ton to delete...

Operating Guide
Page 38
... channel number. 5 Press RETURN button to return to TV viewing or press MENU button to return to the previous menu. 36 Auto Tuning Manual Tuning Channel Edit 1 Auto Tuning Manual Tuning Channel Edit G Selection ( G or ) leads you to the channel edit screen. 2 34 Once a channel is highlighted and then add or delete...
... channel number. 5 Press RETURN button to return to TV viewing or press MENU button to return to the previous menu. 36 Auto Tuning Manual Tuning Channel Edit 1 Auto Tuning Manual Tuning Channel Edit G Selection ( G or ) leads you to the channel edit screen. 2 34 Once a channel is highlighted and then add or delete...

Operating Guide
Page 45
... to confirm. User Mode Adjust the picture appearance to select the desired picture option (Contrast, Brightness, Color, Sharpness, Tint, or Back Light (LCD TV only)). MANUAL PICTURE ADJUSTMENT Picture Mode - or button to 4 Press the button and then use or button to suit your preference and viewing situations. 1 Press the MENU...
... to confirm. User Mode Adjust the picture appearance to select the desired picture option (Contrast, Brightness, Color, Sharpness, Tint, or Back Light (LCD TV only)). MANUAL PICTURE ADJUSTMENT Picture Mode - or button to 4 Press the button and then use or button to suit your preference and viewing situations. 1 Press the MENU...
Operating Guide
Page 47
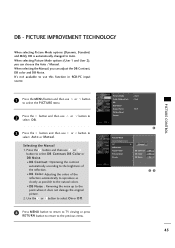
... brightness of the reflection. PICTURE CONTROL Picture Mode Color Temperature DB Advanced Aspect Ratio Picture Reset Screen : User1 : Cool : 16:9 1 Picture Mode Color Temperature DB G Manual Advanced Aspect Ratio DB Contrast On Picture Reset DB Color On Screen DB Noise On 23 45 When selecting the... Manual, you can adjust the DB Contrast, DB color and DB Noise. I DB Noise : Removing the noise up to Auto. I DB Contrast: Optimizing the contrast automatically ...
... brightness of the reflection. PICTURE CONTROL Picture Mode Color Temperature DB Advanced Aspect Ratio Picture Reset Screen : User1 : Cool : 16:9 1 Picture Mode Color Temperature DB G Manual Advanced Aspect Ratio DB Contrast On Picture Reset DB Color On Screen DB Noise On 23 45 When selecting the... Manual, you can adjust the DB Contrast, DB color and DB Noise. I DB Noise : Removing the noise up to Auto. I DB Contrast: Optimizing the contrast automatically ...

