
Operating Guide
Page 4
... the cord exits the appliance. 16. that appliance and has no objects filled with an exact replacement part by an authorized servicer. Unplug this owner's manual to dripping or splashing and no additional outlets or branch circuits. Protect the power cord from physical or mechanical abuse, such as vases, shall be...
... the cord exits the appliance. 16. that appliance and has no objects filled with an exact replacement part by an authorized servicer. Unplug this owner's manual to dripping or splashing and no additional outlets or branch circuits. Protect the power cord from physical or mechanical abuse, such as vases, shall be...

Operating Guide
Page 5
...future reference. See pages 24. 3 Install batteries in remote control. Turn TV on . 2. see pages 12~17. 6. See page 21. 7. After reading this manual, keep it handy for TV. Additional features set tumbling 10 External Equipment Connections 12~17 Antenna or Cable Connection 12~13 VCR Setup 13 External...Option 26 Front Surround 27 TV Speakers On/Off Setup 27 BBE 28 Stereo/SAP Broadcasts Setup 28 Time Menu Options Auto Clock Setup 29 Manual Clock Setup 29 On/Off Timer Setup 29 Sleep Timer / Auto Off 30 Option Menu Features Aspect Ratio Control 31 Cinema 3:2 Mode ...
...future reference. See pages 24. 3 Install batteries in remote control. Turn TV on . 2. see pages 12~17. 6. See page 21. 7. After reading this manual, keep it handy for TV. Additional features set tumbling 10 External Equipment Connections 12~17 Antenna or Cable Connection 12~13 VCR Setup 13 External...Option 26 Front Surround 27 TV Speakers On/Off Setup 27 BBE 28 Stereo/SAP Broadcasts Setup 28 Time Menu Options Auto Clock Setup 29 Manual Clock Setup 29 On/Off Timer Setup 29 Sleep Timer / Auto Off 30 Option Menu Features Aspect Ratio Control 31 Cinema 3:2 Mode ...

Operating Guide
Page 7
... an external device. HDMI/DVI RS-232C INPUT (VIDEO)INPUT (CONTROL/SER connect a VICE) PORT DVI(Video) sig- RS-232C port on DC power. Owner's Manual 7 S-Video Input Connect S-Video out from a PC to operate the TV on a PC. Remote Control Port Connect your wired remote control here. these jacks. Digital...
... an external device. HDMI/DVI RS-232C INPUT (VIDEO)INPUT (CONTROL/SER connect a VICE) PORT DVI(Video) sig- RS-232C port on DC power. Owner's Manual 7 S-Video Input Connect S-Video out from a PC to operate the TV on a PC. Remote Control Port Connect your wired remote control here. these jacks. Digital...

Operating Guide
Page 10
... when it becomes horizontal between the wall and the product. If an accessory is missing, please contact the dealer where you purchased the product. Owner's Manual 1.5V 1.5V Batteries Power Cord 75Ω Round Cable TV INPUT TV/VIDEO MODE DAY - Please make sure that the height of the bracket that...
... when it becomes horizontal between the wall and the product. If an accessory is missing, please contact the dealer where you purchased the product. Owner's Manual 1.5V 1.5V Batteries Power Cord 75Ω Round Cable TV INPUT TV/VIDEO MODE DAY - Please make sure that the height of the bracket that...

Operating Guide
Page 13
... adequate distance between the VCR and TV Connection Option 1 Set VCR output switch to channel 3 or 4 and then tune the TV to the VCR owner's manual.) 3. Connection Option 2 1. Insert a video tape into the VCR and press PLAY on the remote control. When connecting the TV to the Video input. 2. compared to...
... adequate distance between the VCR and TV Connection Option 1 Set VCR output switch to channel 3 or 4 and then tune the TV to the VCR owner's manual.) 3. Connection Option 2 1. Insert a video tape into the VCR and press PLAY on the remote control. When connecting the TV to the Video input. 2. compared to...

Operating Guide
Page 14
... input ports as shown below. How to use 1. If your DVD player does not have component video output, use S-Video. Refer to the DVD player's manual for Video, Front Video and Component 1-2. Note that RGB and HDMI/DVI sources are connected. 2. Connect the DVD video outputs (Y, PB, PR) to the COMPONENT...
... input ports as shown below. How to use 1. If your DVD player does not have component video output, use S-Video. Refer to the DVD player's manual for Video, Front Video and Component 1-2. Note that RGB and HDMI/DVI sources are connected. 2. Connect the DVD video outputs (Y, PB, PR) to the COMPONENT...

Operating Guide
Page 15
Use TV/VIDEO on the digital set-top box. (Refer to the owner's manual for the digital set -top box connector. This TV supports HDCP (High-bandwidth Digital Contents Protection) protocol for video connections, depending on your set -top ...
Use TV/VIDEO on the digital set-top box. (Refer to the owner's manual for the digital set -top box connector. This TV supports HDCP (High-bandwidth Digital Contents Protection) protocol for video connections, depending on your set -top ...
Operating Guide
Page 17
... audio output jacks for Monitor out. • When connecting with external audio equipments, such as amplif- See the Operating Manual of an optical cable to connect 1. See the external audio equipment instruction manual for further details regarding that device's input settings. Connect one end of the second TV or monitor for operation...
... audio output jacks for Monitor out. • When connecting with external audio equipments, such as amplif- See the Operating Manual of an optical cable to connect 1. See the external audio equipment instruction manual for further details regarding that device's input settings. Connect one end of the second TV or monitor for operation...
Operating Guide
Page 20
..., XGA), Position, Size may be noise associated with the resolution, vertical pattern, contrast or brightness in input source option of SETUP menu.(Refer to the Manual of the PC graphics card can not changed, change the refresh rate or adjust the brightness and contrast on the TV SET and HDMI/DVI... Source Devices remote control. 3. If not, refer to the Manual of , Video Resolution not supported TV SET output in HDMI/DVI Input. Installation How to use a HDMI to DVI Cable. - Refer to P.24) 4. Turn on...
..., XGA), Position, Size may be noise associated with the resolution, vertical pattern, contrast or brightness in input source option of SETUP menu.(Refer to the Manual of the PC graphics card can not changed, change the refresh rate or adjust the brightness and contrast on the TV SET and HDMI/DVI... Source Devices remote control. 3. If not, refer to the Manual of , Video Resolution not supported TV SET output in HDMI/DVI Input. Installation How to use a HDMI to DVI Cable. - Refer to P.24) 4. Turn on...

Operating Guide
Page 21
... TV/VIDEO button on the remote control. 2. Press the G button and then use D / E button to select your language. 1. Operation Turning the TV On * In this manual, the OSD (On Screen Display) may be different from your TV's because it was last set to, even if the power cord is just an...
... TV/VIDEO button on the remote control. 2. Press the G button and then use D / E button to select your language. 1. Operation Turning the TV On * In this manual, the OSD (On Screen Display) may be different from your TV's because it was last set to, even if the power cord is just an...

Operating Guide
Page 22
... begin the channel search. Press the G button and then use D / E button to select EZ Scan. 3. SETUP VIDEO AUDIO TIME OPTION EZ Scan Manual Scan Channel Edit DTV Signal Channel Label Input Source Input Label SetID Select channel type and RF-channel number. G TV 2 LOCK MENU Previous Notes: •... and CABLE. ANTENNA CABLE Selection ( G or ) leads you want to EZ Scan menu if the Lock System is turned on . MENU Previous Manual Scan - Automatically finds all available channels through antenna or cable inputs, and stores them in Channel Edit. • TV: analog antenna(over-the-air...
... begin the channel search. Press the G button and then use D / E button to select EZ Scan. 3. SETUP VIDEO AUDIO TIME OPTION EZ Scan Manual Scan Channel Edit DTV Signal Channel Label Input Source Input Label SetID Select channel type and RF-channel number. G TV 2 LOCK MENU Previous Notes: •... and CABLE. ANTENNA CABLE Selection ( G or ) leads you want to EZ Scan menu if the Lock System is turned on . MENU Previous Manual Scan - Automatically finds all available channels through antenna or cable inputs, and stores them in Channel Edit. • TV: analog antenna(over-the-air...

Operating Guide
Page 23
... Previous 1. View the on the remote control when a channel is highlighted you need to select the SETUP menu. 2. SETUP VIDEO AUDIO TIME OPTION EZ Scan Manual Scan Channel Edit DTV Signal Channel Label Input Source Input Label Set ID G Selection ( G or ) leads you are to select Channel Edit. 3. The higher the...
... Previous 1. View the on the remote control when a channel is highlighted you need to select the SETUP menu. 2. SETUP VIDEO AUDIO TIME OPTION EZ Scan Manual Scan Channel Edit DTV Signal Channel Label Input Source Input Label Set ID G Selection ( G or ) leads you are to select Channel Edit. 3. The higher the...

Operating Guide
Page 24
... button to Label. 5. Use the CH D/E button to select a channel to select the label. 5. SETUP VIDEO AUDIO TIME OPTION EZ Scan Manual Scan Channel Edit DTV Signal Channel Label Input Source Input Label Set ID LOCK MENU Previous Antenna Cable Video Front Video G Component1 Component2 RGB-PC... select Channel Label. 3. Press the G button and then use D / E button to select the SETUP menu. 2. SETUP VIDEO AUDIO TIME OPTION EZ Scan Manual Scan Channel Edit DTV Signal Channel Label Input Source Input Label Set ID G Selection ( G or ) leads you didn't preset a label for your TV. ...
... button to Label. 5. Use the CH D/E button to select a channel to select the label. 5. SETUP VIDEO AUDIO TIME OPTION EZ Scan Manual Scan Channel Edit DTV Signal Channel Label Input Source Input Label Set ID LOCK MENU Previous Antenna Cable Video Front Video G Component1 Component2 RGB-PC... select Channel Label. 3. Press the G button and then use D / E button to select the SETUP menu. 2. SETUP VIDEO AUDIO TIME OPTION EZ Scan Manual Scan Channel Edit DTV Signal Channel Label Input Source Input Label Set ID G Selection ( G or ) leads you didn't preset a label for your TV. ...

Operating Guide
Page 25
...Picture menu based on the program category. - When adjusting Video menu options (contrast, brightness, color, sharpness, tint, and color temperature) manually, EZ Picture automatically changes to the previous menu. Press the G button and then use D / E button to enhance hotter colors ...set to cool to select Color Temperature . 3. Press the MENU button and then use D / E button to adjust EZ Picture. 2. Manual Picture Control (Custom option) - SETUP VIDEO AUDIO TIME OPTION EZ Picture Contrast Brightness Color Sharpness Tint Color Temperature Video Reset G LOCK MENU ...
...Picture menu based on the program category. - When adjusting Video menu options (contrast, brightness, color, sharpness, tint, and color temperature) manually, EZ Picture automatically changes to the previous menu. Press the G button and then use D / E button to enhance hotter colors ...set to cool to select Color Temperature . 3. Press the MENU button and then use D / E button to adjust EZ Picture. 2. Manual Picture Control (Custom option) - SETUP VIDEO AUDIO TIME OPTION EZ Picture Contrast Brightness Color Sharpness Tint Color Temperature Video Reset G LOCK MENU ...
Operating Guide
Page 26
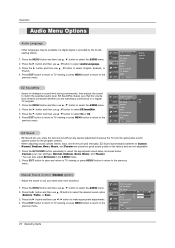
...Front Surround TV Speaker BBE MENU Previous English Spanish French EZ SoundRite - When adjusting sound options (treble, bass, and front surround) manually, EZ Sound automatically switches to the previous menu. Press EXIT button to return to TV viewing or press MENU button to return to...and then use D / E button to select EZ SoundRite. 3. VIDEO EZ SoundRite EZ Sound 2. Operation Audio Menu Options Audio Language - Manual Sound Control (Custom option) - EZ SoundRite makes sure that the volume level remains consistent whether you enjoy the best sound without any special ...
...Front Surround TV Speaker BBE MENU Previous English Spanish French EZ SoundRite - When adjusting sound options (treble, bass, and front surround) manually, EZ Sound automatically switches to the previous menu. Press EXIT button to return to TV viewing or press MENU button to return to...and then use D / E button to select EZ SoundRite. 3. VIDEO EZ SoundRite EZ Sound 2. Operation Audio Menu Options Audio Language - Manual Sound Control (Custom option) - EZ SoundRite makes sure that the volume level remains consistent whether you enjoy the best sound without any special ...
Operating Guide
Page 29
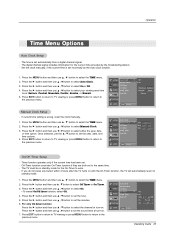
... the G button and then use D / E button to select either the year, date, or time option. SETUP VIDEO AUDIO TIME Auto Clock Manual Clock Off Timer On Timer Sleep Timer Auto Off G Off On Time Zone Eastern Daylight Auto Saving OPTION LOCK MENU Previous SETUP VIDEO AUDIO TIME... then use D / E button to the same time. - Operation Time Menu Options Auto Clock Setup - The time is wrong, reset the clock manually. 1. Manual Clock Setup - Press EXIT button to return to TV viewing or press MENU button to return to work. - Time OPTION LOCK MENU Previous On/Off...
... the G button and then use D / E button to select either the year, date, or time option. SETUP VIDEO AUDIO TIME Auto Clock Manual Clock Off Timer On Timer Sleep Timer Auto Off G Off On Time Zone Eastern Daylight Auto Saving OPTION LOCK MENU Previous SETUP VIDEO AUDIO TIME... then use D / E button to the same time. - Operation Time Menu Options Auto Clock Setup - The time is wrong, reset the clock manually. 1. Manual Clock Setup - Press EXIT button to return to TV viewing or press MENU button to return to work. - Time OPTION LOCK MENU Previous On/Off...
Operating Guide
Page 30
... then use D / E button to On and there is no input signal, the TV turns off automatically after 10 minutes. 1. SETUP VIDEO AUDIO TIME Auto Clock Manual Clock Off Timer On Timer Sleep Timer Auto Off OPTION If set to select Auto Off. 3. Note that this setting is cleared when the TV...
... then use D / E button to On and there is no input signal, the TV turns off automatically after 10 minutes. 1. SETUP VIDEO AUDIO TIME Auto Clock Manual Clock Off Timer On Timer Sleep Timer Auto Off OPTION If set to select Auto Off. 3. Note that this setting is cleared when the TV...

Operating Guide
Page 41
Press the G button and then use D / E button to select the SETUP menu. 2. Communication Parameters SETUP EZ Scan Manual Scan VIDEO Channel Edit G AUDIO DTV Signal Channel Label TIME Input Source Input Label OPTION Set ID G 1 LOCK MENU Previous • Baud rate : 9600 bps (...
Press the G button and then use D / E button to select the SETUP menu. 2. Communication Parameters SETUP EZ Scan Manual Scan VIDEO Channel Edit G AUDIO DTV Signal Channel Label TIME Input Source Input Label OPTION Set ID G 1 LOCK MENU Previous • Baud rate : 9600 bps (...


