
Operating Guide
Page 3
... the obsolete outlet. 10. PORTABLE CART WARNING Operating Guide 3 Heed all instructions. 5. Install in accordance with dry cloth. 7. Do not install near water. 6. Protect the power cord from being walked on or pinched particularly at plugs, convenience receptacles, and the point where they exit from tip-over. Clean only with the...
... the obsolete outlet. 10. PORTABLE CART WARNING Operating Guide 3 Heed all instructions. 5. Install in accordance with dry cloth. 7. Do not install near water. 6. Protect the power cord from being walked on or pinched particularly at plugs, convenience receptacles, and the point where they exit from tip-over. Clean only with the...

Operating Guide
Page 4
...page of these conditions could result in electric shock or fire. Overloaded wall outlets, loose or damaged wall outlets, extension cords, frayed power cords, or damaged or cracked wire insulation are dangerous. Pay particular attention to qualified service personnel. Wet Location Marking : Apparatus shall not... circuits. Refer all servicing to plugs, wall outlets, and the point where the cord exits the appliance. 16. CAUTION concerning the Power Cord : Most appliances recommend they be placed upon . Periodically examine the cord of your appliance, and if its appearance indicates damage or...
...page of these conditions could result in electric shock or fire. Overloaded wall outlets, loose or damaged wall outlets, extension cords, frayed power cords, or damaged or cracked wire insulation are dangerous. Pay particular attention to qualified service personnel. Wet Location Marking : Apparatus shall not... circuits. Refer all servicing to plugs, wall outlets, and the point where the cord exits the appliance. 16. CAUTION concerning the Power Cord : Most appliances recommend they be placed upon . Periodically examine the cord of your appliance, and if its appearance indicates damage or...

Operating Guide
Page 7
...DTV Input (Component 1-2) Connect a component video/audio device to hear stereo sound from a video device. RS-232C port on an AC power. CABLE Input Connect cable signals to the appropriate input port. Digital Audio Output Audio/Video Input Connect digital audio from a PC to this ...port supplies Analog audio. Connection Options Introduction Back Connection Panel S-VIDEO Input A connection available to HDMI/DVI. AC IN Power Cord Socket This TV operates on a PC. HDMI/DVI RS-232C INPUT (VIDEO)INPUT (CONTROL/SER connect a VICE) PORT DVI(Video) sig...
...DTV Input (Component 1-2) Connect a component video/audio device to hear stereo sound from a video device. RS-232C port on an AC power. CABLE Input Connect cable signals to the appropriate input port. Digital Audio Output Audio/Video Input Connect digital audio from a PC to this ...port supplies Analog audio. Connection Options Introduction Back Connection Panel S-VIDEO Input A connection available to HDMI/DVI. AC IN Power Cord Socket This TV operates on a PC. HDMI/DVI RS-232C INPUT (VIDEO)INPUT (CONTROL/SER connect a VICE) PORT DVI(Video) sig...

Operating Guide
Page 9
... menus and adjust the system settings to the next one. VOLUME UP/DOWN Increases/decreases the sound level. Operating Guide 9 Remote Control Key Functions Introduction POWER Turns your pref-
... menus and adjust the system settings to the next one. VOLUME UP/DOWN Increases/decreases the sound level. Operating Guide 9 Remote Control Key Functions Introduction POWER Turns your pref-

Operating Guide
Page 10
... from falling forward and hurting people. Introduction Installation Accessories Ensure that the following accessories are included with the tie band. Owner's Manual 1.5V 1.5V Batteries Power Cord 75Ω Round Cable TV INPUT TV/VIDEO MODE DAY - GUIDE DAY + EXIT TIMER CC FLASHBK Remote Control 4-Wall brackets 2-bolts Tie Band Arrange...
... from falling forward and hurting people. Introduction Installation Accessories Ensure that the following accessories are included with the tie band. Owner's Manual 1.5V 1.5V Batteries Power Cord 75Ω Round Cable TV INPUT TV/VIDEO MODE DAY - GUIDE DAY + EXIT TIMER CC FLASHBK Remote Control 4-Wall brackets 2-bolts Tie Band Arrange...

Operating Guide
Page 11
... cables as on a wall, or on each side and the top, 2.36" on the set and bundle the cables using the supplied tie band. Installation Power Supply Short-circuit Breaker Wall Mount: Horizontal installation Desktop Pedestal Installation For proper ventilation, allow a clearance of 4" on a desktop etc. • The TV is designed...
... cables as on a wall, or on each side and the top, 2.36" on the set and bundle the cables using the supplied tie band. Installation Power Supply Short-circuit Breaker Wall Mount: Horizontal installation Desktop Pedestal Installation For proper ventilation, allow a clearance of 4" on a desktop etc. • The TV is designed...
Operating Guide
Page 20
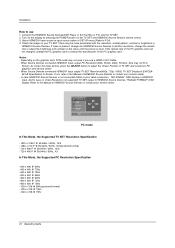
Turn on the display by pressing the POWER button on your TV SET. Notes: - And In case of, Video Resolution not supported TV SET output in HDMI/DVI Input. Check the image on ...
Turn on the display by pressing the POWER button on your TV SET. Notes: - And In case of, Video Resolution not supported TV SET output in HDMI/DVI Input. Check the image on ...

Operating Guide
Page 21
... TV/VIDEO button on the remote control. First select your desired language. Operation 1. Select the viewing source by using the TV, press the POWER button on the remote control. 2. From this point on, the on the screen in the selected language. 4. The menus can be shown on .... 3. In standby mode to standby mode. The TV reverts to turn TV on, press the , TV/VIDEO , CH (D / E) button on the TV or press the POWER, TV INPUT, TV/VIDEO, CH (D / E), Number (0 ~ 9) button on the remote control. Press the G button and then use D / E button to select your language....
... TV/VIDEO button on the remote control. First select your desired language. Operation 1. Select the viewing source by using the TV, press the POWER button on the remote control. 2. From this point on, the on the screen in the selected language. 4. The menus can be shown on .... 3. In standby mode to standby mode. The TV reverts to turn TV on, press the , TV/VIDEO , CH (D / E) button on the TV or press the POWER, TV INPUT, TV/VIDEO, CH (D / E), Number (0 ~ 9) button on the remote control. Press the G button and then use D / E button to select your language....

Operating Guide
Page 32
... Language OPTION LOCK MENU Previous Analog Broadcasting System Captions - Text displays information, usually at any position on the program. 1. Choose the language you turn the power off. 1. Languages can also use D / E button to the previous menu. Press the G button and then use the OPTION menu to select caption: CC1, CC2, CC3...
... Language OPTION LOCK MENU Previous Analog Broadcasting System Captions - Text displays information, usually at any position on the program. 1. Choose the language you turn the power off. 1. Languages can also use D / E button to the previous menu. Press the G button and then use the OPTION menu to select caption: CC1, CC2, CC3...

Operating Guide
Page 41
... k 11. Bass k 16. Error Acknowledgement [Command2][ ][Set ID][ ][NG][Data][x] * The Monitor transmits ACK (acknowledgement) based on transmission/receiving protocol. * [DATA]: To transmit command data. Power k 02. Brightness k 09. Treble k 15. Data 1: Illegal Code 2: Not supported function 3: Wait more time COM- Refer to select SET ID. 3. Press the G button and then...
... k 11. Bass k 16. Error Acknowledgement [Command2][ ][Set ID][ ][NG][Data][x] * The Monitor transmits ACK (acknowledgement) based on transmission/receiving protocol. * [DATA]: To transmit command data. Power k 02. Brightness k 09. Treble k 15. Data 1: Illegal Code 2: Not supported function 3: Wait more time COM- Refer to select SET ID. 3. Press the G button and then...

Operating Guide
Page 42
Transmission [k][a][ ][Set ID][ ][Data][Cr] Data 0 : Power Off Acknowledgement 1 : Power On [a][ ][Set ID][ ][OK][Data][x] * In a like manner, if other functions transmit 'FF' data based on (Picture off) Acknowledgement [d][ ][Set ID][ ][OK][Data... Zoom (1) 1F: Cinema Zoom (16) Acknowledgement [c][ ][Set ID][ ][OK][Data][x] 04. Screen Mute (Command2:d) G To select screen mute on remote control. Power (Command2:a) G To control Power On/Off of the Monitor. Aspect Ratio (Command2:c) (Main picture format) G To adjust the screen format. You can also adjust volume with the volume...
Transmission [k][a][ ][Set ID][ ][Data][Cr] Data 0 : Power Off Acknowledgement 1 : Power On [a][ ][Set ID][ ][OK][Data][x] * In a like manner, if other functions transmit 'FF' data based on (Picture off) Acknowledgement [d][ ][Set ID][ ][OK][Data... Zoom (1) 1F: Cinema Zoom (16) Acknowledgement [c][ ][Set ID][ ][OK][Data][x] 04. Screen Mute (Command2:d) G To select screen mute on remote control. Power (Command2:a) G To control Power On/Off of the Monitor. Aspect Ratio (Command2:c) (Main picture format) G To adjust the screen format. You can also adjust volume with the volume...

Operating Guide
Page 47
... 44 43 A9 52 4D 5B 0A CB D6 5A D0 BF D4 D5 D7 C6 76 77 AF 98 Function TV/VIDEO TV INPUT POWER POWER ON POWER OFF RATIO TIMER Number Key 0~ 9 - (Dash) FLASHBK MUTE FREEZE VOL D VOLE CH D CH E FAV INFO CC D E F G ENTER ... Front Video COMPONENT 1 COMPONENT 2 RGB-PC RGB-DTV HDMI/DVI Ratio 4:3 Ratio 16:9 Ratio Zoom MULTIMEDIA Note R/C Button R/C Button R/C Button (Power On/Off) Discrete IR Code (Only Power On) Discrete IR Code (Only Power Off) R/C Button R/C Button R/C Button R/C Button R/C Button R/C Button R/C Button R/C Button R/C Button R/C Button R/C Button R/C Button R/C Button R/C Button R/C...
... 44 43 A9 52 4D 5B 0A CB D6 5A D0 BF D4 D5 D7 C6 76 77 AF 98 Function TV/VIDEO TV INPUT POWER POWER ON POWER OFF RATIO TIMER Number Key 0~ 9 - (Dash) FLASHBK MUTE FREEZE VOL D VOLE CH D CH E FAV INFO CC D E F G ENTER ... Front Video COMPONENT 1 COMPONENT 2 RGB-PC RGB-DTV HDMI/DVI Ratio 4:3 Ratio 16:9 Ratio Zoom MULTIMEDIA Note R/C Button R/C Button R/C Button (Power On/Off) Discrete IR Code (Only Power On) Discrete IR Code (Only Power Off) R/C Button R/C Button R/C Button R/C Button R/C Button R/C Button R/C Button R/C Button R/C Button R/C Button R/C Button R/C Button R/C Button R/C Button R/C...

Operating Guide
Page 48
... the MENU and MUTE button continuously at a time. The programming procedures are explained below. 2. If you have to operate the device. In that , press the POWER button. After blinking twice, this code is successful. 4. If not, repeat from step 2. 3. If not, the remote should be turned off , the programming is stored...
... the MENU and MUTE button continuously at a time. The programming procedures are explained below. 2. If you have to operate the device. In that , press the POWER button. After blinking twice, this code is successful. 4. If not, repeat from step 2. 3. If not, the remote should be turned off , the programming is stored...

Operating Guide
Page 51
...5 minutes, the screen gets dark.) Horizontal/vertical bars or picture shaking • Check for local interference such as an electrical appliance or power tool. Troubleshooting Checklist Troubleshooting Checklist No picture & No sound • Check whether the TV is turned on. • Is the... power cord inserted into wall power outlet? • Test the wall power outlet, plug another product's power cord into the outlet where the TV's power cord was plugged in the Video menu and press the G button. (Refer to p.25)...
...5 minutes, the screen gets dark.) Horizontal/vertical bars or picture shaking • Check for local interference such as an electrical appliance or power tool. Troubleshooting Checklist Troubleshooting Checklist No picture & No sound • Check whether the TV is turned on. • Is the... power cord inserted into wall power outlet? • Test the wall power outlet, plug another product's power cord into the outlet where the TV's power cord was plugged in the Video menu and press the G button. (Refer to p.25)...

Operating Guide
Page 52
Cleaning the Screen 1. Wet a soft cloth in a mixture of time you turn the power off your TV. Cleaning the Cabinet To remove dirt or dust, wipe the cabinet with... to leave your new TV. Here's a great way to protect against possible damage from lightning or power surges. 52 Operating Guide Make sure the excess water is off the screen, and then let it 's a good idea ...to unplug the power cord to keep the dust off and unplug the power cord before you will have your TV dormant for a long time (such as a vacation), ...
Cleaning the Screen 1. Wet a soft cloth in a mixture of time you turn the power off your TV. Cleaning the Cabinet To remove dirt or dust, wipe the cabinet with... to leave your new TV. Here's a great way to protect against possible damage from lightning or power surges. 52 Operating Guide Make sure the excess water is off the screen, and then let it 's a good idea ...to unplug the power cord to keep the dust off and unplug the power cord before you will have your TV dormant for a long time (such as a vacation), ...

Operating Guide
Page 53
Operating Guide 53 Product Specifications Specification MODELS Z37LZ5D Power requirement Power Consumption Television System Program Coverage External Antenna Impedance Operating Temperature Range Operating Humidity Range AC100-240V ~ 50/60Hz 2.0A 190W NTSC-M, ATSC, 64 & 256 QAM VHF 2 ~ 13, UHF 14 ~ 69, CATV 1 ~ 135, CADTV 1 ~ 135, DTV 2 ~ 69 75 Ω 32 ~ 104°F (0 ~ 40°C) Less than 80% • The specifications shown above may be changed without prior notice for quality improvement.
Operating Guide 53 Product Specifications Specification MODELS Z37LZ5D Power requirement Power Consumption Television System Program Coverage External Antenna Impedance Operating Temperature Range Operating Humidity Range AC100-240V ~ 50/60Hz 2.0A 190W NTSC-M, ATSC, 64 & 256 QAM VHF 2 ~ 13, UHF 14 ~ 69, CATV 1 ~ 135, CADTV 1 ~ 135, DTV 2 ~ 69 75 Ω 32 ~ 104°F (0 ~ 40°C) Less than 80% • The specifications shown above may be changed without prior notice for quality improvement.


