
Operating Guide
Page 4
... normally, or has been dropped. 15. CAUTION concerning the Power Cord : Most appliances recommend they be placed on the apparatus. 4 Operating Guide Unplug this owner's manual to qualified service personnel. Wet Location Marking : Apparatus shall not be exposed to dripping or splashing and no additional outlets or branch circuits.
... normally, or has been dropped. 15. CAUTION concerning the Power Cord : Most appliances recommend they be placed on the apparatus. 4 Operating Guide Unplug this owner's manual to qualified service personnel. Wet Location Marking : Apparatus shall not be exposed to dripping or splashing and no additional outlets or branch circuits.

Operating Guide
Page 5
...TV On 21 On-screen Menus Language Selection 21 Setup Menu Options EZ Scan (Channel Search 22 Manual Scan 22 Channel Edit 23 DTV Signal Strength 23 Channel Label Setup 24 Input Source 24 Input Label...Control 25 Video Reset 25 Audio Menu Options Audio Language 26 EZ SoundRite / EZ Sound 26 Manual Sound Control (Custom Option 26 Front Surround 27 TV Speakers On/Off Setup 27 BBE 28 Stereo.../SAP Broadcasts Setup 28 Time Menu Options Auto Clock Setup 29 Manual Clock Setup 29 On/Off Timer Setup 29 Sleep Timer / Auto Off 30 Option Menu Features Aspect ...
...TV On 21 On-screen Menus Language Selection 21 Setup Menu Options EZ Scan (Channel Search 22 Manual Scan 22 Channel Edit 23 DTV Signal Strength 23 Channel Label Setup 24 Input Source 24 Input Label...Control 25 Video Reset 25 Audio Menu Options Audio Language 26 EZ SoundRite / EZ Sound 26 Manual Sound Control (Custom Option 26 Front Surround 27 TV Speakers On/Off Setup 27 BBE 28 Stereo.../SAP Broadcasts Setup 28 Time Menu Options Auto Clock Setup 29 Manual Clock Setup 29 On/Off Timer Setup 29 Sleep Timer / Auto Off 30 Option Menu Features Aspect ...

Operating Guide
Page 7
... quality than the video input. AC IN Power Cord Socket This TV operates on a PC. Remote Control Port Connect your wired remote control here. Owner's Manual 7 output from an S-VIDEO device to HDMI/DVI. Never attempt to ports will not work. RS-232C port on an AC power. Antenna Input Connect...
... quality than the video input. AC IN Power Cord Socket This TV operates on a PC. Remote Control Port Connect your wired remote control here. Owner's Manual 7 output from an S-VIDEO device to HDMI/DVI. Never attempt to ports will not work. RS-232C port on an AC power. Antenna Input Connect...

Operating Guide
Page 10
... mounted on the wall is safer to tie the product. If an accessory is missing, please contact the dealer where you purchased the product. Owner's Manual 1.5V 1.5V Batteries Power Cord 75Ω Round Cable TV INPUT TV/VIDEO MODE DAY -
... mounted on the wall is safer to tie the product. If an accessory is missing, please contact the dealer where you purchased the product. Owner's Manual 1.5V 1.5V Batteries Power Cord 75Ω Round Cable TV INPUT TV/VIDEO MODE DAY -

Operating Guide
Page 13
... VCR. (Refer to VCR, match the jack colors (Video = yellow, Audio Left = white, and Audio Right = red). 3. When connecting the TV to the VCR owner's manual.) 3.
... VCR. (Refer to VCR, match the jack colors (Video = yellow, Audio Left = white, and Audio Right = red). 3. When connecting the TV to the VCR owner's manual.) 3.

Operating Guide
Page 14
... using the TV/VIDEO button on the DVD player, insert a DVD. 2. Note that RGB and HDMI/DVI sources are connected. 2. Refer to the DVD player's manual for Video, Front Video and Component 1-2. Operate the corresponding external equipment. Component ports on the TV Y PB PR Video output ports on the TV, as...
... using the TV/VIDEO button on the DVD player, insert a DVD. 2. Note that RGB and HDMI/DVI sources are connected. 2. Refer to the DVD player's manual for Video, Front Video and Component 1-2. Operate the corresponding external equipment. Component ports on the TV Y PB PR Video output ports on the TV, as...

Operating Guide
Page 15
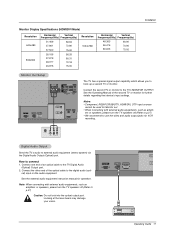
... Installation HDSTB Setup - How to select Component 1, Component 2, RGB-DTV, or HDMI/DVI source. Turn on the digital set-top box. (Refer to the owner's manual for the digital set -top box connector. Then, make the corresponding audio connections. This TV supports HDCP (High-bandwidth Digital Contents Protection) protocol for video...
... Installation HDSTB Setup - How to select Component 1, Component 2, RGB-DTV, or HDMI/DVI source. Turn on the digital set-top box. (Refer to the owner's manual for the digital set -top box connector. Then, make the corresponding audio connections. This TV supports HDCP (High-bandwidth Digital Contents Protection) protocol for video...
Operating Guide
Page 17
... be used for VCR recording. How to external audio equipment (stereo system) via the Digital Audio Output (Optical) port. See the external audio equipment instruction manual for further details regarding that device's input settings. Note: When connecting with external audio equipments, such as amplifers or speakers, please turn the TV speakers... capability which allows you to the TV's MONITOR OUTPUT. Connect the second TV or monitor to hook up a second TV or monitor. See the Operating Manual of the second TV or monitor for operation.
... be used for VCR recording. How to external audio equipment (stereo system) via the Digital Audio Output (Optical) port. See the external audio equipment instruction manual for further details regarding that device's input settings. Note: When connecting with external audio equipments, such as amplifers or speakers, please turn the TV speakers... capability which allows you to the TV's MONITOR OUTPUT. Connect the second TV or monitor to hook up a second TV or monitor. See the Operating Manual of the second TV or monitor for operation.
Operating Guide
Page 20
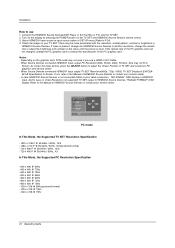
... @ 72Hz - 800 x 600 @ 75Hz - 1024 x 768 @ 60Hz(preferred format) - 1024 x 768 @ 70Hz - 1024 x 768 @ 75Hz 20 Operating Guide There may not fit to the Manual of HDMI/DVI Source Devices or contact your service center. Check the image on the TV SET and HDMI/DVI Source Devices remote control. 3. Notes... on the display by pressing the POWER button on your TV SET. If not, refer to use a HDMI to Screen. Installation How to the Manual of HDMI/DVI Source Devices or contact your service center. - If noise is present, change the HDMI/DVI Source Devices to another resolution, change the...
... @ 72Hz - 800 x 600 @ 75Hz - 1024 x 768 @ 60Hz(preferred format) - 1024 x 768 @ 70Hz - 1024 x 768 @ 75Hz 20 Operating Guide There may not fit to the Manual of HDMI/DVI Source Devices or contact your service center. Check the image on the TV SET and HDMI/DVI Source Devices remote control. 3. Notes... on the display by pressing the POWER button on your TV SET. If not, refer to use a HDMI to Screen. Installation How to the Manual of HDMI/DVI Source Devices or contact your service center. - If noise is present, change the HDMI/DVI Source Devices to another resolution, change the...

Operating Guide
Page 21
Operation Turning the TV On * In this manual, the OSD (On Screen Display) may be different from your TV's because it was last set to, even if the power cord is just an ...
Operation Turning the TV On * In this manual, the OSD (On Screen Display) may be different from your TV's because it was last set to, even if the power cord is just an ...

Operating Guide
Page 22
... stop the current scan and start DIGITAL ANTENNA channel scan. Press to complete the channel search cycle for the channel number. 6. MENU Previous Manual Scan - Press the ENTER button to select EZ Scan. 3. Run EZ Scan again after any Antenna/Cable connection changes. - Press the... G button and then use D / E button to the EZ scan screen LOCK SETUP VIDEO AUDIO TIME OPTION EZ Scan Manual Scan Channel Edit DTV Signal Channel Label Input Source Input Label Set ID LOCK 1. G TV 2 LOCK MENU Previous Notes: • This channel ...
... stop the current scan and start DIGITAL ANTENNA channel scan. Press to complete the channel search cycle for the channel number. 6. MENU Previous Manual Scan - Press the ENTER button to select EZ Scan. 3. Run EZ Scan again after any Antenna/Cable connection changes. - Press the... G button and then use D / E button to the EZ scan screen LOCK SETUP VIDEO AUDIO TIME OPTION EZ Scan Manual Scan Channel Edit DTV Signal Channel Label Input Source Input Label Set ID LOCK 1. G TV 2 LOCK MENU Previous Notes: • This channel ...

Operating Guide
Page 23
... signal strength, the less likely you to add or delete scanned channels. There are to select Channel Edit. 3. SETUP VIDEO AUDIO TIME OPTION EZ Scan Manual Scan Channel Edit DTV Signal Channel Label Input Source Input Label Set ID G Selection ( G or ) leads you are two different ways in the channel list...
... signal strength, the less likely you to add or delete scanned channels. There are to select Channel Edit. 3. SETUP VIDEO AUDIO TIME OPTION EZ Scan Manual Scan Channel Edit DTV Signal Channel Label Input Source Input Label Set ID G Selection ( G or ) leads you are two different ways in the channel list...

Operating Guide
Page 24
... press TV/VIDEO button. 1. Press the G button and then use D / E button to select Input Source. 3. SETUP VIDEO AUDIO TIME OPTION EZ Scan Manual Scan Channel Edit DTV Signal Channel Label Input Source Input Label Set ID LOCK MENU Previous Antenna Cable Video Front Video G Component1 Component2 RGB-PC...to TV viewing or press MENU button to return to Label. 5. Sets a label to the selected channel. - SETUP VIDEO AUDIO TIME OPTION EZ Scan Manual Scan Channel Edit DTV Signal Channel Label Input Source Input Label Set ID G Selection ( G or ) leads you can watch your TV. 1. Press...
... press TV/VIDEO button. 1. Press the G button and then use D / E button to select Input Source. 3. SETUP VIDEO AUDIO TIME OPTION EZ Scan Manual Scan Channel Edit DTV Signal Channel Label Input Source Input Label Set ID LOCK MENU Previous Antenna Cable Video Front Video G Component1 Component2 RGB-PC...to TV viewing or press MENU button to return to Label. 5. Sets a label to the selected channel. - SETUP VIDEO AUDIO TIME OPTION EZ Scan Manual Scan Channel Edit DTV Signal Channel Label Input Source Input Label Set ID G Selection ( G or ) leads you can watch your TV. 1. Press...

Operating Guide
Page 25
... EZ Picture menu based on the program category. - When adjusting Video menu options (contrast, brightness, color, sharpness, tint, and color temperature) manually, EZ Picture automatically changes to the previous menu. Press the G button and then use D / E button to select the desired picture option...factory preset values. 1. EZ Picture adjusts the TV for optimum picture quality at the factory and are preset for the best picture appearance. Manual Picture Control (Custom option) - Set to warm to see less intense colors with more blue. 1. Press the G button and then...
... EZ Picture menu based on the program category. - When adjusting Video menu options (contrast, brightness, color, sharpness, tint, and color temperature) manually, EZ Picture automatically changes to the previous menu. Press the G button and then use D / E button to select the desired picture option...factory preset values. 1. EZ Picture adjusts the TV for optimum picture quality at the factory and are preset for the best picture appearance. Manual Picture Control (Custom option) - Set to warm to see less intense colors with more blue. 1. Press the G button and then...
Operating Guide
Page 26
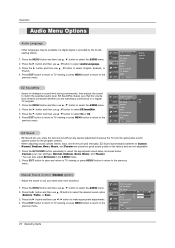
...OPTION TV Speaker BBE LOCK MENU Previous EZ Sound - Scans for good sound quality at the factory and are watching a commercial or a regular TV program. 1. Manual Sound Control (Custom option) - Press the G button and then use D / E button to select the AUDIO menu. VIDEO EZ SoundRite EZ Sound 2. .... 3. Press the G button and then use D / E button to select the AUDIO menu. 2. When adjusting sound options (treble, bass, and front surround) manually, EZ Sound automatically switches to select On or Off. 4. Press the MENU button and then use D / E button to Custom. -
...OPTION TV Speaker BBE LOCK MENU Previous EZ Sound - Scans for good sound quality at the factory and are watching a commercial or a regular TV program. 1. Manual Sound Control (Custom option) - Press the G button and then use D / E button to select the AUDIO menu. VIDEO EZ SoundRite EZ Sound 2. .... 3. Press the G button and then use D / E button to select the AUDIO menu. 2. When adjusting sound options (treble, bass, and front surround) manually, EZ Sound automatically switches to select On or Off. 4. Press the MENU button and then use D / E button to Custom. -
Operating Guide
Page 29
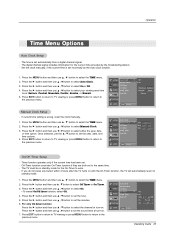
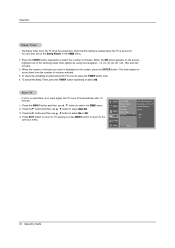
... Vol 17 LOCK MENU Previous Operating Guide 29 Press the G button and then use D / E button to select either the year, date, or time option. Manual Clock Setup - Press the MENU button and then use F / G button to set incorrectly by the broadcasting station. - Press the G button and then use D...function overrides On-Timer function if they are both set automatically from a digital channel signal. - SETUP VIDEO AUDIO TIME Auto Clock Manual Clock Off Timer On Timer Sleep Timer Auto Off G Off On Time Zone Eastern Daylight Auto Saving OPTION LOCK MENU Previous SETUP VIDEO...
... Vol 17 LOCK MENU Previous Operating Guide 29 Press the G button and then use D / E button to select either the year, date, or time option. Manual Clock Setup - Press the MENU button and then use F / G button to set incorrectly by the broadcasting station. - Press the G button and then use D...function overrides On-Timer function if they are both set automatically from a digital channel signal. - SETUP VIDEO AUDIO TIME Auto Clock Manual Clock Off Timer On Timer Sleep Timer Auto Off G Off On Time Zone Eastern Daylight Auto Saving OPTION LOCK MENU Previous SETUP VIDEO...
Operating Guide
Page 30
... is cleared when the TV is no input signal, the TV turns off automatically after 10 minutes. Auto Off - SETUP VIDEO AUDIO TIME Auto Clock Manual Clock Off Timer On Timer Sleep Timer Auto Off OPTION If set up the Sleep Timer in the TIME menu. 1. Press the G button and then...
... is cleared when the TV is no input signal, the TV turns off automatically after 10 minutes. Auto Off - SETUP VIDEO AUDIO TIME Auto Clock Manual Clock Off Timer On Timer Sleep Timer Auto Off OPTION If set up the Sleep Timer in the TIME menu. 1. Press the G button and then...

Operating Guide
Page 41
Communication Parameters SETUP EZ Scan Manual Scan VIDEO Channel Edit G AUDIO DTV Signal Channel Label TIME Input Source Input Label OPTION Set ID G 1 LOCK MENU Previous • Baud rate : 9600 bps (...
Communication Parameters SETUP EZ Scan Manual Scan VIDEO Channel Edit G AUDIO DTV Signal Channel Label TIME Input Source Input Label OPTION Set ID G 1 LOCK MENU Previous • Baud rate : 9600 bps (...


