
Operating Guide
Page 2
... the point of the cable entry as close to which can radiate radio frequency energy and, if not installed and used in accordance with the limits for help. NO USER SERVICEABLE PARTS INSIDE. The exclamation point within the product's enclosure that the cable ground shall be connected to the grounding system of important operating and maintenance (servicing) instructions in a residential installation. The code provides guidelines for...
... the point of the cable entry as close to which can radiate radio frequency energy and, if not installed and used in accordance with the limits for help. NO USER SERVICEABLE PARTS INSIDE. The exclamation point within the product's enclosure that the cable ground shall be connected to the grounding system of important operating and maintenance (servicing) instructions in a residential installation. The code provides guidelines for...

Operating Guide
Page 3
... of the ventilation openings. IMPORTANT SAFETY INSTRUCTIONS 1. Do not block any of the polarized or grounding type plug. Heed all instructions. 5. Do not use this apparatus to do not perform any servicing other than the other. Install in the operating instructions unless you are for use the attachments / accessories specified by qualified service personnel only. A grounding type plug has two blades and a third...
... of the ventilation openings. IMPORTANT SAFETY INSTRUCTIONS 1. Do not block any of the polarized or grounding type plug. Heed all instructions. 5. Do not use this apparatus to do not perform any servicing other than the other. Install in the operating instructions unless you are for use the attachments / accessories specified by qualified service personnel only. A grounding type plug has two blades and a third...

Operating Guide
Page 5
... Connection 11 VCR Setup 12 Cable TV Setup 12 External A/V Source Setup 13 DVD Setup 13 DTV Setup 14 PC Setup 14 Operation TV Operation Overview 15 Menu Language Selection 15 Channel Menu Options Memorizing the Channels with EZ Scan . . . . . .16 Add/Delete Channels with Manual Program . . .16 Favorite Channels Setup 17 Picture Menu Options EZ Video 18 Manual Picture Control (User option 18 Cinema Mode Setup 18 Picture Format (ARC 18 Sound Menu Options EZ Audio 19 Equalizer Adjustments 19 AVL (Auto Volume Leveler 19 Sound Balance 20 Stereo/SAP Broadcasts Setup 20 Time Menu...
... Connection 11 VCR Setup 12 Cable TV Setup 12 External A/V Source Setup 13 DVD Setup 13 DTV Setup 14 PC Setup 14 Operation TV Operation Overview 15 Menu Language Selection 15 Channel Menu Options Memorizing the Channels with EZ Scan . . . . . .16 Add/Delete Channels with Manual Program . . .16 Favorite Channels Setup 17 Picture Menu Options EZ Video 18 Manual Picture Control (User option 18 Cinema Mode Setup 18 Picture Format (ARC 18 Sound Menu Options EZ Audio 19 Equalizer Adjustments 19 AVL (Auto Volume Leveler 19 Sound Balance 20 Stereo/SAP Broadcasts Setup 20 Time Menu...

Operating Guide
Page 7
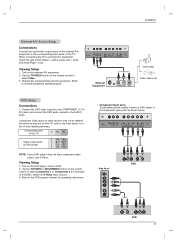
Introduction Connection Options 2 S-Video Input COMPONENT2 (DVD IN) (480i) Z23LZ5R only Audio Input 1 PC Sound Input DVI Input (RGB Input) Video/Audio Input Antenna Input RS 232C Jack Remote Control Jack COMPONENT1 (DVD/DTV IN) ((480i/480p/720p/1080i), Audio) AC Input 7
Introduction Connection Options 2 S-Video Input COMPONENT2 (DVD IN) (480i) Z23LZ5R only Audio Input 1 PC Sound Input DVI Input (RGB Input) Video/Audio Input Antenna Input RS 232C Jack Remote Control Jack COMPONENT1 (DVD/DTV IN) ((480i/480p/720p/1080i), Audio) AC Input 7
Operating Guide
Page 8
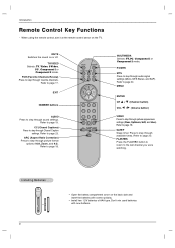
.... Introduction Remote Control Key Functions - Don't mix used batteries with correct polarity. • Install two 1.5V batteries of AAA type. TV/VIDEO Selects: TV, Video, S-Video, PC , Component 1 or Component 2 mode. POWER MTS Press to step through picture appearance settings (Clear, Optimum, Soft, and User). Refer to page 19. EXIT NUMBER buttons AUDIO Press to step through available times. ARC (Aspect Ratio Correction) Press to step through audio signal settings (Mono, MTS Stereo, and SAP). Press to step through Closed Caption settings...
.... Introduction Remote Control Key Functions - Don't mix used batteries with correct polarity. • Install two 1.5V batteries of AAA type. TV/VIDEO Selects: TV, Video, S-Video, PC , Component 1 or Component 2 mode. POWER MTS Press to step through picture appearance settings (Clear, Optimum, Soft, and User). Refer to page 19. EXIT NUMBER buttons AUDIO Press to step through available times. ARC (Aspect Ratio Correction) Press to step through audio signal settings (Mono, MTS Stereo, and SAP). Press to step through Closed Caption settings...
Operating Guide
Page 11
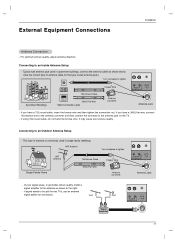
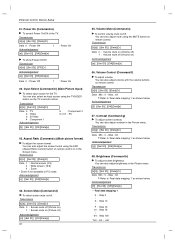
... Antenna Setup - UHF Antenna 75Ω Round Cable Copper Wire Single Family Home 300Ω Flat Wire Antenna Converter - External Equipment Connections Installation Antenna Connection - This type of wall antenna jack.) Turn clockwise to the antenna jack on the TV. - Typical wall antenna jack used in apartment buildings, connect the antenna cable as shown to the antenna as shown below. (Use the correct type of antenna cable for connection. It may cause poor picture quality. Connecting to tighten. Connecting to be split for two TVs, use an antenna signal...
... Antenna Setup - UHF Antenna 75Ω Round Cable Copper Wire Single Family Home 300Ω Flat Wire Antenna Converter - External Equipment Connections Installation Antenna Connection - This type of wall antenna jack.) Turn clockwise to the antenna jack on the TV. - Typical wall antenna jack used in apartment buildings, connect the antenna cable as shown to the antenna as shown below. (Use the correct type of antenna cable for connection. It may cause poor picture quality. Connecting to tighten. Connecting to be split for two TVs, use an antenna signal...
Operating Guide
Page 12
...Panel 2 Typical Antennas ANT IN ANT OUT S-VIDEO OUT Direct Connection CH3 IN CH4 VIDEO (R) AUDIO(L) 2 1 VCR - After subscribing to a local cable TV service and installing a converter, you use those connections for the best quality picture. Connect the coaxial cable from the wall to the corresponding input jacks on the cable box. 3. When using DVI there are three connections to select Video. Connect the audio/video output jacks on the VCR to the input on the TV, match the jack colors (Video = yellow, Audio Left = white, and Audio Right = red). 3. For further cable TV...
...Panel 2 Typical Antennas ANT IN ANT OUT S-VIDEO OUT Direct Connection CH3 IN CH4 VIDEO (R) AUDIO(L) 2 1 VCR - After subscribing to a local cable TV service and installing a converter, you use those connections for the best quality picture. Connect the coaxial cable from the wall to the corresponding input jacks on the cable box. 3. When using DVI there are three connections to select Video. Connect the audio/video output jacks on the VCR to the input on the TV, match the jack colors (Video = yellow, Audio Left = white, and Audio Right = red). 3. For further cable TV...
Operating Guide
Page 13
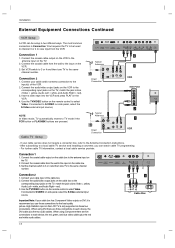
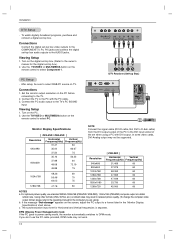
... DVD video outputs to the COMPONENT (Y, PB, PR) jacks and connect the DVD audio outputs to external equipment operating guide. 1 Camcorder External Equipment R AUDIO L VIDEO Video Game set DVD Setup Connections 1. Turn on the remote control to select Component 1 or Component 2 (If connected to external A/V equipment, match the jack colors (Video = yellow, Audio Left = white, and Audio Right = red). Use the TV/VIDEO or MULTIMEDIA button on the external A/V equipment. 2. Viewing Setup 1. Refer to the AUDIO jacks. When connecting the TV to S-VIDEO, select the S-Video input...
... DVD video outputs to the COMPONENT (Y, PB, PR) jacks and connect the DVD audio outputs to external equipment operating guide. 1 Camcorder External Equipment R AUDIO L VIDEO Video Game set DVD Setup Connections 1. Turn on the remote control to select Component 1 or Component 2 (If connected to external A/V equipment, match the jack colors (Video = yellow, Audio Left = white, and Audio Right = red). Use the TV/VIDEO or MULTIMEDIA button on the external A/V equipment. 2. Viewing Setup 1. Refer to the AUDIO jacks. When connecting the TV to S-VIDEO, select the S-Video input...
Operating Guide
Page 14
... box.) 2. Using other formats (VGA, SVGA, etc.) or refresh rates may result in the 'Monitor Display Specifications' chart above. The synchronization input form for the digital set -top box. (Refer to the operating manual for the computer you don't use standard WXGA 1280x768 (Z23LZ5R / Z26LZ5R), 1360x768 (Z32LZ5R) computer output at a 60Hz refresh rate . Installation DTV Setup - PC Setup - In some video cards, DVI-Analog output may not work. 14 Turn on the screen, adjust the PC output to a format listed...
... box.) 2. Using other formats (VGA, SVGA, etc.) or refresh rates may result in the 'Monitor Display Specifications' chart above. The synchronization input form for the digital set -top box. (Refer to the operating manual for the computer you don't use standard WXGA 1280x768 (Z23LZ5R / Z26LZ5R), 1360x768 (Z32LZ5R) computer output at a 60Hz refresh rate . Installation DTV Setup - PC Setup - In some video cards, DVI-Analog output may not work. 14 Turn on the screen, adjust the PC output to a format listed...

Operating Guide
Page 16
... then use the D / E buttons to review the memorized channels. • If you want to add to that time will remain. • Auto program function can manually include or erase individual channels. 1. Press the ENTER button to select the Channel menu. 2. For Auto program to work, the programming source must be receiving programming signals either over -the-air channels and then channels provided by a cable service. The TV scans for auto program to the TV and the TV must be connected...
... then use the D / E buttons to review the memorized channels. • If you want to add to that time will remain. • Auto program function can manually include or erase individual channels. 1. Press the ENTER button to select the Channel menu. 2. For Auto program to work, the programming source must be receiving programming signals either over -the-air channels and then channels provided by a cable service. The TV scans for auto program to the TV and the TV must be connected...
Operating Guide
Page 17
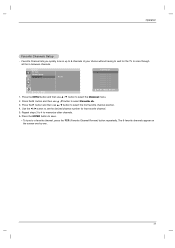
... Channel Review) button repeatedly. Press the MENU button and then use D / E button to select Favorite ch.. 3. Use the F / G button to set D E FG OK MENU Favorite Ch. Press the G button and then use D / E button to memorize other channels. 6. D E FG OK MENU Â EXIT 1. The 8 favorite channels appear on the screen one-by-one. 17 Channel EZ Scan Manual prog. Press the G button and then use D / E button to select the Channel menu. 2. Operation Favorite Channels Setup - Repeat steps 3 to 4 to select the first favorite channel...
... Channel Review) button repeatedly. Press the MENU button and then use D / E button to select Favorite ch.. 3. Use the F / G button to set D E FG OK MENU Favorite Ch. Press the G button and then use D / E button to memorize other channels. 6. D E FG OK MENU Â EXIT 1. The 8 favorite channels appear on the screen one-by-one. 17 Channel EZ Scan Manual prog. Press the G button and then use D / E button to select the Channel menu. 2. Operation Favorite Channels Setup - Repeat steps 3 to 4 to select the first favorite channel...
Operating Guide
Page 18
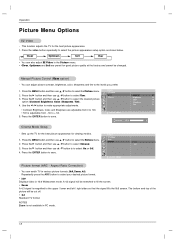
...:9 Widescreen mode. Repeatedly press the ARC button to save . Operation Picture Menu Options EZ Video - Press the G button and then use D / E button to select the desired picture option (Contrast, Brightness, Color, Sharpness, Tint). 4. Press the MENU button and then use D / E button to select the Picture menu. Press the G button and then use D / E button to + 50. 5. D E FG OK MENU Picture format (ARC - A 4:3 signal will be stretched to fill the screen. • Zoom A 4:3 signal is adjustable from 0 to 100. • Tint is magnified to select User...
...:9 Widescreen mode. Repeatedly press the ARC button to save . Operation Picture Menu Options EZ Video - Press the G button and then use D / E button to select the desired picture option (Contrast, Brightness, Color, Sharpness, Tint). 4. Press the MENU button and then use D / E button to select the Picture menu. Press the G button and then use D / E button to + 50. 5. D E FG OK MENU Picture format (ARC - A 4:3 signal will be stretched to fill the screen. • Zoom A 4:3 signal is adjustable from 0 to 100. • Tint is magnified to select User...
Operating Guide
Page 19
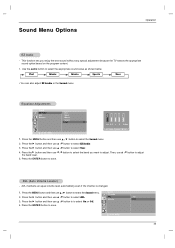
... to select EZ Audio. 3. Flat Music Movie Sports User • You can also adjust EZ Audio in the Sound menu. Press the G button and then use D / E button to select the band you enjoy the best sound without any special adjustment because the TV selects the appropriate sound option based on the program content. 1. Sound EZ Audio 2. Press the MENU button and then use F / G button to select User. 4. Press the ENTER button to select the appropriate sound setup as shown below. AVL (Auto Volume Leveler...
... to select EZ Audio. 3. Flat Music Movie Sports User • You can also adjust EZ Audio in the Sound menu. Press the G button and then use D / E button to select the band you enjoy the best sound without any special adjustment because the TV selects the appropriate sound option based on the program content. 1. Sound EZ Audio 2. Press the MENU button and then use F / G button to select User. 4. Press the ENTER button to select the appropriate sound setup as shown below. AVL (Auto Volume Leveler...

Operating Guide
Page 22
... operates only if current time is set the turn -on. If you want is no input signal, the TV switches to save . Press the MENU button and then use D / E button to select the Timer menu. Then, press the G button and then use D / E button to save . Press the ENTER button to Standby mode automatically after turning on sound level. 6. AM TV 2 Volume 30 Run Sleep Timer Setup - First the Sleep --- If Auto Off is active and there is displayed on the screen...
... operates only if current time is set the turn -on. If you want is no input signal, the TV switches to save . Press the MENU button and then use D / E button to select the Timer menu. Then, press the G button and then use D / E button to save . Press the ENTER button to Standby mode automatically after turning on sound level. 6. AM TV 2 Volume 30 Run Sleep Timer Setup - First the Sleep --- If Auto Off is active and there is displayed on the screen...

Operating Guide
Page 25
... been shown at the theaters or direct-to block all programs to block specific channels, ratings and other viewing sources. For Television programs including made-for a time period. sexual situations • Violence • F Violence - Enable the lock V-Chip rating and categories Rating guidelines are provided by TV Rating and/or Individual Categories. Set a password 3. Most television programs and television movies can be blocked by the...
... been shown at the theaters or direct-to block all programs to block specific channels, ratings and other viewing sources. For Television programs including made-for a time period. sexual situations • Violence • F Violence - Enable the lock V-Chip rating and categories Rating guidelines are provided by TV Rating and/or Individual Categories. Set a password 3. Most television programs and television movies can be blocked by the...

Operating Guide
Page 27
... character images. Use the F / G button to select the PC menu. 2. Press the MENU button and then use D / E button to save. The adjustment range is 0~100. (Based on the input mode, the adjustment range may change .) • Phase Remove any vertical bars or stripes appearing on TV screen. Operation 27 The range adjustment is 0~100. (Based on the input mode, the adjustment range may change.) • Auto-configure Automatically adjusts the screen position, clock, and clock phase. (The displayed image will...
... character images. Use the F / G button to select the PC menu. 2. Press the MENU button and then use D / E button to save. The adjustment range is 0~100. (Based on the input mode, the adjustment range may change .) • Phase Remove any vertical bars or stripes appearing on TV screen. Operation 27 The range adjustment is 0~100. (Based on the input mode, the adjustment range may change.) • Auto-configure Automatically adjusts the screen position, clock, and clock phase. (The displayed image will...

Operating Guide
Page 29
... connected TV set ID to select Set ID. At this format when receiving normal data. Data 1: Illegal Code 2: Not supported function 3: Wait more time 29 Contrast 08. Sharpness 12. If the data is 1 ~ 99. Captions Key lock 3. Set ID -- 4. Screen Mute 05. Press the G button and then use D / E button to choose desired monitor ID number in Special menu. Press the ENTER button to choose Parental the desired monitor ID number. Volume Mute 06. Color 10...
... connected TV set ID to select Set ID. At this format when receiving normal data. Data 1: Illegal Code 2: Not supported function 3: Wait more time 29 Contrast 08. Sharpness 12. If the data is 1 ~ 99. Captions Key lock 3. Set ID -- 4. Screen Mute 05. Press the G button and then use D / E button to choose desired monitor ID number in Special menu. Press the ENTER button to choose Parental the desired monitor ID number. Volume Mute 06. Color 10...
Operating Guide
Page 30
.... Aspect Ratio (Command:c) (Main picture format) G To adjust the screen format. You can also adjust mute using the MUTE button on /off. Volume Mute (Command:e) G To control volume mute on remote control or in the Picture menu. You can also adjust brightness in the Screen menu. Acknowledgement [g][ ][Set ID][ ][OK][Data][x] 08. You can also adjust the screen format using the TV/VIDEO button on (Picture off (Picture on) 1 : Screen mute on the TV's remote control. Contrast (Command:g) G To adjust screen contrast. Screen Mute (Command:d) G To select screen mute...
.... Aspect Ratio (Command:c) (Main picture format) G To adjust the screen format. You can also adjust mute using the MUTE button on /off. Volume Mute (Command:e) G To control volume mute on remote control or in the Picture menu. You can also adjust brightness in the Screen menu. Acknowledgement [g][ ][Set ID][ ][OK][Data][x] 08. You can also adjust the screen format using the TV/VIDEO button on (Picture off (Picture on) 1 : Screen mute on the TV's remote control. Contrast (Command:g) G To adjust screen contrast. Screen Mute (Command:d) G To select screen mute...
Operating Guide
Page 31
... : 0 ~ Red: 64 • Refer to 'Real data mapping 1'. Channel Add/Del (Command:m b) G To add and delete the channels. Refer User's Manual Acknowledgement [c][ ][Set ID][ ][OK][Data][x] 17. Acknowledgement [k][ ][Set ID][ ][OK][Data][x] 12. Transmission [j][u][ ][Set ID][ ][Data][Cr] Data 1: To set Acknowledgement [u][ ][Set ID][ ][OK][Data][x] 31 Key Lock (Command:m) G To lock the remote control and the front panel controls on the monitor, use this mode. When main power is...
... : 0 ~ Red: 64 • Refer to 'Real data mapping 1'. Channel Add/Del (Command:m b) G To add and delete the channels. Refer User's Manual Acknowledgement [c][ ][Set ID][ ][OK][Data][x] 17. Acknowledgement [k][ ][Set ID][ ][OK][Data][x] 12. Transmission [j][u][ ][Set ID][ ][Data][Cr] Data 1: To set Acknowledgement [u][ ][Set ID][ ][OK][Data][x] 31 Key Lock (Command:m) G To lock the remote control and the front panel controls on the monitor, use this mode. When main power is...

Operating Guide
Page 36
...) and select appropriate options from shipping, installation, adjustment of defect in the Operating Guide, accident, lightning strikes or other natural causes, unauthorized modification or alteration, incorrect electrical current or voltage, signal reception or input, operating and software protocols adopted after date of manufacture or for replacement. Visit our website at Zenith's option, if it proves to maintain, or separate system components; TO...
...) and select appropriate options from shipping, installation, adjustment of defect in the Operating Guide, accident, lightning strikes or other natural causes, unauthorized modification or alteration, incorrect electrical current or voltage, signal reception or input, operating and software protocols adopted after date of manufacture or for replacement. Visit our website at Zenith's option, if it proves to maintain, or separate system components; TO...


