
Operation Guide
Page 4
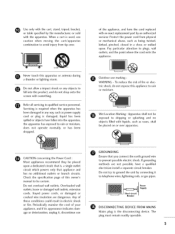
tric shock, do not drop onto the screen with liquids, such as vases, shall be certain. Check the specification page of this owner's manual to qualified service personnel. Overloaded wall outlets, loose or damaged wall outlets, extension cords, frayed power cords, or damaged or cracked wire insulation are not ...
tric shock, do not drop onto the screen with liquids, such as vases, shall be certain. Check the specification page of this owner's manual to qualified service personnel. Overloaded wall outlets, loose or damaged wall outlets, extension cords, frayed power cords, or damaged or cracked wire insulation are not ...

Operation Guide
Page 5
... Functions 30 Turning On TV 32 Channel Selection 32 Volume Adjustment 32 On-Screen Menus Selection 33 Channel Setup - Add / Delete Channel (Manual Tuning) ...... 35 - Preset 41 - Preset 42 Manual Picture Adjustment - Color Tone - User Mode 51 Balance 52 TV Speakers On/Off Setup 53 Stereo/SAP Broadcasts Setup 54 Audio Language...
... Functions 30 Turning On TV 32 Channel Selection 32 Volume Adjustment 32 On-Screen Menus Selection 33 Channel Setup - Add / Delete Channel (Manual Tuning) ...... 35 - Preset 41 - Preset 42 Manual Picture Adjustment - Color Tone - User Mode 51 Balance 52 TV Speakers On/Off Setup 53 Stereo/SAP Broadcasts Setup 54 Audio Language...
Operation Guide
Page 6
Manual Clock Setup 62 Auto On/Off Timer Setting 63 Sleep Timer Setting 64 Auto Shut-off Setting 65 Set Password & Lock System 66 Channel Blocking 68 External Input Blocking 68 Movie & TV Rating 69 Troubleshooting 72 Maintenance 74 Product Specifications 75 Programming the Remote Control 76 IR Codes 79 External Control Through RS-232C 81 Open Source License 88 S Clock Setting - Auto Clock Setup 61 -
Manual Clock Setup 62 Auto On/Off Timer Setting 63 Sleep Timer Setting 64 Auto Shut-off Setting 65 Set Password & Lock System 66 Channel Blocking 68 External Input Blocking 68 Movie & TV Rating 69 Troubleshooting 72 Maintenance 74 Product Specifications 75 Programming the Remote Control 76 IR Codes 79 External Control Through RS-232C 81 Open Source License 88 S Clock Setting - Auto Clock Setup 61 -

Operation Guide
Page 8
... Ensure that excessive pressure may differ from the images below. "o _o _o © or z i®®® i®®® i®®® Owner's Manual CD Manual Remote Control Batteries Cable Management Clip 4-Bolts for stand assembly (Refer to p.10) Screw for stand fixing (Refer to maintain standards compliance. 7 The accessories included...
... Ensure that excessive pressure may differ from the images below. "o _o _o © or z i®®® i®®® i®®® Owner's Manual CD Manual Remote Control Batteries Cable Management Clip 4-Bolts for stand assembly (Refer to p.10) Screw for stand fixing (Refer to maintain standards compliance. 7 The accessories included...
Operation Guide
Page 18
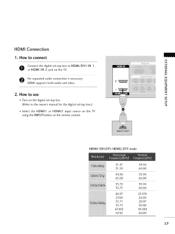
... bToVx. X:) c m z 2. HDMI Connection 1. How to HDMI/DVI IN 1 _o z m No separated audio connection is necessary. 2 HDMI supports both audio and video. How to the owner's manual for the digital set -top box.
... bToVx. X:) c m z 2. HDMI Connection 1. How to HDMI/DVI IN 1 _o z m No separated audio connection is necessary. 2 HDMI supports both audio and video. How to the owner's manual for the digital set -top box.

Operation Guide
Page 19
EXTERNALEQUIPMENT SETUP DVI to the HDMI/DVI IN 1 jack on the TV. How to connect O Connect the DVI output of the digital set-top box to the owner's manual for the digital set -top box. (Refer to the AUDIO (RGB/DVI) jack on the remote control. 18 O Connect the audio output of the digital set-top box to HDMI Connection m x m _o z m X:) c "O m z m c "O 1. How to use 01T_urn on the digital set -top box.) 01S1e_lect the HDMI1 input source on the TV using the INPUT button on the TV. 2.
EXTERNALEQUIPMENT SETUP DVI to the HDMI/DVI IN 1 jack on the TV. How to connect O Connect the DVI output of the digital set-top box to the owner's manual for the digital set -top box. (Refer to the AUDIO (RGB/DVI) jack on the remote control. 18 O Connect the audio output of the digital set-top box to HDMI Connection m x m _o z m X:) c "O m z m c "O 1. How to use 01T_urn on the digital set -top box.) 01S1e_lect the HDMI1 input source on the TV using the INPUT button on the TV. 2.

Operation Guide
Page 20
m z 2. Component Input ports To get better picture quality, connect a DVD player to the DVD player's manual for operating instructions. m XD c O Connect the audio outputs of the DVD to the COMPONENT IN AUDIO1 jacks on the TV. 01_Refer to the component input ...
m z 2. Component Input ports To get better picture quality, connect a DVD player to the DVD player's manual for operating instructions. m XD c O Connect the audio outputs of the DVD to the COMPONENT IN AUDIO1 jacks on the TV. 01_Refer to the component input ...

Operation Guide
Page 21
... control. 01_Refer to the AUDIO input jacks on the remote control. How to connect O onnect the S-VIDEO output of the DVD to the DVD player's manual for operating instructions. How to the DVD player...
... control. 01_Refer to the AUDIO input jacks on the remote control. How to connect O onnect the S-VIDEO output of the DVD to the DVD player's manual for operating instructions. How to the DVD player...

Operation Guide
Page 22
How to use Set VCR output switch to 3 or 4 and then tune TV to the VCR owner's manual.) 21 the fixed images on the sides of the screen may remain visible on the TV. 2. IN socket on the screen. Insert a video tape into ...
How to use Set VCR output switch to 3 or 4 and then tune TV to the VCR owner's manual.) 21 the fixed images on the sides of the screen may remain visible on the TV. 2. IN socket on the screen. Insert a video tape into ...

Operation Guide
Page 23
How to use _o z _> 01I_nsert a video tape into the VCR and press PLAY on the VCR. (Refer to the VCR owner's manual.) 01_Select the AV1 input source on the TV using the INPUT "0 button on the remote control. Match the jack colors (Video = yellow, Audio Left = white, ... VCR to the Connect the audio outputs of the VCR to the AUDIO input jacks on the remote control. 01_If connected to the VCR owner's manual.) x:) C 01S_elect the AVl input source on the TV using the INPUT button on the TV. 2. z 01_If connected to connect O Connect the AUDIO/VIDEO jacks between...
How to use _o z _> 01I_nsert a video tape into the VCR and press PLAY on the VCR. (Refer to the VCR owner's manual.) 01_Select the AV1 input source on the TV using the INPUT "0 button on the remote control. Match the jack colors (Video = yellow, Audio Left = white, ... VCR to the Connect the audio outputs of the VCR to the AUDIO input jacks on the remote control. 01_If connected to the VCR owner's manual.) x:) C 01S_elect the AVl input source on the TV using the INPUT button on the TV. 2. z 01_If connected to connect O Connect the AUDIO/VIDEO jacks between...

Operation Guide
Page 30
... operation. O Set the "TV Speaker option - See the external audio equipment instruction manual for operation. AUDIO OUT CONNECTION Send the TV's audio to connect O AUonDnIOect OonUeTenOd PoTf ItChAeLo. Analog 1. Off" in the AUDIO menu. (b p.53). How to external ...
... operation. O Set the "TV Speaker option - See the external audio equipment instruction manual for operation. AUDIO OUT CONNECTION Send the TV's audio to connect O AUonDnIOect OonUeTenOd PoTf ItChAeLo. Analog 1. Off" in the AUDIO menu. (b p.53). How to external ...

Operation Guide
Page 34
SETUP PICTURE "1z < N -r" > Z Z ftl N 0 It It Z LOCK For USA For Canada AUDIO _m 0 It OPTION TIME It 33 ON-SCREENMENUS SELECTION Your TV's OSD (On Screen Display) may differ slightly from what is shown in this manual. @ Press the MENU button and then use ^ v or A • button to select the each menu. @ Press the > or I_ button and then use ^ v < > or A • _1 I_ button to display the available menus.
SETUP PICTURE "1z < N -r" > Z Z ftl N 0 It It Z LOCK For USA For Canada AUDIO _m 0 It OPTION TIME It 33 ON-SCREENMENUS SELECTION Your TV's OSD (On Screen Display) may differ slightly from what is shown in this manual. @ Press the MENU button and then use ^ v or A • button to select the each menu. @ Press the > or I_ button and then use ^ v < > or A • _1 I_ button to display the available menus.

Operation Guide
Page 36
If selecting DTV or CADTV input signal, you want to add or delete. Pburettsosn thteo MseEleNcUt thebutStoEnTUaPnd mtheennu. Add/Delete Channel (Manual Tuning) A password is required to gain access to see the quality of the signal being received. Press the ENTER button to the previous menu. Press ....orA • @ Press the > orl_ button and then use ^ v orA • button to select channel you can view the on-screen signal strength monitor to Manual Tuning menu if the Lock System is turned on. N "-iz < N -r > z z fT1 N © Z © @@@ 35
If selecting DTV or CADTV input signal, you want to add or delete. Pburettsosn thteo MseEleNcUt thebutStoEnTUaPnd mtheennu. Add/Delete Channel (Manual Tuning) A password is required to gain access to see the quality of the signal being received. Press the ENTER button to the previous menu. Press ....orA • @ Press the > orl_ button and then use ^ v orA • button to select channel you can view the on-screen signal strength monitor to Manual Tuning menu if the Lock System is turned on. N "-iz < N -r > z z fT1 N © Z © @@@ 35
Operation Guide
Page 42
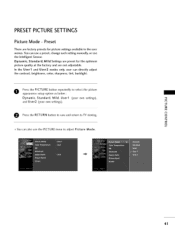
In the User1 and User2 modes only, user can use a preset, change each setting manually, or use the PICTURE menu to adjust Picture Mode. 41 N C m 0 Press the RETURN button to save and return to select the picture appearance setup option ...
In the User1 and User2 modes only, user can use a preset, change each setting manually, or use the PICTURE menu to adjust Picture Mode. 41 N C m 0 Press the RETURN button to save and return to select the picture appearance setup option ...

Operation Guide
Page 44
use ^ v or A • O Press the >or I_ button and then use ^ v or A • button to make appropriate adjustments. "O N C m N O Z O O0 43 MANUAL PICTUREADJUSTMENT Picture Mode - User Mode Adjust the picture appearance to the previous menu. O Press RETURN button to return to TV viewing or press MENU button ... the brightness brightness of the screen, adjust the O ress the > or I_ button and then use < > or _II I_ button to select Picture Mode. of LCD panel. O Pburettsosn thteo >seolrectI_Usbeurtton1 oarndUstehre2n.
use ^ v or A • O Press the >or I_ button and then use ^ v or A • button to make appropriate adjustments. "O N C m N O Z O O0 43 MANUAL PICTUREADJUSTMENT Picture Mode - User Mode Adjust the picture appearance to the previous menu. O Press RETURN button to return to TV viewing or press MENU button ... the brightness brightness of the screen, adjust the O ress the > or I_ button and then use < > or _II I_ button to select Picture Mode. of LCD panel. O Pburettsosn thteo >seolrectI_Usbeurtton1 oarndUstehre2n.
Operation Guide
Page 46
...'s not available to the previous menu. 45 O Press the > or I_ button and then use this function in RGB-PC input source. When selecting the Manual, you can adjust the DB Contrast, DB color and DB Noise. When selecting Picture Mode options (User I 't"l t'h © Z _e © @0 Press ... through an advanced digital signal processing algorithm. DB - O ress the MENU button and then use ^ v orA • O button to select Auto or Manual. PICTURE IMPROVEMENT TECHNOLOGY DB is automatically changed to Auto. When selecting Picture Mode options (Dynamic, Standard, and Mild), DB is...
...'s not available to the previous menu. 45 O Press the > or I_ button and then use this function in RGB-PC input source. When selecting the Manual, you can adjust the DB Contrast, DB color and DB Noise. When selecting Picture Mode options (User I 't"l t'h © Z _e © @0 Press ... through an advanced digital signal processing algorithm. DB - O ress the MENU button and then use ^ v orA • O button to select Auto or Manual. PICTURE IMPROVEMENT TECHNOLOGY DB is automatically changed to Auto. When selecting Picture Mode options (Dynamic, Standard, and Mild), DB is...

Operation Guide
Page 62
... to select Auto, Off, On, depending on whether or not your viewing area time zone: U.S.A: Eastern, Central, Mountain, Pacific, Alaska or Hawaii. Set the clock manually if the current time is set incorrectly by the broadcasting station. n use ^ v or A • O Pburettsosn thteo >seolrectI_Clbouctkt.on and then use ^ v or A • O burettsosn thteo...
... to select Auto, Off, On, depending on whether or not your viewing area time zone: U.S.A: Eastern, Central, Mountain, Pacific, Alaska or Hawaii. Set the clock manually if the current time is set incorrectly by the broadcasting station. n use ^ v or A • O Pburettsosn thteo >seolrectI_Clbouctkt.on and then use ^ v or A • O burettsosn thteo...
Operation Guide
Page 63
... button and then use ^ v orA • O Pburettsosn thteo >soerlel_ct Mbauntutoanl. Once selected, use ^ v orA • Pburettsosn thteo >soerlel_ct Clbouctkto. Manual Clock Setup If the current time setting is wrong, reset the clock manually. n use the ^ v or A • button to set the year, date, and time options. 0O O Press RETURN button to return...
... button and then use ^ v orA • O Pburettsosn thteo >soerlel_ct Mbauntutoanl. Once selected, use ^ v orA • Pburettsosn thteo >soerlel_ct Clbouctkto. Manual Clock Setup If the current time setting is wrong, reset the clock manually. n use the ^ v or A • button to set the year, date, and time options. 0O O Press RETURN button to return...

Operation Guide
Page 70
... out all programs) If you set PG-13: G and PG movies will be available, PG-13, R, NC-17 and X will be blocked. Keep in this manual. 69 MOVIE & TV RATING Movie Rating (MPAA) -
... out all programs) If you set PG-13: G and PG movies will be available, PG-13, R, NC-17 and X will be blocked. Keep in this manual. 69 MOVIE & TV RATING Movie Rating (MPAA) -


