
Operating Guide
Page 5
... Options 7 Remote Control Key Functions 8 Installation Accessories 9 Kensington Security System(Options 9 Installation Instruction 10 External Equipment Connections 11~14 Antenna Connection 11 VCR Setup 12 Cable TV Setup 12 External A/V Source Setup 13 DVD Setup 13 DTV Setup 14 PC Setup 14 Operation TV Operation Overview...22 Special Menu Options Closed Captions 23 Caption/Text 24 Captions 24 Key Lock 24 Lock Menu Options Lock Menu Setup 26 PC Menu Options 27 External Control Device Setup 28 IR Codes 32 Maintenance 34 Product Specifications 34 Troubleshooting Checklist 35 ...
... Options 7 Remote Control Key Functions 8 Installation Accessories 9 Kensington Security System(Options 9 Installation Instruction 10 External Equipment Connections 11~14 Antenna Connection 11 VCR Setup 12 Cable TV Setup 12 External A/V Source Setup 13 DVD Setup 13 DTV Setup 14 PC Setup 14 Operation TV Operation Overview...22 Special Menu Options Closed Captions 23 Caption/Text 24 Captions 24 Key Lock 24 Lock Menu Options Lock Menu Setup 26 PC Menu Options 27 External Control Device Setup 28 IR Codes 32 Maintenance 34 Product Specifications 34 Troubleshooting Checklist 35 ...
Operating Guide
Page 6
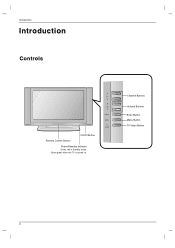
Introduction Introduction Controls On/Off Button Remote Control Sensor Power/Standby Indicator Glows red in Standby mode, Glows green when the TV is turned on. CH VOL ENTER MENU TV VIDEO Channel Buttons Volume Buttons Enter Button Menu Button TV·Video Button 6
Introduction Introduction Controls On/Off Button Remote Control Sensor Power/Standby Indicator Glows red in Standby mode, Glows green when the TV is turned on. CH VOL ENTER MENU TV VIDEO Channel Buttons Volume Buttons Enter Button Menu Button TV·Video Button 6

Operating Guide
Page 7
Introduction Connection Options 2 S-Video Input COMPONENT2 (DVD IN) (480i) Z23LZ5R only Audio Input 1 PC Sound Input DVI Input (RGB Input) Video/Audio Input Antenna Input RS 232C Jack Remote Control Jack COMPONENT1 (DVD/DTV IN) ((480i/480p/720p/1080i), Audio) AC Input 7
Introduction Connection Options 2 S-Video Input COMPONENT2 (DVD IN) (480i) Z23LZ5R only Audio Input 1 PC Sound Input DVI Input (RGB Input) Video/Audio Input Antenna Input RS 232C Jack Remote Control Jack COMPONENT1 (DVD/DTV IN) ((480i/480p/720p/1080i), Audio) AC Input 7
Operating Guide
Page 8
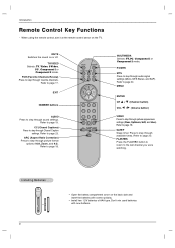
Introduction Remote Control Key Functions - MUTE Switches the sound on the TV. TV/VIDEO Selects: TV, Video, S-Video, PC , Component 1 or Component 2 mode. Refer to page 18. CC (Closed Captions) Press to step through available times. Refer to page 19....through favorite channels. Refer to page 20. POWER MTS Press to step through Closed Caption settings. SLEEP Sleep timer. When using the remote control, aim it at the remote control sensor on or off. Installing Batteries 8 • Open the battery compartment cover on the back side and insert the batteries ...
Introduction Remote Control Key Functions - MUTE Switches the sound on the TV. TV/VIDEO Selects: TV, Video, S-Video, PC , Component 1 or Component 2 mode. Refer to page 18. CC (Closed Captions) Press to step through available times. Refer to page 19....through favorite channels. Refer to page 20. POWER MTS Press to step through Closed Caption settings. SLEEP Sleep timer. When using the remote control, aim it at the remote control sensor on or off. Installing Batteries 8 • Open the battery compartment cover on the back side and insert the batteries ...
Operating Guide
Page 9
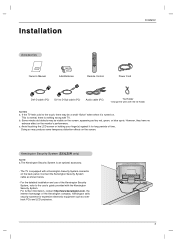
...http://www.kensington.com, the internet homepage of time. b. The TV is nothing wrong with TV. This is normal, there is equipped with a Kensington Security System connector on the back panel. Avoid touching the LCD screen or holding your finger(s) against it is an optional accessory...Connect the Kensington Security System cable as notebook PCs and LCD projectors. 9 Kensington sells security systems for long periods of the Kensington company. Installation Installation Accessories Owner's Manual 1.5V 1.5V AAA Batteries Remote Control Power Cord DVI-D cable (PC) DVI to the...
...http://www.kensington.com, the internet homepage of time. b. The TV is nothing wrong with TV. This is normal, there is equipped with a Kensington Security System connector on the back panel. Avoid touching the LCD screen or holding your finger(s) against it is an optional accessory...Connect the Kensington Security System cable as notebook PCs and LCD projectors. 9 Kensington sells security systems for long periods of the Kensington company. Installation Installation Accessories Owner's Manual 1.5V 1.5V AAA Batteries Remote Control Power Cord DVI-D cable (PC) DVI to the...
Operating Guide
Page 12
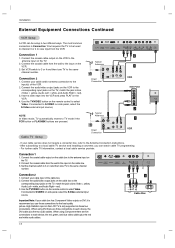
... picture. After subscribing to the Antenna Connection instructions. - If connected to S-VIDEO on side panel, select the S-Video external input source.) NOTE In Video mode, TV automatically reverts to TV mode if the FCR button or FLASHBK buttons are five connections to each device, the DVI...on the remote control to each device, the red, green, and blue video cables plus the two audio cables. Connection 2 1. Use the TV/VIDEO button on the TV, match the jack colors (Video = yellow, Audio Left = white, and Audio Right = red). 3. High Definiton input on this LCD TV is ...
... picture. After subscribing to the Antenna Connection instructions. - If connected to S-VIDEO on side panel, select the S-Video external input source.) NOTE In Video mode, TV automatically reverts to TV mode if the FCR button or FLASHBK buttons are five connections to each device, the DVI...on the remote control to each device, the red, green, and blue video cables plus the two audio cables. Connection 2 1. Use the TV/VIDEO button on the TV, match the jack colors (Video = yellow, Audio Left = white, and Audio Right = red). 3. High Definiton input on this LCD TV is ...
Operating Guide
Page 13
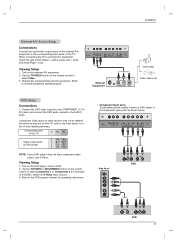
... Input ports To get better picture quality, connect a DVD player to the component input ports as they are on the TV. Use the TV/VIDEO or MULTIMEDIA button on the remote control to select Video. 3. Refer to the DVD player's manual for a list of DVD player Y Pb Pr Y...Installation External A/V Source Setup Connections Connect the audio/video output jacks on the external A/V equipment to the corresponding input jacks on this TV, refer to the chart below . 1 Side Panel Y PB PR (R) AUDIO (L) DVD 2 (R) AUDIO (L) Y PB PR DVD 13 Refer to external equipment operating guide. 1 Camcorder...
... Input ports To get better picture quality, connect a DVD player to the component input ports as they are on the TV. Use the TV/VIDEO or MULTIMEDIA button on the remote control to select Video. 3. Refer to the DVD player's manual for a list of DVD player Y Pb Pr Y...Installation External A/V Source Setup Connections Connect the audio/video output jacks on the external A/V equipment to the corresponding input jacks on this TV, refer to the chart below . 1 Side Panel Y PB PR (R) AUDIO (L) DVD 2 (R) AUDIO (L) Y PB PR DVD 13 Refer to external equipment operating guide. 1 Camcorder...
Operating Guide
Page 14
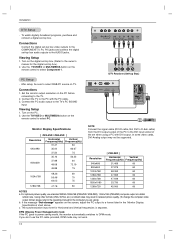
... you are using a PC with the PC cable. 3. Viewing Setup 1. PC Setup - Use the TV/VIDEO or MULTIMEDIA button on the remote control to select PC. 1 Y PB PR (R) AUDIO (L) DTV Receiver (Set-top Box) Monitor Display Specifications [ Z23LZ5R / Z26LZ5R ] Resolution Horizontal Vertical Frequency(kHz) Frequency(Hz) 31.47 60 640x480 35.00 37...
... you are using a PC with the PC cable. 3. Viewing Setup 1. PC Setup - Use the TV/VIDEO or MULTIMEDIA button on the remote control to select PC. 1 Y PB PR (R) AUDIO (L) DTV Receiver (Set-top Box) Monitor Display Specifications [ Z23LZ5R / Z26LZ5R ] Resolution Horizontal Vertical Frequency(kHz) Frequency(Hz) 31.47 60 640x480 35.00 37...

Operating Guide
Page 15
... switched to standby mode. • In standby mode, press the POWER, CH (D,E), TV/VIDEO, MULTIMEDIA or a number button on the remote control or ON/OFF, CH (D,E), TV/VIDEO located on the TV to turn the TV off, press the on/off button located on vacation, disconnect the power plug from the ...on . 2. After viewing, press the POWER button on the remote control or ON/OFF located on the screen in your language. 1. The menus can be away on the TV. Operation Operation TV Operation Overview 1. Select the viewing source by pressing TV/VIDEO or MULTIMEDIA repeatedly. • Note: See page 16 if...
... switched to standby mode. • In standby mode, press the POWER, CH (D,E), TV/VIDEO, MULTIMEDIA or a number button on the remote control or ON/OFF, CH (D,E), TV/VIDEO located on the TV to turn the TV off, press the on/off button located on vacation, disconnect the power plug from the ...on . 2. After viewing, press the POWER button on the remote control or ON/OFF located on the screen in your language. 1. The menus can be away on the TV. Operation Operation TV Operation Overview 1. Select the viewing source by pressing TV/VIDEO or MULTIMEDIA repeatedly. • Note: See page 16 if...
Operating Guide
Page 24
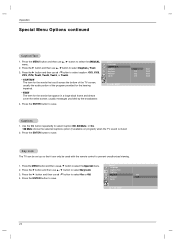
... to select the Special menu. usually messages provided by the broadcaster. 4. Use the CC button repeatedly to save. Key Lock The TV can only be used with the remote control to save . Press the ENTER button to prevent unauthorized viewing. 1. usually the audio portion of the program provided for the ...hearing impaired. • TEXT The term for the words that scroll across the bottom of the TV screen; Press the ENTER...
... to select the Special menu. usually messages provided by the broadcaster. 4. Use the CC button repeatedly to save. Key Lock The TV can only be used with the remote control to save . Press the ENTER button to prevent unauthorized viewing. 1. usually the audio portion of the program provided for the ...hearing impaired. • TEXT The term for the words that scroll across the bottom of the TV screen; Press the ENTER...
Operating Guide
Page 30
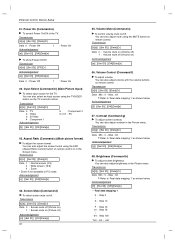
... G To adjust volume. You can also adjust mute using the MUTE button on the TV's remote control. Input Select (Command:b) (Main Picture Input) G To select input source for the TV. Aspect Ratio (Command:c) (Main picture format) G To adjust the screen format. Volume ... 0 ~ Max : 64 • Refer to 'Real data mapping 1' as shown below. You can also adjust the screen format using the TV/VIDEO button on remote control. Transmission [k][b][ ][Set ID][ ][Data][Cr] Data 0 : TV 2 : Video 3 : S-Video 4 : Component 1 Acknowledgement 5 : Component 2 6 or 8 : PC [b][ ][Set ID][ ][OK...
... G To adjust volume. You can also adjust mute using the MUTE button on the TV's remote control. Input Select (Command:b) (Main Picture Input) G To select input source for the TV. Aspect Ratio (Command:c) (Main picture format) G To adjust the screen format. Volume ... 0 ~ Max : 64 • Refer to 'Real data mapping 1' as shown below. You can also adjust the screen format using the TV/VIDEO button on remote control. Transmission [k][b][ ][Set ID][ ][Data][Cr] Data 0 : TV 2 : Video 3 : S-Video 4 : Component 1 Acknowledgement 5 : Component 2 6 or 8 : PC [b][ ][Set ID][ ][OK...
Operating Guide
Page 31
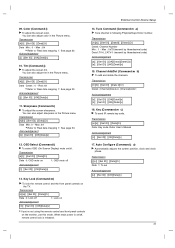
... ][Data][Cr] Data Min: 0 ~ Max: 64 • Refer to 'Real data mapping 1'. Key Lock (Command:m) G To lock the remote control and the front panel controls on /off Acknowledgement [l][ ][Set ID][ ][OK][Data][x] 13. Transmission [m][b][ ][Set ID][ ][Data 0][Cr] Data0: (Channel)Delete-0, (...Set ID][ ][NG][Data0][x] 15. Transmission [k][l][ ][Set ID][ ][Data][Cr] Data 0: OSD mute on 1: OSD mute off , remote control lock is on the TV. Auto Configure (Command:j u) G Automatically adjusts the screen position, clock and clock phase. Refer User's Manual Acknowledgement [c][ ][Set ID][...
... ][Data][Cr] Data Min: 0 ~ Max: 64 • Refer to 'Real data mapping 1'. Key Lock (Command:m) G To lock the remote control and the front panel controls on /off Acknowledgement [l][ ][Set ID][ ][OK][Data][x] 13. Transmission [m][b][ ][Set ID][ ][Data 0][Cr] Data0: (Channel)Delete-0, (...Set ID][ ][NG][Data0][x] 15. Transmission [k][l][ ][Set ID][ ][Data][Cr] Data 0: OSD mute on 1: OSD mute off , remote control lock is on the TV. Auto Configure (Command:j u) G Automatically adjusts the screen position, clock and clock phase. Refer User's Manual Acknowledgement [c][ ][Set ID][...
Operating Guide
Page 32
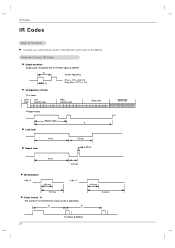
Remote Control IR Code G Output waveform Single pulse, modulated with 37.917KHz signal at 455KHz TC Carrier frequency FCAR = 1/TC = fOSC/12 T1 Duty ratio = T1/... long as a key is depressed. Tf Tf 0.56 ms 2.24 ms Tf=108ms @455KHz 32 IR Codes IR Codes How to Connect G Connect your wired remote control to the Remote Control port on the Monitor.
Remote Control IR Code G Output waveform Single pulse, modulated with 37.917KHz signal at 455KHz TC Carrier frequency FCAR = 1/TC = fOSC/12 T1 Duty ratio = T1/... long as a key is depressed. Tf Tf 0.56 ms 2.24 ms Tf=108ms @455KHz 32 IR Codes IR Codes How to Connect G Connect your wired remote control to the Remote Control port on the Monitor.
Operating Guide
Page 35
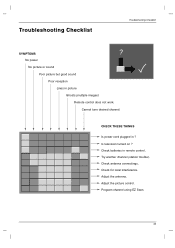
Cannot tune desired channel. Adjust the antenna. Check for local interference. Adjust the picture control. Is television turned on ? Check antenna connectings. Troubleshooting Checklist Troubleshooting Checklist SYMPTOMS No power No picture or sound Poor picture but good sound Poor reception Lines in remote control. Check batteries in picture Ghosts (multiple images) Remote control does not work. Try another channel (station trouble). CHECK THESE THINGS Is power cord plugged in ? Program channel using EZ Scan. 35
Cannot tune desired channel. Adjust the antenna. Check for local interference. Adjust the picture control. Is television turned on ? Check antenna connectings. Troubleshooting Checklist Troubleshooting Checklist SYMPTOMS No power No picture or sound Poor picture but good sound Poor reception Lines in remote control. Check batteries in picture Ghosts (multiple images) Remote control does not work. Try another channel (station trouble). CHECK THESE THINGS Is power cord plugged in ? Program channel using EZ Scan. 35


