

Operation Guide
Page 5
...24 External Control Device Setup 25~30 IR Code Information 31~32 Troubleshooting Checklist 33 Maintenance 34 Specifications 34 Your Zenith Limited Warranty 35~36 Setup and Operation Checklist Setup and Operation Checklist (See pages 11~13 for available connection and...Select viewing source for future reference. Turn Monitor on . 6. Contents Warnings 2 Safety Instructions 3~4 Introduction Controls and Connection Options 7 Remote Control Key Functions 8 Installation Installation Instructions 9~10 External Equipment Connections 11~14 VCR Setup 11 Cable TV Setup 11 External A/V ...
...24 External Control Device Setup 25~30 IR Code Information 31~32 Troubleshooting Checklist 33 Maintenance 34 Specifications 34 Your Zenith Limited Warranty 35~36 Setup and Operation Checklist Setup and Operation Checklist (See pages 11~13 for available connection and...Select viewing source for future reference. Turn Monitor on . 6. Contents Warnings 2 Safety Instructions 3~4 Introduction Controls and Connection Options 7 Remote Control Key Functions 8 Installation Installation Instructions 9~10 External Equipment Connections 11~14 VCR Setup 11 Cable TV Setup 11 External A/V ...
Operation Guide
Page 7
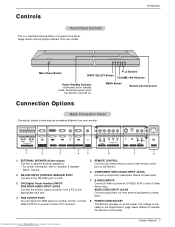
...may be somewhat different from your monitor. ( )R( ) ( )L ( ) EXTERNAL SPEAKER RS-232C INPUT (CONTROL/SERVICE) DVI INPUT RGB INPUT AUDIO INPUT RGB OUTPUT REMOTE CONTROL R AUDIO L Y PB PR AUDIO INPUT COMPONENT INPUT R AUDIO L (MONO) S-VIDEO VIDEO INPUT AUDIO INPUT AC INPUT 1 2 3 4 5 6 7 ...RGB INPUT/AUDIO INPUT JACKS Connect the monitor output connector from external equipment to the appropriate input port. 4. MENU Button Remote Control Sensor Connection Options Back Connection Panel - AUDIO/VIDEO INPUT JACKS Connect audio/video out from a PC to these ...
...may be somewhat different from your monitor. ( )R( ) ( )L ( ) EXTERNAL SPEAKER RS-232C INPUT (CONTROL/SERVICE) DVI INPUT RGB INPUT AUDIO INPUT RGB OUTPUT REMOTE CONTROL R AUDIO L Y PB PR AUDIO INPUT COMPONENT INPUT R AUDIO L (MONO) S-VIDEO VIDEO INPUT AUDIO INPUT AC INPUT 1 2 3 4 5 6 7 ...RGB INPUT/AUDIO INPUT JACKS Connect the monitor output connector from external equipment to the appropriate input port. 4. MENU Button Remote Control Sensor Connection Options Back Connection Panel - AUDIO/VIDEO INPUT JACKS Connect audio/video out from a PC to these ...

Operation Guide
Page 8
... mix used batteries with correct polarity. • Install two 1.5V batteries of AAA type. Press the key again as if the remote IR signal is interrupted, the remote control may not function. OK D /E Selects menu option. Installing Batteries 8 Plasma Display Panel Downloaded from www.Manualslib.com manuals search...sub picture images. (Refer to p.24) SUB INPUT Selects the input source for the sub picture. Introduction Remote Control Key Functions - When using the remote control, aim it at the remote control sensor on or off . SLEEP Sets the Sleep Timer. (Refer to p.18) APC Adjusts the factory...
... mix used batteries with correct polarity. • Install two 1.5V batteries of AAA type. Press the key again as if the remote IR signal is interrupted, the remote control may not function. OK D /E Selects menu option. Installing Batteries 8 Plasma Display Panel Downloaded from www.Manualslib.com manuals search...sub picture images. (Refer to p.24) SUB INPUT Selects the input source for the sub picture. Introduction Remote Control Key Functions - When using the remote control, aim it at the remote control sensor on or off . SLEEP Sets the Sleep Timer. (Refer to p.18) APC Adjusts the factory...

Operation Guide
Page 9
... the optional Wall Mounting Bracket Installation and Setup Guide. 4 inches 4 inches 4 inches 2 inches 4 inches Downloaded from the wall. ZOOM + Owner's Manual Batteries BNC-RCA Adapter Remote Control D-sub 15 pin Cable Power Cord DVI-D Cable Installation Instructions • The Monitor can be mounted horizontally or vertically. Installation Installation Ensure that you...
... the optional Wall Mounting Bracket Installation and Setup Guide. 4 inches 4 inches 4 inches 2 inches 4 inches Downloaded from the wall. ZOOM + Owner's Manual Batteries BNC-RCA Adapter Remote Control D-sub 15 pin Cable Power Cord DVI-D Cable Installation Instructions • The Monitor can be mounted horizontally or vertically. Installation Installation Ensure that you...
Operation Guide
Page 11
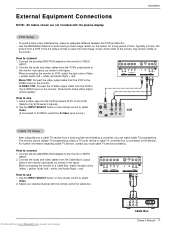
... output cable from the VCR to the VIDEO input on the VCR. (Refer to the Monitor. - Use the INPUT SELECT button on the remote control to S-VIDEO, select the S-Video input source.) S-VIDEO OUT (R) AUDIO (L) IN VIDEO VCR Cable TV Setup - Use the INPUT SELECT button ...jack colors (Video = yellow, Audio Left = white, and Audio Right = red). External Equipment Connections NOTE: All cables shown are not included with the remote control for a long period of the screen, may remain visible on the screen. To avoid picture noise (interference), leave an adequate distance between the VCR...
... output cable from the VCR to the VIDEO input on the VCR. (Refer to the Monitor. - Use the INPUT SELECT button on the remote control to S-VIDEO, select the S-Video input source.) S-VIDEO OUT (R) AUDIO (L) IN VIDEO VCR Cable TV Setup - Use the INPUT SELECT button ...jack colors (Video = yellow, Audio Left = white, and Audio Right = red). External Equipment Connections NOTE: All cables shown are not included with the remote control for a long period of the screen, may remain visible on the screen. To avoid picture noise (interference), leave an adequate distance between the VCR...
Operation Guide
Page 12
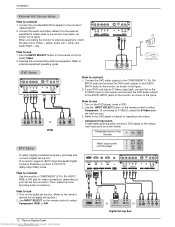
..., as shown in the figure. (R) AUDIO (L) B R or DVD (R) AUDIO (L) S-VIDEO How to use 1. Use the INPUT SELECT button on the remote control to select Component. (If connected to the owner's manual for video connections, depending on your DVD only has an S-Video output jack, connect this... monitor and connect the DVD audio outputs to the component input ports as shown in the figure. 2. DVI INPUT RGB INPUT AUDIO INPUT RGB OUTPUT REMOTE CONTROL R AUDIO L Y PB PR AUDIO INPUT COMPONENT INPUT R AUDIO L (MONO) S-VIDEO VIDEO INPUT AUDIO INPUT DVI-DTV OUTPUT (R) AUDIO (L) or or ...
..., as shown in the figure. (R) AUDIO (L) B R or DVD (R) AUDIO (L) S-VIDEO How to use 1. Use the INPUT SELECT button on the remote control to select Component. (If connected to the owner's manual for video connections, depending on your DVD only has an S-Video output jack, connect this... monitor and connect the DVD audio outputs to the component input ports as shown in the figure. 2. DVI INPUT RGB INPUT AUDIO INPUT RGB OUTPUT REMOTE CONTROL R AUDIO L Y PB PR AUDIO INPUT COMPONENT INPUT R AUDIO L (MONO) S-VIDEO VIDEO INPUT AUDIO INPUT DVI-DTV OUTPUT (R) AUDIO (L) or or ...
Operation Guide
Page 13
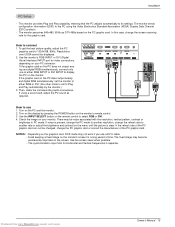
...) INPUT port for a long period of the PC graphic card can not be displayed. 2. Use the INPUT SELECT button on the monitor's remote control. 3. Downloaded from www.Manualslib.com manuals search engine Owner's Manual 13 How to the PC using a sound card, adjust the PC sound... perceives 640x480, 60Hz as required. ( )R( ) ( )L ( ) EXTERNAL SPEAKER RS-232C INPUT (CONTROL/SERVICE) DVI INPUT RGB INPUT AUDIO INPUT RGB OUTPUT REMOTE CONTROL How to another rate or adjust the brightness and contrast on the PC and the monitor. 2. Resolutions over UXGA cannot be changed, change the...
...) INPUT port for a long period of the PC graphic card can not be displayed. 2. Use the INPUT SELECT button on the monitor's remote control. 3. Downloaded from www.Manualslib.com manuals search engine Owner's Manual 13 How to the PC using a sound card, adjust the PC sound... perceives 640x480, 60Hz as required. ( )R( ) ( )L ( ) EXTERNAL SPEAKER RS-232C INPUT (CONTROL/SERVICE) DVI INPUT RGB INPUT AUDIO INPUT RGB OUTPUT REMOTE CONTROL How to another rate or adjust the brightness and contrast on the PC and the monitor. 2. Resolutions over UXGA cannot be changed, change the...

Operation Guide
Page 15
If the Monitor was turned off with the remote control and then the ON/OFF button on the Monitor • Press the ON/OFF...the Monitor is still connected) 1. Press the INPUT SELECT button on the Monitor or press the POWER, INPUT SELECT button on the remote control and then the Monitor will be shown on . 2. Turning on . Connect power cord correctly. 2. The menus can be ... www.Manualslib.com manuals search engine Owner's Manual 15 Operation Turning on the Monitor Turning on the remote control to save. Operation Menu Language Selection - First select your desired language.
If the Monitor was turned off with the remote control and then the ON/OFF button on the Monitor • Press the ON/OFF...the Monitor is still connected) 1. Press the INPUT SELECT button on the Monitor or press the POWER, INPUT SELECT button on the remote control and then the Monitor will be shown on . 2. Turning on . Connect power cord correctly. 2. The menus can be ... www.Manualslib.com manuals search engine Owner's Manual 15 Operation Turning on the Monitor Turning on the remote control to save. Operation Menu Language Selection - First select your desired language.

Operation Guide
Page 19
This feature can be impossible to clear entirely with the remote control. - Press the G button and then use D / E button to select the SPECIAL menu. 2. A frozen still picture from a PC/video game displayed on the front panel ... save . To return to normal viewing, press any fixed image to turn the monitor off with the remote control, press the INPUT SELECT button on the monitor or POWER, or INPUT SELECT on the remote control to remain on . Operation Special Menu Options Key Lock - Press the G button and then use D / E button...
This feature can be impossible to clear entirely with the remote control. - Press the G button and then use D / E button to select the SPECIAL menu. 2. A frozen still picture from a PC/video game displayed on the front panel ... save . To return to normal viewing, press any fixed image to turn the monitor off with the remote control, press the INPUT SELECT button on the monitor or POWER, or INPUT SELECT on the remote control to remain on . Operation Special Menu Options Key Lock - Press the G button and then use D / E button...
Operation Guide
Page 25
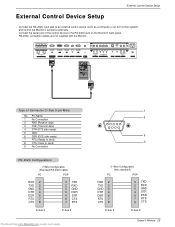
RS-232C connection cables are not supplied with the Monitor. ( )R( ) ( )L ( ) EXTERNAL SPEAKER RS-232C INPUT (CONTROL/SERVICE) DVI INPUT RGB INPUT AUDIO INPUT RGB OUTPUT REMOTE CONTROL R AUDIO L Y PB PR AUDIO INPUT COMPONENT INPUT R AUDIO L (MONO) S-VIDEO VIDEO INPUT AUDIO INPUT AC INPUT Type of the control device to the RS-...
RS-232C connection cables are not supplied with the Monitor. ( )R( ) ( )L ( ) EXTERNAL SPEAKER RS-232C INPUT (CONTROL/SERVICE) DVI INPUT RGB INPUT AUDIO INPUT RGB OUTPUT REMOTE CONTROL R AUDIO L Y PB PR AUDIO INPUT COMPONENT INPUT R AUDIO L (MONO) S-VIDEO VIDEO INPUT AUDIO INPUT AC INPUT Type of the control device to the RS-...
Operation Guide
Page 26
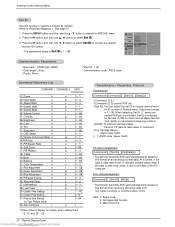
.../receiving protocol. * [DATA]: To transmit command data. Sharpness k 12. Color Temperature k 22. Picture Size Setting j for Twin Picture mode 32. Screen Mute k 05. Color k 10. Remote Control Lock Mode k 14. PIP Input Source k 26. If the data is indicated as decimal (1~99) on menu and as Hexa decimal (0x0~0x63) on...
.../receiving protocol. * [DATA]: To transmit command data. Sharpness k 12. Color Temperature k 22. Picture Size Setting j for Twin Picture mode 32. Screen Mute k 05. Color k 10. Remote Control Lock Mode k 14. PIP Input Source k 26. If the data is indicated as decimal (1~99) on menu and as Hexa decimal (0x0~0x63) on...

Operation Guide
Page 27
... [c][ ][Set ID][ ][OK][Data][x] * You select either 16:9 or 4:3 screen aspect ratio using the MUTE button on the Monitor's remote control. Downloaded from www.Manualslib.com manuals search engine 07. External Control Device Setup 01. You can also adjust the screen format using the... INPUT SELECT button on remote control. Volume Mute (Command2:e) G To control volume mute on this format, Acknowledgement data feedback presents status about each function....
... [c][ ][Set ID][ ][OK][Data][x] * You select either 16:9 or 4:3 screen aspect ratio using the MUTE button on the Monitor's remote control. Downloaded from www.Manualslib.com manuals search engine 07. External Control Device Setup 01. You can also adjust the screen format using the... INPUT SELECT button on remote control. Volume Mute (Command2:e) G To control volume mute on this format, Acknowledgement data feedback presents status about each function....

Operation Guide
Page 28
...Cr] Data Min: 0 ~ Max: 64 • Refer to 'Real Data Mapping 1'. Transmission [k][n][ ][Set ID][ ][Data][Cr] Data 0: PIP/DW off , remote control lock is turned on the monitor, use this mode. Acknowledgement [h][ ][Set ID][ ][OK][Data][x] 09. Sharpness (Command2:k) G To adjust the screen sharpness. ...ID][ ][Data][Cr] Data 0: Lock off 1: Lock on Acknowledgement [m][ ][Set ID][ ][OK][Data][x] • If you're not using the remote control or front panel controls on /off 1: PIP Acknowledgement 2: DW1 3: DW2 [n][ ][Set ID][ ][OK][Data][x] 15. When the main power is...
...Cr] Data Min: 0 ~ Max: 64 • Refer to 'Real Data Mapping 1'. Transmission [k][n][ ][Set ID][ ][Data][Cr] Data 0: PIP/DW off , remote control lock is turned on the monitor, use this mode. Acknowledgement [h][ ][Set ID][ ][OK][Data][x] 09. Sharpness (Command2:k) G To adjust the screen sharpness. ...ID][ ][Data][Cr] Data 0: Lock off 1: Lock on Acknowledgement [m][ ][Set ID][ ][OK][Data][x] • If you're not using the remote control or front panel controls on /off 1: PIP Acknowledgement 2: DW1 3: DW2 [n][ ][Set ID][ ][OK][Data][x] 15. When the main power is...

Operation Guide
Page 29
Transmission [k][q][ ][Set ID][ ][Data][Cr] Data 0: Right down on screen 1: Left down on screen 2: Left up on screen 3: Right up on the remote control or in the Audio menu. Balance (Command2:t) G To adjust balance. See page 27. You can also adjust balance in the Twin menu. Transmission [k][$][ ][Set ...
Transmission [k][q][ ][Set ID][ ][Data][Cr] Data 0: Right down on screen 1: Left down on screen 2: Left up on screen 3: Right up on the remote control or in the Audio menu. Balance (Command2:t) G To adjust balance. See page 27. You can also adjust balance in the Twin menu. Transmission [k][$][ ][Set ...

Operation Guide
Page 30
... an abnormal state. External Control Device Setup 25. Transmission [j][q][ ][Set ID][ ][Data][Cr] Data 0: Low power off 1: Low power on ). 2: Turn the monitor off with remote control. 3: Turn the monitor off with Sleep Time function. 4: Turn the monitor off with RS-232C function. 5: 5V down. 6: AC down. 7: Turn the monitor off...
... an abnormal state. External Control Device Setup 25. Transmission [j][q][ ][Set ID][ ][Data][Cr] Data 0: Low power off 1: Low power on ). 2: Turn the monitor off with remote control. 3: Turn the monitor off with Sleep Time function. 4: Turn the monitor off with RS-232C function. 5: 5V down. 6: AC down. 7: Turn the monitor off...

Operation Guide
Page 31
Remote Control IR Code G Output waveform Single pulse, modulated with 37.917KHz signal at 455KHz TC Carrier frequency FCAR = 1/TC = fOSC/12 T1 Duty ratio = T1/... : Tf The waveform is transmitted as long as a key is depressed. IR Code Information IR Code Information How to Connect G Connect your wired remote control to the Remote Control port on the Monitor. Tf Tf 0.56 ms 2.24 ms Tf=108ms @455KHz Downloaded from www.Manualslib.com manuals search engine Owner's Manual...
Remote Control IR Code G Output waveform Single pulse, modulated with 37.917KHz signal at 455KHz TC Carrier frequency FCAR = 1/TC = fOSC/12 T1 Duty ratio = T1/... : Tf The waveform is transmitted as long as a key is depressed. IR Code Information IR Code Information How to Connect G Connect your wired remote control to the Remote Control port on the Monitor. Tf Tf 0.56 ms 2.24 ms Tf=108ms @455KHz Downloaded from www.Manualslib.com manuals search engine Owner's Manual...

Operation Guide
Page 33
... cord was plugged in the VIDEO menu and press the VOLUME (G) button. (Refer to p.16) • Keep a sufficient distance between the Plasma Display and the remote control causing obstruction. • Are batteries installed with the monitor. to -)? (Refer to p.8) • Install new batteries. (Refer to +, - No or Poor color or Poor... is turned on or off and does not indicate a fault with correct polarity (+ to p.8) Picture appears slowly after five minutes. Picture OK & No sound The remote control doesn't work • Press the VOLUME (G) button. • Sound muted?
... cord was plugged in the VIDEO menu and press the VOLUME (G) button. (Refer to p.16) • Keep a sufficient distance between the Plasma Display and the remote control causing obstruction. • Are batteries installed with the monitor. to -)? (Refer to p.8) • Install new batteries. (Refer to +, - No or Poor color or Poor... is turned on or off and does not indicate a fault with correct polarity (+ to p.8) Picture appears slowly after five minutes. Picture OK & No sound The remote control doesn't work • Press the VOLUME (G) button. • Sound muted?
Operation Guide
Page 35
... surges, power outages and water damage.) q Image burn-in a video system q set-up or adjustment on the remote control. PARTS: ONE YEAR from the menu. ZENITH WILL NOT BE LIABLE FOR ANY INCIDENTAL, CONSEQUENTIAL, INDIRECT, SPECIAL, OR PUNITIVE DAMAGES OF ANY NATURE, INCLUDING, WITHOUT ...have been removed, defaced or changed in the United States. ZENITH ELECTRONICS CORPORATION PLASMA DISPLAY PANEL P50W38/H/P LIMITED WARRANTY - This warranty is good only to the original consumer/end user. Please Call the Zenith Interactive Center at http://www.zenithservice.com THIS WARRANTY IS ...
... surges, power outages and water damage.) q Image burn-in a video system q set-up or adjustment on the remote control. PARTS: ONE YEAR from the menu. ZENITH WILL NOT BE LIABLE FOR ANY INCIDENTAL, CONSEQUENTIAL, INDIRECT, SPECIAL, OR PUNITIVE DAMAGES OF ANY NATURE, INCLUDING, WITHOUT ...have been removed, defaced or changed in the United States. ZENITH ELECTRONICS CORPORATION PLASMA DISPLAY PANEL P50W38/H/P LIMITED WARRANTY - This warranty is good only to the original consumer/end user. Please Call the Zenith Interactive Center at http://www.zenithservice.com THIS WARRANTY IS ...
Service Manual
Page 4
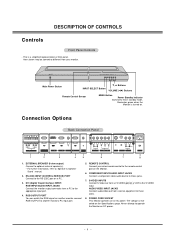
... Illuminates green when the Monitor is turned on DC power. -4- AUDIO/VIDEO INPUT JACKS Connect audio/video out from your wired remote control to another monitor's PC input port. 5. COMPONENT INPUT/AUDIO INPUT JACKS Connect a component video/audio device to 'Speaker... on . Connection Options Back Connection Panel ( )R( ) ( )L ( ) EXTERNAL SPEAKER RS-232C INPUT (CONTROL/SERVICE) DVI INPUT RGB INPUT AUDIO INPUT RGB OUTPUT REMOTE CONTROL R AUDIO L Y PB PR AUDIO INPUT COMPONENT INPUT R AUDIO L (MONO) S-VIDEO VIDEO INPUT AUDIO INPUT AC INPUT 1 2 3 4 5 6 7...
... Illuminates green when the Monitor is turned on DC power. -4- AUDIO/VIDEO INPUT JACKS Connect audio/video out from your wired remote control to another monitor's PC input port. 5. COMPONENT INPUT/AUDIO INPUT JACKS Connect a component video/audio device to 'Speaker... on . Connection Options Back Connection Panel ( )R( ) ( )L ( ) EXTERNAL SPEAKER RS-232C INPUT (CONTROL/SERVICE) DVI INPUT RGB INPUT AUDIO INPUT RGB OUTPUT REMOTE CONTROL R AUDIO L Y PB PR AUDIO INPUT COMPONENT INPUT R AUDIO L (MONO) S-VIDEO VIDEO INPUT AUDIO INPUT AC INPUT 1 2 3 4 5 6 7...

Service Manual
Page 5
...to the room. TWIN PICTURE SUB INPUT Selects the input source for the sub picture. Press the key again as if the remote IR signal is interrupted, the remote control may not function. WIN.POSITION Moves the sub picture. POWER SLEEP APC ARC PIP SWAP MENU INPUT SELECT DASP PIP ...MUTE VOL OK VOL 1 2 3 4 5 6 7 8 9 0 POWER STOP REW PLAY P/STILL FF REC WIN.SIZE WIN.POSITION SPLIT ZOOM ZOOM - When using the remote control, aim it at the remote control sensor on or off . SLEEP Sets the Sleep Timer. MENU Displays on or off . NUMBER buttons WIN. ZOOM-/ZOOM+ Enlarges or reduces...
...to the room. TWIN PICTURE SUB INPUT Selects the input source for the sub picture. Press the key again as if the remote IR signal is interrupted, the remote control may not function. WIN.POSITION Moves the sub picture. POWER SLEEP APC ARC PIP SWAP MENU INPUT SELECT DASP PIP ...MUTE VOL OK VOL 1 2 3 4 5 6 7 8 9 0 POWER STOP REW PLAY P/STILL FF REC WIN.SIZE WIN.POSITION SPLIT ZOOM ZOOM - When using the remote control, aim it at the remote control sensor on or off . SLEEP Sets the Sleep Timer. MENU Displays on or off . NUMBER buttons WIN. ZOOM-/ZOOM+ Enlarges or reduces...