

Operation Guide
Page 5
... Options Watching Twin Picture 24 Sub Picture Size Adjustment 24 Swapping the Twin Picture 24 Selecting a Source for the Twin Picture 24 External Control Device Setup 25~30 IR Code Information 31~32 Troubleshooting Checklist 33 Maintenance 34 Specifications 34 Your Zenith Limited Warranty 35~36 Setup and ... ISM Method 19 Low power 19 Menu Rotation For Vertical Viewing 19 Contents Screen Menu Options Auto Adjustment 20 Setting Picture Format 20 Picture Size Zoom 20 Split Zoom 21 Screen Position 21 Manual Configure 21 Screen Adjustments 22 Initializing 22 Selecting Wide VGA/...
... Options Watching Twin Picture 24 Sub Picture Size Adjustment 24 Swapping the Twin Picture 24 Selecting a Source for the Twin Picture 24 External Control Device Setup 25~30 IR Code Information 31~32 Troubleshooting Checklist 33 Maintenance 34 Specifications 34 Your Zenith Limited Warranty 35~36 Setup and ... ISM Method 19 Low power 19 Menu Rotation For Vertical Viewing 19 Contents Screen Menu Options Auto Adjustment 20 Setting Picture Format 20 Picture Size Zoom 20 Split Zoom 21 Screen Position 21 Manual Configure 21 Screen Adjustments 22 Initializing 22 Selecting Wide VGA/...
Operation Guide
Page 6
... your PC and video images simultaneously. A few cell defects are operating and cooling the PDP. Therefore, a certain level of this phenomenon. 160° - The Picture-in-Picture feature allows you can see the screen anywhere in a PC computer to keep the CPU (Central Processing Unit) cool, the PDP is designed to minimize...
... your PC and video images simultaneously. A few cell defects are operating and cooling the PDP. Therefore, a certain level of this phenomenon. 160° - The Picture-in-Picture feature allows you can see the screen anywhere in a PC computer to keep the CPU (Central Processing Unit) cool, the PDP is designed to minimize...

Operation Guide
Page 8
..., DVI, or Component mode. POWER Switches the Monitor between ON and STANDBY. POWER SLEEP APC ARC PIP SWAP MENU INPUT SELECT DASP PIP ARC TWIN PICTURE SUB INPUT MUTE VOL OK VOL 1 2 3 4 5 6 7 8 9 0 POWER STOP REW PLAY P/STILL FF REC WIN.SIZE WIN.POSITION ...ZOOM ZOOM - Don't mix used batteries with correct polarity. • Install two 1.5V batteries of AAA type. SPLIT ZOOM Enlarges the picture. Introduction Remote Control Key Functions - Exits the current menu. Installing Batteries 8 Plasma Display Panel Downloaded from www.Manualslib.com manuals search ...
..., DVI, or Component mode. POWER Switches the Monitor between ON and STANDBY. POWER SLEEP APC ARC PIP SWAP MENU INPUT SELECT DASP PIP ARC TWIN PICTURE SUB INPUT MUTE VOL OK VOL 1 2 3 4 5 6 7 8 9 0 POWER STOP REW PLAY P/STILL FF REC WIN.SIZE WIN.POSITION ...ZOOM ZOOM - Don't mix used batteries with correct polarity. • Install two 1.5V batteries of AAA type. SPLIT ZOOM Enlarges the picture. Introduction Remote Control Key Functions - Exits the current menu. Installing Batteries 8 Plasma Display Panel Downloaded from www.Manualslib.com manuals search ...

Operation Guide
Page 9
... circuit breaker. Installation Installation Ensure that you purchased the product. 1.5V 1.5V POWER SLEEP APC ARC PIP SWAP MENU INPUT SELECT DASP PIP ARC TWIN PICTURE SUB INPUT MUTE VOL OK VOL 1 2 3 4 5 6 7 8 9 0 POWER STOP REW PLAY P/STILL FF REC WIN.SIZE WIN.POSITION SPLIT ZOOM ZOOM...
... circuit breaker. Installation Installation Ensure that you purchased the product. 1.5V 1.5V POWER SLEEP APC ARC PIP SWAP MENU INPUT SELECT DASP PIP ARC TWIN PICTURE SUB INPUT MUTE VOL OK VOL 1 2 3 4 5 6 7 8 9 0 POWER STOP REW PLAY P/STILL FF REC WIN.SIZE WIN.POSITION SPLIT ZOOM ZOOM...
Operation Guide
Page 11
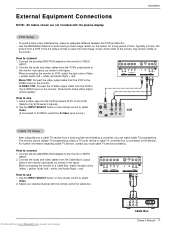
... white, and Audio Right = red). When connecting the monitor to the monitor's VIDEO INPUT. 2. How to the VCR owner's manual.) 2. To avoid picture noise (interference), leave an adequate distance between the VCR and Monitor. - Connect the provided BNC-RCA adapter to select Video. 2. Insert a video tape ...Use the INPUT SELECT button on the screen for cable box. Select your local cable TV service provider(s). Installation VCR Setup - If the 4:3 picture format is connected to VCR, match the jack colors (Video = yellow, Audio Left = white, and Audio Right = red). Connect the audio...
... white, and Audio Right = red). When connecting the monitor to the monitor's VIDEO INPUT. 2. How to the VCR owner's manual.) 2. To avoid picture noise (interference), leave an adequate distance between the VCR and Monitor. - Connect the provided BNC-RCA adapter to select Video. 2. Insert a video tape ...Use the INPUT SELECT button on the screen for cable box. Select your local cable TV service provider(s). Installation VCR Setup - If the 4:3 picture format is connected to VCR, match the jack colors (Video = yellow, Audio Left = white, and Audio Right = red). Connect the audio...
Operation Guide
Page 12
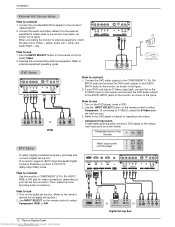
... DVD audio outputs to use 1. This monitor supports HDCP (High-bandwidth Digital Contents Protection) protocol for operating instructions. • Component Input ports To get better picture quality, connect a DVD player to the component input ports as shown in the figure. (R) AUDIO (L) B R or DVD (R) AUDIO (L) S-VIDEO How to the AUDIO INPUT jacks...
... DVD audio outputs to use 1. This monitor supports HDCP (High-bandwidth Digital Contents Protection) protocol for operating instructions. • Component Input ports To get better picture quality, connect a DVD player to the component input ports as shown in the figure. (R) AUDIO (L) B R or DVD (R) AUDIO (L) S-VIDEO How to the AUDIO INPUT jacks...
Operation Guide
Page 13
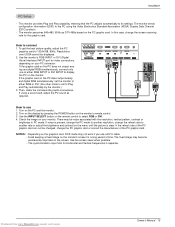
...RGB simultaneously, set to another rate or adjust the brightness and contrast on the display by the monitor.) 3. Turn on the menu until the picture is separate. If the refresh rate of either RGB or DVI; (the other mode is set the monitor to either RGB INPUT or DVI... not work if you use 1. This monitor provides Plug and Play capability, meaning that the PC adjusts automatically to 1024x768, 60Hz. To get the best picture quality, adjust the PC graphics card to its settings. If using the Video Electronics Standard Association (VESA) Display Data Channel (DDC) protocol. - Turn...
...RGB simultaneously, set to another rate or adjust the brightness and contrast on the display by the monitor.) 3. Turn on the menu until the picture is separate. If the refresh rate of either RGB or DVI; (the other mode is set the monitor to either RGB INPUT or DVI... not work if you use 1. This monitor provides Plug and Play capability, meaning that the PC adjusts automatically to 1024x768, 60Hz. To get the best picture quality, adjust the PC graphics card to its settings. If using the Video Electronics Standard Association (VESA) Display Data Channel (DDC) protocol. - Turn...
Operation Guide
Page 16
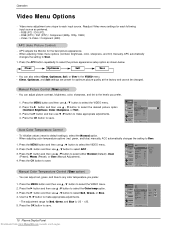
...Video menu adjustment are preset for Red, Green, and Blue is -20 ~ +20. 5. Readjust Video menu settings for the best picture appearance. - When adjusting Video menu options (contrast, brightness, color, sharpness, and tint) manually, APC automatically changes the setting to... default settings), select the Normal option. - Manual Picture Control (User option) - When adjusting color temperature options (red, green, and blue) manually, ACC automatically changes the setting to save. ...
...Video menu adjustment are preset for Red, Green, and Blue is -20 ~ +20. 5. Readjust Video menu settings for the best picture appearance. - When adjusting Video menu options (contrast, brightness, color, sharpness, and tint) manually, APC automatically changes the setting to... default settings), select the Normal option. - Manual Picture Control (User option) - When adjusting color temperature options (red, green, and blue) manually, ACC automatically changes the setting to save. ...

Operation Guide
Page 19
... On or Off. • When you select On, the screen darkens. 4. Press the G button and then use D / E button to select the SPECIAL menu. A frozen still picture from a PC/video game displayed on . Press the OK button to select Key lock. 3. Press the MENU button and then use D / E button to save . ISM...
... On or Off. • When you select On, the screen darkens. 4. Press the G button and then use D / E button to select the SPECIAL menu. A frozen still picture from a PC/video game displayed on . Press the OK button to select Key lock. 3. Press the MENU button and then use D / E button to save . ISM...
Operation Guide
Page 20
... that is still not correct, try Auto adjustment again. 4. You can make further adjustments with the Manual config. If enlarging or reducing the picture, the image may remain visible. - button to select Auto config.. 3. VIDEO Auto config. Caution: If a 4:3 fixed image is shown ...and then use D / E button to fill the screen. • 16:9 - option. Choose Horizon when you can also adjust ARC in enlarged picture mode. Picture Size Zoom - This function doesn't work for DVI mode. 1. Auto config. After adjustment, if the image is still not correct, your Monitor is ...
... that is still not correct, try Auto adjustment again. 4. You can make further adjustments with the Manual config. If enlarging or reducing the picture, the image may remain visible. - button to select Auto config.. 3. VIDEO Auto config. Caution: If a 4:3 fixed image is shown ...and then use D / E button to fill the screen. • 16:9 - option. Choose Horizon when you can also adjust ARC in enlarged picture mode. Picture Size Zoom - This function doesn't work for DVI mode. 1. Auto config. After adjustment, if the image is still not correct, your Monitor is ...

Operation Guide
Page 21
... to save . VIDEO Auto config. If the image still isn't clear after auto adjustment and especially if characters are still jittery, adjust the picture Phase manually. - To correct the screen size, adjust Clock. 1. Press the OK button to select Manual config.. 3. Screen Position - Press...button to the Rotate option. 1. Clock 0 Reset SCREEN XGA Mode TWIN MENU Prev. Operation Split Zoom - G Phase 0 SPECIAL Screen adj. Enlarges the picture in /out Position Manual config. It's not available to use D / E button to to fill the screen. To return to enlarge. Press the G ...
... to save . VIDEO Auto config. If the image still isn't clear after auto adjustment and especially if characters are still jittery, adjust the picture Phase manually. - To correct the screen size, adjust Clock. 1. Press the OK button to select Manual config.. 3. Screen Position - Press...button to the Rotate option. 1. Clock 0 Reset SCREEN XGA Mode TWIN MENU Prev. Operation Split Zoom - G Phase 0 SPECIAL Screen adj. Enlarges the picture in /out Position Manual config. It's not available to use D / E button to to fill the screen. To return to enlarge. Press the G ...

Operation Guide
Page 22
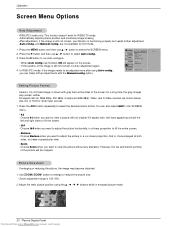
... ARC TIME Zoom in all modes. - You can initialize Zoom In/Out, Manual config., Position, Split zoom, PIP size, PIP position, and sub picture size for twin picture features. Press the G button and then use D / E button to select Reset. 3. Screen adj. SCREEN Reset G XGA Mode TWIN MENU Prev....or Off. 4. Press the MENU button and then use D / E button to select the SCREEN menu. 2. TV VCR Initializing (Reset to reduce the picture noise which may appear on the screen. 1. Press the G button. • You can reset values in /out Position Manual config. VIDEO AUDIO TIME...
... ARC TIME Zoom in all modes. - You can initialize Zoom In/Out, Manual config., Position, Split zoom, PIP size, PIP position, and sub picture size for twin picture features. Press the G button and then use D / E button to select Reset. 3. Screen adj. SCREEN Reset G XGA Mode TWIN MENU Prev....or Off. 4. Press the MENU button and then use D / E button to select the SCREEN menu. 2. TV VCR Initializing (Reset to reduce the picture noise which may appear on the screen. 1. Press the G button. • You can reset values in /out Position Manual config. VIDEO AUDIO TIME...

Operation Guide
Page 23
... to turn PIP on your monitor screen at the same time. Watching PIP Press the PIP button repeatedly to switch the main and sub pictures. The sub picture appears as shown. 4: 3 16 : 9 Moving PIP Press the WIN.POSITION button. Press the D / E / F / G button repeatedly... until desired position is achieved. Main Picture Source Video S-Video Component 480i Component 480p/720p/1080i RGB and DVI Available Sub Picture Sources S-Video, Component 480i/480p/720p/1080i, RGB, and DVI Video, Component 480i/480p/720p/1080i, RGB, and...
... to turn PIP on your monitor screen at the same time. Watching PIP Press the PIP button repeatedly to switch the main and sub pictures. The sub picture appears as shown. 4: 3 16 : 9 Moving PIP Press the WIN.POSITION button. Press the D / E / F / G button repeatedly... until desired position is achieved. Main Picture Source Video S-Video Component 480i Component 480p/720p/1080i RGB and DVI Available Sub Picture Sources S-Video, Component 480i/480p/720p/1080i, RGB, and DVI Video, Component 480i/480p/720p/1080i, RGB, and...

Operation Guide
Page 24
... Component 10 : 30 Win.size Ú F GÜ Main Picture Sub Picture Selecting a Source for the Twin Picture Use the SUB INPUT button to select one of the Twin Picture options. Watching Twin Picture Press the TWIN PICTURE button repeatedly to select the input source for the sub picture. Using the WIN.SIZE function in PIP mode, sub...
... Component 10 : 30 Win.size Ú F GÜ Main Picture Sub Picture Selecting a Source for the Twin Picture Use the SUB INPUT button to select one of the Twin Picture options. Watching Twin Picture Press the TWIN PICTURE button repeatedly to select the input source for the sub picture. Using the WIN.SIZE function in PIP mode, sub...
Operation Guide
Page 26
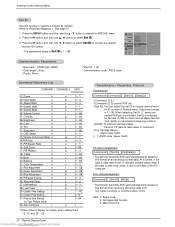
.... Sharpness k 12. Power k 02. Volume Mute k 06. OSD Select k 13. Remote Control Lock Mode k 14. Bass k 20. See page 27. 1. Abnormal State k 27. Picture Size Setting j for Twin Picture mode 32. Orbiter Pixel Setting j 31. External Control Device Setup Set ID - Use this format when receiving abnormal data from www.Manualslib.com...
.... Sharpness k 12. Power k 02. Volume Mute k 06. OSD Select k 13. Remote Control Lock Mode k 14. Bass k 20. See page 27. 1. Abnormal State k 27. Picture Size Setting j for Twin Picture mode 32. Orbiter Pixel Setting j 31. External Control Device Setup Set ID - Use this format when receiving abnormal data from www.Manualslib.com...

Operation Guide
Page 27
... (Command2:d) G To select screen mute on /off . Volume Control (Command2:f) G To adjust volume. Aspect Ratio (Command2:c) (Main Picture Format) G To adjust the screen format. External Control Device Setup 01. Power (Command2:a) G To control Power On/Off of the ...][Set ID][ ][OK][Data][x] 03. Transmission [k][e][ ][Set ID][ ][Data][Cr] Data 0 : Volume mute on (Volume off) 1 : Volume mute off (Volume on (Picture off (Picture on) 1 : Screen mute on ) Acknowledgement [e][ ][Set ID][ ][OK][Data][x] 06. Acknowledgement [g][ ][Set ID][ ][OK][Data][x] * Real Data Mapping 1 0 : Step...
... (Command2:d) G To select screen mute on /off . Volume Control (Command2:f) G To adjust volume. Aspect Ratio (Command2:c) (Main Picture Format) G To adjust the screen format. External Control Device Setup 01. Power (Command2:a) G To control Power On/Off of the ...][Set ID][ ][OK][Data][x] 03. Transmission [k][e][ ][Set ID][ ][Data][Cr] Data 0 : Volume mute on (Volume off) 1 : Volume mute off (Volume on (Picture off (Picture on) 1 : Screen mute on ) Acknowledgement [e][ ][Set ID][ ][OK][Data][x] 06. Acknowledgement [g][ ][Set ID][ ][OK][Data][x] * Real Data Mapping 1 0 : Step...

Operation Guide
Page 28
...to 'Real Data Mapping 1'. You can also adjust brightness in the Video menu. See page 27. PIP / Twin (Command2:n) G To control the PIP (Picture-in the Video menu. Brightness (Command2:h) G To adjust screen brightness. Acknowledgement [h][ ][Set ID][ ][OK][Data][x] 09. Transmission [k][i][ ][Set ID][ ][Data...Data][Cr] Data 0: OSD off 1: Lock on Acknowledgement [m][ ][Set ID][ ][OK][Data][x] • If you're not using the PIP or TWIN PICTURE button on the remote control. Transmission [k][p][ ][Set ID][ ][Data][Cr] Data Min: 0 ~ Max: 99 • Refer to 'Real Data Mapping...
...to 'Real Data Mapping 1'. You can also adjust brightness in the Video menu. See page 27. PIP / Twin (Command2:n) G To control the PIP (Picture-in the Video menu. Brightness (Command2:h) G To adjust screen brightness. Acknowledgement [h][ ][Set ID][ ][OK][Data][x] 09. Transmission [k][i][ ][Set ID][ ][Data...Data][Cr] Data 0: OSD off 1: Lock on Acknowledgement [m][ ][Set ID][ ][OK][Data][x] • If you're not using the PIP or TWIN PICTURE button on the remote control. Transmission [k][p][ ][Set ID][ ][Data][Cr] Data Min: 0 ~ Max: 99 • Refer to 'Real Data Mapping...

Operation Guide
Page 29
...Real Data Mapping 3' as shown below. Blue Adjustment (Command2:$) G To adjust blue in color temperature. PIP Position (Command2:q) G To select sub picture position for PIP. You can also adjust ACC in the Audio menu. Acknowledgement [s][ ][Set ID][ ][OK][Data][x] 20. Transmission [k][u][ ][Set ID][...:s) G To adjust bass. External Control Device Setup 17. You can also adjust balance in the Twin menu. You can also adjust the sub picture position using Win.position on screen Acknowledgement [q][ ][Set ID][ ][OK][Data][x] 18. Transmission [k][w][ ][Set ID][ ][Data][Cr] Data Min: ...
...Real Data Mapping 3' as shown below. Blue Adjustment (Command2:$) G To adjust blue in color temperature. PIP Position (Command2:q) G To select sub picture position for PIP. You can also adjust ACC in the Audio menu. Acknowledgement [s][ ][Set ID][ ][OK][Data][x] 20. Transmission [k][u][ ][Set ID][...:s) G To adjust bass. External Control Device Setup 17. You can also adjust balance in the Twin menu. You can also adjust the sub picture position using Win.position on screen Acknowledgement [q][ ][Set ID][ ][OK][Data][x] 18. Transmission [k][w][ ][Set ID][ ][Data][Cr] Data Min: ...

Operation Guide
Page 30
...~ Max: 64 • Refer to 'Real data mapping1'. PIP Input Select (Command2:y) G To select input source for Twin Picture mode (Command2:t) G To adjust main picture size in RGB-PC mode. External Control Device Setup 25. Transmission [j][p][ ][Set ID][ ][Data][Cr] Data 0: Normal 1: ... DVI Acknowledgement [y][ ][Set ID][ ][OK][Data][x] 26. a: Turn the monitor off . Auto Configure only works in twin picture mode. Picture Size Setting for sub picture in orbiter function. Low Power (Command2:q) G To control the low power function on/off with auto off 1: Low power on...
...~ Max: 64 • Refer to 'Real data mapping1'. PIP Input Select (Command2:y) G To select input source for Twin Picture mode (Command2:t) G To adjust main picture size in RGB-PC mode. External Control Device Setup 25. Transmission [j][p][ ][Set ID][ ][Data][Cr] Data 0: Normal 1: ... DVI Acknowledgement [y][ ][Set ID][ ][OK][Data][x] 26. a: Turn the monitor off . Auto Configure only works in twin picture mode. Picture Size Setting for sub picture in orbiter function. Low Power (Command2:q) G To control the low power function on/off with auto off 1: Low power on...

Operation Guide
Page 32
... 7 Number Key 8 Number Key 9 AII INPUT SELECT RGB DVI VIDEO S-VIDEO COMPONENT SLEEP OK (Á) MENU DASP APC PIP SUB INPUT SWAP PIP ARC TWIN PICTURE ZOOM + ZOOM Window Size Window Position Split Zoom ARC ARC (4:3) ARC (16:9) ARC (ZOOM) Auto configure Note R/C Button R/C Button R/C Button R/C Button R/C Button (Power On/Off...
... 7 Number Key 8 Number Key 9 AII INPUT SELECT RGB DVI VIDEO S-VIDEO COMPONENT SLEEP OK (Á) MENU DASP APC PIP SUB INPUT SWAP PIP ARC TWIN PICTURE ZOOM + ZOOM Window Size Window Position Split Zoom ARC ARC (4:3) ARC (16:9) ARC (ZOOM) Auto configure Note R/C Button R/C Button R/C Button R/C Button R/C Button (Power On/Off...