
Operating Guide
Page 3
Keep this manual with Monitor for future easy reference Table of Contents First step Setup and Operation Checklist 4 WARNINGS 5 Safety instructions 6 Monitor Overview Front Panel Controls 8 Connection Panel ... Feature 39 PC Mode Features 41 PC Mode Adjustments 42 External Control Device Setup 44 Misc. Maintenance 52 Troubleshooting Checklist 53 Product Specifications 55 Your Zenith Limited Warranty Back Cover
Keep this manual with Monitor for future easy reference Table of Contents First step Setup and Operation Checklist 4 WARNINGS 5 Safety instructions 6 Monitor Overview Front Panel Controls 8 Connection Panel ... Feature 39 PC Mode Features 41 PC Mode Adjustments 42 External Control Device Setup 44 Misc. Maintenance 52 Troubleshooting Checklist 53 Product Specifications 55 Your Zenith Limited Warranty Back Cover

Operating Guide
Page 12
Accessories/Options Accessories POWER SLEEP APC ARC PIP SWAP MENU INPUT SELECT DASP PIP ARC TWIN PICTURE SUB INPUT MUTE VOL ENTER VOL 1 2 3 4 5 6 7 8 9 0 WIN.SIZE WIN.POSITION ZOOM- ZOOM+ Remote Control Owner's Manual 1.5V 1.5V Power Cord Alkaline Batteries PC Audio Cable D-sub 15 pin cable Video Cable DVI Computer (DVI-D) Cable Speaker cable Options Speakers 12
Accessories/Options Accessories POWER SLEEP APC ARC PIP SWAP MENU INPUT SELECT DASP PIP ARC TWIN PICTURE SUB INPUT MUTE VOL ENTER VOL 1 2 3 4 5 6 7 8 9 0 WIN.SIZE WIN.POSITION ZOOM- ZOOM+ Remote Control Owner's Manual 1.5V 1.5V Power Cord Alkaline Batteries PC Audio Cable D-sub 15 pin cable Video Cable DVI Computer (DVI-D) Cable Speaker cable Options Speakers 12
Operating Guide
Page 15
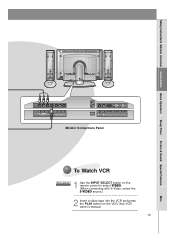
See VCR owner's manual. 15 Misc. Safety Instructions Monitor Overview Connections Basic Operation Sleep Timer Picture & Sound Special Features DC OUTPUT R AUDIO L MONO (DC 12V) AV INPUT VIDEO S-VIDEO Y ...
See VCR owner's manual. 15 Misc. Safety Instructions Monitor Overview Connections Basic Operation Sleep Timer Picture & Sound Special Features DC OUTPUT R AUDIO L MONO (DC 12V) AV INPUT VIDEO S-VIDEO Y ...
Operating Guide
Page 18
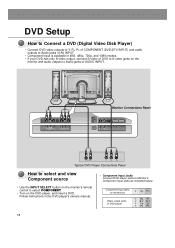
..., PR of COMPONENT (DVD/DTV INPUT) and audio outputs to Audio jacks of AV INPUT. • Component Input is available in the DVD player's owners manual. • Component Input Jacks Connect DVD player jacks to select COMPONENT. • Turn on the DVD player, and insert a DVD. DC OUTPUT (DC 12V) R AUDIO...
..., PR of COMPONENT (DVD/DTV INPUT) and audio outputs to Audio jacks of AV INPUT. • Component Input is available in the DVD player's owners manual. • Component Input Jacks Connect DVD player jacks to select COMPONENT. • Turn on the DVD player, and insert a DVD. DC OUTPUT (DC 12V) R AUDIO...
Operating Guide
Page 19
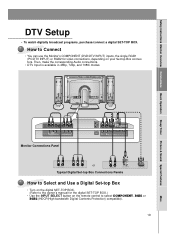
... Panels DVI-HDTV-OUT How to Select and Use a Digital Set-top Box • Turn on the digital SET-TOP BOX. (Refer to the owner's manual for video connections, depending on the remote control to Connect • You can use the Monitor's COMPONENT (DVD/DTV INPUT) inputs, the single RGB1 (PC...
... Panels DVI-HDTV-OUT How to Select and Use a Digital Set-top Box • Turn on the digital SET-TOP BOX. (Refer to the owner's manual for video connections, depending on the remote control to Connect • You can use the Monitor's COMPONENT (DVD/DTV INPUT) inputs, the single RGB1 (PC...

Operating Guide
Page 27
... Sleep Timer Picture & Sound Special Features Auto Sound Control DASP (Digital Auto Sound Processing) • This feature lets you enjoy the best sound without any manual adjustment; DASP 1 Press the DASP button. 2 Use the DASP or UP/DOWN button to select a sound setup. Normal Cinema Music User Sports • You can...
... Sleep Timer Picture & Sound Special Features Auto Sound Control DASP (Digital Auto Sound Processing) • This feature lets you enjoy the best sound without any manual adjustment; DASP 1 Press the DASP button. 2 Use the DASP or UP/DOWN button to select a sound setup. Normal Cinema Music User Sports • You can...
Operating Guide
Page 28
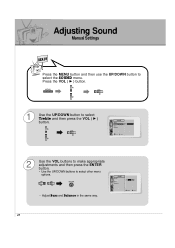
VOL SOUND DASP Treble Bass Balance G 100 D Move E F Prev. 2 Use the VOL buttons to make appropriate adjustments and then press the ENTER button. • Use the UP/DOWN buttons to select Treble and then press the VOL ( G ) button. Press the VOL ( G ) button. VOL VOL ENTER • Adjust Bass and Balance in the same way. MENU VOL 1 Use the UP/DOWN button to select other menu options. Adjusting Sound Manual Settings READY Press the MENU button and then use the UP/DOWN button to select the SOUND menu. SOUND DASP Treble 50 Bass Balance FGAdjust A Prev. 28
VOL SOUND DASP Treble Bass Balance G 100 D Move E F Prev. 2 Use the VOL buttons to make appropriate adjustments and then press the ENTER button. • Use the UP/DOWN buttons to select Treble and then press the VOL ( G ) button. Press the VOL ( G ) button. VOL VOL ENTER • Adjust Bass and Balance in the same way. MENU VOL 1 Use the UP/DOWN button to select other menu options. Adjusting Sound Manual Settings READY Press the MENU button and then use the UP/DOWN button to select the SOUND menu. SOUND DASP Treble 50 Bass Balance FGAdjust A Prev. 28
Operating Guide
Page 42
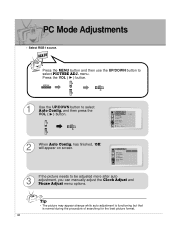
.... OK ARC(Main) Zoom In/Out Position Clock Adjust Phase Adjust Reset If the picture needs to be adjusted more after auto 3 adjustment, you can manually adjust the Clock Adjust and Phase Adjust menu options. VOL PICTURE ADJ. Select RGB1 source.
.... OK ARC(Main) Zoom In/Out Position Clock Adjust Phase Adjust Reset If the picture needs to be adjusted more after auto 3 adjustment, you can manually adjust the Clock Adjust and Phase Adjust menu options. VOL PICTURE ADJ. Select RGB1 source.