
Operating Guide
Page 3
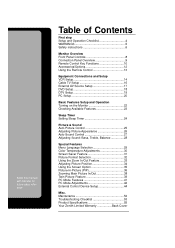
... Setup and Operation Turning on the Monitor 22 Checking Available Features 23 Sleep Timer Setting Sleep Timer 24 Picture & Sound Auto Picture Control 25 Adjusting Picture Appearance 26 Auto Sound Control 27 Adjusting Sound: Bass, Treble, Balance 28 Special Features Menu Language Selection 29 Color Temperature Adjustments 30 Screen Saver Feature 31 Picture... Feature 39 PC Mode Features 41 PC Mode Adjustments 42 External Control Device Setup 44 Misc. Maintenance 52 Troubleshooting Checklist 53 Product Specifications 55 Your Zenith Limited Warranty Back Cover
... Setup and Operation Turning on the Monitor 22 Checking Available Features 23 Sleep Timer Setting Sleep Timer 24 Picture & Sound Auto Picture Control 25 Adjusting Picture Appearance 26 Auto Sound Control 27 Adjusting Sound: Bass, Treble, Balance 28 Special Features Menu Language Selection 29 Color Temperature Adjustments 30 Screen Saver Feature 31 Picture... Feature 39 PC Mode Features 41 PC Mode Adjustments 42 External Control Device Setup 44 Misc. Maintenance 52 Troubleshooting Checklist 53 Product Specifications 55 Your Zenith Limited Warranty Back Cover
Operating Guide
Page 4
Select viewing source for available connection and operational setup options.) 1. Fine-tune source image and sound to personal preference or as required by source. Connect all accessories. 2. See page 11. 8. Install batteries in remote control. See page 13. 4. See page 29. (...
Select viewing source for available connection and operational setup options.) 1. Fine-tune source image and sound to personal preference or as required by source. Connect all accessories. 2. See page 11. 8. Install batteries in remote control. See page 13. 4. See page 29. (...
Operating Guide
Page 5
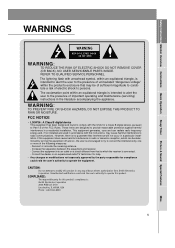
...L30W36 : A Class B digital device This equipment has been tested and found to comply with the instructions, may be determined by turning the equipment off and on a circuit different from Zenith Electronics Corporation. However, there is connected. - Connect the equipment into an outlet on , the user is : Zenith... that interference will not occur in a residential installation. Safety Instructions Monitor Overview Connections Basic Operation Sleep Timer Picture & Sound Special Features WARNINGS WARNING RISK OF ELECTRIC SHOCK DO NOT OPEN WARNING: TO REDUCE THE RISK OF ELECTRIC SHOCK DO ...
...L30W36 : A Class B digital device This equipment has been tested and found to comply with the instructions, may be determined by turning the equipment off and on a circuit different from Zenith Electronics Corporation. However, there is connected. - Connect the equipment into an outlet on , the user is : Zenith... that interference will not occur in a residential installation. Safety Instructions Monitor Overview Connections Basic Operation Sleep Timer Picture & Sound Special Features WARNINGS WARNING RISK OF ELECTRIC SHOCK DO NOT OPEN WARNING: TO REDUCE THE RISK OF ELECTRIC SHOCK DO ...
Operating Guide
Page 7
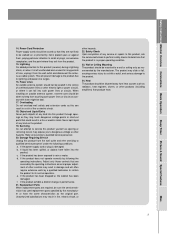
... fallen into such power lines or circuits. Servicing Do not attempt to its normal operation. d. Safety Instructions Monitor Overview Connections Basic Operation Sleep Timer Picture & Sound Special Features 14. Power-Cord Protection Power-supply cords should be fatal. 17. If liquid has been spilled, or objects have the same characteristics as...
... fallen into such power lines or circuits. Servicing Do not attempt to its normal operation. d. Safety Instructions Monitor Overview Connections Basic Operation Sleep Timer Picture & Sound Special Features 14. Power-Cord Protection Power-supply cords should be fatal. 17. If liquid has been spilled, or objects have the same characteristics as...
Operating Guide
Page 11
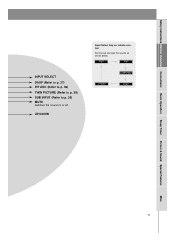
RGB1 RGB2 COMPONENT S-VIDEO VIDEO Misc. 11 UP/DOWN Input Select Key on or off. Safety Instructions Monitor Overview Connections Basic Operation Sleep Timer Picture & Sound Special Features INPUT SELECT DASP (Refer to p. 27) PIP ARC (Refer to p. 36) TWIN PICTURE (Refer to p. 39) SUB INPUT (Refer to p. 39) MUTE switches the sound on remote control Each press changes the source as shown below.
RGB1 RGB2 COMPONENT S-VIDEO VIDEO Misc. 11 UP/DOWN Input Select Key on or off. Safety Instructions Monitor Overview Connections Basic Operation Sleep Timer Picture & Sound Special Features INPUT SELECT DASP (Refer to p. 27) PIP ARC (Refer to p. 36) TWIN PICTURE (Refer to p. 39) SUB INPUT (Refer to p. 39) MUTE switches the sound on remote control Each press changes the source as shown below.
Operating Guide
Page 13
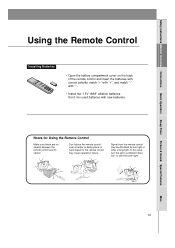
... set to the remote control may be disturbed by sun light or other strong light. Safety Instructions Monitor Overview Connections Basic Operation Sleep Timer Picture & Sound Special Features Using the Remote Control Installing Batteries • Open the battery compartment cover on the back of the remote control and insert the batteries...
... set to the remote control may be disturbed by sun light or other strong light. Safety Instructions Monitor Overview Connections Basic Operation Sleep Timer Picture & Sound Special Features Using the Remote Control Installing Batteries • Open the battery compartment cover on the back of the remote control and insert the batteries...
Operating Guide
Page 15
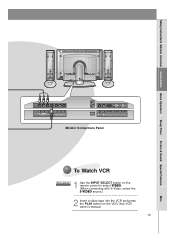
See VCR owner's manual. 15 Misc. Safety Instructions Monitor Overview Connections Basic Operation Sleep Timer Picture & Sound Special Features DC OUTPUT R AUDIO L MONO (DC 12V) AV INPUT VIDEO S-VIDEO Y PB PR COMPONENT (DVD/DTV INPUT) AC INPUT R AUDIO L RGB 2 INPUT RGB 1 INPUT ...
See VCR owner's manual. 15 Misc. Safety Instructions Monitor Overview Connections Basic Operation Sleep Timer Picture & Sound Special Features DC OUTPUT R AUDIO L MONO (DC 12V) AV INPUT VIDEO S-VIDEO Y PB PR COMPONENT (DVD/DTV INPUT) AC INPUT R AUDIO L RGB 2 INPUT RGB 1 INPUT ...
Operating Guide
Page 17
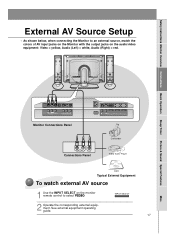
... on the Monitor with the output jacks on the monitor remote control to select VIDEO. Safety Instructions Monitor Overview Connections Basic Operation Sleep Timer Picture & Sound Special Features External AV Source Setup -
... on the Monitor with the output jacks on the monitor remote control to select VIDEO. Safety Instructions Monitor Overview Connections Basic Operation Sleep Timer Picture & Sound Special Features External AV Source Setup -
Operating Guide
Page 19
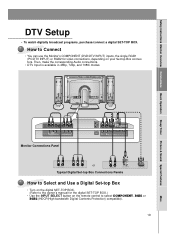
Safety Instructions Monitor Overview Connections Basic Operation Sleep Timer Picture & Sound Special Features DTV Setup - How to Connect • You can use the Monitor's COMPONENT (DVD/DTV INPUT) inputs, the single RGB1 (PC/DTV INPUT) or ...
Safety Instructions Monitor Overview Connections Basic Operation Sleep Timer Picture & Sound Special Features DTV Setup - How to Connect • You can use the Monitor's COMPONENT (DVD/DTV INPUT) inputs, the single RGB1 (PC/DTV INPUT) or ...

Operating Guide
Page 20
...Monitor. • Connect the audio cable from the PC to the Audio ports on the Monitor. • If your PC is equipped with a sound card, adjust the sound output on the PC. • Set the display resolution of PC to a displayable mode (Refer to page 21) and connect to it. ...INPUT) (CONTROL/SERVICE) How to use a screen saver when possible. • Change the output resolution of the PC to 1024X768 for outstanding image and sound. The fixed image may become permanently imprinted on the Monitor's screen for a long period of the PC to your PC window environment, select Normal, Standard...
...Monitor. • Connect the audio cable from the PC to the Audio ports on the Monitor. • If your PC is equipped with a sound card, adjust the sound output on the PC. • Set the display resolution of PC to a displayable mode (Refer to page 21) and connect to it. ...INPUT) (CONTROL/SERVICE) How to use a screen saver when possible. • Change the output resolution of the PC to 1024X768 for outstanding image and sound. The fixed image may become permanently imprinted on the Monitor's screen for a long period of the PC to your PC window environment, select Normal, Standard...
Operating Guide
Page 21
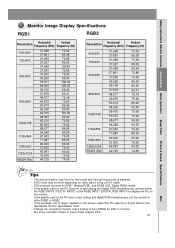
...function. • Not every resolution shown in the displayable monitor specification chart. • Change the computer's monitor output setting to the L30W36 for RGB1 (Analog RGB), and RGB2 (DVI, Digital RGB) modes. • If the graphic card on the PC does not ...; If the message "out of range" appears on the monitor. Safety Instructions Monitor Overview Connections Basic Operation Sleep Timer Picture & Sound Special Features Monitor Image Display Specifications RGB1 RGB2 Resolution Horizontal Frequency (KHz) Vertical Frequency (Hz) 640x350 720x400 640x480 800x600 1024x768 1152x864 ...
...function. • Not every resolution shown in the displayable monitor specification chart. • Change the computer's monitor output setting to the L30W36 for RGB1 (Analog RGB), and RGB2 (DVI, Digital RGB) modes. • If the graphic card on the PC does not ...; If the message "out of range" appears on the monitor. Safety Instructions Monitor Overview Connections Basic Operation Sleep Timer Picture & Sound Special Features Monitor Image Display Specifications RGB1 RGB2 Resolution Horizontal Frequency (KHz) Vertical Frequency (Hz) 640x350 720x400 640x480 800x600 1024x768 1152x864 ...

Operating Guide
Page 22
... the Monitor on . 3 If the Monitor is switched to standby mode. Turning on the Monitor. Tip • Adjusting volume level The volume (G) button increases the sound level and the volume (F) button decreases the...
... the Monitor on . 3 If the Monitor is switched to standby mode. Turning on the Monitor. Tip • Adjusting volume level The volume (G) button increases the sound level and the volume (F) button decreases the...

Operating Guide
Page 23
... Features Checking Available Features - Config. PICTURE APC Contrast Brightness Color Sharpness Tint Screen D Move menu Exit E SOUND DASP Treble Bass Balance D Move menu Exit E SPECIAL Language Color TEMP. Position Win. Size Win. ARC(Main) Zoom In/Out Position Clock Adjust Phase Adjust ...
... Features Checking Available Features - Config. PICTURE APC Contrast Brightness Color Sharpness Tint Screen D Move menu Exit E SOUND DASP Treble Bass Balance D Move menu Exit E SPECIAL Language Color TEMP. Position Win. Size Win. ARC(Main) Zoom In/Out Position Clock Adjust Phase Adjust ...

Operating Guide
Page 25
Misc. 25 Clear Soft User • You can also select Clear, Soft or User in the PICTURE menu. APC Clear Soft UseUrser D E Adjust A Exit • Each press of APC button or UP/DOWN buttons changes the menu option as shown below. Safety Instructions Monitor Overview Connections Basic Operation Sleep Timer Picture & Sound Special Features Auto Picture Control Use APC to set up the Monitor for the best picture appearance APC (Auto Picture Control) APC 1 Press the APC button. 2 Use the APC or UP/DOWN buttons to select your desired picture appearance.
Misc. 25 Clear Soft User • You can also select Clear, Soft or User in the PICTURE menu. APC Clear Soft UseUrser D E Adjust A Exit • Each press of APC button or UP/DOWN buttons changes the menu option as shown below. Safety Instructions Monitor Overview Connections Basic Operation Sleep Timer Picture & Sound Special Features Auto Picture Control Use APC to set up the Monitor for the best picture appearance APC (Auto Picture Control) APC 1 Press the APC button. 2 Use the APC or UP/DOWN buttons to select your desired picture appearance.

Operating Guide
Page 27
Normal Cinema Music User Sports • You can also select Normal, Cinema, Music, Sports or User in the SOUND menu. DASP NoNrmoarml al Cinema Music Sports User D E Adjust A Exit • Each press of DASP or UP/DOWN buttons changes the menu ... levels, based on the program content. DASP 1 Press the DASP button. 2 Use the DASP or UP/DOWN button to select a sound setup. Safety Instructions Monitor Overview Connections Basic Operation Sleep Timer Picture & Sound Special Features Auto Sound Control DASP (Digital Auto Sound Processing) • This feature lets you enjoy the best...
Normal Cinema Music User Sports • You can also select Normal, Cinema, Music, Sports or User in the SOUND menu. DASP NoNrmoarml al Cinema Music Sports User D E Adjust A Exit • Each press of DASP or UP/DOWN buttons changes the menu ... levels, based on the program content. DASP 1 Press the DASP button. 2 Use the DASP or UP/DOWN button to select a sound setup. Safety Instructions Monitor Overview Connections Basic Operation Sleep Timer Picture & Sound Special Features Auto Sound Control DASP (Digital Auto Sound Processing) • This feature lets you enjoy the best...
Operating Guide
Page 28
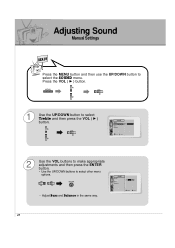
VOL VOL ENTER • Adjust Bass and Balance in the same way. Adjusting Sound Manual Settings READY Press the MENU button and then use the UP/DOWN button to select other menu options. VOL SOUND DASP Treble Bass Balance G 100 D Move E F Prev. 2 Use the VOL buttons to make appropriate adjustments and then press the ENTER button. • Use the UP/DOWN buttons to select the SOUND menu. Press the VOL ( G ) button. SOUND DASP Treble 50 Bass Balance FGAdjust A Prev. 28 MENU VOL 1 Use the UP/DOWN button to select Treble and then press the VOL ( G ) button.
VOL VOL ENTER • Adjust Bass and Balance in the same way. Adjusting Sound Manual Settings READY Press the MENU button and then use the UP/DOWN button to select other menu options. VOL SOUND DASP Treble Bass Balance G 100 D Move E F Prev. 2 Use the VOL buttons to make appropriate adjustments and then press the ENTER button. • Use the UP/DOWN buttons to select the SOUND menu. Press the VOL ( G ) button. SOUND DASP Treble 50 Bass Balance FGAdjust A Prev. 28 MENU VOL 1 Use the UP/DOWN button to select Treble and then press the VOL ( G ) button.

Operating Guide
Page 29
...ÇAIS ESPAÑOL PORTUGUÊS DEUTSCH ITALIANO D Move. Press the VOL ( G ) button. F Prev. Safety Instructions Monitor Overview Connections Basic Operation Sleep Timer Picture & Sound Special Features Menu Language Selection READY Press the MENU button and then use the UP/DOWN button to remove menu. E 3 Press the ENTER button to...
...ÇAIS ESPAÑOL PORTUGUÊS DEUTSCH ITALIANO D Move. Press the VOL ( G ) button. F Prev. Safety Instructions Monitor Overview Connections Basic Operation Sleep Timer Picture & Sound Special Features Menu Language Selection READY Press the MENU button and then use the UP/DOWN button to remove menu. E 3 Press the ENTER button to...

Operating Guide
Page 31
... On D Move E F Prev. 2 Use the UP/DOWN button to go back within menu. 31 Misc. Safety Instructions Monitor Overview Connections Basic Operation Sleep Timer Picture & Sound Special Features Screen Saver Feature - MENU VOL 1 Use the UP/DOWN button to prevent a permanent image burn in but it is still possible to permanently...
... On D Move E F Prev. 2 Use the UP/DOWN button to go back within menu. 31 Misc. Safety Instructions Monitor Overview Connections Basic Operation Sleep Timer Picture & Sound Special Features Screen Saver Feature - MENU VOL 1 Use the UP/DOWN button to prevent a permanent image burn in but it is still possible to permanently...

Operating Guide
Page 33
...(Main) ZZoooommIInn/O/Ouut.t G Position Clock Adjust Phase Adjust Reset D Move E F Prev. PICTURE ADJ. Auto. Auto. Safety Instructions Monitor Overview Connections Basic Operation Sleep Timer Picture & Sound Special Features Using the Zoom In/Out Feature READY Press the MENU button and then use the UP/DOWN button to 50x. VOL VOL •...
...(Main) ZZoooommIInn/O/Ouut.t G Position Clock Adjust Phase Adjust Reset D Move E F Prev. PICTURE ADJ. Auto. Auto. Safety Instructions Monitor Overview Connections Basic Operation Sleep Timer Picture & Sound Special Features Using the Zoom In/Out Feature READY Press the MENU button and then use the UP/DOWN button to 50x. VOL VOL •...

Operating Guide
Page 35
... ( G ) button. ENTER 35 PICTURE APC Contrast Brightness Color Sharpness Tint Screen VCR TV D E Move A Prev. Safety Instructions Monitor Overview Connections Basic Operation Sleep Timer Picture & Sound Special Features Using the Screen Option - This function works in Video and S-video modes. -
... ( G ) button. ENTER 35 PICTURE APC Contrast Brightness Color Sharpness Tint Screen VCR TV D E Move A Prev. Safety Instructions Monitor Overview Connections Basic Operation Sleep Timer Picture & Sound Special Features Using the Screen Option - This function works in Video and S-video modes. -