
Operating Guide
Page 6
... been built into the outlet, contact your electrician to . 5. Attachments Do not use can help you are built into the grounding-type power outlet. Do not use a mounting accessory recommended by the manufacturer, or sold with the product. Use a damp cloth for the grounding ... According to grounding electrodes, and requirements for cleaning. 6. Federal safety requirements, and those of the grounding-type plug. 13. Example of power source indicated on a bed, sofa, rug, or other sources, refer to . 11. Follow Instructions All operating and use instructions should ...
... been built into the outlet, contact your electrician to . 5. Attachments Do not use can help you are built into the grounding-type power outlet. Do not use a mounting accessory recommended by the manufacturer, or sold with the product. Use a damp cloth for the grounding ... According to grounding electrodes, and requirements for cleaning. 6. Federal safety requirements, and those of the grounding-type plug. 13. Example of power source indicated on a bed, sofa, rug, or other sources, refer to . 11. Follow Instructions All operating and use instructions should ...
Operating Guide
Page 7
...result in proper operating condition. 23. This will often require extensive work by the operating instructions as an improper adjustment of overhead power lines or other controls may result in a fire or electric shock. When installing an outside antenna system should not be walked on... Servicing Do not attempt to service this can fall , causing serious injury to a child or adult, and serious damage to lightning and power-line surges. 16. Misc. 7 If the product has been exposed to qualified service personnel. 20. Safety Instructions Monitor Overview Connections Basic Operation...
...result in proper operating condition. 23. This will often require extensive work by the operating instructions as an improper adjustment of overhead power lines or other controls may result in a fire or electric shock. When installing an outside antenna system should not be walked on... Servicing Do not attempt to service this can fall , causing serious injury to a child or adult, and serious damage to lightning and power-line surges. 16. Misc. 7 If the product has been exposed to qualified service personnel. 20. Safety Instructions Monitor Overview Connections Basic Operation...
Operating Guide
Page 8
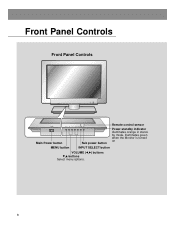
Front Panel Controls Front Panel Controls POWER ON OFF MENU VOL INPUT /I SELECT POWER ON OFF MENU Main Power button VOL INPUT /I SELECT Sub power button Remote control sensor Power standby indicator Illuminates orange in standby mode, illuminates green when the Monitor is turned on MENU button INPUT SELECT button VOLUME (F,G) buttons E,D buttons Select menu options. 8
Front Panel Controls Front Panel Controls POWER ON OFF MENU VOL INPUT /I SELECT POWER ON OFF MENU Main Power button VOL INPUT /I SELECT Sub power button Remote control sensor Power standby indicator Illuminates orange in standby mode, illuminates green when the Monitor is turned on MENU button INPUT SELECT button VOLUME (F,G) buttons E,D buttons Select menu options. 8
Operating Guide
Page 10
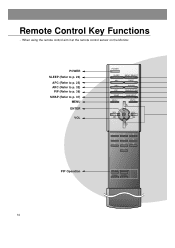
ZOOM+ 10 When using the remote control aim it at the remote control sensor on the Monitor. POWER SLEEP (Refer to p. 24) APC (Refer to p. 25) ARC (Refer to p. 32) PIP (Refer to p. 36) SWAP (Refer to p. 37) MENU ENTER VOL PIP Operation POWER SLEEP APC ARC PIP SWAP MENU INPUT SELECT DASP PIP ARC TWIN PICTURE SUB INPUT MUTE VOL ENTER VOL 1 2 3 4 5 6 7 8 9 0 WIN.SIZE WIN.POSITION ZOOM- Remote Control Key Functions -
ZOOM+ 10 When using the remote control aim it at the remote control sensor on the Monitor. POWER SLEEP (Refer to p. 24) APC (Refer to p. 25) ARC (Refer to p. 32) PIP (Refer to p. 36) SWAP (Refer to p. 37) MENU ENTER VOL PIP Operation POWER SLEEP APC ARC PIP SWAP MENU INPUT SELECT DASP PIP ARC TWIN PICTURE SUB INPUT MUTE VOL ENTER VOL 1 2 3 4 5 6 7 8 9 0 WIN.SIZE WIN.POSITION ZOOM- Remote Control Key Functions -

Operating Guide
Page 12
ZOOM+ Remote Control Owner's Manual 1.5V 1.5V Power Cord Alkaline Batteries PC Audio Cable D-sub 15 pin cable Video Cable DVI Computer (DVI-D) Cable Speaker cable Options Speakers 12 Accessories/Options Accessories POWER SLEEP APC ARC PIP SWAP MENU INPUT SELECT DASP PIP ARC TWIN PICTURE SUB INPUT MUTE VOL ENTER VOL 1 2 3 4 5 6 7 8 9 0 WIN.SIZE WIN.POSITION ZOOM-
ZOOM+ Remote Control Owner's Manual 1.5V 1.5V Power Cord Alkaline Batteries PC Audio Cable D-sub 15 pin cable Video Cable DVI Computer (DVI-D) Cable Speaker cable Options Speakers 12 Accessories/Options Accessories POWER SLEEP APC ARC PIP SWAP MENU INPUT SELECT DASP PIP ARC TWIN PICTURE SUB INPUT MUTE VOL ENTER VOL 1 2 3 4 5 6 7 8 9 0 WIN.SIZE WIN.POSITION ZOOM-

Operating Guide
Page 20
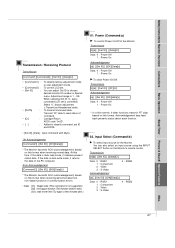
... resolution output of PC to a displayable mode (Refer to page 21) and connect to RGB1/RGB2 Input (PC/DTV Input) on the Monitor to apply power to your PC window environment, select Normal, Standard or Default Monitor. DC OUTPUT R AUDIO L MONO (DC 12V) AV INPUT VIDEO S-VIDEO Y PB PR COMPONENT (... INPUT SELECT On the remote control PC Setup • First, turn on the display by pressing the button on the Monitor or by pressing the POWER button on the Monitor's remote control. • Use the INPUT SELECT button on the screen; Tips • Avoid keeping a fixed image on the PC. &#...
... resolution output of PC to a displayable mode (Refer to page 21) and connect to RGB1/RGB2 Input (PC/DTV Input) on the Monitor to apply power to your PC window environment, select Normal, Standard or Default Monitor. DC OUTPUT R AUDIO L MONO (DC 12V) AV INPUT VIDEO S-VIDEO Y PB PR COMPONENT (... INPUT SELECT On the remote control PC Setup • First, turn on the display by pressing the button on the Monitor or by pressing the POWER button on the Monitor's remote control. • Use the INPUT SELECT button on the screen; Tips • Avoid keeping a fixed image on the PC. &#...

Operating Guide
Page 22
... Monitor • Press the main ON OFF button on the Monitor and then press the or INPUT SELECT button on the Monitor or press the POWER or INPUT SELECT button on . Turning on the Monitor. Tip • Adjusting volume level The volume (G) button increases the sound level and the volume (F) button... • Press the main ON OFF button on the Monitor to turn it at the sensor on . Turning on the Monitor just after installation 1 Connect power cord correctly. 2 Press the main ON OFF button on the Monitor - When using the remote control, aim it on. 3 If the Monitor is switched to...
... Monitor • Press the main ON OFF button on the Monitor and then press the or INPUT SELECT button on the Monitor or press the POWER or INPUT SELECT button on . Turning on the Monitor. Tip • Adjusting volume level The volume (G) button increases the sound level and the volume (F) button... • Press the main ON OFF button on the Monitor to turn it at the sensor on . Turning on the Monitor just after installation 1 Connect power cord correctly. 2 Press the main ON OFF button on the Monitor - When using the remote control, aim it on. 3 If the Monitor is switched to...

Operating Guide
Page 46
... ready) 5 GND 6 DSR (DCE side ready) 9 7 RTS (Ready to send) 6 8 CTS (Clear to control the Monitor's functions with an external control device. PIP position k 17. Power k 02. Contrast k 08. External Control Device Setup - Color k 10. Balance k 20.
... ready) 5 GND 6 DSR (DCE side ready) 9 7 RTS (Ready to send) 6 8 CTS (Clear to control the Monitor's functions with an external control device. PIP position k 17. Power k 02. Contrast k 08. External Control Device Setup - Color k 10. Balance k 20.
Operating Guide
Page 47
... transmits ACK (acknowledgement) based on the Monitor's remote control. Transmission [k][a][ ][Set ID][ ][Data][Cr] Data 0 : Power Off 1 : Power On Acknowledgement [a][ ][Set ID][ ][OK][Data][x] Data 0 : Power Off 1 : Power On G To show Power On/Off. Transmission [k][b][ ][Set ID][ ][Data][Cr] Data 0 : RGB1 1 : Component 2 : Video 3 :...receiving normal data. Transmission [k][a][ ][Set ID][ ][FF][Cr] Acknowledgement [a][ ][Set ID][ ][OK][data][x] Data 0 : Power Off 1 : Power On * In a like manner, if other functions transmit 'FF' data based on this format, Acknowledgement data feed back ...
... transmits ACK (acknowledgement) based on the Monitor's remote control. Transmission [k][a][ ][Set ID][ ][Data][Cr] Data 0 : Power Off 1 : Power On Acknowledgement [a][ ][Set ID][ ][OK][Data][x] Data 0 : Power Off 1 : Power On G To show Power On/Off. Transmission [k][b][ ][Set ID][ ][Data][Cr] Data 0 : RGB1 1 : Component 2 : Video 3 :...receiving normal data. Transmission [k][a][ ][Set ID][ ][FF][Cr] Acknowledgement [a][ ][Set ID][ ][OK][data][x] Data 0 : Power Off 1 : Power On * In a like manner, if other functions transmit 'FF' data based on this format, Acknowledgement data feed back ...

Operating Guide
Page 52
Here's a great way to protect against possible damage from lightning or power surges. 52 Make sure the excess water is off the screen, and then let it 's a good idea to unplug the power cord to keep the dust off your screen for a long time (such as a vacation), it air-dry before you turn... the power off and unplug the power cord before you begin any cleaning. Cleaning the Cabinet To remove dirt or dust, wipe the cabinet with a soft, dry, lint-free cloth. Wet a soft ...
Here's a great way to protect against possible damage from lightning or power surges. 52 Make sure the excess water is off the screen, and then let it 's a good idea to unplug the power cord to keep the dust off your screen for a long time (such as a vacation), it air-dry before you turn... the power off and unplug the power cord before you begin any cleaning. Cleaning the Cabinet To remove dirt or dust, wipe the cabinet with a soft, dry, lint-free cloth. Wet a soft ...
Operating Guide
Page 53
... installed with the correct polarities. See page 13. • Install new batteries. See page 22. • Power cord inserted into wall outlet? • Plug another product's power cord into the wall outlet where the Monitor's power cord was plugged in the PICTURE menu and press the VOLUME (G) button. Safety Instructions Monitor Overview Connections...
... installed with the correct polarities. See page 13. • Install new batteries. See page 22. • Power cord inserted into wall outlet? • Plug another product's power cord into the wall outlet where the Monitor's power cord was plugged in the PICTURE menu and press the VOLUME (G) button. Safety Instructions Monitor Overview Connections...
Operating Guide
Page 54
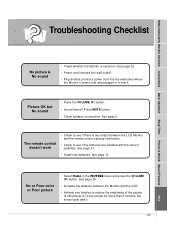
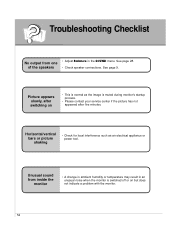
... picture shaking • Check for local interference such as the image is switched off or on • This is normal as an electrical appliance or power tool.
... picture shaking • Check for local interference such as the image is switched off or on • This is normal as an electrical appliance or power tool.
Operating Guide
Page 55
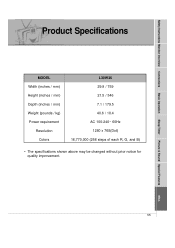
Misc. 55 Safety Instructions Monitor Overview Connections Basic Operation Sleep Timer Picture & Sound Special Features Product Specifications MODEL Width (inches / mm) Height (inches / mm) Depth (inches / mm) Weight (pounds / kg) Power requirement Resolution Colors L30W36 29.9 / 759 21.5 / 546 7.1 / 179.5 40.6 / 18.4 AC 100-240~ 60Hz 1280 x 768(Dot) 16,770,000 (256 steps of each R, G, and B) • The specifications shown above may be changed without prior notice for quality improvement.
Misc. 55 Safety Instructions Monitor Overview Connections Basic Operation Sleep Timer Picture & Sound Special Features Product Specifications MODEL Width (inches / mm) Height (inches / mm) Depth (inches / mm) Weight (pounds / kg) Power requirement Resolution Colors L30W36 29.9 / 759 21.5 / 546 7.1 / 179.5 40.6 / 18.4 AC 100-240~ 60Hz 1280 x 768(Dot) 16,770,000 (256 steps of each R, G, and B) • The specifications shown above may be changed without prior notice for quality improvement.