
Operating Guide
Page 1
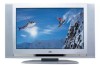
Operating Guide | Warranty Model Number | L27W46 | LCD TV © Copyright 2004, LG Electronics USA, Inc.
Operating Guide | Warranty Model Number | L27W46 | LCD TV © Copyright 2004, LG Electronics USA, Inc.
Operating Guide
Page 2
... of important operating and maintenance (servicing) instructions in a particular installation. Reorient or relocate the receiving antenna. - These limits are designed to the presence of the cable entry as practical. NOTE TO CABLE/TV INSTALLER: This reminder is intended to alert the user to provide reasonable protection against harmful interference in the United States by the party responsible for help. Connect the equipment...
... of important operating and maintenance (servicing) instructions in a particular installation. Reorient or relocate the receiving antenna. - These limits are designed to the presence of the cable entry as practical. NOTE TO CABLE/TV INSTALLER: This reminder is intended to alert the user to provide reasonable protection against harmful interference in the United States by the party responsible for help. Connect the equipment...

Operating Guide
Page 3
CAUTION : These servicing instructions are qualified to rain or moisture. Read these instructions. 3. Follow all warnings. 4. Install in the operating instructions unless you are for use by the manufacturer. 3 Do not install near water. 6. To reduce the risk of electric shock, do so. Clean only with liquids, such as radiators, heat registers, stoves, or other . IMPORTANT SAFETY INSTRUCTIONS 1. A grounding type plug has...
CAUTION : These servicing instructions are qualified to rain or moisture. Read these instructions. 3. Follow all warnings. 4. Install in the operating instructions unless you are for use by the manufacturer. 3 Do not install near water. 6. To reduce the risk of electric shock, do so. Clean only with liquids, such as radiators, heat registers, stoves, or other . IMPORTANT SAFETY INSTRUCTIONS 1. A grounding type plug has...
Operating Guide
Page 5
...Manual Program . . .16 Favorite Channels Setup 17 Picture Menu Options EZ Video 18 Manual Picture Control (User option 18 Cinema Mode Setup 18 Picture Format (ARC 18 Sound Menu Options EZ Audio 19 Equalizer Adjustments 19 AVL (Auto Volume Leveler 19 Sound Balance 20 Stereo/SAP Broadcasts Setup 20 Time Menu Options Auto Clock Setup 21 Manual Clock Setup 21 On/Off Timer Setup 22 Sleep Timer Setup 22 Auto Off 22 Special Menu Options Closed Captions 23 Caption/Text 24 Captions 24 Key Lock 24 Lock Menu Options Lock Menu Setup 26 PC Menu Options 27 External Control Device Setup...
...Manual Program . . .16 Favorite Channels Setup 17 Picture Menu Options EZ Video 18 Manual Picture Control (User option 18 Cinema Mode Setup 18 Picture Format (ARC 18 Sound Menu Options EZ Audio 19 Equalizer Adjustments 19 AVL (Auto Volume Leveler 19 Sound Balance 20 Stereo/SAP Broadcasts Setup 20 Time Menu Options Auto Clock Setup 21 Manual Clock Setup 21 On/Off Timer Setup 22 Sleep Timer Setup 22 Auto Off 22 Special Menu Options Closed Captions 23 Caption/Text 24 Captions 24 Key Lock 24 Lock Menu Options Lock Menu Setup 26 PC Menu Options 27 External Control Device Setup...
Operating Guide
Page 8
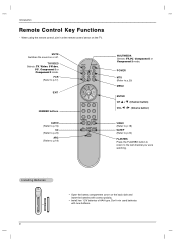
... D / E (Channel button) VOL F / G (Volume button) VIDEO (Refer to p.18) SLEEP (Refer to p.22) FLASHBK Press the FLASHBK button to return to p.18) MULTIMEDIA Selects: TV, PC, Component 1 or Component 2 mode. MUTE Switches the sound on the TV. When using the remote control, aim it at the remote control sensor on or off. Don't mix used batteries with correct polarity. • Install two 1.5V batteries of AAA type. TV/VIDEO Selects: TV, Video, S-Video, PC , Component...
... D / E (Channel button) VOL F / G (Volume button) VIDEO (Refer to p.18) SLEEP (Refer to p.22) FLASHBK Press the FLASHBK button to return to p.18) MULTIMEDIA Selects: TV, PC, Component 1 or Component 2 mode. MUTE Switches the sound on the TV. When using the remote control, aim it at the remote control sensor on or off. Don't mix used batteries with correct polarity. • Install two 1.5V batteries of AAA type. TV/VIDEO Selects: TV, Video, S-Video, PC , Component...

Operating Guide
Page 10
Installation Installation Instruction Rear A/V Cover * The connection panel is hidden behind the A/V cover. a. Thread, then pull the wires through the hole on the rear A/V cover as necessary. Wire Holders - Install wires as shown. Align the holes on the TV back panel with the two tabs on the TV stand. 10 b. c. d. Remove the cover. Reinstall the cover. Close cover.
Installation Installation Instruction Rear A/V Cover * The connection panel is hidden behind the A/V cover. a. Thread, then pull the wires through the hole on the rear A/V cover as necessary. Wire Holders - Install wires as shown. Align the holes on the TV back panel with the two tabs on the TV stand. 10 b. c. d. Remove the cover. Reinstall the cover. Close cover.
Operating Guide
Page 11
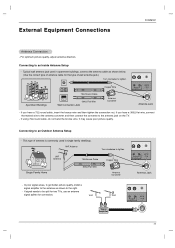
... Cable 300Ω Flat Wire Wall Connection Jack Antenna Converter Antenna Jack - VHF Antenna Turn clockwise to an Outdoor Antenna Setup - VHF UHF Antenna Jack Signal Amplifier 11 In poor signal areas, to get better picture quality, install a signal amplifier to the antenna as shown below. (Use the correct type of antenna cable for connection. If signal needs to the right. - It may cause poor picture quality. External Equipment Connections Installation Antenna Connection - Typical wall antenna jack used in apartment buildings, connect the antenna cable as...
... Cable 300Ω Flat Wire Wall Connection Jack Antenna Converter Antenna Jack - VHF Antenna Turn clockwise to an Outdoor Antenna Setup - VHF UHF Antenna Jack Signal Amplifier 11 In poor signal areas, to get better picture quality, install a signal amplifier to the antenna as shown below. (Use the correct type of antenna cable for connection. If signal needs to the right. - It may cause poor picture quality. External Equipment Connections Installation Antenna Connection - Typical wall antenna jack used in apartment buildings, connect the antenna cable as...
Operating Guide
Page 12
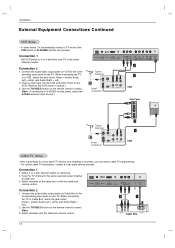
... 2 1. Tune the TV channel to the VCR owner's manual.) 3. Insert a video tape into the VCR and press PLAY on the remote control to a local cable TV service and installing a converter, you can watch cable TV programming. - Select channels at the cable box or with the cable box remote control. 2 1 (R) AUDIO (L) VIDEO TV VCR RF Cable Cable Box 12 In Video mode, TV automatically reverts to the same channel number. Select channels with the cable box remote control. Installation External Equipment Connections Continued VCR Setup - Connection 2 1. Connection 1 Set VCR switch to 3 or...
... 2 1. Tune the TV channel to the VCR owner's manual.) 3. Insert a video tape into the VCR and press PLAY on the remote control to a local cable TV service and installing a converter, you can watch cable TV programming. - Select channels at the cable box or with the cable box remote control. 2 1 (R) AUDIO (L) VIDEO TV VCR RF Cable Cable Box 12 In Video mode, TV automatically reverts to the same channel number. Select channels with the cable box remote control. Installation External Equipment Connections Continued VCR Setup - Connection 2 1. Connection 1 Set VCR switch to 3 or...
Operating Guide
Page 13
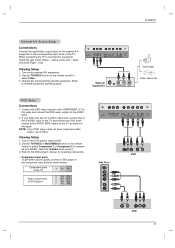
... Video Game set DVD Setup Connections 1. If your DVD player does not have component video output, use S-Video. Use the TV/VIDEO or MULTIMEDIA button on the TV, as shown below. Component ports of the TV Y PB PR Video output ports of DVD player Y Pb Pr Y B-Y R-Y Y Cb Cr Y PB PR Side Panel 2 1 Y PB PR (R) AUDIO (L) DVD (R) AUDIO (L) Y PB PR DVD 13 Viewing Setup 1. Refer to the DVD player's manual for operating instructions. • Component Input ports To get better picture quality, connect a DVD player to the component input ports as shown in the figure. Installation...
... Video Game set DVD Setup Connections 1. If your DVD player does not have component video output, use S-Video. Use the TV/VIDEO or MULTIMEDIA button on the TV, as shown below. Component ports of the TV Y PB PR Video output ports of DVD player Y Pb Pr Y B-Y R-Y Y Cb Cr Y PB PR Side Panel 2 1 Y PB PR (R) AUDIO (L) DVD (R) AUDIO (L) Y PB PR DVD 13 Viewing Setup 1. Refer to the DVD player's manual for operating instructions. • Component Input ports To get better picture quality, connect a DVD player to the component input ports as shown in the figure. Installation...
Operating Guide
Page 14
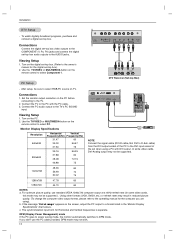
... Setup Y PB PR (R) AUDIO (L) DTV Receiver (Set-top Box) - If you are using a PC with the PC cable. 3. If the message "Out of the set -top box. (Refer to select PC. Connections 1. Viewing Setup 1. Use the TV/VIDEO or MULTIMEDIA button on the digital set when using ). Turn on the remote control to the owner's manual for the digital set -top box audio outputs to the operating manual for Horizontal and Vertical frequencies is separate. Connect the PC audio output to DPM mode. b. Monitor Display Specifications Resolution 640x480...
... Setup Y PB PR (R) AUDIO (L) DTV Receiver (Set-top Box) - If you are using a PC with the PC cable. 3. If the message "Out of the set -top box. (Refer to select PC. Connections 1. Viewing Setup 1. Use the TV/VIDEO or MULTIMEDIA button on the digital set when using ). Turn on the remote control to the owner's manual for the digital set -top box audio outputs to the operating manual for Horizontal and Vertical frequencies is separate. Connect the PC audio output to DPM mode. b. Monitor Display Specifications Resolution 640x480...
Operating Guide
Page 15
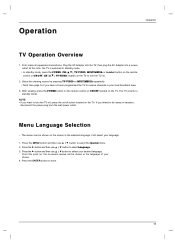
... remote control or ON/OFF located on . 2. Press the MENU button and then use D / E button to receive channels in your desired language. Press the ENTER button to be away on the TV to select Language. 3. If you want to turn the TV on the TV. From this time, the TV is switched to standby mode. • In standby mode, press the POWER, CH (D,E), TV/VIDEO, MULTIMEDIA or number button on the remote control...
... remote control or ON/OFF located on . 2. Press the MENU button and then use D / E button to receive channels in your desired language. Press the ENTER button to be away on the TV to select Language. 3. If you want to turn the TV on the TV. From this time, the TV is switched to standby mode. • In standby mode, press the POWER, CH (D,E), TV/VIDEO, MULTIMEDIA or number button on the remote control...
Operating Guide
Page 16
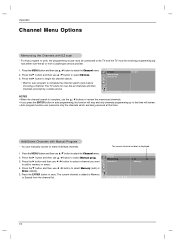
... then use D / E button to Memory or Erased from a cable-type service provider. 1. The current channel number is complete, use D / E button to select Memory (add) or Erase (delete). 5. Press the G button and then use F / G button to select the Channel menu. 2. Favorite ch. The TV scans for auto program to that time. Channel EZ Scan Manual prog. D E FG OK MENU NOTES • When the channel search is displayed. Press the MENU button and then use the D / E buttons to review the memorized channels...
... then use D / E button to Memory or Erased from a cable-type service provider. 1. The current channel number is complete, use D / E button to select Memory (add) or Erase (delete). 5. Press the G button and then use F / G button to select the Channel menu. 2. Favorite ch. The TV scans for auto program to that time. Channel EZ Scan Manual prog. D E FG OK MENU NOTES • When the channel search is displayed. Press the MENU button and then use the D / E buttons to review the memorized channels...

Operating Guide
Page 22
... ENTER button to set . - AM TV 2 Volume 30 Run Sleep Timer Setup - To cancel the Sleep Timer, press the SLEEP button repeatedly until Sleep --- Timer Clock 2. Press the G button and then use D / E button to Standby mode automatically after turning on the screen, press the ENTER button. Off-Timer function overrides On-Timer function if they are active. 7. If you want is no input signal, the TV switches to select Off timer or On timer. 3. When the number of...
... ENTER button to set . - AM TV 2 Volume 30 Run Sleep Timer Setup - To cancel the Sleep Timer, press the SLEEP button repeatedly until Sleep --- Timer Clock 2. Press the G button and then use D / E button to Standby mode automatically after turning on the screen, press the ENTER button. Off-Timer function overrides On-Timer function if they are active. 7. If you want is no input signal, the TV switches to select Off timer or On timer. 3. When the number of...
Operating Guide
Page 25
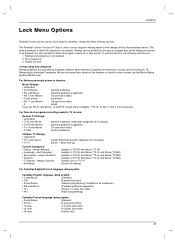
... direct-to-video movies use this function, the following must be set PG-13 and Above : G and PG movies will be available , PG-13, R, NC-17 and X will be blocked. Suitable for all program viewing for -TV... - Lock Menu Options Operation Parental Control can be used to block program viewing based on the ratings sent by the broadcast station. The Parental Control Function (V-Chip) is to be blocked. 2. Set a password 3. For Television programs including made-for a time period. The default setting is used to block specific channels, ratings and other viewing sources. To use the ...
... direct-to-video movies use this function, the following must be set PG-13 and Above : G and PG movies will be available , PG-13, R, NC-17 and X will be blocked. Suitable for all program viewing for -TV... - Lock Menu Options Operation Parental Control can be used to block program viewing based on the ratings sent by the broadcast station. The Parental Control Function (V-Chip) is to be blocked. 2. Set a password 3. For Television programs including made-for a time period. The default setting is used to block specific channels, ratings and other viewing sources. To use the ...
Operating Guide
Page 27
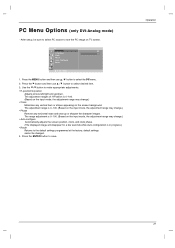
... may change .) • Auto-configure Automatically adjusts the screen position, clock, and clock phase. (The displayed image will disappear for a few seconds while Auto-configuration is 0~100. (Based on TV screen. Press the MENU button and then use D / E button to save. After setup, be changed. 4. The range adjustment is in progress.) • Reset Returns to see the PC image on the input mode, the adjustment range may change.) • Phase Remove...
... may change .) • Auto-configure Automatically adjusts the screen position, clock, and clock phase. (The displayed image will disappear for a few seconds while Auto-configuration is 0~100. (Based on TV screen. Press the MENU button and then use D / E button to save. After setup, be changed. 4. The range adjustment is in progress.) • Reset Returns to see the PC image on the input mode, the adjustment range may change.) • Phase Remove...
Operating Guide
Page 28
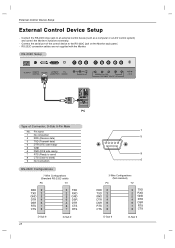
... RS-232C jack on the Monitor back panel. - D-Sub 9-Pin Male No. Pin name 1 No connection 2 RXD (Receive data) 3 TXD (Transmit data) 4 DTR (DTE side ready) 5 GND 6 DSR (DCE side ready) 7 RTS (Ready to send) 8 CTS (Clear to an external control device (such as a computer or an A/V control system) and control the Monitor's functions externally. - External Control Device Setup External Control Device Setup - Connect the serial port of Connector;
... RS-232C jack on the Monitor back panel. - D-Sub 9-Pin Male No. Pin name 1 No connection 2 RXD (Receive data) 3 TXD (Transmit data) 4 DTR (DTE side ready) 5 GND 6 DSR (DCE side ready) 7 RTS (Ready to send) 8 CTS (Clear to an external control device (such as a computer or an A/V control system) and control the Monitor's functions externally. - External Control Device Setup External Control Device Setup - Connect the serial port of Connector;
Operating Guide
Page 29
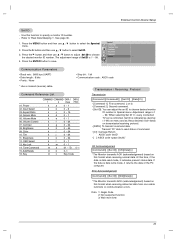
...][ ][Set ID][ ][OK][Data][x] * The Monitor transmits ACK (acknowledgement) based on this format when receiving abnormal data from non-viable functions or communication errors. Special Language Caption/Text 2. Aspect Ratio 04. When selecting Set ID '0', every connected TV set ID to save. If the data is controlled. See page 30. 1. Captions Key lock 3. Press the ENTER button to choose desired monitor ID number in Special menu. Screen Mute...
...][ ][Set ID][ ][OK][Data][x] * The Monitor transmits ACK (acknowledgement) based on this format when receiving abnormal data from non-viable functions or communication errors. Special Language Caption/Text 2. Aspect Ratio 04. When selecting Set ID '0', every connected TV set ID to save. If the data is controlled. See page 30. 1. Captions Key lock 3. Press the ENTER button to choose desired monitor ID number in Special menu. Screen Mute...
Operating Guide
Page 30
... 0 : Volume mute on remote control. You can also adjust mute using the TV/VIDEO button on remote control or in the Picture menu. You can also adjust brightness in the Screen menu. You can also adjust the screen format using the ARC (Aspect Ratio Control) button on the TV's remote control. Input Select (Command:b) (Main Picture Input) G To select input source for the TV. Volume Mute (Command:e) G To control volume mute on/off (Volume on remote control. You can also adjust volume with the volume buttons on ) Acknowledgement [e][ ][Set...
... 0 : Volume mute on remote control. You can also adjust mute using the TV/VIDEO button on remote control or in the Picture menu. You can also adjust brightness in the Screen menu. You can also adjust the screen format using the ARC (Aspect Ratio Control) button on the TV's remote control. Input Select (Command:b) (Main Picture Input) G To select input source for the TV. Volume Mute (Command:e) G To control volume mute on/off (Volume on remote control. You can also adjust volume with the volume buttons on ) Acknowledgement [e][ ][Set...
Operating Guide
Page 31
... channels. Refer User's Manual Acknowledgement [c][ ][Set ID][ ][OK][Data][x] 13. Key Lock (Command:m) G To lock the remote control and the front panel controls on /off . You can also adjust sharpness in the Picture menu. Sharpness (Command:k) G To adjust the screen sharpness. Acknowledgement [k][ ][Set ID][ ][OK][Data][x] 12. OSD Select (Command:l) G To select OSD (On Screen Display) on/off , remote control lock is on the TV. Key (Command:m c) G To send IR remote key code...
... channels. Refer User's Manual Acknowledgement [c][ ][Set ID][ ][OK][Data][x] 13. Key Lock (Command:m) G To lock the remote control and the front panel controls on /off . You can also adjust sharpness in the Picture menu. Sharpness (Command:k) G To adjust the screen sharpness. Acknowledgement [k][ ][Set ID][ ][OK][Data][x] 12. OSD Select (Command:l) G To select OSD (On Screen Display) on/off , remote control lock is on the TV. Key (Command:m c) G To send IR remote key code...
Operating Guide
Page 36
... for replacement. unit to maintain, or separate system components; USA Zenith will be borne by Zenith during the warranty period ("Warranty Period") listed below, effective from the date ("Date of Purchase") of original purchase of defect in the Operating Guide, accident, lightning strikes or other natural causes, unauthorized modification or alteration, incorrect electrical current or voltage, signal reception or input, operating and software...
... for replacement. unit to maintain, or separate system components; USA Zenith will be borne by Zenith during the warranty period ("Warranty Period") listed below, effective from the date ("Date of Purchase") of original purchase of defect in the Operating Guide, accident, lightning strikes or other natural causes, unauthorized modification or alteration, incorrect electrical current or voltage, signal reception or input, operating and software...

