
Specification Sheet
Page 1
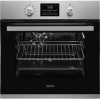
... • Top heat • Bottom heat • Fan controlled defrosting • Oven features: • Auto safety switch off unsightly smudges, maintaining your kitchen's pristine look without the tiresome clean-up to 500°C, burning dirt and grease to wipe grease and grime away. Keep your oven smudge and fingerprint free The anti-fingerprint coating on the menu. N/A Built-in Oven ZZP35901XK Exercise all your...
... • Top heat • Bottom heat • Fan controlled defrosting • Oven features: • Auto safety switch off unsightly smudges, maintaining your kitchen's pristine look without the tiresome clean-up to 500°C, burning dirt and grease to wipe grease and grime away. Keep your oven smudge and fingerprint free The anti-fingerprint coating on the menu. N/A Built-in Oven ZZP35901XK Exercise all your...

User Manual
Page 2
... if they have been given supervision or instruction concerning the use oven gloves to avoid touching heating elements. • Always use of the appliance without supervision. SAFETY INFORMATION Before the installation and use . Accessible parts are the result of the appliance, carefully read the supplied instructions. GENERAL SAFETY • Only a qualified person must install this appliance and replace the cable. • WARNING: The appliance...
... if they have been given supervision or instruction concerning the use oven gloves to avoid touching heating elements. • Always use of the appliance without supervision. SAFETY INFORMATION Before the installation and use . Accessible parts are the result of the appliance, carefully read the supplied instructions. GENERAL SAFETY • Only a qualified person must install this appliance and replace the cable. • WARNING: The appliance...
User Manual
Page 3
.... ELECTRICAL CONNECTION WARNING! It must be removed without tools. • Connect the mains plug to the mains cable. Remove all the packaging. • Do not install or use a damaged appliance. • Follow the installation instructions supplied with the electrical ratings of the mains power supply. • Always use a correctly installed shockproof socket. • Do not use harsh abrasive cleaners or sharp metal scrapers to clean the glass door since...
.... ELECTRICAL CONNECTION WARNING! It must be removed without tools. • Connect the mains plug to the mains cable. Remove all the packaging. • Do not install or use a damaged appliance. • Follow the installation instructions supplied with the electrical ratings of the mains power supply. • Always use a correctly installed shockproof socket. • Do not use harsh abrasive cleaners or sharp metal scrapers to clean the glass door since...

User Manual
Page 4
...; Open the appliance door carefully. Contact the Authorised Service Centre. • Be careful when you remove or install the accessories. • Discoloration of the enamel or stainless steel has no effect on the bottom of cavity of detergent. The door is in Pyrolytic Mode. • Before carrying out a Pyrolitic self-cleaning function or the First Use please remove from the oven cavity: - Only use an oven...
...; Open the appliance door carefully. Contact the Authorised Service Centre. • Be careful when you remove or install the accessories. • Discoloration of the enamel or stainless steel has no effect on the bottom of cavity of detergent. The door is in Pyrolytic Mode. • Before carrying out a Pyrolitic self-cleaning function or the First Use please remove from the oven cavity: - Only use an oven...

User Manual
Page 5
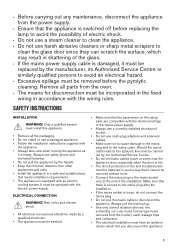
... after each Pyrolytic cleaning. - Remove any pets (especially birds) from the vicinity of all Pyrolytic Ovens / Cooking Residues as such consumers are not harmful PRODUCT DESCRIPTION to : - GENERAL OVERVIEW 234 1 4 9 3 2 1 1 Control panel 2 Knob for the heating functions 3 Display 4 Control knob (for the temperature) 5 5 Air vents for the cooling fan 6 6 Heating element 7 7 Lamp 8 Fan 8 9 Shelf positions ACCESSORIES • Wire shelf For cookware, cake tins, roasts. • Grill- / Roasting pan 5 INTERNAL LIGHTING WARNING! Risk of...
... after each Pyrolytic cleaning. - Remove any pets (especially birds) from the vicinity of all Pyrolytic Ovens / Cooking Residues as such consumers are not harmful PRODUCT DESCRIPTION to : - GENERAL OVERVIEW 234 1 4 9 3 2 1 1 Control panel 2 Knob for the heating functions 3 Display 4 Control knob (for the temperature) 5 5 Air vents for the cooling fan 6 6 Heating element 7 7 Lamp 8 Fan 8 9 Shelf positions ACCESSORIES • Wire shelf For cookware, cake tins, roasts. • Grill- / Roasting pan 5 INTERNAL LIGHTING WARNING! Risk of...
User Manual
Page 6
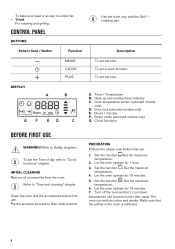
CONTROL PANEL BUTTONS Use the trivet only with the Grill- / roasting pan. To set the time. Timer / Temperature B. Refer to their initial position. Set the function . DISPLAY A B G F ED C A. Clean the oven and the accessories before first use . Set the function . Accessories can emit an odour and smoke. Hours / minutes F. Clock functions BEFORE FIRST USE WARNING! INITIAL CLEANING Remove all accessories from the oven. Put the accessories back to "Care and cleaning" chapter. Set the function...
CONTROL PANEL BUTTONS Use the trivet only with the Grill- / roasting pan. To set the time. Timer / Temperature B. Refer to their initial position. Set the function . DISPLAY A B G F ED C A. Clean the oven and the accessories before first use . Set the function . Accessories can emit an odour and smoke. Hours / minutes F. Clock functions BEFORE FIRST USE WARNING! INITIAL CLEANING Remove all accessories from the oven. Put the accessories back to "Care and cleaning" chapter. Set the function...

User Manual
Page 7
... position True Fan Cooking Conventional Cooking (Top / Bottom Heat) Grilling Fast Grilling Turbo Grilling Bottom Heat Pizza Setting To bake on the amount and size of the oven. The residual heat is off the oven, turn on when the oven operates. 3. For general energy saving recommendations refer to "Energy Efficiency" chapter, Energy Saving.This function was used .The heating power may differ from the set temperature. The defrosting time depends on...
... position True Fan Cooking Conventional Cooking (Top / Bottom Heat) Grilling Fast Grilling Turbo Grilling Bottom Heat Pizza Setting To bake on the amount and size of the oven. The residual heat is off the oven, turn on when the oven operates. 3. For general energy saving recommendations refer to "Energy Efficiency" chapter, Energy Saving.This function was used .The heating power may differ from the set temperature. The defrosting time depends on...
User Manual
Page 8
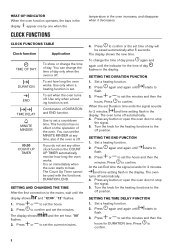
... set hour. and the set any button or open the oven door to heat. Press to confirm. Press to confirm or the set a countdown time. The oven turns off . Press any other clock function the COUNT UP TIMER automatically monitor how long the oven works. You can set the hours and then the minutes. Use only when a heating function is set . and time setting flash in the display. and time setting flash in the oven...
... set hour. and the set any button or open the oven door to heat. Press to confirm. Press to confirm or the set a countdown time. The oven turns off . Press any other clock function the COUNT UP TIMER automatically monitor how long the oven works. You can set the hours and then the minutes. Use only when a heating function is set . and time setting flash in the display. and time setting flash in the oven...
User Manual
Page 9
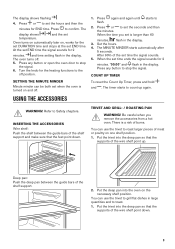
... deep pan so that the supports of the shelf support. 2. The display shows temperature. Press any button to set the hours and then the minutes for 2 minutes. Press again and again until starts to confirm. Press or to stop the signal. 6. The MINUTE MINDER starts automatically after 5 seconds. When the set time ends the signal sounds for the set DURATION time and stops at the set Oven turns...
... deep pan so that the supports of the shelf support. 2. The display shows temperature. Press any button to set the hours and then the minutes for 2 minutes. Press again and again until starts to confirm. Press or to stop the signal. 6. The MINUTE MINDER starts automatically after 5 seconds. When the set time ends the signal sounds for the set DURATION time and stops at the set Oven turns...

User Manual
Page 10
... fan turns on accidentally. 1. SAFETY THERMOSTAT Incorrect operation of the ingredients used. 10 The temperature and baking times in the oven is locked. SAFE and appear on the necessary shelf position. RESIDUAL HEAT INDICATOR When you turn off automatically after some time if a heating function operates and you turn off the Child Lock, repeat step 2. If you do not change the oven temperature. Put the deep pan into the oven on the display...
... fan turns on accidentally. 1. SAFETY THERMOSTAT Incorrect operation of the ingredients used. 10 The temperature and baking times in the oven is locked. SAFE and appear on the necessary shelf position. RESIDUAL HEAT INDICATOR When you turn off automatically after some time if a heating function operates and you turn off the Child Lock, repeat step 2. If you do not change the oven temperature. Put the deep pan into the oven on the display...
User Manual
Page 11
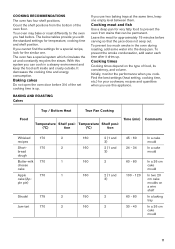
... one . Find the best settings (heat setting, cooking time, etc.) for your cookware, recipes and quantities when you had before. Food Top / Bottom Heat True Fan Cooking Temperature Shelf posi- With this appliance. Baking cakes Do not open the oven door before carving so that can cook in the oven during roasting, add some water into the deep pan. Cooking meat and fish Use a deep pan for temperature, cooking time and shelf position. ple...
... one . Find the best settings (heat setting, cooking time, etc.) for your cookware, recipes and quantities when you had before. Food Top / Bottom Heat True Fan Cooking Temperature Shelf posi- With this appliance. Baking cakes Do not open the oven door before carving so that can cook in the oven during roasting, add some water into the deep pan. Cooking meat and fish Use a deep pan for temperature, cooking time and shelf position. ple...
User Manual
Page 15
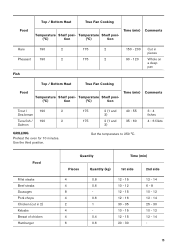
... / 190 2 Salmon GRILLING Preheat the oven for 10 minutes. Use the third position. 175 2 (1 and 40 - 55 3) 175 2 (1 and 35 - 60 3) Set the temperature to 250 °C. 3 - 4 fishes 4 - 6 fillets Food Fillet steaks Beef steaks Sausages Pork chops Chicken (cut in pieces Whole on a deep pan Food Top / Bottom Heat True Fan Cooking Temperature Shelf posi- Food Top / Bottom Heat True Fan Cooking Temperature Shelf posi-
... / 190 2 Salmon GRILLING Preheat the oven for 10 minutes. Use the third position. 175 2 (1 and 40 - 55 3) 175 2 (1 and 35 - 60 3) Set the temperature to 250 °C. 3 - 4 fishes 4 - 6 fillets Food Fillet steaks Beef steaks Sausages Pork chops Chicken (cut in pieces Whole on a deep pan Food Top / Bottom Heat True Fan Cooking Temperature Shelf posi- Food Top / Bottom Heat True Fan Cooking Temperature Shelf posi-
User Manual
Page 16
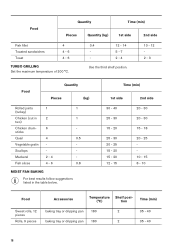
... baking tray or dripping pan 180 2 35 - 40 16 Mackerel 2 - 4 - sticks Quail 4 0.5 Vegetable gratin - - Scallops - - Food Quantity Time (min) Pieces Quantity (kg) 1st side 2nd side Fish fillet Toasted sandwiches Toast 4 4 - 6 4 - 6 TURBO GRILLING Set the maximum temperature of 200 °C. 0.4 12 - 14 - 5 - 7 - 2 - 4 Use the third shelf position. 10 - 12 2 - 3 Food Quantity Pieces (kg) Rolled joints 1 1 (turkey) Chicken (cut...
... baking tray or dripping pan 180 2 35 - 40 16 Mackerel 2 - 4 - sticks Quail 4 0.5 Vegetable gratin - - Scallops - - Food Quantity Time (min) Pieces Quantity (kg) 1st side 2nd side Fish fillet Toasted sandwiches Toast 4 4 - 6 4 - 6 TURBO GRILLING Set the maximum temperature of 200 °C. 0.4 12 - 14 - 5 - 7 - 2 - 4 Use the third shelf position. 10 - 12 2 - 3 Food Quantity Pieces (kg) Rolled joints 1 1 (turkey) Chicken (cut...
User Manual
Page 18
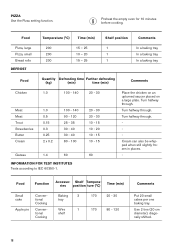
... Accesso- Turn halfway through . Use 2 tins (20 cm diameter), diagonally shifted. 18 Preheat the empty oven for 10 minutes before cooking. PIZZA Use the Pizza setting function. Food Temperature (°C) Time (min) Shelf position Comments Pizza, large 200 Pizza, small 200 Bread rolls 200 DEFROST 15 - 25 1 10 - 20 1 15 - 25 1 In a baking tray In a baking tray In a baking tray Food Quantity Defrosting time Further defrosting...
... Accesso- Turn halfway through . Use 2 tins (20 cm diameter), diagonally shifted. 18 Preheat the empty oven for 10 minutes before cooking. PIZZA Use the Pizza setting function. Food Temperature (°C) Time (min) Shelf position Comments Pizza, large 200 Pizza, small 200 Bread rolls 200 DEFROST 15 - 25 1 10 - 20 1 15 - 25 1 In a baking tray In a baking tray In a baking tray Food Quantity Defrosting time Further defrosting...
User Manual
Page 19
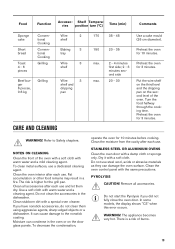
... STEEL OR ALUMINIUM OVENS Clean the oven door with warm water and a mild cleaning agent. Shelf Temperaries position ture (°C) Time (min) Comments Sponge cake Short bread Toast 4 - 6 pieces Conventional Cooking Conventional Cooking Grilling Beef burger 6 pieces, 0.6 kg Grilling Wire 2 shelf Baking 3 tray Wire 3 shelf Wire 3 shelf and dripping pan CARE AND CLEANING 170 35 - 45 Use a cake mould (26 cm diameter). 150 20 - 35 Preheat the oven for 10...
... STEEL OR ALUMINIUM OVENS Clean the oven door with warm water and a mild cleaning agent. Shelf Temperaries position ture (°C) Time (min) Comments Sponge cake Short bread Toast 4 - 6 pieces Conventional Cooking Conventional Cooking Grilling Beef burger 6 pieces, 0.6 kg Grilling Wire 2 shelf Baking 3 tray Wire 3 shelf Wire 3 shelf and dripping pan CARE AND CLEANING 170 35 - 45 Use a cake mould (26 cm diameter). 150 20 - 35 Preheat the oven for 10...
User Manual
Page 20
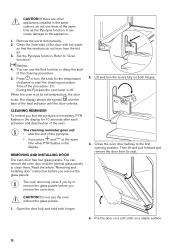
... time while PYR flashes in the display. You can cause damage to remove the glass panels before you remove the oven door. Read the whole "Removing and installing door" instruction before you remove the glass panels. CAUTION! Then lift and pull forward and remove the door from the hot air. 3. Put the door on a soft cloth on both hinges. 2. CAUTION! You can use the oven without the glass panels. 1. REMOVING AND INSTALLING DOOR The oven door has four glass panels. The oven door...
... time while PYR flashes in the display. You can cause damage to remove the glass panels before you remove the oven door. Read the whole "Removing and installing door" instruction before you remove the glass panels. CAUTION! Then lift and pull forward and remove the door from the hot air. 3. Put the door on a soft cloth on both hinges. 2. CAUTION! You can use the oven without the glass panels. 1. REMOVING AND INSTALLING DOOR The oven door has four glass panels. The oven door...

User Manual
Page 21
... by one. First lift carefully and then remove the glass panels one by 90° and remove them from the mains. 3. Turn off the oven. Wait until the oven is completed, install the glass panels and the oven door. Disconnect the oven from their seats. Clean the glass cover. 3. When installed correctly the door trim clicks. Start from the top panel. 1 2 REPLACING THE LAMP WARNING! Dry the glass panels carefully. When the cleaning is cooled down. 2. A 90...
... by one. First lift carefully and then remove the glass panels one by 90° and remove them from the mains. 3. Turn off the oven. Wait until the oven is completed, install the glass panels and the oven door. Disconnect the oven from their seats. Clean the glass cover. 3. When installed correctly the door trim clicks. Start from the top panel. 1 2 REPLACING THE LAMP WARNING! Dry the glass panels carefully. When the cleaning is cooled down. 2. A 90...

User Manual
Page 22
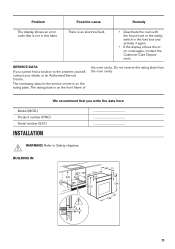
... not operate. Replace the lamp. Fully close the door. • Fully close the door. • The door lock is too low or too high. Refer to "Using the Child Lock". The oven does not heat up . The lamp is deactivated. Set the clock. Refer to Safety chapters. Adjust the temperature if necessary. The oven does not heat up . The oven is defective. Follow the advice in the user manual...
... not operate. Replace the lamp. Fully close the door. • Fully close the door. • The door lock is too low or too high. Refer to "Using the Child Lock". The oven does not heat up . The lamp is deactivated. Set the clock. Refer to Safety chapters. Adjust the temperature if necessary. The oven does not heat up . The oven is defective. Follow the advice in the user manual...
User Manual
Page 23
... min. 550 558 600 20 19 6 min. 560 570 540 21 114 589 594 6 3 23 The necessary data for the service centre is an electrical fault. • Deactivate the oven with the house fuse or the safety switch in this table. Do not remove the rating plate from the oven cavity. SERVICE DATA If you write the data here: Model (MOD.) Product number (PNC) Serial number (S.N.) INSTALLATION ...
... min. 550 558 600 20 19 6 min. 560 570 540 21 114 589 594 6 3 23 The necessary data for the service centre is an electrical fault. • Deactivate the oven with the house fuse or the safety switch in this table. Do not remove the rating plate from the oven cavity. SERVICE DATA If you write the data here: Model (MOD.) Product number (PNC) Serial number (S.N.) INSTALLATION ...
User Manual
Page 25
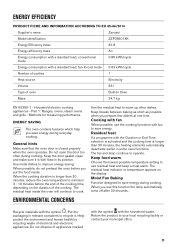
... a standard load, fan-forced mode 0.63 kWh/cycle Number of cavities 1 Heat source Electricity Volume 53 l Type of appliances marked with the symbol with the household waste. When possible, do not preheat the oven before the end of the cooking time, depending on the display. Keep food warm Choose the lowest possible temperature setting to cook. Return the product to operate. ENERGY SAVING The oven contains features...
... a standard load, fan-forced mode 0.63 kWh/cycle Number of cavities 1 Heat source Electricity Volume 53 l Type of appliances marked with the symbol with the household waste. When possible, do not preheat the oven before the end of the cooking time, depending on the display. Keep food warm Choose the lowest possible temperature setting to cook. Return the product to operate. ENERGY SAVING The oven contains features...


