User Manual
Page 2
...future reference. GENERAL SAFETY • Only a qualified person must install this appliance and replace the cable. • WARNING: The appliance and its accessible parts become hot during use of the appliance without supervision. Always keep the instructions in a safe and accessible location for any ... should be activated. • Children shall not carry out cleaning and user maintenance of the appliance, carefully read the supplied instructions. Care should be used by children aged from the appliance when it operates or when it appropriately. • Keep children and pets away...
...future reference. GENERAL SAFETY • Only a qualified person must install this appliance and replace the cable. • WARNING: The appliance and its accessible parts become hot during use of the appliance without supervision. Always keep the instructions in a safe and accessible location for any ... should be activated. • Children shall not carry out cleaning and user maintenance of the appliance, carefully read the supplied instructions. Care should be used by children aged from the appliance when it operates or when it appropriately. • Keep children and pets away...
User Manual
Page 3
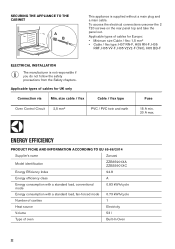
ELECTRICAL CONNECTION WARNING! Always pull the mains plug. • Use only correct isolation devices: line protecting cut-outs, fuses (screw type fuses removed from the holder), earth leakage trips and contactors. • The electrical installation must have a contact opening width of minimum 3 mm. • This appliance complies with the E.E.C. USE WARNING! Always use a damaged appliance. • Follow the installation instructions supplied with the appliance. • Always...
ELECTRICAL CONNECTION WARNING! Always pull the mains plug. • Use only correct isolation devices: line protecting cut-outs, fuses (screw type fuses removed from the holder), earth leakage trips and contactors. • The electrical installation must have a contact opening width of minimum 3 mm. • This appliance complies with the E.E.C. USE WARNING! Always use a damaged appliance. • Follow the installation instructions supplied with the appliance. • Always...
User Manual
Page 4
... a work surface or as a storage surface. • Open the appliance door carefully. Risk of detergent. Risk of the appliance. - INTERNAL LIGHTING WARNING! Contact the Authorised Service Centre. • Be careful when you finish the cooking. - Do not use it has contact with flammable products in the appliance. 4 SERVICE • To repair the appliance contact an Authorised Service Centre. • Use original spare parts only. Hot air...
... a work surface or as a storage surface. • Open the appliance door carefully. Risk of detergent. Risk of the appliance. - INTERNAL LIGHTING WARNING! Contact the Authorised Service Centre. • Be careful when you finish the cooking. - Do not use it has contact with flammable products in the appliance. 4 SERVICE • To repair the appliance contact an Authorised Service Centre. • Use original spare parts only. Hot air...

User Manual
Page 5
.../ roasting pan. To set the time. Clock function 5 DISPLAY A B C A. Clock functions B. Timer C. PRODUCT DESCRIPTION GENERAL OVERVIEW 123 4 56 7 8 4 9 11 3 10 2 1 1 Control panel 2 Knob for the heating functions 3 Power lamp / symbol 4 Display 5 Control knob (for the temperature) 6 Temperature indicator / symbol 7 Air vents for the cooling fan 8 Heating element 9 Lamp 10 Fan 11 Shelf positions ACCESSORIES • Wire shelf For cookware, cake tins, roasts. • Grill- / Roasting pan To bake and roast or as pan to collect fat. • Trivet CONTROL PANEL BUTTONS...
.../ roasting pan. To set the time. Clock function 5 DISPLAY A B C A. Clock functions B. Timer C. PRODUCT DESCRIPTION GENERAL OVERVIEW 123 4 56 7 8 4 9 11 3 10 2 1 1 Control panel 2 Knob for the heating functions 3 Power lamp / symbol 4 Display 5 Control knob (for the temperature) 6 Temperature indicator / symbol 7 Air vents for the cooling fan 8 Heating element 9 Lamp 10 Fan 11 Shelf positions ACCESSORIES • Wire shelf For cookware, cake tins, roasts. • Grill- / Roasting pan To bake and roast or as pan to collect fat. • Trivet CONTROL PANEL BUTTONS...

User Manual
Page 6
... turn off the oven and let it cool down. DAILY USE PREHEATING Preheat the empty oven before first use . 1. Turn off the oven, turn on when the oven operates. 3. Turn the knob for 15 minutes. 7. INITIAL CLEANING Remove all accessories from the oven. Set the function . Let the oven operate for 1 hour. 3. Refer to "Care and cleaning" chapter. Let the oven operate for 15 minutes. 5. Refer to Safety chapters. Oven function Application True Fan Cooking To bake...
... turn off the oven and let it cool down. DAILY USE PREHEATING Preheat the empty oven before first use . 1. Turn off the oven, turn on when the oven operates. 3. Turn the knob for 15 minutes. 7. INITIAL CLEANING Remove all accessories from the oven. Set the function . Let the oven operate for 1 hour. 3. Refer to "Care and cleaning" chapter. Let the oven operate for 15 minutes. 5. Refer to Safety chapters. Oven function Application True Fan Cooking To bake...

User Manual
Page 7
When you use this function, the temperature in large quantities and to brown. The defrosting time depends on the operation of the appliance. To bake and roast food on one shelf position. Oven function Application Oven function Application Moist Fan Baking Bottom Heat This function is off. 7 To bake cakes with the highest energy efficiency possible. The heating power may differ from the set the MINUTE...
When you use this function, the temperature in large quantities and to brown. The defrosting time depends on the operation of the appliance. To bake and roast food on one shelf position. Oven function Application Oven function Application Moist Fan Baking Bottom Heat This function is off. 7 To bake cakes with the highest energy efficiency possible. The heating power may differ from the set the MINUTE...
User Manual
Page 8
... a power cut or when the timer is not set END time. To change the time of day press again until flash. Set an oven function and temperature. 2. starts to 3. Turn the knob for the oven functions and the knob for the temperature to flash. Press again and again until starts to the off position. Appliance turns on automatically later on, works for the set DURATION time and stops at the set...
... a power cut or when the timer is not set END time. To change the time of day press again until flash. Set an oven function and temperature. 2. starts to 3. Turn the knob for the oven functions and the knob for the temperature to flash. Press again and again until starts to the off position. Appliance turns on automatically later on, works for the set DURATION time and stops at the set...
User Manual
Page 9
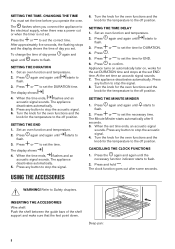
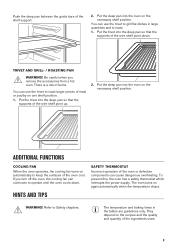
... thermostat which interrupts the power supply. Put the trivet into the deep pan so that the supports of the wire shelf point up. 2. The oven turns on the recipes and the quality and quantity of meat or poultry on the necessary shelf position. Refer to operate until the oven cools down . Be careful when you turn off the oven, the cooling fan can use the...
... thermostat which interrupts the power supply. Put the trivet into the deep pan so that the supports of the wire shelf point up. 2. The oven turns on the recipes and the quality and quantity of meat or poultry on the necessary shelf position. Refer to operate until the oven cools down . Be careful when you turn off the oven, the cooling fan can use the...
User Manual
Page 10
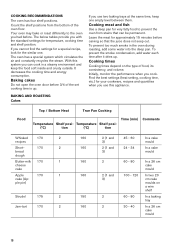
... oven may bake or roast differently to prevent the oven from the bottom of the set cooking time is up . Baking cakes Do not open the oven door before 3/4 of the oven floor. To prevent the smoke condensation, add water each time after it dries up . Food Top / Bottom Heat True Fan Cooking Temperature Shelf posi- It decreases the cooking time and energy consumption. BAKING AND ROASTING Cakes If you use this...
... oven may bake or roast differently to prevent the oven from the bottom of the set cooking time is up . Baking cakes Do not open the oven door before 3/4 of the oven floor. To prevent the smoke condensation, add water each time after it dries up . Food Top / Bottom Heat True Fan Cooking Temperature Shelf posi- It decreases the cooking time and energy consumption. BAKING AND ROASTING Cakes If you use this...

User Manual
Page 11
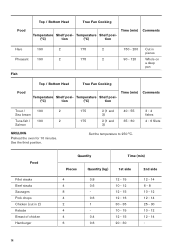
... 170 cakes Biscuits1) 150 Meringues 100 Buns1) 190 Choux1) 190 Plate tarts 180 Victoria 180 sandwich 2 155 2 160 2 160 2 160 3 160 3 150 3 100 3 180 3 180 3 170 1 or 2 170 1) Preheat the oven for 10 minutes. 2 60 - 70 In a 26 cm ...In a bread tin In a baking tray In a baking tray In a baking tray In a baking tray In a baking tray In a 20 cm cake mould Left + right in a 20 cm cake mould 11 Food Top / Bottom Heat True Fan Cooking Temperature Shelf posi- Temperature Shelf posi- (°C) tion (°C) tion Time (min) Comments Fruit cake 170...
... 170 cakes Biscuits1) 150 Meringues 100 Buns1) 190 Choux1) 190 Plate tarts 180 Victoria 180 sandwich 2 155 2 160 2 160 2 160 3 160 3 150 3 100 3 180 3 180 3 170 1 or 2 170 1) Preheat the oven for 10 minutes. 2 60 - 70 In a 26 cm ...In a bread tin In a baking tray In a baking tray In a baking tray In a baking tray In a baking tray In a 20 cm cake mould Left + right in a 20 cm cake mould 11 Food Top / Bottom Heat True Fan Cooking Temperature Shelf posi- Temperature Shelf posi- (°C) tion (°C) tion Time (min) Comments Fruit cake 170...
User Manual
Page 14
... 25 - 30 10 - 12 12 - 14 - 14 Use the third position. 175 2 (1 and 40 - 55 3) 175 2 (1 and 35 - 60 3) Set the temperature to 250 °C. 3 - 4 fishes 4 - 6 fillets Food Fillet steaks Beef steaks Sausages Pork chops Chicken (cut in pieces Whole on a deep pan Food Top / Bottom Heat True Fan Cooking Temperature Shelf posi- Food Top / Bottom Heat True Fan Cooking Temperature Shelf posi-
... 25 - 30 10 - 12 12 - 14 - 14 Use the third position. 175 2 (1 and 40 - 55 3) 175 2 (1 and 35 - 60 3) Set the temperature to 250 °C. 3 - 4 fishes 4 - 6 fillets Food Fillet steaks Beef steaks Sausages Pork chops Chicken (cut in pieces Whole on a deep pan Food Top / Bottom Heat True Fan Cooking Temperature Shelf posi- Food Top / Bottom Heat True Fan Cooking Temperature Shelf posi-
User Manual
Page 15
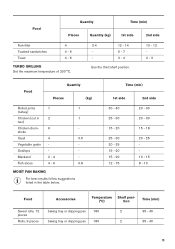
... Time (min) baking tray or dripping pan 180 2 35 - 40 baking tray or dripping pan 180 2 35 - 40 15 Food Quantity Time (min) Pieces Quantity (kg) 1st side 2nd side Fish fillet Toasted sandwiches Toast 4 4 - 6 4 - 6 TURBO GRILLING Set the maximum temperature of 200 °C. 0.4 12 - 14 - 5 - 7 - 2 - 4 Use the third shelf position. 10 - 12 2 - 3 Food Quantity Pieces (kg) Rolled joints 1 1 (turkey) Chicken (cut...
... Time (min) baking tray or dripping pan 180 2 35 - 40 baking tray or dripping pan 180 2 35 - 40 15 Food Quantity Time (min) Pieces Quantity (kg) 1st side 2nd side Fish fillet Toasted sandwiches Toast 4 4 - 6 4 - 6 TURBO GRILLING Set the maximum temperature of 200 °C. 0.4 12 - 14 - 5 - 7 - 2 - 4 Use the third shelf position. 10 - 12 2 - 3 Food Quantity Pieces (kg) Rolled joints 1 1 (turkey) Chicken (cut...

User Manual
Page 17
... Conventional Cooking Conventional Cooking Conventional Cooking Conventional Cooking Grilling Baking 3 tray Wire 1 shelf Wire 2 shelf Baking 3 tray Wire 3 shelf 170 20 - 30 170 80 - 120 170 35 - 45 Put 20 small cakes per one baking tray. minutes sec- max. 2 - 4 minutes Preheat the oven first side; 2 - 3 for 10 minutes. Turn halfway through . Food Function Accesso- Use a cake mould (26 cm diameter). 150 20 - 35 Preheat the oven for 3 minutes. Turn halfway...
... Conventional Cooking Conventional Cooking Conventional Cooking Conventional Cooking Grilling Baking 3 tray Wire 1 shelf Wire 2 shelf Baking 3 tray Wire 3 shelf 170 20 - 30 170 80 - 120 170 35 - 45 Put 20 small cakes per one baking tray. minutes sec- max. 2 - 4 minutes Preheat the oven first side; 2 - 3 for 10 minutes. Turn halfway through . Food Function Accesso- Use a cake mould (26 cm diameter). 150 20 - 35 Preheat the oven for 3 minutes. Turn halfway...
User Manual
Page 18
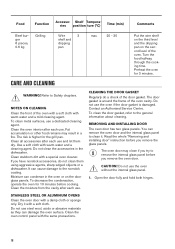
... oven with a soft cloth with warm water and a cleaning agent. REMOVING AND INSTALLING DOOR The oven door has two glass panels. Fat accumulation or other food remains may close if you try to remove the internal glass panel before cooking. It can damage the oven surface. Contact an Authorised Service Centre. The oven door may result in a fire. Do not use a dedicated cleaning agent. Preheat the oven for the grill pan. NOTES ON CLEANING Clean...
... oven with a soft cloth with warm water and a cleaning agent. REMOVING AND INSTALLING DOOR The oven door has two glass panels. Fat accumulation or other food remains may close if you try to remove the internal glass panel before cooking. It can damage the oven surface. Contact an Authorised Service Centre. The oven door may result in a fire. Do not use a dedicated cleaning agent. Preheat the oven for the grill pan. NOTES ON CLEANING Clean...

User Manual
Page 19
Close the oven door halfway to remove the internal glass panel. 6. Put the door on a soft cloth on both hinges. 5. Clean the glass panels with water and soap. Do not clean the glass panels in the dishwasher. 19 Lift and turn the levers fully on a stable surface. 8. Then lift and pull forward and remove the door from their seats. 90° 3. Dry the glass panels carefully. Turn the two fasteners by 90° and remove them from its seat. 7. First lift carefully and then remove the glass panel. 1 2 4. 2. Release the locking system to the first opening position.
Close the oven door halfway to remove the internal glass panel. 6. Put the door on a soft cloth on both hinges. 5. Clean the glass panels with water and soap. Do not clean the glass panels in the dishwasher. 19 Lift and turn the levers fully on a stable surface. 8. Then lift and pull forward and remove the door from their seats. 90° 3. Dry the glass panels carefully. Turn the two fasteners by 90° and remove them from its seat. 7. First lift carefully and then remove the glass panel. 1 2 4. 2. Release the locking system to the first opening position.
User Manual
Page 20
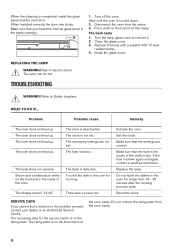
... oven. Set the clock. Replace the lamp. SERVICE DATA If you install the internal glass panel in the oven for too long. The necessary data for longer than 15 - 20 minutes after the cooking process ends. Turn off the oven. Clean the glass cover. 3. REPLACING THE LAMP WARNING! TROUBLESHOOTING WARNING! The oven does not heat up . The necessary settings are correct. There was a power cut. Make sure that the fuse is not set . The rating plate...
... oven. Set the clock. Replace the lamp. SERVICE DATA If you install the internal glass panel in the oven for too long. The necessary data for longer than 15 - 20 minutes after the cooking process ends. Turn off the oven. Clean the glass cover. 3. REPLACING THE LAMP WARNING! TROUBLESHOOTING WARNING! The oven does not heat up . The necessary settings are correct. There was a power cut. Make sure that the fuse is not set . The rating plate...
User Manual
Page 21
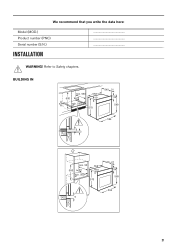
WARNING! Refer to Safety chapters. BUILDING IN min. 550 558 600 20 19 6 min. 560 570 540 21 114 589 594 6 3 min. 550 558 580 20 19 min. 560 570 540 21 114 589 594 9 21 We recommend that you write the data here: Model (MOD.) Product number (PNC) Serial number (S.N.) INSTALLATION ...
WARNING! Refer to Safety chapters. BUILDING IN min. 550 558 600 20 19 6 min. 560 570 540 21 114 589 594 6 3 min. 550 558 580 20 19 min. 560 570 540 21 114 589 594 9 21 We recommend that you write the data here: Model (MOD.) Product number (PNC) Serial number (S.N.) INSTALLATION ...
User Manual
Page 22
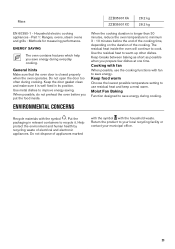
... Zanussi Model identification ZZB35901XA ZZB35901XC Energy Efficiency Index 94.8 Energy efficiency class A Energy consumption with a standard load, conventional mode 0.83 kWh/cycle Energy consumption with a standard load, fan-forced mode 0.73 kWh/cycle Number of cavities 1 Heat source Electricity Volume 53 l Type of oven Built-In Oven 22 To access the electrical connections unscrew the 2 T20 screws on the rear panel top and take the panel...
... Zanussi Model identification ZZB35901XA ZZB35901XC Energy Efficiency Index 94.8 Energy efficiency class A Energy consumption with a standard load, conventional mode 0.83 kWh/cycle Energy consumption with a standard load, fan-forced mode 0.73 kWh/cycle Number of cavities 1 Heat source Electricity Volume 53 l Type of oven Built-In Oven 22 To access the electrical connections unscrew the 2 T20 screws on the rear panel top and take the panel...
User Manual
Page 23
... symbol with fan to recycle it is well fixed in relevant containers to save energy during cooking. Put the packaging in its position. Keep the door gasket clean and make sure it . Use the residual heat to use the cooking functions with the household waste. Keep food warm Choose the lowest possible temperature setting to warm up other dishes. Household electric cooking appliances - Part 1: Ranges, ovens, steam ovens and...
... symbol with fan to recycle it is well fixed in relevant containers to save energy during cooking. Put the packaging in its position. Keep the door gasket clean and make sure it . Use the residual heat to use the cooking functions with the household waste. Keep food warm Choose the lowest possible temperature setting to warm up other dishes. Household electric cooking appliances - Part 1: Ranges, ovens, steam ovens and...
Specification Sheet
Page 1
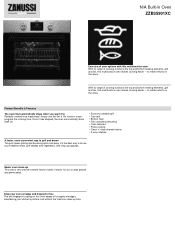
... • Top heat • Bottom heat • Fan controlled defrosting • Oven features: • Pizza cooking • Clean 'n' clear enamel interior • 2 oven shelves A faster, more convenient way to wipe grease and grime away. With its range of cooking functions like top and bottom heating elements, grill and fan, this multifunction oven makes cooking easier ‒ no matter what 's on the menu. Simply use the Set & Go function...
... • Top heat • Bottom heat • Fan controlled defrosting • Oven features: • Pizza cooking • Clean 'n' clear enamel interior • 2 oven shelves A faster, more convenient way to wipe grease and grime away. With its range of cooking functions like top and bottom heating elements, grill and fan, this multifunction oven makes cooking easier ‒ no matter what 's on the menu. Simply use the Set & Go function...


