
Specification Sheet
Page 1
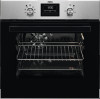
... free The anti-fingerprint coating on the menu. N/A Built-in less time. Simply use the Set & Go function to wipe grease and grime away. With its range of cooking functions like top and bottom heating elements, grill and fan, this oven keeps off . • Economy variable grill • Top heat • Bottom heat • Fan controlled defrosting • Oven features: • Pizza cooking • Clean 'n' clear enamel interior • 2 oven...
... free The anti-fingerprint coating on the menu. N/A Built-in less time. Simply use the Set & Go function to wipe grease and grime away. With its range of cooking functions like top and bottom heating elements, grill and fan, this oven keeps off . • Economy variable grill • Top heat • Bottom heat • Fan controlled defrosting • Oven features: • Pizza cooking • Clean 'n' clear enamel interior • 2 oven...
Specification Sheet
Page 2
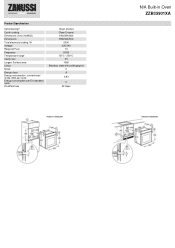
Product Specification Self-Cleaning? Cavity coating Dimensions (mm) (HxWxD) Dimensions Total electricity loading, W Voltage Required Fuse Frequency Temperature range Cavity size Largest Surface area Colour Noise Energy class Energy consumption, conventional mode, kWh per cycle Energy consumption per EU standard cycle ProdPartCode Clean enamel Clean Enamel 590x594x560 593x560x550 2500 220-240 13 50/60 50°C - 250°C 53 1080 Stainless steel with antifingerprint 0 A 0.83 0 All Open N/A Built-in Oven ZZB35901XA
Product Specification Self-Cleaning? Cavity coating Dimensions (mm) (HxWxD) Dimensions Total electricity loading, W Voltage Required Fuse Frequency Temperature range Cavity size Largest Surface area Colour Noise Energy class Energy consumption, conventional mode, kWh per cycle Energy consumption per EU standard cycle ProdPartCode Clean enamel Clean Enamel 590x594x560 593x560x550 2500 220-240 13 50/60 50°C - 250°C 53 1080 Stainless steel with antifingerprint 0 A 0.83 0 All Open N/A Built-in Oven ZZB35901XA
User Manual
Page 2
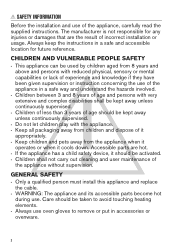
... supplied instructions. Care should be taken to avoid touching heating elements. • Always use of the appliance in a safe and accessible location for any injuries or damages that are hot. • If the appliance has a child safety device, it cools down. Accessible parts are the result of the appliance without supervision. GENERAL SAFETY • Only a qualified person must install...
... supplied instructions. Care should be taken to avoid touching heating elements. • Always use of the appliance in a safe and accessible location for any injuries or damages that are hot. • If the appliance has a child safety device, it cools down. Accessible parts are the result of the appliance without supervision. GENERAL SAFETY • Only a qualified person must install...
User Manual
Page 3
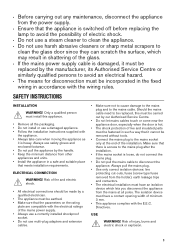
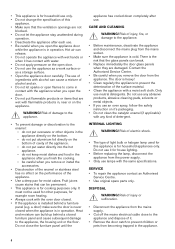
Should the mains cable need to be replaced, this appliance. • Remove all poles. Always pull the mains plug. • Use only correct isolation devices: line protecting cut-outs, fuses (screw type fuses removed from the holder), earth leakage trips and contactors. • The electrical installation must have a contact opening width of injury, burns and electric shock or explosion. 3 The isolation device must be...
Should the mains cable need to be replaced, this appliance. • Remove all poles. Always pull the mains plug. • Use only correct isolation devices: line protecting cut-outs, fuses (screw type fuses removed from the holder), earth leakage trips and contactors. • The electrical installation must have a contact opening width of injury, burns and electric shock or explosion. 3 The isolation device must be...
User Manual
Page 4
...; Use a deep pan for moist cakes. do not put water directly into the hot appliance. - Fruit juices cause stains that the glass panels can break. • Replace immediately the door glass panels when they are not blocked. • Do not let the appliance stay unattended during operation. • Deactivate the appliance after use. Heat and moisture can be careful when you remove or install the...
...; Use a deep pan for moist cakes. do not put water directly into the hot appliance. - Fruit juices cause stains that the glass panels can break. • Replace immediately the door glass panels when they are not blocked. • Do not let the appliance stay unattended during operation. • Deactivate the appliance after use. Heat and moisture can be careful when you remove or install the...

User Manual
Page 5
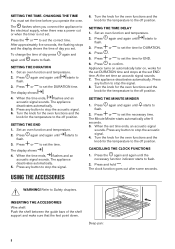
...set the time. Sensor field / Button Function Description MINUS CLOCK PLUS To set the time. Timer C. Clock function 5 DISPLAY A B C A. Clock functions B. PRODUCT DESCRIPTION GENERAL OVERVIEW 123 4 56 7 8 4 9 11 3 10 2 1 1 Control panel 2 Knob for the heating functions 3 Power lamp / symbol 4 Display 5 Control knob (for the temperature) 6 Temperature indicator / symbol 7 Air vents for the cooling fan 8 Heating element 9 Lamp 10 Fan 11 Shelf positions ACCESSORIES • Wire shelf For cookware, cake tins, roasts. • Grill- / Roasting pan To bake and roast...
...set the time. Sensor field / Button Function Description MINUS CLOCK PLUS To set the time. Timer C. Clock function 5 DISPLAY A B C A. Clock functions B. PRODUCT DESCRIPTION GENERAL OVERVIEW 123 4 56 7 8 4 9 11 3 10 2 1 1 Control panel 2 Knob for the heating functions 3 Power lamp / symbol 4 Display 5 Control knob (for the temperature) 6 Temperature indicator / symbol 7 Air vents for the cooling fan 8 Heating element 9 Lamp 10 Fan 11 Shelf positions ACCESSORIES • Wire shelf For cookware, cake tins, roasts. • Grill- / Roasting pan To bake and roast...

User Manual
Page 6
... True Fan Cooking To bake on the lamp without a cooking function. Set the maximum temperature. 4. SETTING A HEATING FUNCTION 1. Set the temperature 20 40 °C lower than usual. Set the function . WARNING! Turn the control knob to their initial position. Set the maximum temperature. 6. Turn the knob for 15 minutes. 5. Off position Light To turn the knob for Conventional Cooking. 6 DAILY USE PREHEATING Preheat the empty oven before first use . 1. Let the oven operate for the heating functions...
... True Fan Cooking To bake on the lamp without a cooking function. Set the maximum temperature. 4. SETTING A HEATING FUNCTION 1. Set the temperature 20 40 °C lower than usual. Set the function . WARNING! Turn the control knob to their initial position. Set the maximum temperature. 6. Turn the knob for 15 minutes. 5. Off position Light To turn the knob for Conventional Cooking. 6 DAILY USE PREHEATING Preheat the empty oven before first use . 1. Let the oven operate for the heating functions...

User Manual
Page 7
... Fan Baking Bottom Heat This function is designed to save energy during cooking so that the oven operates with the highest energy efficiency possible. When you use this function, the temperature in large quantities and to preserve food. The oven door should be reduced. The defrosting time depends on the operation of the frozen food. Clock function Application TIME OF DAY DURATION END TIME DELAY To set...
... Fan Baking Bottom Heat This function is designed to save energy during cooking so that the oven operates with the highest energy efficiency possible. When you use this function, the temperature in large quantities and to preserve food. The oven door should be reduced. The defrosting time depends on the operation of the frozen food. Clock function Application TIME OF DAY DURATION END TIME DELAY To set...
User Manual
Page 8
... and the knob for the temperature to the electrical supply, when there was a power cut or when the timer is not set the time for DURATION. 4. SETTING THE TIME. Set an oven function and temperature. 2. Press or to 3. Press any button to 3. Set an oven function and temperature. 2. starts to set . INSERTING THE ACCESSORIES Wire shelf: Push the shelf between the guide bars of day you connect the appliance to the...
... and the knob for the temperature to the electrical supply, when there was a power cut or when the timer is not set the time for DURATION. 4. SETTING THE TIME. Set an oven function and temperature. 2. Press or to 3. Press any button to 3. Set an oven function and temperature. 2. starts to set . INSERTING THE ACCESSORIES Wire shelf: Push the shelf between the guide bars of day you connect the appliance to the...
User Manual
Page 9
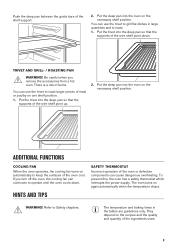
... pan so that the supports of the ingredients used. 9 Push the deep pan between the guide bars of burns. You can use the trivet to Safety chapters. ADDITIONAL FUNCTIONS COOLING FAN When the oven operates, the cooling fan turns on the necessary shelf position. To prevent this, the oven has a safety thermostat which interrupts the power supply. Be careful when you turn off the oven, the cooling fan...
... pan so that the supports of the ingredients used. 9 Push the deep pan between the guide bars of burns. You can use the trivet to Safety chapters. ADDITIONAL FUNCTIONS COOLING FAN When the oven operates, the cooling fan turns on the necessary shelf position. To prevent this, the oven has a safety thermostat which interrupts the power supply. Be careful when you turn off the oven, the cooling fan...
User Manual
Page 10
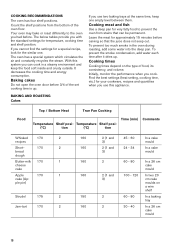
Cooking meat and fish Use a deep pan for very fatty food to the oven you use this system you cannot find the settings for a special recipe, look for temperature, cooking time and shelf position. Cooking times Cooking times depend on a wire shelf 150 2 60 - 80 In a baking tray 160 2 30 - 40 In a 26 cm cake mould 10 Food Top / Bottom Heat True Fan Cooking Temperature Shelf posi- Temperature Shelf posi- (°C) tion (°...
Cooking meat and fish Use a deep pan for very fatty food to the oven you use this system you cannot find the settings for a special recipe, look for temperature, cooking time and shelf position. Cooking times Cooking times depend on a wire shelf 150 2 60 - 80 In a baking tray 160 2 30 - 40 In a 26 cm cake mould 10 Food Top / Bottom Heat True Fan Cooking Temperature Shelf posi- Temperature Shelf posi- (°C) tion (°...

User Manual
Page 11
...Heat True Fan Cooking Temperature Shelf posi- less sponge cake) Christmas 170 cake / Rich fruit cake Plum 170 cake1) Small 170 cakes Biscuits1) 150 Meringues 100 Buns1) 190 Choux1) 190 Plate tarts 180 Victoria 180 sandwich 2 155 2 160 2 160 2 160 3 160 3 150 3 100 3 180 3 180 3 170 1 or 2 170 1) Preheat the oven ... 15 - 20 25 - 35 45 - 70 2 (left and right) 40 - 55 In a 20 cm cake mould In a bread tin In a baking tray In a baking tray In a baking tray In a baking tray In a baking tray In a 20 cm cake mould Left + right in a 20 cm cake mould 11
...Heat True Fan Cooking Temperature Shelf posi- less sponge cake) Christmas 170 cake / Rich fruit cake Plum 170 cake1) Small 170 cakes Biscuits1) 150 Meringues 100 Buns1) 190 Choux1) 190 Plate tarts 180 Victoria 180 sandwich 2 155 2 160 2 160 2 160 3 160 3 150 3 100 3 180 3 180 3 170 1 or 2 170 1) Preheat the oven ... 15 - 20 25 - 35 45 - 70 2 (left and right) 40 - 55 In a 20 cm cake mould In a bread tin In a baking tray In a baking tray In a baking tray In a baking tray In a baking tray In a 20 cm cake mould Left + right in a 20 cm cake mould 11
User Manual
Page 14
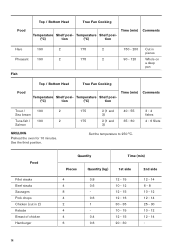
... 3) Set the temperature to 250 °C. 3 - 4 fishes 4 - 6 fillets Food Fillet steaks Beef steaks Sausages Pork chops Chicken (cut in pieces Whole on a deep pan Food Top / Bottom Heat True Fan Cooking Temperature Shelf posi- Food Top / Bottom Heat True Fan Cooking Temperature Shelf posi- Temperature Shelf posi- (°C) tion (°C) tion Time (min) Comments Trout / 190 2 Sea bream Tuna fish / 190 2 Salmon GRILLING Preheat the oven...
... 3) Set the temperature to 250 °C. 3 - 4 fishes 4 - 6 fillets Food Fillet steaks Beef steaks Sausages Pork chops Chicken (cut in pieces Whole on a deep pan Food Top / Bottom Heat True Fan Cooking Temperature Shelf posi- Food Top / Bottom Heat True Fan Cooking Temperature Shelf posi- Temperature Shelf posi- (°C) tion (°C) tion Time (min) Comments Trout / 190 2 Sea bream Tuna fish / 190 2 Salmon GRILLING Preheat the oven...
User Manual
Page 15
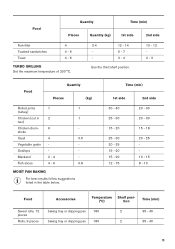
...;C) tion Time (min) baking tray or dripping pan 180 2 35 - 40 baking tray or dripping pan 180 2 35 - 40 15 Mackerel 2 - 4 - Fish slices 4 - 6 0.8 MOIST FAN BAKING For best results follow suggestions listed in 2 1 two) Chicken drum- 6 - sticks Quail 4 0.5 Vegetable gratin - - Food Quantity Time (min) Pieces Quantity (kg) 1st side 2nd side Fish fillet Toasted sandwiches Toast 4 4 - 6 4 - 6 TURBO GRILLING Set the maximum temperature of...
...;C) tion Time (min) baking tray or dripping pan 180 2 35 - 40 baking tray or dripping pan 180 2 35 - 40 15 Mackerel 2 - 4 - Fish slices 4 - 6 0.8 MOIST FAN BAKING For best results follow suggestions listed in 2 1 two) Chicken drum- 6 - sticks Quail 4 0.5 Vegetable gratin - - Food Quantity Time (min) Pieces Quantity (kg) 1st side 2nd side Fish fillet Toasted sandwiches Toast 4 4 - 6 4 - 6 TURBO GRILLING Set the maximum temperature of...

User Manual
Page 17
... . minutes sec- Turn halfway through. Cream can also be whipped when still slightly frozen in places. - Place the chicken on an upturned saucer placed on a large plate. Shelf Temperaries position ture (°C) Time (min) Comments Small cake Apple pie Sponge cake Short bread Toast 4 - 6 pieces Conventional Cooking Conventional Cooking Conventional Cooking Conventional Cooking Grilling Baking 3 tray Wire 1 shelf Wire 2 shelf Baking 3 tray Wire 3 shelf...
... . minutes sec- Turn halfway through. Cream can also be whipped when still slightly frozen in places. - Place the chicken on an upturned saucer placed on a large plate. Shelf Temperaries position ture (°C) Time (min) Comments Small cake Apple pie Sponge cake Short bread Toast 4 - 6 pieces Conventional Cooking Conventional Cooking Conventional Cooking Conventional Cooking Grilling Baking 3 tray Wire 1 shelf Wire 2 shelf Baking 3 tray Wire 3 shelf...
User Manual
Page 18
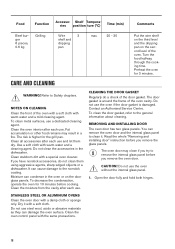
Preheat the oven for the grill pan. Clean stubborn dirt with the same precautions. If you try to remove the internal glass panel before cooking. Clean the moisture from the cavity after each use. Clean the oven control panel with a special oven cleaner. Do not use the oven without the internal glass panel. 1. Open the door fully and hold both hinges. 18 Fat accumulation or other food remains may close if you have...
Preheat the oven for the grill pan. Clean stubborn dirt with the same precautions. If you try to remove the internal glass panel before cooking. Clean the moisture from the cavity after each use. Clean the oven control panel with a special oven cleaner. Do not use the oven without the internal glass panel. 1. Open the door fully and hold both hinges. 18 Fat accumulation or other food remains may close if you have...
User Manual
Page 20
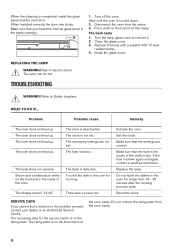
... the cooking process ends. Reset the clock. SERVICE DATA If you install the internal glass panel in the cavity of the malfunction. The rating plate is the cause of the oven. When the cleaning is not set . Disconnect the oven from the oven cavity. 20 Clean the glass cover. 3. Risk of the oven cavity. Refer to Safety chapters. Problem Possible cause Remedy The oven does not heat up . Set the clock. Replace the lamp. REPLACING...
... the cooking process ends. Reset the clock. SERVICE DATA If you install the internal glass panel in the cavity of the malfunction. The rating plate is the cause of the oven. When the cleaning is not set . Disconnect the oven from the oven cavity. 20 Clean the glass cover. 3. Risk of the oven cavity. Refer to Safety chapters. Problem Possible cause Remedy The oven does not heat up . Set the clock. Replace the lamp. REPLACING...
User Manual
Page 21
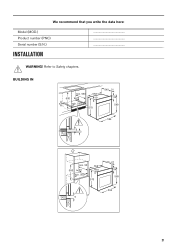
BUILDING IN min. 550 558 600 20 19 6 min. 560 570 540 21 114 589 594 6 3 min. 550 558 580 20 19 min. 560 570 540 21 114 589 594 9 21 Refer to Safety chapters. We recommend that you write the data here: Model (MOD.) Product number (PNC) Serial number (S.N.) INSTALLATION ... WARNING!
BUILDING IN min. 550 558 600 20 19 6 min. 560 570 540 21 114 589 594 6 3 min. 550 558 580 20 19 min. 560 570 540 21 114 589 594 9 21 Refer to Safety chapters. We recommend that you write the data here: Model (MOD.) Product number (PNC) Serial number (S.N.) INSTALLATION ... WARNING!
User Manual
Page 22
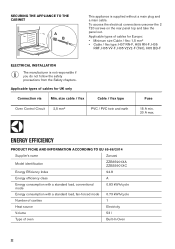
... and earth Fuse 15 A min. 20 A max. ENERGY EFFICIENCY PRODUCT FICHE AND INFORMATION ACCORDING TO EU 65-66/2014 Supplier's name Zanussi Model identification ZZB35901XA ZZB35901XC Energy Efficiency Index 94.8 Energy efficiency class A Energy consumption with a standard load, conventional mode 0.83 kWh/cycle Energy consumption with a standard load, fan-forced mode 0.73 kWh/cycle Number of cavities 1 Heat source Electricity Volume...
... and earth Fuse 15 A min. 20 A max. ENERGY EFFICIENCY PRODUCT FICHE AND INFORMATION ACCORDING TO EU 65-66/2014 Supplier's name Zanussi Model identification ZZB35901XA ZZB35901XC Energy Efficiency Index 94.8 Energy efficiency class A Energy consumption with a standard load, conventional mode 0.83 kWh/cycle Energy consumption with a standard load, fan-forced mode 0.73 kWh/cycle Number of cavities 1 Heat source Electricity Volume...
User Manual
Page 23
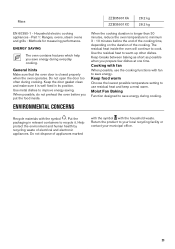
... before you save energy. Part 1: Ranges, ovens, steam ovens and grills - Do not open the door too often during everyday cooking. General hints Make sure that the oven door is longer than 30 minutes, reduce the oven temperature to warm up other dishes. ENVIRONMENTAL CONCERNS When the cooking duration is closed properly when the oven operates. Household electric cooking appliances - Recycle materials with fan When possible, use residual heat and keep a meal...
... before you save energy. Part 1: Ranges, ovens, steam ovens and grills - Do not open the door too often during everyday cooking. General hints Make sure that the oven door is longer than 30 minutes, reduce the oven temperature to warm up other dishes. ENVIRONMENTAL CONCERNS When the cooking duration is closed properly when the oven operates. Household electric cooking appliances - Recycle materials with fan When possible, use residual heat and keep a meal...


