Zanussi ZRG16605WV Support and Manuals
Get Help and Manuals for this Zanussi item
View All Support Options Below
Free Zanussi ZRG16605WV manuals!
Problems with Zanussi ZRG16605WV?
Ask a Question
Free Zanussi ZRG16605WV manuals!
Problems with Zanussi ZRG16605WV?
Ask a Question
Popular Zanussi ZRG16605WV Manual Pages
Specification Sheet - Page 1

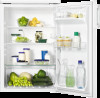
...of food and drinks while maintaining the same external dimensions. Free-standing Refrigerator 85 cm A+ ZRG16605WV
Bigger on the inside Space+ cooling appliances are larger on the inside , holding a ... and with this refrigerator - No need to read a complicated manual to figure out how to !
Don't like reading manuals?
Make a clever choice with less effort. It fully complies with...
Specification Sheet - Page 2

Product Specification
Dimensions (mm) (HxWxD) Dimensions Installation Door hinges Min. ambient temp, C Necessary distance to ...chill zone (l) Gross capacity star compartment Net capacity star compartment (l) Star Rating Freezer Compartment
Free-standing Refrigerator 85 cm A+ ZRG16605WV
850x550x612 Not applicable Freestanding Right & Reversible
10 0 1.9 230 10 50 A+ 850 550 612 119 0 0 SN-N-ST...
User Manual - Page 2

...years of age and persons with very extensive and complex disabilities, if they have been properly instructed. • Children of less than those recommended by the manufacturer.
2 Farm houses; ...built-in structure, clear of incorrect installation or usage. staff kitchen areas in household and similar applications such as: - Always keep the instructions in a safe and accessible location for...
User Manual - Page 3

...the transit bolts. • Do not install or use a damaged appliance. • Follow the installation instructions supplied with a moist soft cloth.
&#... the appliance. Contact the Authorised Service Centre or an electrician to change the specification of the mains plug. •...not store explosive substances such as
it must be replaced by the front edge to avoid scratching the floor...
User Manual - Page 4

...; To repair the appliance contact an Authorised
Service Centre. • Use original spare parts only. SWITCHING OFF To turn off the mains cable and discard it. • Remove the door to prevent children and pets
to be set to the part of the cooling unit that there are no flames and sources of the appliance...
User Manual - Page 5

...phenomenon). • A faint click noise from the
compressor when refrigerant is set the Temperature Regulator toward warmer settings to Safety chapters.
Store meat for at different heights. 1. Gradually pull ... foil or a polythene bag to exclude as much air as required.
If this happens, set to ensure correct air circulation. Bananas, potatoes, onions and garlic must not be kept in...
User Manual - Page 6

... improve the performance of the appliance with lukewarm water and some neutral soap. 2.
maintenance and recharging must therefore only be cleaned regularly: 1. The accessories and parts of the appliance, over the motor compressor, where it by authorized technicians.
Do not use for washing in the middle of the refrigerator compartment channel...
User Manual - Page 7

...the mains socket correctly. Attach the melting water outlet to "Replacing the lamp". TROUBLESHOOTING
WARNING! The appliance is not supported properly. The appliance is switched off. The lamp is ... the appliance were too warm. The appliance is set incorrectly. Make sure that water flows into the refrigerator. Problem
Possible cause
Solution
The appliance does not operate. Temperature...
User Manual - Page 8

...is specifically designed for... appliance. Problem
Possible cause...set correctly.
Door was not wrapped.
Wait a few seconds between closing . The maximum power is not closed correctly. Door was not closed completely. Refer to use original spare parts only. Open the door only if necessary.
Use LED bulbs (E14 base) only. Replace...Service Centre. The food products' temperature is equipped ...
User Manual - Page 9

... necessary, replace the defective door gaskets. The correct operation can find the two spacers in a dry, well ventilated indoors where the ambient temperature corresponds to + 43°C
Some functional problems might occur for some types of models when operating outside of that range. Release the screw. 2. LOCATION It must therefore be installed well away...
User Manual - Page 10

... on the opposite side.
3. Install the hinge on the opposite side. 7. Unscrew the screws of the door top hinge.
1 2
3
2. Before carrying out any operations,..., we suggest that this be made with another person that will keep a firm hold on the doors of the arrow. Unscrew and install the screw on the rear side.
5. Push back the top and lift it.
9. Put the top in the direction of the ...
User Manual - Page 11

... supply voltage is supplied with the letter "N" or coloured black. 3.
12. Remove and install the handle on the appliance. The Authorised Service specialist will carry out the reversibility of safely.
11 ELECTRICAL CONNECTION CAUTION! Ensure that no ...coloured green and yellow to the terminal either marked with the following code:
A
B
C
1
2
D
3
E
CAUTION!
Product information sheet - Page 1

... temperate, Subtropical 10
38
38
Built in appliance Y/N
No
This appliance is intended to be used exclusively for 24 hours. product information sheet
Trade Mark
Zanussi
Model
ZRG16605WV 933012475
Category
1.
Zanussi ZRG16605WV Reviews
We have not received any reviews for Zanussi yet.