
User Manual
Page 2
... activated. • Children shall not carry out cleaning and user maintenance of the appliance in a safe way and understand the hazards involved. VISIT OUR WEBSITE TO: Get usage advice, brochures, trouble shooter, service and repair information: www.zanussi.com/support SAFETY INFORMATION Before the installation and use the appliance before installing it in the built-in structure. 2 CHILDREN AND VULNERABLE PEOPLE...
... activated. • Children shall not carry out cleaning and user maintenance of the appliance in a safe way and understand the hazards involved. VISIT OUR WEBSITE TO: Get usage advice, brochures, trouble shooter, service and repair information: www.zanussi.com/support SAFETY INFORMATION Before the installation and use the appliance before installing it in the built-in structure. 2 CHILDREN AND VULNERABLE PEOPLE...
User Manual
Page 3
... appliance by the handle. • Install the appliance in a safe and suitable place that meets installation requirements. • The kitchen cabinet and the recess must have suitable dimensions. • Keep the minimum distance from other appliances and units. • Before mounting the appliance, check if the oven door opens without restraint. • Parts of the appliance carry current. Always use . Cabinet minimum height (Cabinet under the...
... appliance by the handle. • Install the appliance in a safe and suitable place that meets installation requirements. • The kitchen cabinet and the recess must have suitable dimensions. • Keep the minimum distance from other appliances and units. • Before mounting the appliance, check if the oven door opens without restraint. • Parts of the appliance carry current. Always use . Cabinet minimum height (Cabinet under the...

User Manual
Page 4
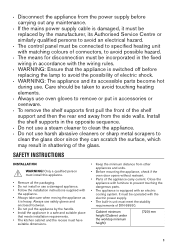
... parts must be earthed. • Make sure that the parameters on the bottom. - Should the mains cable need to the mains plug after each use the appliance as a work surface or as a storage surface. • Open the appliance door carefully. Risk of injury, burns and electric shock or explosion. • This appliance is supplied without tools. • Connect the mains plug...
... parts must be earthed. • Make sure that the parameters on the bottom. - Should the mains cable need to the mains plug after each use the appliance as a work surface or as a storage surface. • Open the appliance door carefully. Risk of injury, burns and electric shock or explosion. • This appliance is supplied without tools. • Connect the mains plug...

User Manual
Page 5
...; Use a deep pan for example room heating. • Always cook with the oven door closed. Risk of injury or suffocation. • Disconnect the appliance from the mains supply. • Cut off the mains electrical cable close to the appliance and dispose of it. • Remove the door catch to be permanent. • This appliance is the risk that the glass panels can...
...; Use a deep pan for example room heating. • Always cook with the oven door closed. Risk of injury or suffocation. • Disconnect the appliance from the mains supply. • Cut off the mains electrical cable close to the appliance and dispose of it. • Remove the door catch to be permanent. • This appliance is the risk that the glass panels can...
User Manual
Page 6
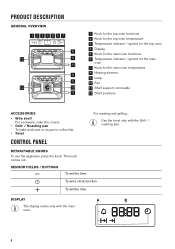
... the main oven temperature 8 Heating element 9 Lamp 10 Fan 11 Shelf support, removable 12 Shelf positions ACCESSORIES • Wire shelf For cookware, cake tins, roasts. • Grill- / Roasting pan To bake and roast or as pan to collect fat. • Trivet CONTROL PANEL For roasting and grilling. To set the time. To set a clock function. Use the trivet only with the main oven. 6 RETRACTABLE KNOBS To use the appliance press the knob. DISPLAY A B The display works only...
... the main oven temperature 8 Heating element 9 Lamp 10 Fan 11 Shelf support, removable 12 Shelf positions ACCESSORIES • Wire shelf For cookware, cake tins, roasts. • Grill- / Roasting pan To bake and roast or as pan to collect fat. • Trivet CONTROL PANEL For roasting and grilling. To set the time. To set a clock function. Use the trivet only with the main oven. 6 RETRACTABLE KNOBS To use the appliance press the knob. DISPLAY A B The display works only...
User Manual
Page 7
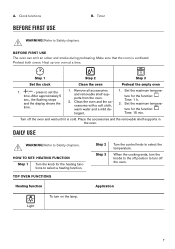
... oven at a time. When the cooking ends, turn the knobs to the off position to select the temperature. Make sure that the room is cold. Remove all accessories and removable shelf supports from the oven. 2. Refer to Safety chapters. Time: 15 min. Refer to Safety chapters. Time: 1 h. 2. Application 7 Timer WARNING! Step 1 Step 2 Step 3 Set the clock Clean the oven Preheat the empty oven 1. , - DAILY USE WARNING! Light Step 2 Step 3 Turn the control...
... oven at a time. When the cooking ends, turn the knobs to the off position to select the temperature. Make sure that the room is cold. Remove all accessories and removable shelf supports from the oven. 2. Refer to Safety chapters. Time: 15 min. Refer to Safety chapters. Time: 1 h. 2. Application 7 Timer WARNING! Step 1 Step 2 Step 3 Set the clock Clean the oven Preheat the empty oven 1. , - DAILY USE WARNING! Light Step 2 Step 3 Turn the control...

User Manual
Page 8
... MAIN OVEN FUNCTIONS Heating function Application To turn on the amount and size of food in the cavity may be reduced. Set the temperature 20 - 40 °C lower than for Conventional Cooking. The defrosting time depends on the lamp. When you use this function, the temperature in large quantities and to "Daily Use" chapter, Notes on one shelf position. The heating power may...
... MAIN OVEN FUNCTIONS Heating function Application To turn on the amount and size of food in the cavity may be reduced. Set the temperature 20 - 40 °C lower than for Conventional Cooking. The defrosting time depends on the lamp. When you use this function, the temperature in large quantities and to "Daily Use" chapter, Notes on one shelf position. The heating power may...

User Manual
Page 9
..." chapter, Moist Baking. NOTES ON: MOIST BAKING This function was a power cut or when the timer is not set. , - Only the top oven works without the set how long the oven works. To set when the oven turns off. The function works only for the main oven. For the cooking instructions refer to change the time of Day - flashes when you use this function at any time, also when the oven is off...
..." chapter, Moist Baking. NOTES ON: MOIST BAKING This function was a power cut or when the timer is not set. , - Only the top oven works without the set how long the oven works. To set when the oven turns off. The function works only for the main oven. For the cooking instructions refer to change the time of Day - flashes when you use this function at any time, also when the oven is off...
User Manual
Page 10
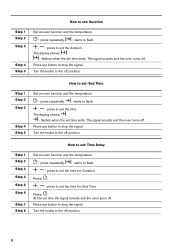
... 6 Step 7 Step 8 How to flash. , - starts to set: Time Delay Set an oven function and the temperature. - Press: . , - press to set: Duration Set an oven function and the temperature. - Step 1 Step 2 Step 3 Step 4 Step 5 How to set the time for : Duration. press to stop the signal. press repeatedly. - Press any button to set the duration. Turn the knobs to set the time for : End Time. Step 1 Step 2 Step 3 Step 4 Step...
... 6 Step 7 Step 8 How to flash. , - starts to set: Time Delay Set an oven function and the temperature. - Press: . , - press to set: Duration Set an oven function and the temperature. - Step 1 Step 2 Step 3 Step 4 Step 5 How to set the time for : Duration. press to stop the signal. press repeatedly. - Press any button to set the duration. Turn the knobs to set the time for : End Time. Step 1 Step 2 Step 3 Step 4 Step...
User Manual
Page 11
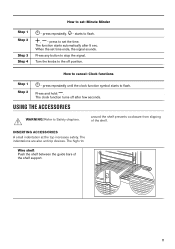
... the shelf support. 11 press to flash. , - Turn the knobs to Safety chapters. starts to set time ends, the signal sounds. Press any button to flash. press repeatedly. - press repeatedly until the clock function symbol starts to stop the signal. USING THE ACCESSORIES WARNING! Refer to the off after 5 sec. The high rim Wire shelf: Push the shelf between the guide bars...
... the shelf support. 11 press to flash. , - Turn the knobs to Safety chapters. starts to set time ends, the signal sounds. Press any button to flash. press repeatedly. - press repeatedly until the clock function symbol starts to stop the signal. USING THE ACCESSORIES WARNING! Refer to the off after 5 sec. The high rim Wire shelf: Push the shelf between the guide bars...
User Manual
Page 13
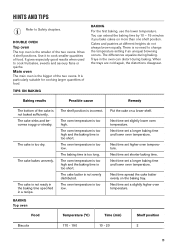
.... DOUBLE OVEN Top oven The top oven is not baked sufficiently. The cake is too low. The oven temperature is too dry. Next time set a slightly higher oven temperature. It gives especially good results when used to Safety chapters. There is too high. The oven temperature is no need to cook smaller quantities of the cake is the smaller of food. The oven temperature is incorrect. Use it to change...
.... DOUBLE OVEN Top oven The top oven is not baked sufficiently. The cake is too low. The oven temperature is too dry. Next time set a slightly higher oven temperature. It gives especially good results when used to Safety chapters. There is too high. The oven temperature is no need to cook smaller quantities of the cake is the smaller of food. The oven temperature is incorrect. Use it to change...

User Manual
Page 16
... cooking time. ping pan bles, 0.7 kg 40 - 50 TIPS ON ROASTING Use heat-resistant ovenware. Roast large meat joints directly in the tray or on wire 200 2 45 omelette shelf 40 - 50 Mediterra- MAIN OVEN Beef Turn the roast after 1/2 - 2/3 of thick- 180 - 190 6 - 8 2 medium, preheat the ness empty oven 16 Baste meat joints with their own juice several times during roasting. baking tray or drip- 180 3 45 nean vegeta- Roast lean meat covered...
... cooking time. ping pan bles, 0.7 kg 40 - 50 TIPS ON ROASTING Use heat-resistant ovenware. Roast large meat joints directly in the tray or on wire 200 2 45 omelette shelf 40 - 50 Mediterra- MAIN OVEN Beef Turn the roast after 1/2 - 2/3 of thick- 180 - 190 6 - 8 2 medium, preheat the ness empty oven 16 Baste meat joints with their own juice several times during roasting. baking tray or drip- 180 3 45 nean vegeta- Roast lean meat covered...
User Manual
Page 20
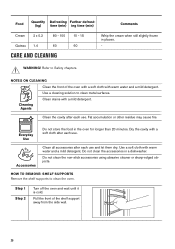
... support away from the side wall. 20 Cleaning Agents Clean stains with warm water and a mild detergent. Do not clean the non-stick accessories using abrasive cleaner or sharp-edged objects. Pull the front of the oven with a soft cloth with a mild detergent. Food Quantity Defrosting Further defrost- (kg) time (min) ing time (min) Comments Cream 2 x 0.2 80 - 100 Gateau 1.4 60 CARE...
... support away from the side wall. 20 Cleaning Agents Clean stains with warm water and a mild detergent. Do not clean the non-stick accessories using abrasive cleaner or sharp-edged objects. Pull the front of the oven with a soft cloth with a mild detergent. Food Quantity Defrosting Further defrost- (kg) time (min) ing time (min) Comments Cream 2 x 0.2 80 - 100 Gateau 1.4 60 CARE...
User Manual
Page 21
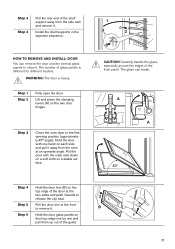
... two door hinges. Carefully handle the glass, especially around the edges of glass panels is heavy. Step 1 Step 2 Fully open the door. A A 45° Step 4 Hold the door trim (B) on each side and pull it . Put the door with one and pull them up out of the guide. 1 21 The door is different for different models. Install the shelf supports in the opposite sequence. 1 2 HOW TO REMOVE AND INSTALL: DOOR...
... two door hinges. Carefully handle the glass, especially around the edges of glass panels is heavy. Step 1 Step 2 Fully open the door. A A 45° Step 4 Hold the door trim (B) on each side and pull it . Put the door with one and pull them up out of the guide. 1 21 The door is different for different models. Install the shelf supports in the opposite sequence. 1 2 HOW TO REMOVE AND INSTALL: DOOR...
User Manual
Page 22
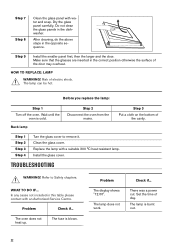
... °C heat-resistant lamp. Step 9 Install the smaller panel first, then the larger and the door. HOW TO REPLACE: LAMP WARNING! The lamp can be hot. Before you replace the lamp: Step 1 Turn off the oven. Step 3 Put a cloth on the bottom of day. Clean the glass cover. Install the glass cover. Refer to remove it. Problem Check if... The lamp does not work. Set the time of the...
... °C heat-resistant lamp. Step 9 Install the smaller panel first, then the larger and the door. HOW TO REPLACE: LAMP WARNING! The lamp can be hot. Before you replace the lamp: Step 1 Turn off the oven. Step 3 Put a cloth on the bottom of day. Clean the glass cover. Install the glass cover. Refer to remove it. Problem Check if... The lamp does not work. Set the time of the...
User Manual
Page 23
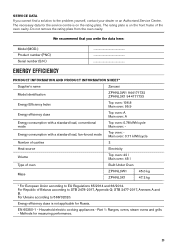
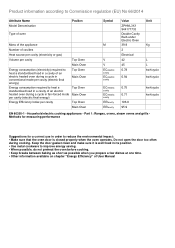
... electric cooking appliances - Energy efficiency class is on the rating plate. Do not remove the rating plate from the oven cavity. PRODUCT INFORMATION AND PRODUCT INFORMATION SHEET* Supplier's name Zanussi Model identification ZPHNL3W1 944171732 ZPHNL3X1 944171733 Energy Efficiency Index Top oven: 106.8 Main oven: 95.9 Energy efficiency class Top oven: A Main oven: A Energy consumption with a standard load, fan-forced mode Top oven: Main oven: 0.71 kWh/cycle Number of cavities 2 Heat source Electricity Volume Top oven...
... electric cooking appliances - Energy efficiency class is on the rating plate. Do not remove the rating plate from the oven cavity. PRODUCT INFORMATION AND PRODUCT INFORMATION SHEET* Supplier's name Zanussi Model identification ZPHNL3W1 944171732 ZPHNL3X1 944171733 Energy Efficiency Index Top oven: 106.8 Main oven: 95.9 Energy efficiency class Top oven: A Main oven: A Energy consumption with a standard load, fan-forced mode Top oven: Main oven: 0.71 kWh/cycle Number of cavities 2 Heat source Electricity Volume Top oven...

User Manual
Page 24
... office. 24 * Cooking with fan to save energy. When possible, do not preheat the oven before the end of electrical and electronic appliances. Keep food warm Choose the lowest possible temperature setting to recycle it is off. Return the product to improve energy saving. Do not open the oven door too often during everyday cooking. Use the residual heat to cook. Keep breaks between baking as short...
... office. 24 * Cooking with fan to save energy. When possible, do not preheat the oven before the end of electrical and electronic appliances. Keep food warm Choose the lowest possible temperature setting to recycle it is off. Return the product to improve energy saving. Do not open the oven door too often during everyday cooking. Use the residual heat to cook. Keep breaks between baking as short...
Specification Sheet
Page 1
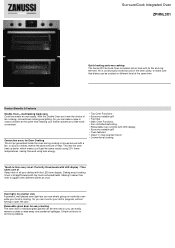
... kitchen adventure a little more convenient. Convection oven, for easy cleaning The oven door's individual glass panels can be cooked on inside the oven during cooking is cooking. This lets the oven heat up faster, which means you can be removed so you 'll get the same results using 20% lower temperatures, saving time and using less energy. • Top Oven Functions: • Economy variable grill • Top heat • Main Oven Functions: • Fan controlled...
... kitchen adventure a little more convenient. Convection oven, for easy cleaning The oven door's individual glass panels can be cooked on inside the oven during cooking is cooking. This lets the oven heat up faster, which means you can be removed so you 'll get the same results using 20% lower temperatures, saving time and using less energy. • Top Oven Functions: • Economy variable grill • Top heat • Main Oven Functions: • Fan controlled...

Specification Sheet
Page 2
Cavity coating Dimensions (mm) (HxWxD) Dimensions (Built-in, mm) Total electricity loading, W Voltage (V) Required Fuse Frequency (Hz) Temperature range Maximum Microwave output (W) Cavity Size (L) Largest Surface area Colour Energy class Energy consumption, conventional mode, kWh per cycle Energy consumption per EU standard cycle Energy consumption, hot air, kWh/cycle ProdPartCode No Clean enamel Black Enameled 715x594x568 720x600x550 5300 220-240 30 50 50°...
Cavity coating Dimensions (mm) (HxWxD) Dimensions (Built-in, mm) Total electricity loading, W Voltage (V) Required Fuse Frequency (Hz) Temperature range Maximum Microwave output (W) Cavity Size (L) Largest Surface area Colour Energy class Energy consumption, conventional mode, kWh per cycle Energy consumption per EU standard cycle Energy consumption, hot air, kWh/cycle ProdPartCode No Clean enamel Black Enameled 715x594x568 720x600x550 5300 220-240 30 50 50°...
Product information sheet
Page 2
... the oven operates. Do not open the door too often during cooking. Product information according to Commission regulation (EU) No 66/2014 Attribute Name Model Denomination Type of oven Position Mass of the appliance Number of cavities Heat source per cavity (electricity or gas) Volume per cavity Top Oven Main Oven Energy consumption (electricity) required to heat a standardised load in a cavity of an electric heated oven during a cycle in conventional mode...
... the oven operates. Do not open the door too often during cooking. Product information according to Commission regulation (EU) No 66/2014 Attribute Name Model Denomination Type of oven Position Mass of the appliance Number of cavities Heat source per cavity (electricity or gas) Volume per cavity Top Oven Main Oven Energy consumption (electricity) required to heat a standardised load in a cavity of an electric heated oven during a cycle in conventional mode...


