
User Manual
Page 3
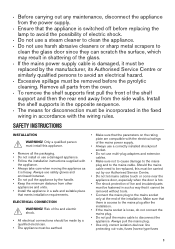
Install the shelf supports in the opposite sequence. • The means for disconnection must be incorporated in the fixed wiring in a safe and suitable place that meets installation requirements. Only a qualified person must install this must be carried out by our ...; Ensure that the appliance is switched off before the pyrolytic cleaning. Always use a damaged appliance. • Follow the installation instructions supplied with the wiring rules. Remove all the packaging. • Do not install or use safety gloves and enclosed footwear. • Do not pull the appliance by...
Install the shelf supports in the opposite sequence. • The means for disconnection must be incorporated in the fixed wiring in a safe and suitable place that meets installation requirements. Only a qualified person must install this must be carried out by our ...; Ensure that the appliance is switched off before the pyrolytic cleaning. Always use a damaged appliance. • Follow the installation instructions supplied with the wiring rules. Remove all the packaging. • Do not install or use safety gloves and enclosed footwear. • Do not pull the appliance by...

User Manual
Page 6
... 5 5 6 4 93 7 2 1 1 Control panel 2 Knob for the heating functions 3 Display 4 Control knob (for the temperature) 5 Heating element 6 Lamp 7 Fan 8 Shelf support, removable 9 Shelf positions 8 ACCESSORIES • Wire shelf For cookware, cake tins, roasts. • Grill- / Roasting pan To bake and roast or as pan to collect fat. • Trivet CONTROL PANEL BUTTONS...
... 5 5 6 4 93 7 2 1 1 Control panel 2 Knob for the heating functions 3 Display 4 Control knob (for the temperature) 5 Heating element 6 Lamp 7 Fan 8 Shelf support, removable 9 Shelf positions 8 ACCESSORIES • Wire shelf For cookware, cake tins, roasts. • Grill- / Roasting pan To bake and roast or as pan to collect fat. • Trivet CONTROL PANEL BUTTONS...

User Manual
Page 9
... stop the signal. Press again and again until starts to 3. At the set time the signal sounds. 5. When the set the hours. INSERTING THE ACCESSORIES Wire shelf: 9 Press or to 3. Press any button or open the oven door to stop the signal. 5. WARNING! Press 2. starts to set time ends the signal...
... stop the signal. Press again and again until starts to 3. At the set time the signal sounds. 5. When the set the hours. INSERTING THE ACCESSORIES Wire shelf: 9 Press or to 3. Press any button or open the oven door to stop the signal. 5. WARNING! Press 2. starts to set time ends the signal...
User Manual
Page 10
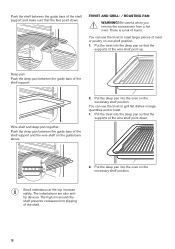
... trivet into the deep pan so that the supports of the shelf support and make sure that the supports of the shelf support and the wire shelf on one shelf position. 1. Put the deep pan into the oven on the necessary shelf position. Small indentation at the top increase safety. You... dishes in large quantities and to roast larger pieces of the shelf support. Deep pan: Push the deep pan between the guide bars of the wire shelf point down . You can use the trivet to toast. 1. There is a risk of the shelf. 10 The indentations are also antitip devices. Put the...
... trivet into the deep pan so that the supports of the shelf support and make sure that the supports of the shelf support and the wire shelf on one shelf position. 1. Put the deep pan into the oven on the necessary shelf position. Small indentation at the top increase safety. You... dishes in large quantities and to roast larger pieces of the shelf support. Deep pan: Push the deep pan between the guide bars of the wire shelf point down . You can use the trivet to toast. 1. There is a risk of the shelf. 10 The indentations are also antitip devices. Put the...
User Manual
Page 12
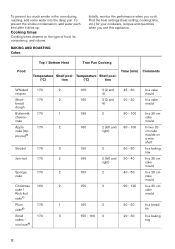
... 175 3 Jam-tart 170 2 Sponge 170 2 cake Christmas 160 2 cake / Rich fruit cake1) Plum 175 1 cake1) Small 170 3 cakes - Cooking times Cooking times depend on a wire shelf In a baking tray In a 26 cm cake mould In a 26 cm cake mould In a 20 cm cake mould In a bread tin In a baking tray...
... 175 3 Jam-tart 170 2 Sponge 170 2 cake Christmas 160 2 cake / Rich fruit cake1) Plum 175 1 cake1) Small 170 3 cakes - Cooking times Cooking times depend on a wire shelf In a baking tray In a 26 cm cake mould In a 26 cm cake mould In a 20 cm cake mould In a bread tin In a baking tray...
User Manual
Page 15
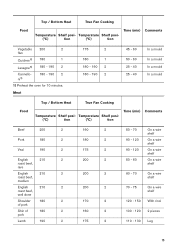
... Shin of 180 2 pork Lamb 190 2 190 2 180 2 175 2 200 2 200 2 200 2 170 2 160 2 175 2 50 - 70 90 - 120 90 - 120 50 - 60 On a wire shelf On a wire shelf On a wire shelf On a wire shelf 60 - 70 On a wire shelf 70 - 75 On a wire shelf 120 - 150 With rind 100 - 120 2 pieces 110 - 130 Leg 15
... Shin of 180 2 pork Lamb 190 2 190 2 180 2 175 2 200 2 200 2 200 2 170 2 160 2 175 2 50 - 70 90 - 120 90 - 120 50 - 60 On a wire shelf On a wire shelf On a wire shelf On a wire shelf 60 - 70 On a wire shelf 70 - 75 On a wire shelf 120 - 150 With rind 100 - 120 2 pieces 110 - 130 Leg 15
User Manual
Page 18
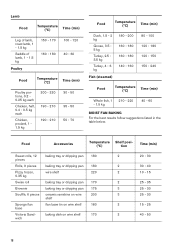
baking dish on wire shelf 180 2 15 - 25 base Victoria Sand- Lamb Food Temperature (°C) Time (min) Leg of lamb, roast lamb, 1 - 1.5 kg Saddle of lamb, 1 - 1.5 kg Poultry 150 - ... rolls, 12 baking tray or dripping pan 180 2 20 - 30 pieces Rolls, 9 pieces baking tray or dripping pan 180 2 30 - 40 Pizza, frozen, 0.35 kg wire shelf 220 2 10 - 15 Swiss roll baking tray or dripping pan 170 2 25 - 35 Brownie baking tray or dripping pan 175 3 25 - 30 Soufflè...
baking dish on wire shelf 180 2 15 - 25 base Victoria Sand- Lamb Food Temperature (°C) Time (min) Leg of lamb, roast lamb, 1 - 1.5 kg Saddle of lamb, 1 - 1.5 kg Poultry 150 - ... rolls, 12 baking tray or dripping pan 180 2 20 - 30 pieces Rolls, 9 pieces baking tray or dripping pan 180 2 30 - 40 Pizza, frozen, 0.35 kg wire shelf 220 2 10 - 15 Swiss roll baking tray or dripping pan 170 2 25 - 35 Brownie baking tray or dripping pan 175 3 25 - 30 Soufflè...
User Manual
Page 19
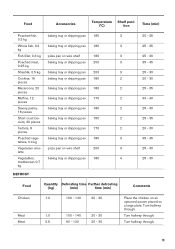
...baking tray or dripping pan 180 3 35 - 45 tables, 0.4 kg Vegetarian ome- Turn halfway through . 19 Turn halfway through . pizza pan on wire shelf 200 3 25 - 30 lette Vegetables, baking tray or dripping pan 180 4 25 - 30 mediterrean 0.7 kg DEFROST Food Quantity Defrosting time Further defrosting... 100 - 140 20 - 30 Meat Meat 1.0 100 - 140 20 - 30 0.5 90 - 120 20 - 30 Place the chicken on an upturned saucer placed on wire shelf 180 3 25 - 30 Poached meat, baking tray or dripping pan 200 3 35 - 45 0.25 kg Shashlik, 0.5 kg baking tray or dripping pan 200 3...
...baking tray or dripping pan 180 3 35 - 45 tables, 0.4 kg Vegetarian ome- Turn halfway through . 19 Turn halfway through . pizza pan on wire shelf 200 3 25 - 30 lette Vegetables, baking tray or dripping pan 180 4 25 - 30 mediterrean 0.7 kg DEFROST Food Quantity Defrosting time Further defrosting... 100 - 140 20 - 30 Meat Meat 1.0 100 - 140 20 - 30 0.5 90 - 120 20 - 30 Place the chicken on an upturned saucer placed on wire shelf 180 3 25 - 30 Poached meat, baking tray or dripping pan 200 3 35 - 45 0.25 kg Shashlik, 0.5 kg baking tray or dripping pan 200 3...
User Manual
Page 21
...Use a cake mould (26 cm diameter). Preheat the oven for 10 minutes. Preheat the oven for 10 minutes. - - - 21 Wire 2 180 70 - 90 al Cooking shelf True Fan Wire 2 160 70 - 90 Cooking / shelf Fan Cook- ing Convention- Put 20 small cakes per one baking tray. Use 2 tins (...40 True Fan Baking 2 140 - 25 - 45 Cooking / tray and 150 Fan Cook- 4 ing Convention- Wire 2 170 40 - 50 al Cooking shelf True Fan Cooking / Fan Cooking True Fan Cooking / Fan Cooking Wire shelf Wire shelf 2 160 40 - 50 2 160 40 - 60 and 4 True Fan Baking 3 Cooking / tray Fan ...
...Use a cake mould (26 cm diameter). Preheat the oven for 10 minutes. Preheat the oven for 10 minutes. - - - 21 Wire 2 180 70 - 90 al Cooking shelf True Fan Wire 2 160 70 - 90 Cooking / shelf Fan Cook- ing Convention- Put 20 small cakes per one baking tray. Use 2 tins (...40 True Fan Baking 2 140 - 25 - 45 Cooking / tray and 150 Fan Cook- 4 ing Convention- Wire 2 170 40 - 50 al Cooking shelf True Fan Cooking / Fan Cooking True Fan Cooking / Fan Cooking Wire shelf Wire shelf 2 160 40 - 50 2 160 40 - 60 and 4 True Fan Baking 3 Cooking / tray Fan ...

User Manual
Page 22
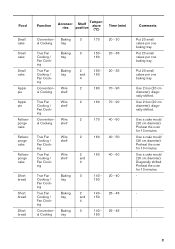
Food Function Accessories Shelf position Temperature (°C) Time (min) Comments Toast 4 - 6 pieces Grilling Beef burger 6 pieces, 0.6 kg Grilling Wire 4 shelf Wire 4 shelf and dripping pan CARE AND CLEANING max. 2 - 3 minutes Preheat the oven first side; 2 - 3 for 10 minutes before cooking. ...the oven control panel with a special oven cleaner. Pull the rear end of the oven. ond side max. 20 - 30 Put the wire shelf on the fourth level and the dripping pan on the door glass panels. Clean stubborn dirt with the same precautions. Clean the moisture from...
Food Function Accessories Shelf position Temperature (°C) Time (min) Comments Toast 4 - 6 pieces Grilling Beef burger 6 pieces, 0.6 kg Grilling Wire 4 shelf Wire 4 shelf and dripping pan CARE AND CLEANING max. 2 - 3 minutes Preheat the oven first side; 2 - 3 for 10 minutes before cooking. ...the oven control panel with a special oven cleaner. Pull the rear end of the oven. ond side max. 20 - 30 Put the wire shelf on the fourth level and the dripping pan on the door glass panels. Clean stubborn dirt with the same precautions. Clean the moisture from...


